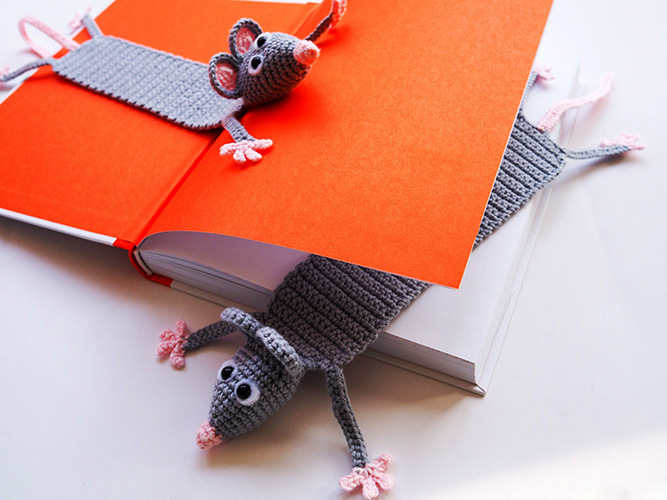
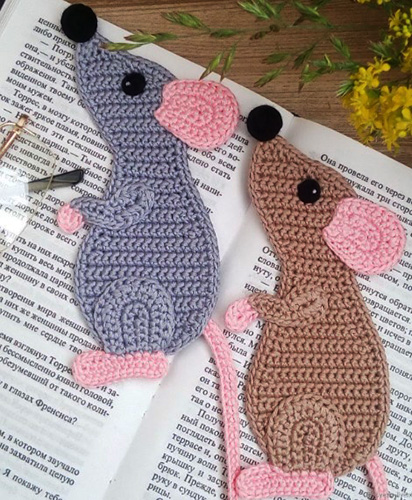
With the help of a hook and thread you can not only knit clothes, but also create toys. Bookmark in the form of a mouse, made according to the amigurumi pattern, can become a nice souvenir. Threads of different colors and textures are used for crafts.
Materials and tools for knitting amigurumi bookmarks
Amigurumi are small crocheted figures of animals and surrounding objects. This type of needlework is suitable for beginners who want to master the technique of knitting dense, even loops.
Bookmarks differ from classic amigurumi in that the body of the toys is not voluminous, but is made in the form of flat parts that can be inserted into a book.
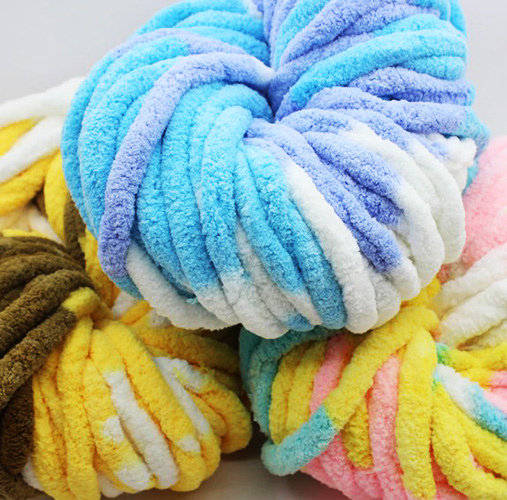
To work you need threads and crochet hooks.
They must meet the following requirements:
- The threads should be chosen to be straight, without knots or thickenings.
- Suitable materials include acrylic, cotton and mohair yarn.
- Fluffy threads (grass, mohair, plush) allow you to create soft crafts, but require some skills.
- The color of the original material depends on the knitting experience. Light yarn accentuates the unevenness, while black yarn, on the contrary, hides the flaws.
- The hook should be the same thickness as the yarn or thinner. Experienced knitters choose the size of the tool individually, which depends on the knitting style (thick or fluffy yarn).
- Beginners are better off choosing lightweight plastic and smooth metal hooks with a finger grip or handle.
Brands of Turkish and Russian manufacturers are considered to be high-quality yarn.
The most popular among them are:
- Iris.
- Alpaca.
- Narcissus.
- Baby Best.
- Jeans.
- Acrylic.
Conventional symbols in diagrams
The crochet bookmark "mouse" (the knitting pattern is given further in the article) consists of three-dimensional and flat parts. The head, ears, and eyes of the animal are knitted in a circle. To create the desired shape, add and decrease loops.
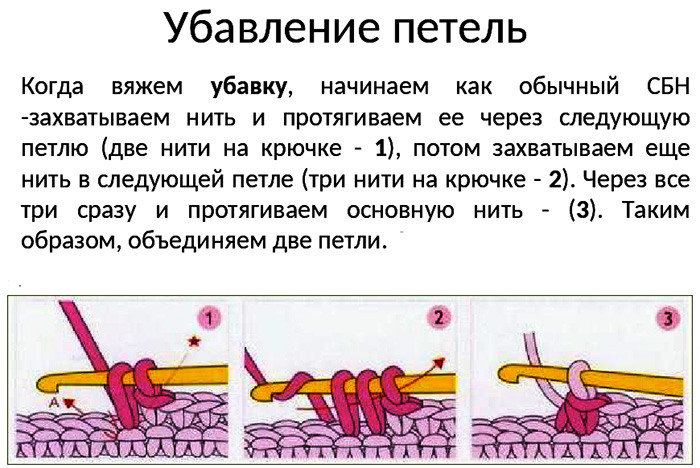
The following abbreviations are used in the description of crocheted crafts:
| Accepted abbreviation/full name | Description of execution |
| SB/SC |
|
| UB/decrease | Easy way:
Invisible way:
|
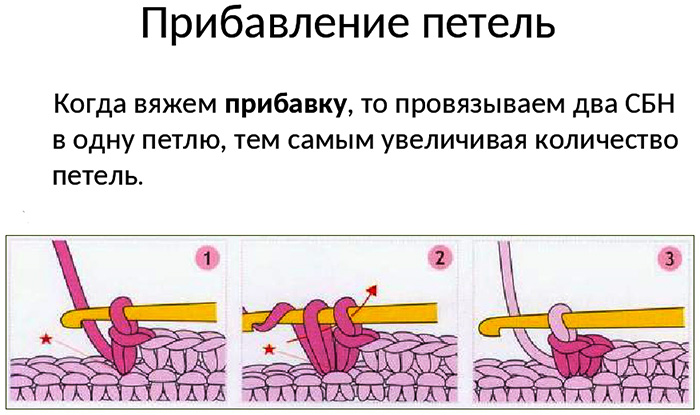
| PR/addition | You need to knit 2 columns into 1 column of the previous row. |
| VP/air loop | Loops are knitted by pulling the working thread through the previous loop. |
Knitting of voluminous parts is done in a circle without using lifting loops.
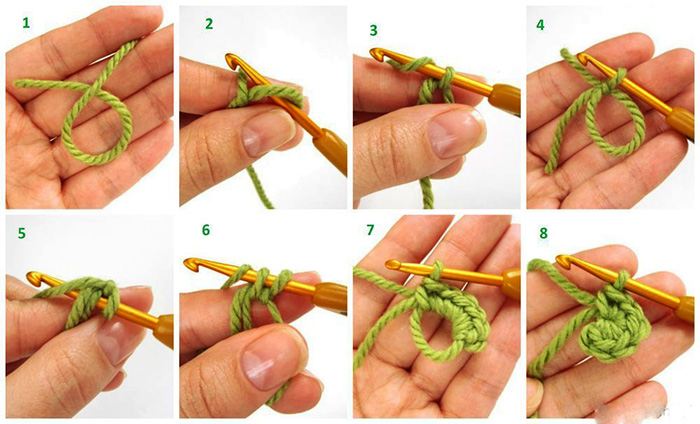
Particular attention is paid to the beginning of knitting. The first element is the amigurumi ring (KA).
To complete it, you need to:
- Wrap the thread around your index finger to form a simple ring.
- Holding the ring with your fingers, insert the hook into the center, hook the working thread, pull out the loop and pull the working thread through it again.
- To make the first stitch, insert the hook into the ring again and knit 2 stitches together.
- After creating the required number of columns, pull the free end of the thread and tighten the ring.
Calculation of the amount of materials, decorative elements
The crochet bookmark "mouse" (the pattern consists of several elements) requires a small amount of yarn. Miniature toys can be knitted from the remains. If you need to know the material consumption, you can knit a sample, for example 3 by 3 cm (3 * 3 = 9 sq. cm). Then unravel it and measure the length of the thread.
By dividing the length of the thread by 9, you can find out how much material is spent per 1 sq. cm. Knowing the area of the pattern of the future toy, you can calculate the yarn consumption.
Small parts of toys are made by crocheting or using ready-made decorative elements.
The following decor will be useful for working and decorating crafts:
- blanks for eyes, nose, mouth;
- beads, rhinestones, sequins, chains for decoration;
- metal elements for making keychains or pendants.
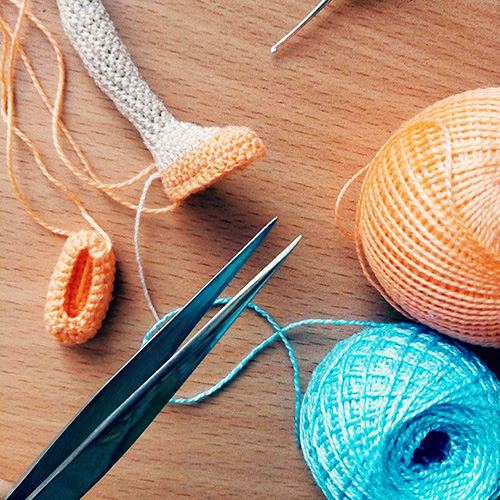
To work with amigurumi you also need scissors, threads, and sewing needles.
Master class for beginners on crocheting bookmarks Mouse
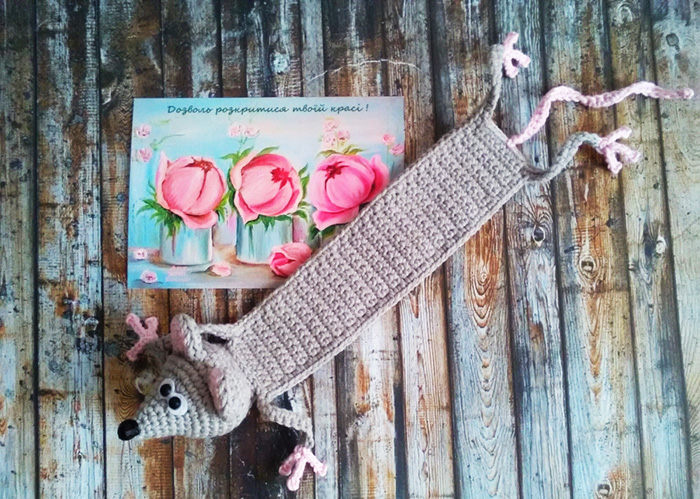
The bookmarks consist of 2 parts: volumetric and flat. The pattern of the crocheted mouse figurine consists of flat parts of the body, tail, paws. Only the head with ears remains voluminous.
To create a bookmark you will need:
- threads of gray, white, beige colors;
- crochet hook;
- threads, needle.
The description uses the abbreviations of knitting elements described earlier.
Muzzle
Knitting should start from the nose. For this you will need pink or beige threads. First you need to make an amigurumi ring with 6 SC, tighten it and knit 3 times a sequence of 1 SC and PR. In the next row you need to make 3 decreases according to the following pattern: 1 SC, UB.

Then you should change the thread to gray and start knitting the head. It will have a cone shape. This means that you will need to make increases in each row first.
To make the head you need:
- In the 1st row, knit three times like this: 1 SC, PR.
- Add again the 2nd time, only after 2 SB.
- In the 3rd row, between the increases, knit 3 SC.
- In the 4th row, knit 6 SC and PR three times.
- From rows 5 to 8, increase the number of SC between increases by 1 pc.
- From rows 9 to 13, knit without increases.
- Start decreasing stitches from row 14. To do this, knit the following sequence: 2 times 6 SC and UB, 8 SC.
- In the 15th row, knit 3 SC and UB 4 times.
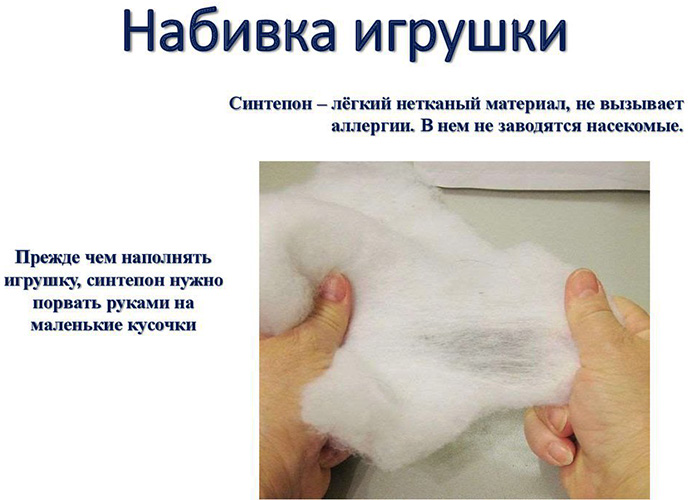
- Next, you need to fill the blank with filler.
- Place the top and bottom sides of the head together and knit 8 SC.
Body
Continue knitting the body from the head.
To expand the piece, you need to knit 3 return rows according to the following pattern:
- PR, 6 SB, PR.
- PR, 8 Sat, PR.
- PR, 10 Sat, PR.
Next, make a strip of the desired length and decrease the loops for knitting the tail. In the next 3 rows, evenly decrease 2 outer loops. Between them, you need to continue knitting SC.
Tail
The tail consists of a chain of loops that is attached directly to the body. You need to dial 35 VP and knit in the opposite direction SB. Cut the thread and hide the free end between the walls of adjacent columns.
Paws
All the paw parts are knitted in the same way. They consist of air chains (12 VP), knitted with single crochets (11 pcs.). The front paws need to be attached to the upper extension of the body, and the back ones - to the narrowing place for the tail.

The fingers need to be tied to the paws.
To do this, use beige threads to perform the following sequence:
- Starting from the end of the grey chain, cast on 4 VP, knit them in the opposite direction with connecting posts.
- Cast on 4 VP again and make reverse slip stitches.
- Knit 2 more fingers in a similar manner.
- Combine the resulting 4 loops together with the working thread.
Assembly and decoration
To assemble the bookmark, you will need to sew on the eyes and ears. The remaining elements were combined in the knitting process. Before sewing on, the eyes need to be stuffed with filler and sewn on 1 black bead in the center of each eye. Sew the eye parts to the head carefully, threading the needle through each column.
After securing, thread the rest of the thread inside the part using a needle. Bring the needle out from the opposite side, pull the thread a little and cut it. Sew the ears with gray threads to the widest part of the head.
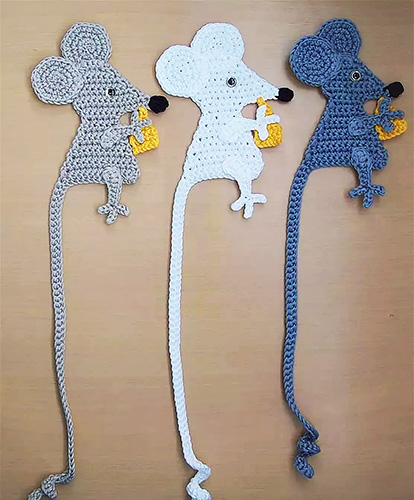
Ideas, patterns and descriptions of cute crochet mouse bookmarks
The crochet bookmark "mouse" (the pattern and colors of the parts can be changed at will) has several manufacturing methods. In addition to a rodent with a voluminous head, you can create flat silhouettes of mice with cheese.
Most often, natural shades are used to make rodents, but you can make a bright craft in any color.
Flat amigurumi
Bookmarks can be made in the form of a mouse silhouette from yarn of different textures. The simplest small pattern consists of 3 colors and is knitted in 15 minutes.
This bookmark is suitable for beginner needlewomen. In the work it is necessary to use even smooth threads.
To knit a miniature flat figure you will need:
- Make an amigurumi loop and knit 19 double crochet stitches into it.
- In the second row, knit a single crochet into each stitch.
- Without tearing off the thread, make the head in the form of a triangle. To do this, at the beginning of each row, make decreases until 1 SC remains. To align the outline, tie the head with connecting posts.
- Step back 1 loop from the head outline and tie 10 double crochet stitches into 1 loop with pink thread. Tie the ear outline with grey thread using slip stitches.
- On the opposite side of the body, make a tail from a chain of air loops. In order for the end of the tail to be twisted, in this section you need to knit 2 SC in each column. Knit the rest of the tail length with SC.
- The mouse's nose and eyes can be embroidered in black or made from large beads.
Another option is knitted in the form of a strip of acrylic yarn of gray color. To make it, you need to knit the head separately and sew it to the strip. Attach the front and back legs to the body, consisting of chains of loops and a tail. Make the eyes and nose from black beads. Such a bookmark can be made in different colors and decorated with embroidered inscriptions.
Mice with a voluminous head
The principle of making the craft is that the body is made with flat knitting, and the head is voluminous. You can use different yarn for creativity. Fluffy thread will make the toy soft. Smooth yarn will accentuate the pattern. The size and colors of the parts can be varied. The body can be made pink or white. Small details can be made in a contrasting tone.
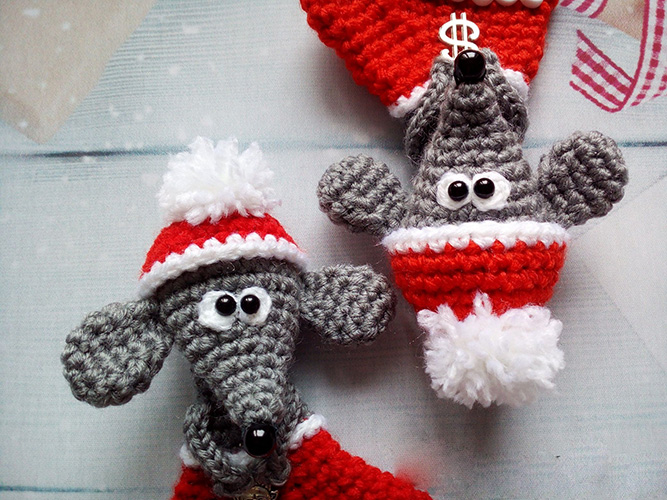
An original option is to knit a bookmark in the shape of a New Year's mouse.
To make such a thing, you need to do the following:
- Instead of the mouse's body, knit a red mitten with white edging along the edge. Small details for decorating the mitten can be glued or embroidered.
- Make the mouse's head in the form of a volumetric cone. Make oblong ears and sew them on the sides. Fill the part with padding polyester and fasten the edges with a crochet hook.
- Continue knitting the body in the form of a strip and attach it from the wrong side to the edge of the mitten. To hide the place of attachment, you can lay a row of columns of white threads along the opposite side of the edge of the mitten.
- Attach paws to the upper part of the body, made from air chains.
- Sew a knitted red Santa Claus hat with a white pompom onto the top of the head.
- Make eyes and nose from black beads.
Another version of a mouse bookmark can be made from marshmallow yarn. This is the name of a thread with evenly wound fluffy pile. The surface of the craft will resemble a plush toy.
For beginners, when crocheting with fluffy yarns, it is recommended to write down the rows knitted on paper, as it is sometimes difficult to count their number.
When using textured threads, the reverse side of the product is fluffier. In this case, the back side acts as the front side.
To make a bookmark, you need:
- Make the rodent's body oval-shaped. To do this, first tie a chain of 30 air loops and then tie it in a circle with two rows of double crochets, making increases for rounding.
- Make paws from chains of 8 loops. Knit a tail of any length.
- Make the muzzle in the form of a cone. Start knitting from the nose and add stitches evenly. Sew round ears to the top.
A rodent in profile with a long tail
The crochet bookmark "mouse" (the knitting pattern can be changed if necessary) in this version is knitted with single-color threads.
To decorate the craft you will need decorations for the eyes and nose.
To make it you need:
- Cast on a chain of 74 air loops and knit 15 times 2 SC in each column of the previous row. Then knit without increases.
- Next, knit the body in the form of a triangle of 10 rows. In each row, evenly decrease the outer loops.
- Knit the head according to the pattern.
- To knit the ears, make a chain of 6 VP, close into a ring and knit 6 PR. In the next row, repeat the sequence 6 times: 1 SB, 1 PR. In the 3rd row, knit 6 times alternately 2 SB and 1 PR.
- Make the paws from a chain of 11 loops. Continue the chain by knitting the fingers. To do this, do the sequence 3 times: 2 half double crochets, 3 VP. Then do 1 SC in each loop of the previous row. Sew the parts to the body.
- Glue the eye and nose decoration onto the face.
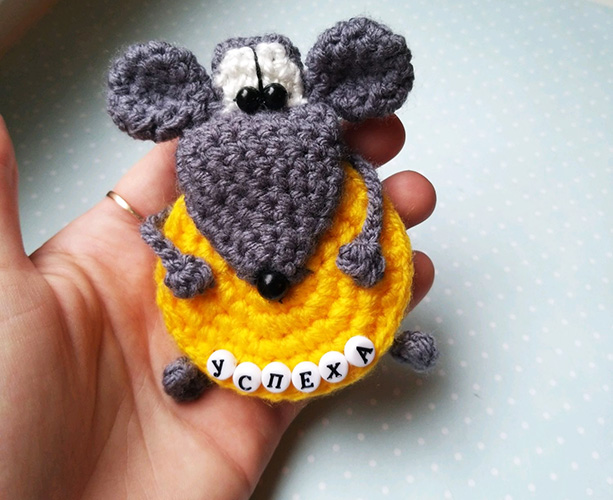
Mouse with cheese
A bright version of the craft is a mouse with cheese. The basis of the bookmark is a yellow circle, which plays the role of a cheese head.
To knit it, you need to take a standard crochet circle pattern. The toy is knitted from even smooth threads.
Sequence of making a bookmark:
- First you need to knit a circle of 8 rows of SC.
- Next, you need to make the muzzle. It consists of a triangular part of the nose and a rounded part of the head, to which the eyes will be attached.
- From threads of the same color you need to make the ears and front paws of the rodent. You will also need to knit a base for the eyes from white threads.
- Then you need to connect all the parts. Make the mouse's eyes and nose from beads.
Another option is to knit a mouse with a voluminous head or a flat bookmark and place a piece of cheese in the front paws.
A volumetric slice can be made according to the following scheme:
- First, you need to make 2 identical triangular-shaped parts. To do this, knit like this: cast on 11 VP, knit 2 rows of SC, in each odd row make decreases at the beginning and at the end until there is 1 SC left.
- After finishing knitting the second part, do not cut the thread, but continue to tie the workpiece in a circle with SB. You need to do 3 rows in this way. In the 4th row, attach the second part and join it by knitting a row of SB.
How to decorate a mouse bookmark?
To liven up and make the craft attractive, special accessories and decor are used. A popular decoration for knitted toys is clothing. It can be made from fabric, tape or knitted. It can be a simple set of a hat and scarf or a suit with trousers.
Crafts are often decorated with embroidery and glitter. A smart bookmark can be a nice gift. You can embroider only individual parts of the figurine with decor, or you can embroider the toy completely.
To create a themed craft, you can use patches with inscriptions. Another option is sewn-on beads with letters, from which you can make words.
Bookmarks for girls can be decorated with bows, ribbons, pompoms in combination with sequins and knitted clothes. Materials made of organza and natural fabrics are suitable for decoration.
Small figures of household items are used for decoration. They can be put into the rodent's paws, sewn onto a hat or clothing.
A mouse-shaped bookmark can be flat or with three-dimensional details. Using a crochet hook and patterns, you can master the Japanese technique of creating miniature figures, make a toy bookmark for children, or prepare a gift.
Video about crochet mouse bookmarks
Master class on crocheting a volumetric mouse bookmark: