To decorate a coat or jacket, it is acceptable to use with various decorative elements. However, a fur trim on the hood can give an elegant, solid look and emphasize the silhouette, so that the image is perfect. At the same time, such a detail can protect from the wind and warm on a frosty day. Beginner seamstresses can sew on the trim if they have a small amount of fur material.
Tools and materials
Fur trim is a piece of fur that is fixed along the sides of a turn-down headdress of the upper type of product. A zipper or buttons are suitable for fixing the accessory so that the trim can be unfastened from the product.
Tips and tricks for edge construction:
- The fur trim can be made removable or sewn onto the garment. It is recommended to attach the accessory to the hood with a zipper, or you can use snaps or buttons. Removable fur is more practical to use, since the coat or jacket can be washed after removing the detail.
- For the trim, it is advisable to use fur with long pile, as it warms well and looks impressive. However, excessively long pile will cover the facial area, which causes inconvenience and discomfort. Using very short fur will spoil the appearance of the outerwear. In this regard, when choosing fur for a decorative element, it is recommended to try it on first.
- The most successful combination is contrasting fur with the shade of the main clothing. However, when using artificial fur, it is permissible to take it in the same tone as the jacket, parka or coat. The optimal color is considered to be grayish or flesh-colored fur.
- It is advisable to give preference to simple models that do not have folds, gathers or turnings.
- When creating a fastener, preference should be given to loops made of leather or cord, as well as fasteners on clips or hooks. Slit loops will be inappropriate in this case.
- Artificial duplicated fur loses its plasticity, therefore it is not recommended to duplicate it using adhesive materials. It is advisable to insert a lining based on a synthetic padding layer and fabric material with windproof properties.
- If the pile is wrinkled, it can be straightened or smoothed out using a dry iron through a presser foot, after setting the device to a low temperature.
- If the fur has become matted, you can use a comb or brush to restore it to its original shape.
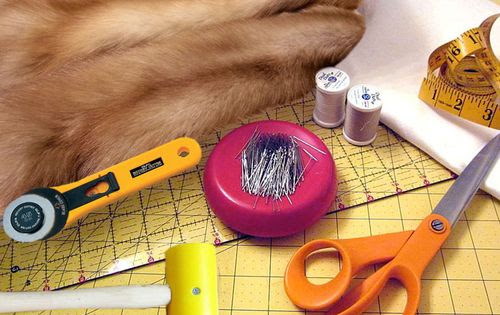 It is permissible to sew fur to the hood using the following set of tools:
| Tool | Nuances |
| For cutting, you need to use a stationery knife or very sharp scissors. | Cutting should be done from the inside relative to the pile direction. It is necessary to cut only the knitted base, without touching the pile. To do this, it should be carefully removed with scissors or a stationery knife. Elongated pile can be spread apart with a comb. When using a knife, it is necessary to abandon the cutting backing so as not to cut the pile. At the same time, do not press hard on the base during cutting. |
| Chalk or special markers | The pattern should be transferred to the fur base using chalk or special markers that can be easily wiped off. |
| Pins | To pin the parts together, you need to use strong and long pins with round heads. Thanks to such tools, it is very easy to sew the parts together. |
| Threads, ruler, thimble | For sewing, it is advisable to use a strong thread that will not break during work. Using a ruler, you can measure the desired size of the edging. A thimble will protect your fingers from injury. |
To decorate the hood, it is permissible to create a fur trim by hand, joining together several pieces of fur. Fur elements, unlike leather ones, must be secured with furrier equipment or manually. When using a simple sewing machine, the stitch will be of low quality and frayed, while the leather fur fabric can tear.
There are several ways to manually fasten the flesh side.
However, the most popular is the hand-made furrier stitch, made with a double puncture:
- Initially, the ends of the two fixed skins must be folded with the pile inward so that it is not visible at the stitching stage.
- The needle should be used to pierce 2 flesh sides from the back, starting from the right or left edge.
- The hand furrier's stitch is made with simple stitches through the edge from right to left, making small steps. It is necessary to make a stitch forward, then in place in similar holes from the needle. Then again a stitch forward, in place, reaching the edge of the seam.
- Afterwards, you need to unfold the parts and straighten the seam by tapping on its surface from the leather side with a small hammer. As a result, the seam will be strong, flat and straight. The parts will be placed end to end.
- Additionally, it is recommended to repeat the stitch so that the needle passes through similar holes twice. The density and height of the stitches will depend on the thickness of the leather material. If the flesh side is thick, the height of the seam should be high and vice versa.
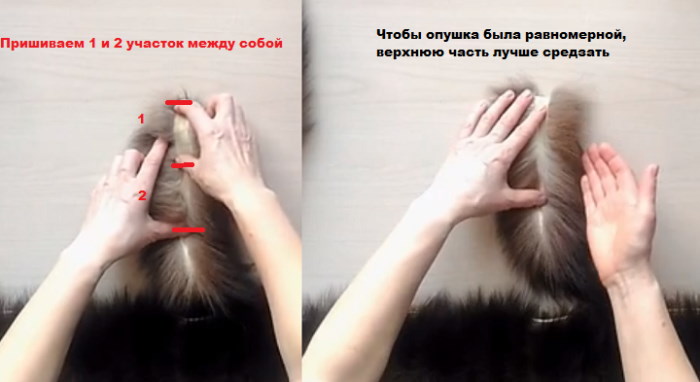
 To equalize the length of the pile of 2 fixed skins, it is necessary to shift upward the ends of the skin with the longer pile. In this case, the stitch must be tightened tightly. When performing a hand furrier's seam, do not tighten the thread too much, maintaining the same tension of the thread in each seam.
A wooden surface is required to stretch the fastened pieces of skin. The connected piece of fur must be slightly moistened with a damp sponge on the material side, nailing the flesh side to the surface at the ends with nails. It must be slightly stretched.
When interacting with fur, you will additionally need the following set of tools:
- A shoemaker's knife for cutting the fur skin, special threads with needles, interlining tapes with an adhesive base and a hammer for smoothing and softening the stitches. If you don't have a shoemaker's knife, you can use scissors. However, you need to work with them carefully so as not to cut the hair. Otherwise, after fastening the pieces of fur, the seam will be visible.
- A small hammer is needed to soften the connecting stitches by tapping. Also needed are small post nails, which are used to stretch the wet flesh side of the wood surface.
- Reinforcing tapes must be glued to the cut end of the skin, where the fur will be subject to tension. The width of the tape should be up to 1.5 cm.
- Non-adhesive lining materials are needed to strengthen the sides. A metal comb allows you to comb the hair well, combing the area where the skins meet.
How much fur do you need for the hood trim?
It is acceptable to use fur for the trim with either artificial or natural pile. In this case, the long pile of the skin, unlike the short one, will look more impressive on the trim sewn to the hood.
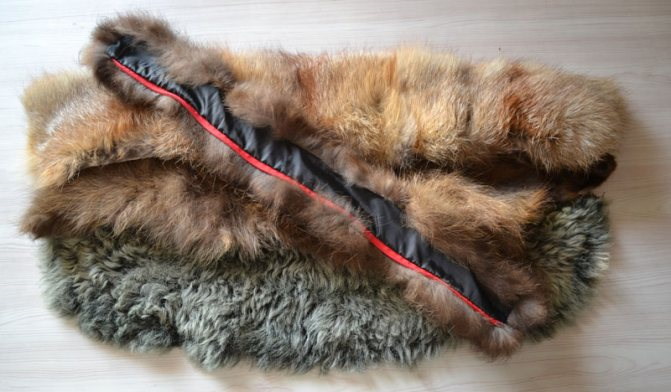
The fur consumption will be affected by the hood parameters. Often a piece up to 10 cm wide and 65 to 70 cm long is required. Natural fur trim can be made from small pieces. Factories often use this method.
Sewing trim from faux fur is suitable for beginner seamstresses, because such pile hides minor defects in work and uneven stitches well.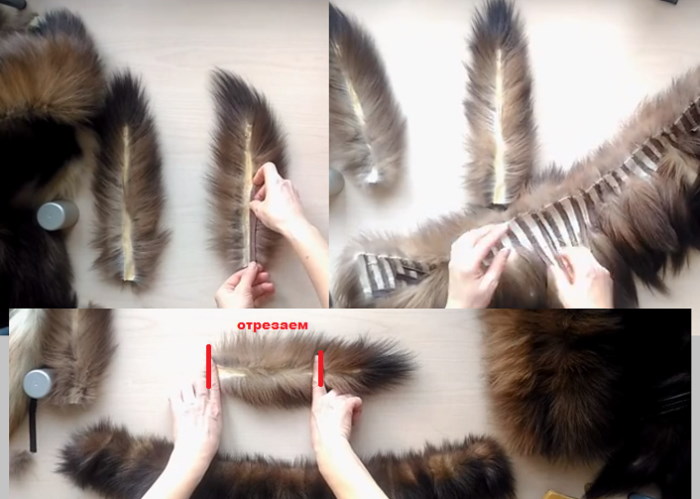
When interacting with artificial fur, it is necessary to adhere to certain rules, taking into account the intricacies of working with this material:
- The pattern pieces should be placed on the inside relative to the pile direction, which should be from top to bottom. The material should be laid out in 1 layer, pinning the pieces with pins.
- If the fur is thick and on a coarse base, the product parts should be cut with minor seam allowances and stitched using a wide zigzag stitch or on an overlock, having adjusted the thread tension in advance. If you have a furrier machine, it is permissible to stitch the parts on it.
- Artificial edging has a pile direction. If you run your hand over the material relative to the pile direction, it will be smooth.
- On the reverse side, to mark the seam allowances, you need to use tailor's chalk; on light fur, use a ballpoint pen.
- In order not to deform the pile, all manipulations when cutting fur with elongated pile should be careful. For cutting, it is recommended to use a special knife for fur, a model knife or a metal blade. Only the base should be cut, without touching the fur. Also, for cutting artificial decor, you can use sharpened scissors with sharp ends, making small cuts with the edges of the tool, touching only the base.
Step-by-step instructions for sewing fur to a hood
When joining several pieces of flesh side, most people use a simple stitch through the edge. As a result, such a stitch begins to break, since the thread cuts the fur skin during tension and the seam begins to stretch. The overlock stitch, which firmly fixes the pieces of flesh side, is not suitable for sewing.
Although it will not stretch with the garment, it will pull the stitches together, which will later be visible on the front side of the garment. To correct this, the garment should be pulled slightly on the pattern or block.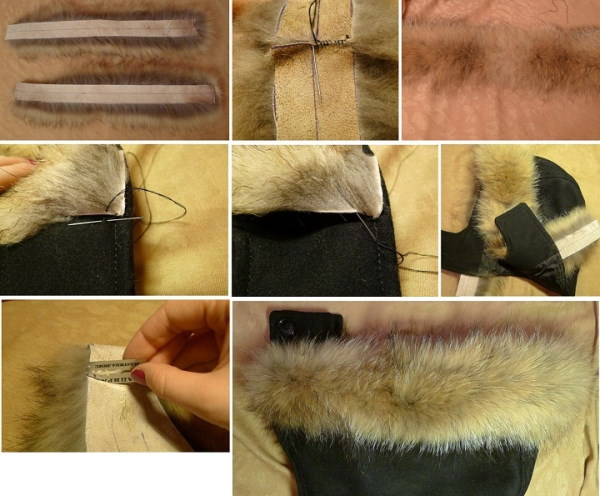
To sew fur to the hood without deforming the flesh side of the fur trim, you can do the following:
- Make a simple stitch through the edge.
- Sew the second seam across the edge into the hole that was made during the first connection.
- The third seam is made in a new hole, the fourth in a similar one. The result should be a zigzag across the edge.
Every second connection must be made in the previous holes so that the seam retains elasticity, firmly fixes the flesh side and does not come apart. At the same time, the threads will not cut into the skin, allowing the product to stretch. If the thread breaks during use of the garment, the seam will not spread. The thread will not creep, since it is firmly fixed by the adjacent connection.
To avoid high loads on the flesh side during use, it is recommended to sew a bias binding to the fur along the entire contour using a furrier's stitch. Later, it can be tucked under the fur. However, only the binding needs to be fixed to the product, sewing it very close to the seam with the flesh side. Thanks to this, the latter will not tear when the material is stretched during use.
The fur trim can be sewn to the hood without using a lining or fixed directly to the main clothing. However, when choosing such methods, you will have to regularly sew off the fur if you need to wash the product.
Step by step instructions:
- Prepare a piece of fur 70 cm long. Place the flesh side on the front side.
- Using a hem stitch, sew the pieces together, touching the center of the hood. Work up and down, grabbing the leather and sewing into the fabric, and vice versa, grabbing the fabric and sewing into the leather.
- Fix the edging on one side and remove unnecessary pieces. Cut with a sharp blade from the flesh side.
- Sew the trim on each side in the same way. As a result, the fur will hide the unevenness and all the seams.
To add volume to the fur trim, it is permissible to place a thin layer of synthetic padding inside, which will add volume.
How to make a fur trim on a hood with a zipper?
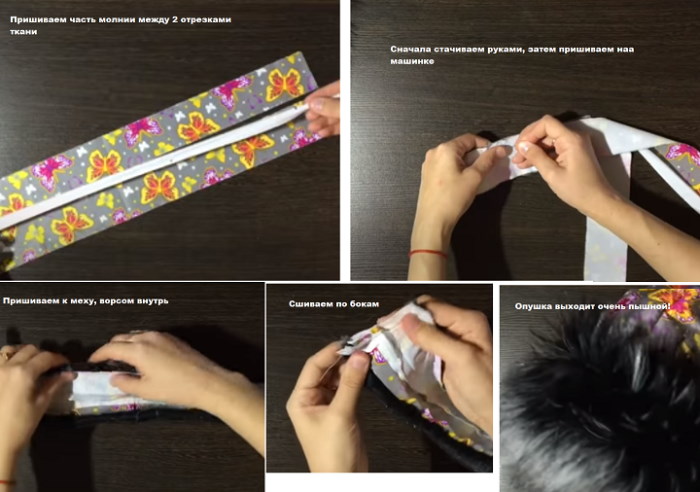
To make a fur trim for a hood with a zipper, you need to prepare the following parts for work:
- 2 tapes needed to secure the fur to the zipper (the length of the tape should be 6 cm longer than the zipper);
- fur with natural pile;
- a strip of the main material that will cover the zipper;
- detachable zipper.
The following method is acceptable for sewing fur to a hood using a zipper:
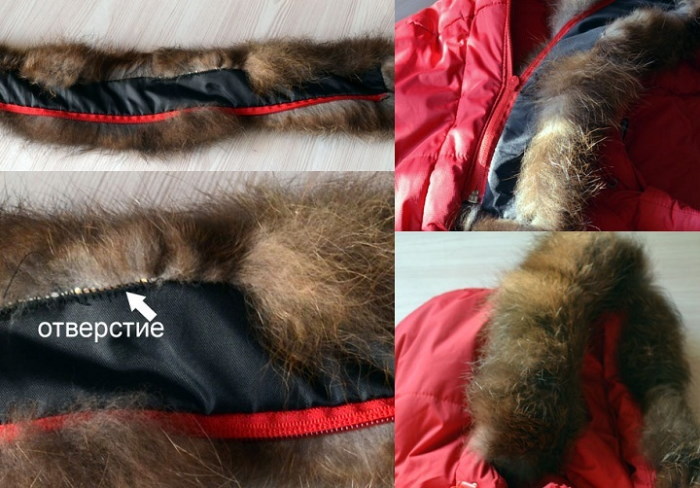
- Topstitch the top hood onto the insulation, fastening it to the central area and topstitching. Punch eyelets and insert a cord with fasteners.
- Mark a line where the zipper for the removable trim will be located. At the bottom, 10 cm from the edge and at the top, 4 cm from the edge.
- Sew the zipper at a distance of 3 cm from the bottom. Take the part of the zipper without the runner and sew it through the zipper with the right side facing up by 2 mm.
- Fold and sew in half the strip that will cover the zipper on the hood.
- Sew the strip onto the garment 3 mm from the cut edge, butt-fitting it to the zipper.
- Turn the strip towards the cut and fix its ends. Topstitch the strip.
- Fasten the inner and upper hoods along the front edge. Notch the seam allowances at the curves.
- Sew the tape onto the fur strip on both sides.
- Sew the zipper part with the slider face down to the tape. Secure the edges of the trim.
- Turn the zipper seam inside out. Fold it to the wrong side and sew a 2 mm fixing stitch so that the seam does not come out when connecting to the second side of the fur.
- Connect 2 ribbons together.
On buttons or snaps
You can sew fur to the hood using buttons or snaps. This option for creating a removable fur trim is quite simple and suitable for beginner seamstresses.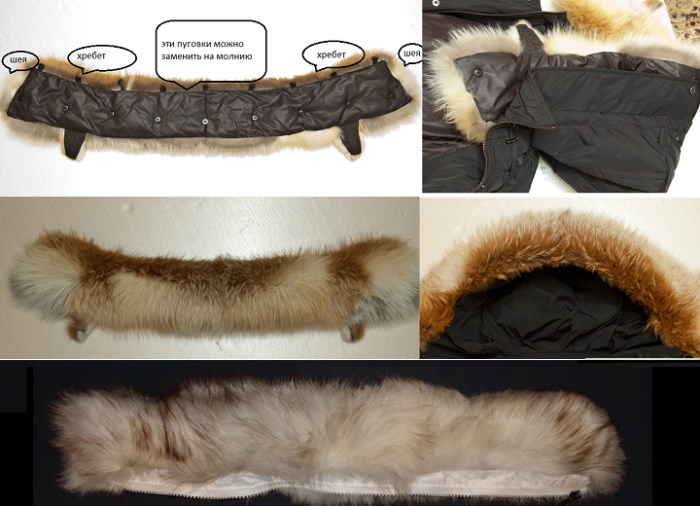
Step-by-step instructions for sewing fur to the hood:
- Use the hat elastic as loops. Place the outer loops, stepping back from the edge by 2 cm and leaving 1 cm for allowances.
- To determine the distance between the loops, measure the middle and place marks at your own discretion. A convenient and optimal interval is considered to be 10 cm.
- Cut the hat elastic into small pieces 3 cm long. As a result, the loop in the finished state should be 1 cm long.
- To give the trim good volume and fluffiness, place an insulating layer between the two layers with the lining, the density of which should not be more than 200 g. The layer should initially be fixed to the lining, then to the fur trim.
- Having placed the marks, baste the loops to the lining fabric and fix them with clamps. Having sewn the loops with a sewing machine, get rid of the extra pieces.
- Sew snaps or buttons to the hood.
- Once you've finished, you can join the fur trim with the hood.
A trim made of artificial or natural fur sewn onto the product can additionally decorate any type of outerwear. At the same time, such an accessory allows you to insulate the hood and protect your face from the cold wind.
To fix the decorative element to the main product, you can use a detachable zipper, snaps, buttons, or sew the fur trim directly to the hood. However, if you choose the latter option, you will have to constantly sew the accessory off the clothes so that you can wash the product. Otherwise, the fur will roll up and wrinkle.
Video about hood trim
Removable fur trim on the hood: