There are several ways to create pompoms, both from yarn and other materials, differing in the set of devices for making the shape and volume. In the process of work, scissors are additionally used - for cutting the edges.
Types of pompoms for hats made from different materials
How to make a pompom from yarn, thread, fabric or fur becomes clear after studying the characteristics. Each option differs in the technique of execution, type of material and appearance.
When using certain raw materials, you need to decide exactly how the base of the decorative element will be formed:
| Material | Relevance | Difficulties |
| Yarn | The products are popular because the pompom is light and neat. Suitable for decorating adult, children's and teenage hats in any style | It is necessary to prepare a special device that will become the base body for forming the sphere. |
| Threads | The thread pompom does not have volume, but is ideal for decorating children's hats and small items. | Difficulties arise when preparing the form, as the threads may fluff up or lie unevenly. |
| Fur | The fur element is relevant for children's and women's hats. Not a universal material, since when wet it becomes visually unattractive | It is advisable to use natural raw materials. It is necessary to carefully form volumes, sewing the edge of the pattern |
| Ribbons | Usually, ribbons made of thick fabric are used. Pompoms look original only in combination with a certain hat design. | The manufacturing process is simple – no special templates or devices are needed to create the element. |
| Textile | Depending on the texture and structure of the material, the scope of use of the pompom is determined. The product can decorate not only winter hats, but also summer analogues | Any type of textile can be easily processed using various techniques and tools for making pom-poms. |
Sometimes several material options are combined within one product. Yarn and threads, thick ribbons and textiles are ideally combined. Fur that is not decorated with additional elements looks harmonious.
How to make a pompom
How to make a pompom from yarn using several techniques is described below. In each version, the distinctive feature is the use of a multi-faceted base for creating the winding.
In handicraft stores, you can buy special forms and bases for creating various pompoms. But you can make decorative elements of this type yourself without any extra costs. Additional tools will be scissors, a needle, and a template.
The base of the product is formed by layering coils of thread or yarn.
Then the alignment and fixation of the base of the future product is performed. Then the loops are cut and the base is straightened. Alignment along the body of the pompom is also performed using sharp scissors.
Dense and round
To make the pompom dense and round, it is worth using a pattern in which the distance of the threads in all directions is the same. A classic pattern in the form of cardboard rings is ideal.
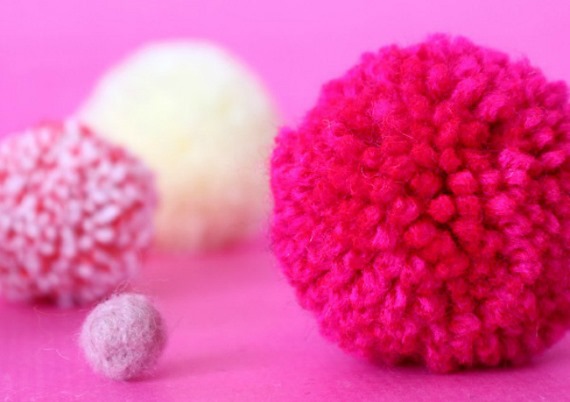
The density depends on the amount of thread or yarn used. The more turns are formed when finishing the pattern, the more dense the pompom will be. The winding density is also important in the process of forming volume. There should be no gaps between the threads when applying them.
Round
To make a hat decoration product that is perfectly round, you need to know a few manufacturing secrets:
- Use templates of the correct shape.
- Wrap multiple layers of material to create maximum volume.
- When finishing, trim off as many uneven edges and protruding threads as possible.
- You can tie the blade of the scissors to the thread that holds the pompom in place. Then the tool will cut the material at equal distances from the center.
Some craftswomen use special devices that initially allow them to create pompoms of the correct shape.
From thin yarn
To make a pompom made of thin yarn look neat and fluffy, you need to maintain the correct winding proportions. The thinner the material, the more turns you need to make. It is advisable to initially choose even patterns that will not require additional alignment after cutting the loops.
Loose
The loose texture of the pompom can only be recreated if the lengths of each thread that is part of the base winding are correctly formed. To obtain a loose texture, you need to make not too many turns and cut the edges of the threads unevenly.
To do this, you can hold the blade of the scissors not parallel to the surface of the pompoms, but vertically. The looseness largely depends on the textile characteristics of the thread itself.
Classic way to make a pompom using cardboard rings
How to make a pompom from yarn on cardboard rings, if you have prepared the necessary tools and materials:
- A piece of thick cardboard. The thicker the paper, the easier it is to roll and cut.
- Sharp scissors with sharpened tips.
- A skein of medium thickness yarn.
- Compass or round template.
Steps to making a pompom from yarn:
- Decide on the size of the future product and volumes. The principle of manufacturing the cardboard base will depend on these parameters.
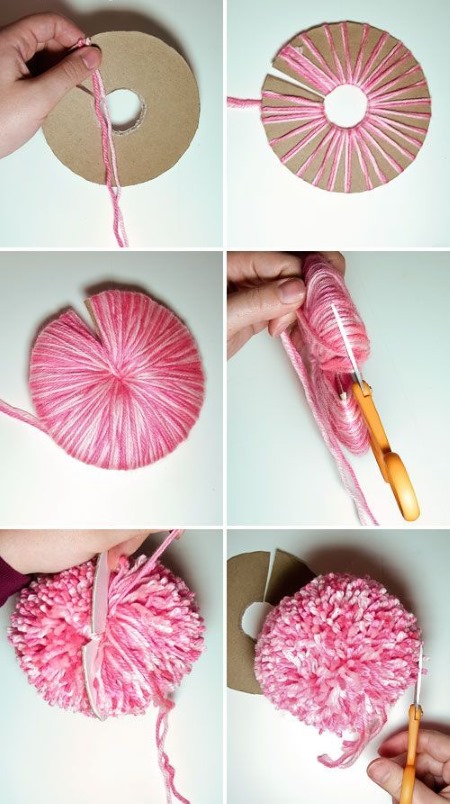
- First, prepare sketches of cardboard rings. Draw the first circle with a compass, which will determine the diameter of the pompom. Inside the formed figure, draw another circle with a smaller diameter. This element will become the determining factor for the volume of the product.
- Place 2 pieces of cardboard on top of each other. Cut out a large circle with scissors, then a small one. You should end up with 2 cardboard rings of the same size. If the yarn is thick, you should make 3 patterns.
- Wind the yarn onto the cardboard templates. You need to cut a long piece of yarn from the skein. Wind the rings with this piece. The yarn should fit tightly in each turn. So that there are no gaps.
- When the entire ring is wrapped with yarn, you need to make cuts along the edges of the workpiece with scissors. You need to move smoothly and carefully so that the already cut threads do not fall out of the pattern.
- In accordance with the cutting, a small expansion of the cardboard rings is made. A small space is formed between the patterns. When all the edges are cut, a piece of yarn is pulled between the cardboard. The yarn pieces must be tied with a thread. It is advisable to tighten the thread well in the process.
- Take out the cardboard blanks. Straighten the yarn and trim any protrusions or frayed parts of the threads by cutting them off with scissors.
Lastly, you need to shake the finished product to remove small cuts and excess threads.
Bright pompom with a pattern
A multi-colored pompom is formed using cardboard rings. You need to prepare material of several colors and choose a thread winding pattern.
Instructions for making a colorful hat decoration:
- Choose several colors of yarn that will go well together.
- Prepare round cardboard templates.
- Fixing yarn on a cardboard base.
Depending on the desired pattern, there are several techniques for winding multi-colored threads onto a cardboard base. If each color should be located at a specific point, then you need to wind the colored yarn along the segments of the circle one by one.
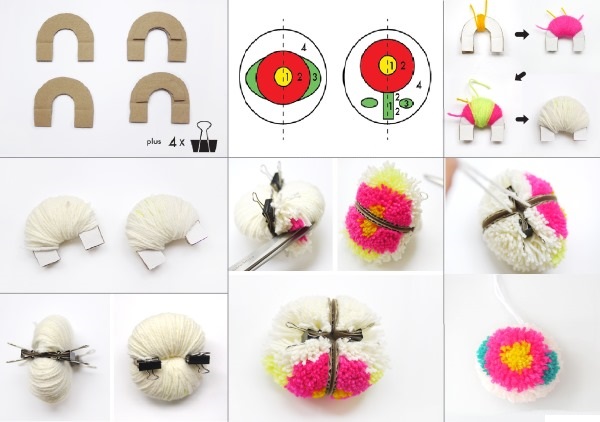
In a tiered combination, an identical application of material is made - first a layer of one color is applied, then another and a third. Partial introduction of color, when a small amount of yarn of a distinctive color is wound at a certain point.
Using a cardboard square
The principle of making pom-poms using a cardboard rectangle as a base:
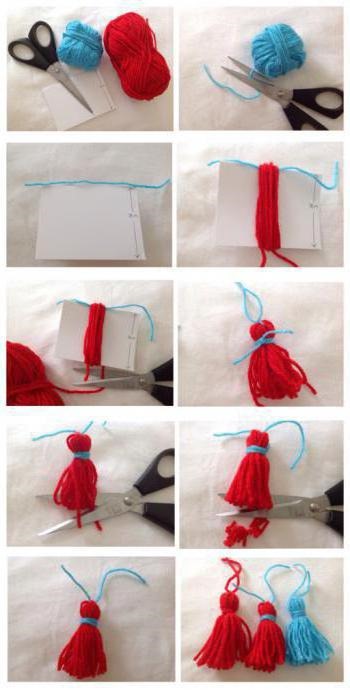
- Cut 2 identical strips from cardboard. The width of the blank will determine the diameter of the future "ball".
- Conventionally fold the patterns in half lengthwise. Cut the cardboard to the middle.
- Cut a 1 m long thread from the main skein, thread the blank through a needle and pull it through the cut in the cardboard.
- Place the ends of the cut so that they are adjacent to the uncut part of the cardboard figure.
- Next, the main yarn is wound onto the pattern, covering the cut. The amount of material determines the density of the future pompom.
- The thread must not be pulled tight during the work process. The product may end up with uneven edges or a deformed shape.
- Once the base is formed, the element will need to be secured.
- Pull the thread with the needle closer to the thread winding and tie it. You need to make several windings to securely fix the yarn.
- Cut the thread edges along the cardboard edges of the workpiece. Pull out the pattern and fluff up the material. Use scissors to cut off excess threads.
By using different types of cardboard bases, it is possible to obtain products of any size with any degree of compaction.
On the fork
You can make a small pompom using a table fork, scissors and yarn. The product will be an ideal option for decorating a child's hat.
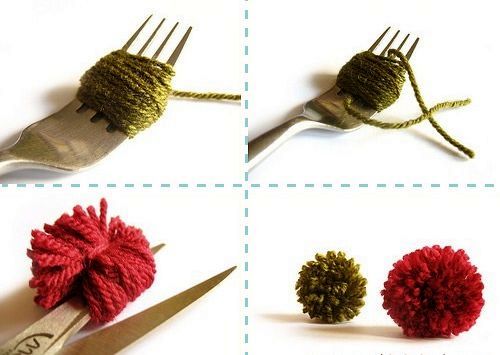
Formation algorithm:
- Make several turns on the fork. Pass a piece of thread through the teeth so that later you can tie a tourniquet.
- When a skein of 2-4 cm width is formed on the cutlery, you need to tie the blank with the fork that was threaded through earlier.
- Cut the yarn on the sides of the fork and remove the workpiece from the base. Fluff up the pompom and give it the correct shape using scissors.
The width of the fork determines the diameter of the product, and the density and degree of winding determine the volume of the element.
On the back of the chair
If the element is figured and has a three-dimensional pattern, then with the help of some details you can create small pompoms for hats.
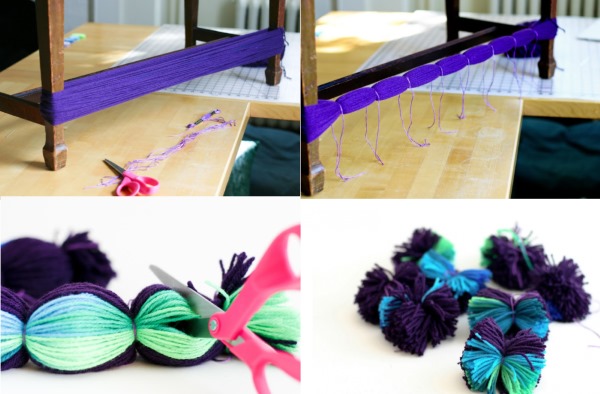
And the standard back shape can be suitable for such work:
- Place a piece of thread or a strip of fabric on the top of the back of the chair, which will later secure the loops of the product.
- Wrap enough material over the convex part of the back to create a three-dimensional sphere.
- Pull the winding with the lower thread, tightening it tightly. Cut the loops of the future product at the same distance from the knot.
- Straighten each thread or piece of fabric. Cut off excess parts and protrusions. A chair leg can be used as an alternative to the back.
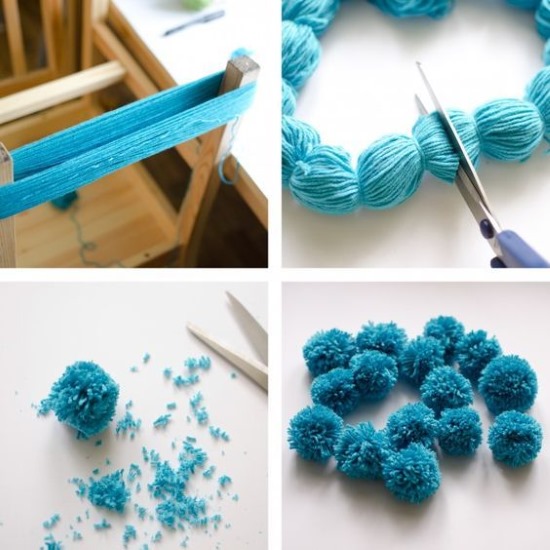
The second option for making a large number of pom-poms using the back of a chair:
- Wrap the back of the chair with yarn. The volume of future products will depend on the number of skeins.
- Cut the yarn into small pieces 10-15 cm long – these will be the fixing threads for each pompom.
- Along the entire length, at equal distances, tighten the skein with short threads. Such fixations will determine the center of the future pompom.
- Remove the winding from the back of the chair and use scissors to separate all the elements. Use scissors to align the edges of each ball.
This method of making pom-poms allows you to make many small elements of the same size in a short period of time.
On the fingers
An elementary option for creating pom-poms for a hat is to wind the thread around your fingers. To make a large element, you need to use 4 folded fingers, and for a small one, 2 is enough.
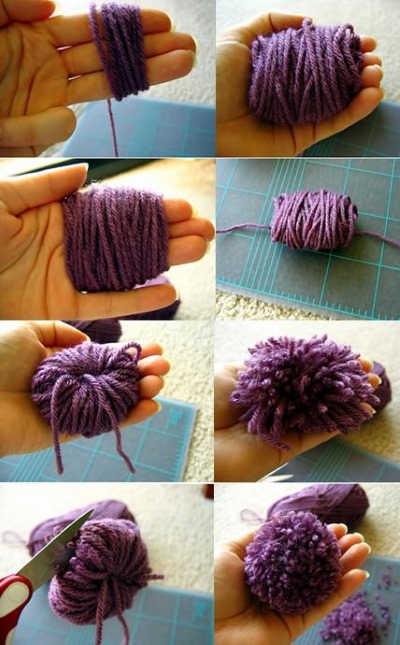
The principle of forming a pompom on your fingers:
- Wind the threads around your folded fingers. The thicker the winding, the denser and fluffier the pompom will be.
- The material must be placed as close to each other as possible with each subsequent turn.
- Carefully remove the workpiece from your fingers and pull the thread through the hole from them.
- This element will secure the element so that the threads do not come apart.
- Tie the auxiliary thread into several knots. Stretch the winding around the central knot.
- You will get a unique flower with petals made of loops.
- Cut the resulting loops, straightening each part of the pompom. Use scissors to trim the uneven edges.
The product has an attractive appearance and does not differ from the special manufacturing technology. You can not only wind the yarn on folded fingers. Spread the index and middle fingers, imitating a slingshot.
Two-color pompom
How to make a pompom from yarn in a two-color way - you can use any technique and devices to form the winding.
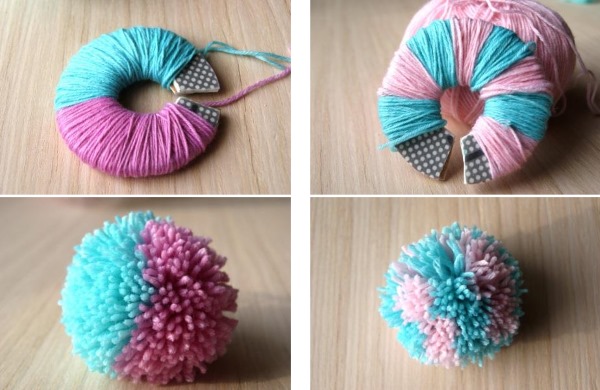
The peculiarity lies in the moment of using multi-colored material and its placement relative to each other.
When using 2 colors, you can recreate several color scheme options:
- alternate layers of different colors;
- wrap half of the pattern with one thread, and the other with a different one;
- chaotic winding of multi-colored threads;
- individual inclusions of shades;
- edge arrangement of yarn of a certain color.
The color scheme depends on your imagination and the fundamental arrangement of the yarn type. You can use not only materials of different colors, but also of different textures, textures and densities.
How to make a pompom for a fur hat
To create a decorative element from fur, you need the following set of tools and materials: fur, chalk, thread, needle, synthetic padding, stationery fur, a base for forming a circle.
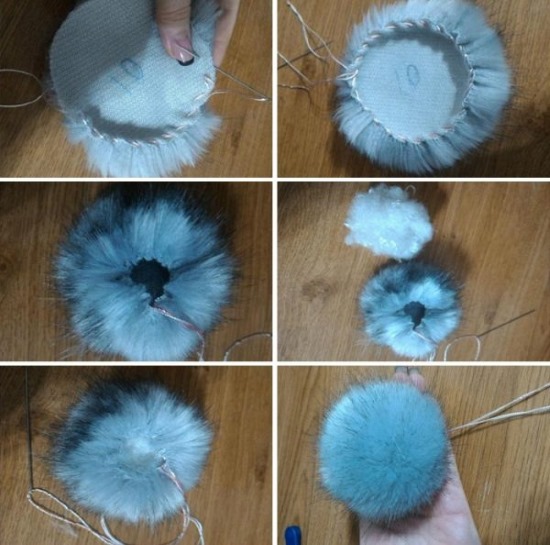
The principle of making a fur pompom with step-by-step instructions:
- Lay the material so that the pile remains on the work surface. The product is marked on the reverse side.
- Decide on the diameter of the future pattern, since the size of the pompom will depend on this parameter.
- Attach an object to the material that will form a circle when traced: a plate, a saucer, the bottom of a jar. If necessary, you can use a compass.
- Use a stationery knife to cut out the pattern. This tool is used to prevent the blade from damaging the fur pile.
- Choose a sewing thread according to the pile color. The needle should not be too thick so as not to separate the warp threads.
- You need to stitch the product with medium-length stitches through the edge of the cut. In the process, you need to pull out the pile, which is pressed under the sewing thread.
- At the beginning of the work there should be a piece of thread left and at the end. These parts will serve as a tightening for the formation of the pom-pom.
- When the entire perimeter of the edges is stitched, you need to put some filler in the center. This technique will help improve the shape of the pompom and hide the voids in it.
- Pull the sewing threads together and tie several knots. Cut off the remaining material. Sometimes the edges are left to secure the element.
You can use another technique, which is simpler, but the result is not always satisfactory in appearance.
The shape will be deformed if the threads are pulled unevenly:
- Make a pattern from fur - cut out a circle with the required diameter. Draw one diameter and the second perpendicular to the first.
- At the ends of each diameter, make several stitches through the edge. In each case, the thread is fixed at the beginning of the work, and at the end it remains extended.
- When all 4 points are prepared, pull the sewing threads together and tie them together. Tie a knot, fixing the shape of the pompom.
It is possible to make more than 4 support points. With this type of work, the shape of the finished product may be deformed.
More options for making pom-poms
Fabric pom-poms are used to decorate summer hats or caps.
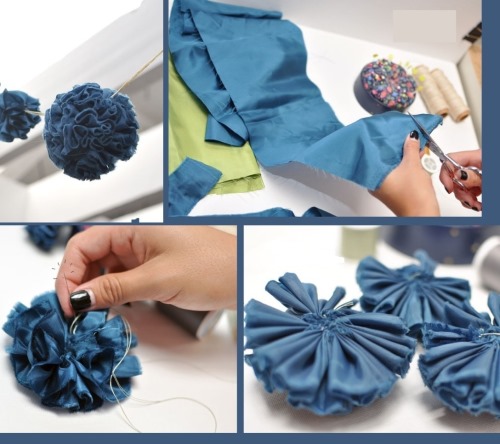
Sometimes used for decorating knitted items:
- Cut a strip of fabric with parameters 1.5×0.2 m. Fold the fabric lengthwise and iron it. Sew the free edges with a thread and a needle using a regular stitch. In this case, you need to leave a long piece of thread at the beginning and at the end of the work. Pull the threads together and tie them together.
- You can make a pompom from fabric using another method. Do the same as in the first case. Just pull the threads a little to form a light wave along the entire canvas. Then roll the fabric into a roll and sew the base.
- To form medium-sized items, you can use toilet paper or paper towel tubes as a basis. Connect two parts of the tubes together and wrap them with material. Tie the middle with a thread at the junction with a thread and cut the formed loops.
- The hoop can be used as a basis for forming the winding. You will get large pompoms with a loose texture. Wrap several fingers with yarn, tie the winding in the middle with a thread, cut the edges on the sides. Align the cuts with scissors and fluff up the base.
To make a regular pompom from yarn or thread, it is enough to use a ruler, a comb handle, or any other element onto which you can wind the material as a base.
Tulle pompom
You will need a hoop, thick thread, and a piece of tulle.
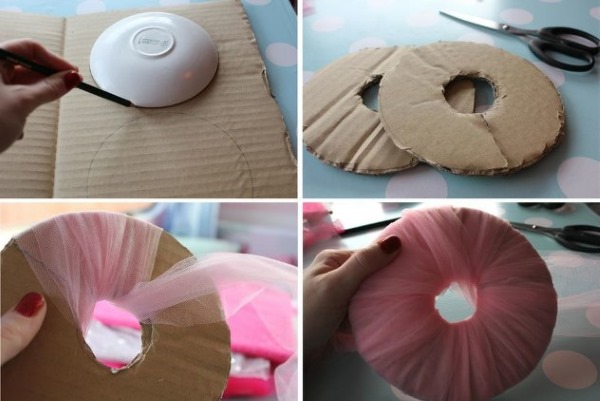
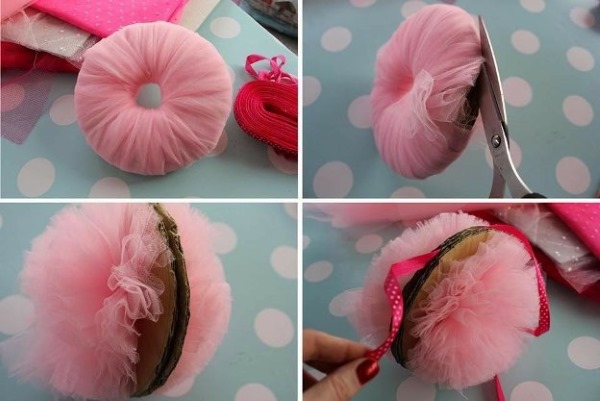
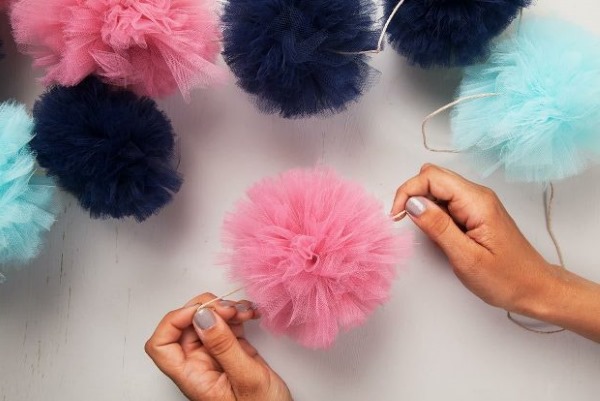
The principle of making a pompom:
- Wrap the material around the hoop body with a piece of tulle.
- Secure the winding in the middle with a thread and cut the loops.
- There is no need to straighten the cuts – uneven edges will add texture.
- Straighten each strip.
The second option for making a voluminous product from tulle:
- Using a ruler, mark the tulle piece so that you get strips of the same width. Cut the material according to the marks.
- Place a 1 m long thread on the surface and stack all the resulting elements evenly on top in a pile.
- Cut all the pieces in half. Put the pieces back into one pile.
- Tie the strips together with a thread. To securely fasten, make several double knots.
- Use your hands to straighten the strips, forming a shape.
The more divisions of the strip lengths are made, the fluffier and smaller in size the product will be.
Pompom made of satin ribbons
To make it you need:
- Minimum 5 m of satin ribbon. Different color solutions can be used.
- Sewing thread. You can also take a needle
- Bottle (plastic or glass).
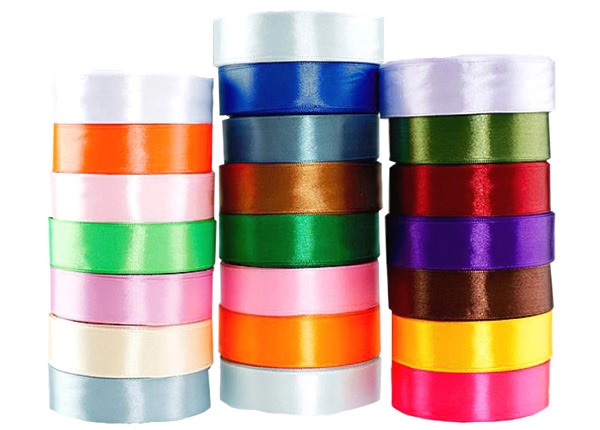
Manufacturing algorithm:
- Place a piece of sewing thread from the bottom to the neck of the bottle.
- Wrap the bottle body with satin ribbon.
- Tighten the winding with a sewing tape, tie the fastening with strong knots. You can stitch all the layers of the tapes with a needle at the tying point. Then cut the fixing thread.
- Remove the winding from the bottle. Do this carefully so as not to change the shape of the winding.
- Spread the loops around and between each other. No need to cut the ribbons.
Beautiful pompoms can be made from yarn, thread, fabric or fur at home. Any available materials can be used to form the base. Using simple techniques and cutting methods, you can get round, oval, dense, voluminous or fluffy pompoms.
By combining several colors, a colorful element is made for decorating adult and children's hats. It is necessary to prepare a template for forming the product: cardboard circles, a fork, a chair back, fingers.
Article formatting:Natalie Podolskaya
Video about making pom poms
How to make a pompom from yarn:
