In every home, over time, things appear that can no longer be used for their intended purpose. These can be old T-shirts, boards or other materials. Crafts from improvised means allow you to turn old unnecessary things into something useful.
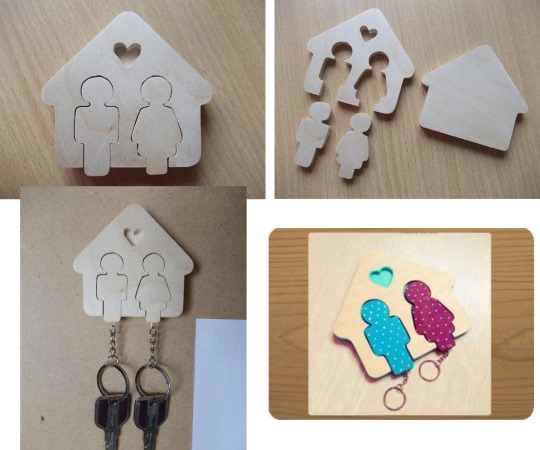
Key hanger
Materials used:
- plywood;
- wooden lath;
- screw hooks;
- hooks for hanging on the wall;
- white stain.
Progress of work:
- You need to take a piece of plywood of the required size, mark it with a pencil and cut out the resulting figure using a saw or a circular saw.
- Cut a rectangle from the strip to which the hooks for the keys will be screwed.
- You should make sure that the dimensions of the plywood and the lath match each other, and then glue the lath to the plywood. To do this, you need to coat the plywood and the lath with glue, put them next to each other and squeeze them with a vice (if you don’t have one, you can put something heavy on top). Remove excess glue with a damp cloth.
- After the glue has dried, the front part should be sanded with sandpaper. It will also be useful to slightly round off the edges of the slat.
- The next step is painting with white water stain. Depending on the stain, 2 or 3 layers must be applied. After drying, the future hanger should be snow-white.
- It is necessary to choose a place for mounting hooks for keys. It is better to make markings with a ruler and a pencil.
- To be sure that the rail will not crack when screwing in the hook, you should drill a hole in the rail in advance. After that, you can mount the hooks.
- Hooks need to be attached to the back wall, on which the hanger will hang. You can make them yourself or buy them in a store.
After that, all that remains is to choose a good location and attach the resulting key hanger to the wall. If desired, you can put a photo of your loved ones or a list of future purchases in the store on it.
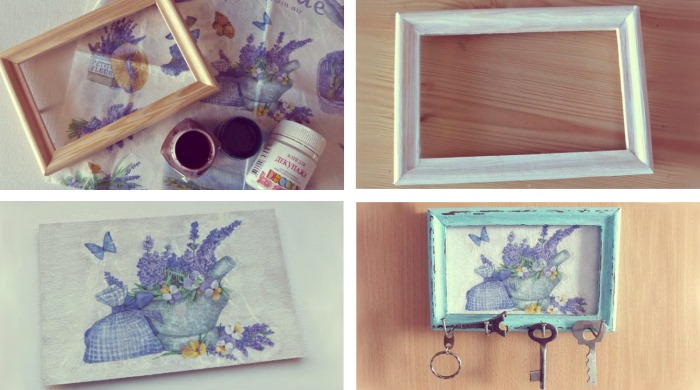
Frame
An ordinary photo frame can be turned into a work of art.
To create you will need:
- wooden frame;
- sandpaper;
- napkin;
- glue;
- soil for wood;
- acrylic varnish;
- brush;
- scissors;
- beads or rhinestones.
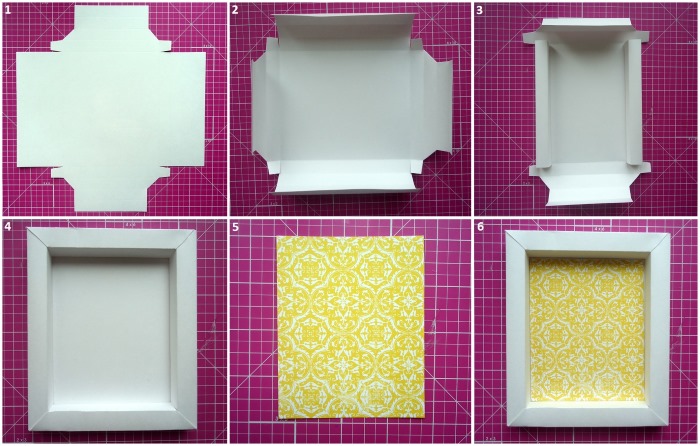
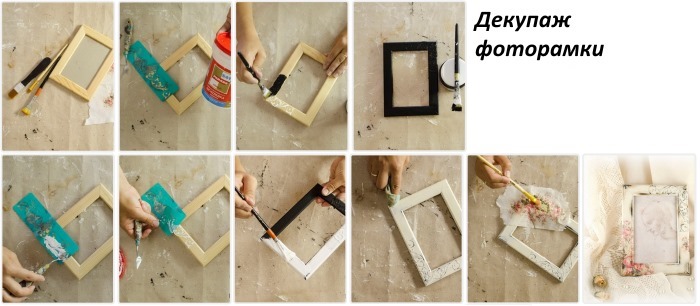
Stages of work when decorating a photo frame:
- In order to eliminate the possibility of unevenness appearing on the frame, it is necessary to sand it with sandpaper.
- Next, you need to cover the frame with primer and let it dry.
- Choose a napkin with a pattern or design. Coat the frame with PVA glue and carefully apply the napkin to the layer of glue so that there are no folds. In this way, it is necessary to glue the entire surface of the frame.
- After the surface is completely dry, apply 2-3 layers of acrylic varnish.
- Now you can decorate the product with beads or seed beads. The decoration depends on the desire and personal preferences of the master.
The frame decoupage is ready, all that's left is to wait for it to dry and insert the photo. It is necessary to do the work carefully so that the photo becomes a pleasant decoration for the house.
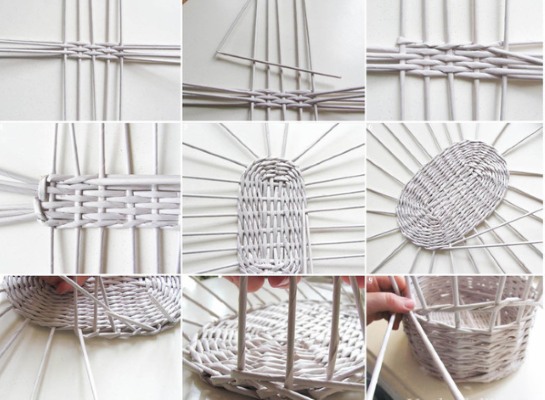
Newspaper baskets
The vase can be used in the kitchen, with cookies in it, or put away in a cupboard, filling it with small details.
To make it you need:
- old newspapers;
- jar;
- PVA glue and a brush;
- knitting needle;
- scissors;
- cardboard;
- ruler;
- acrylic paint (if necessary).
Progress of work:
- It is necessary to divide the newspaper into strips 10 cm wide.
- Place the knitting needle diagonally and roll the resulting strips into tubes, while smearing the end of the newspaper with glue.
- Repeat steps 1 and 2 the required number of times (depending on the size of the basket).
- After this, you need to cut a circle out of a sheet of cardboard. This will be the bottom of the basket. Next, you need to take several ready-made tubes (depending on the size of the basket), flatten one end and glue them to the cut out circle at an equal distance from each other. Insert a jar inside the resulting structure and tighten the ends of the tubes with an elastic band. The basis for weaving is ready.
- After this, you need to take another tube, glue it to the base and start weaving. To do this, put the weaving tube between the base tubes, using the sequence from outside to inside. When the weaving tube ends, you need to insert the next one into it and continue the procedure.
- Once the basket reaches the required height, you need to cut the ends of the tubes, leaving an extra 2-3 cm, bend them inward and glue them.
- Paint the vase.
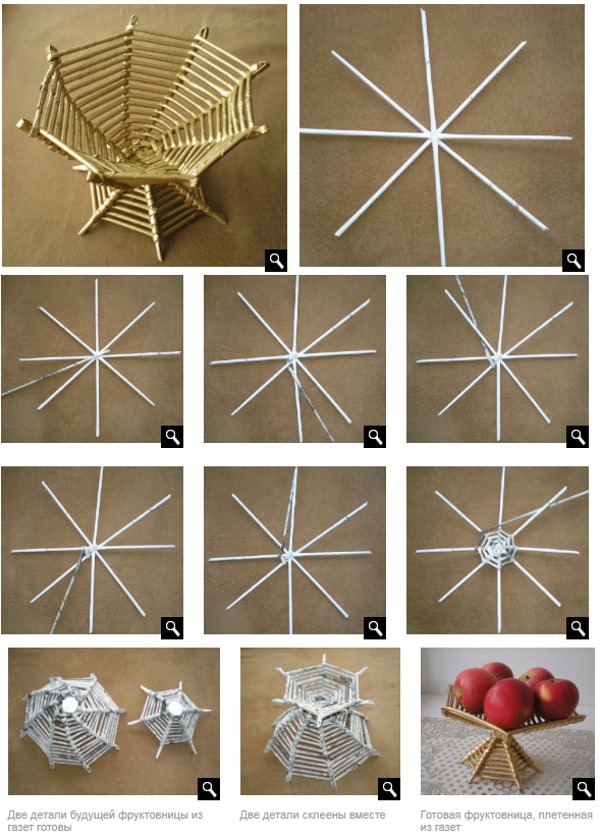
Wicker panel
Crafts for the home made from improvised means can become an interior decoration.
To create the composition you will need:
- hammer;
- nails;
- square board;
- compass;
- colored threads.
Work process:
- It is necessary to find the center of the board and draw a circle with a compass. At equal distances from each other, make marks on the circle line. Nails will be driven into these places.
- Hammer the nails into the marked places. Do this carefully so that they do not bend. The heads should stick out from the board by 1 cm.
- You need to take a thread and tie its end to one of the nails. After that, use the thread to "draw" a triangle inscribed in a circle. With each new repetition, the triangle must be moved 1 nail clockwise. In the process, you can and should change the color of the thread.
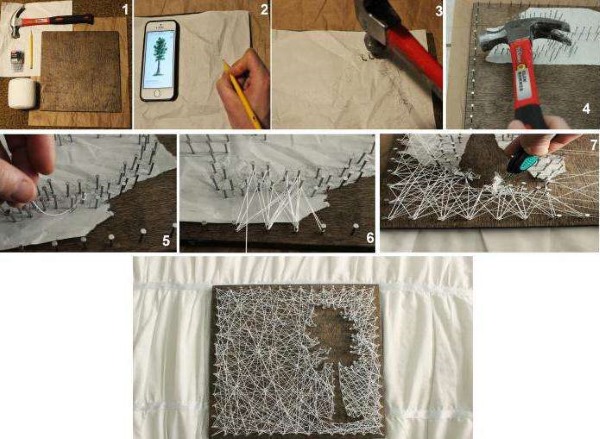
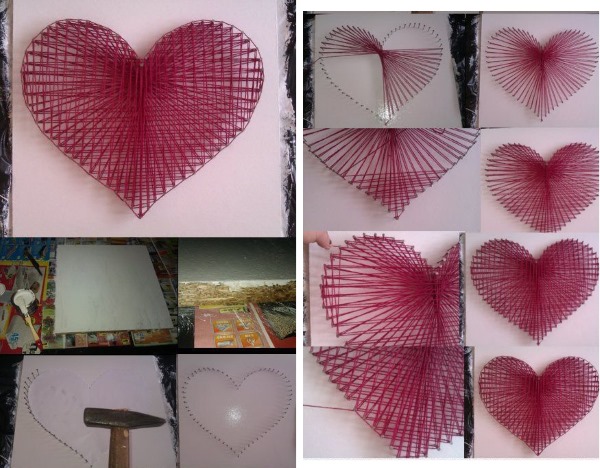
Note: To make the composition more durable, you can sometimes apply a little glue to the nails. This will allow you to secure the thread in certain places, and it will not move anywhere. It is advisable not to use only one triangle, but to alternate geometric figures, this will make the composition even more interesting.
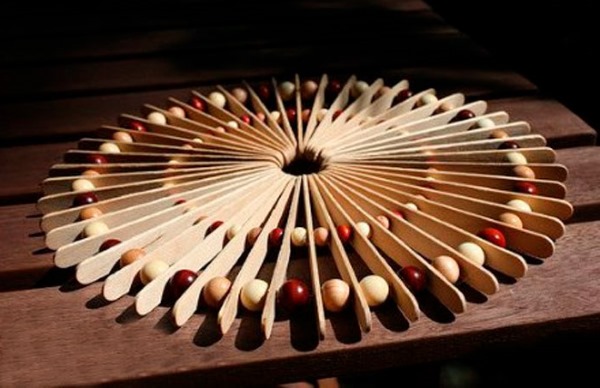
Hot stand
To make a coaster for hot dishes, you only need ice cream sticks, acrylic paint and a brush, and a hot glue gun.
Manufacturing:
- All the sticks need to be painted in different colors - this will give the stand a bright look. You can apply patterns or ornaments to them.
- Once the sticks are dry, you can begin assembly.
- Place 4 sticks and place 5 sticks on edge across them.
- Glue everything together thoroughly using a hot glue gun and wait for the glue to dry.
- Next, you need to glue another stick to the ends of the upper sticks on each side.
- Glue 6 sticks on top of the sticks that stand on their edge, laying them flat.
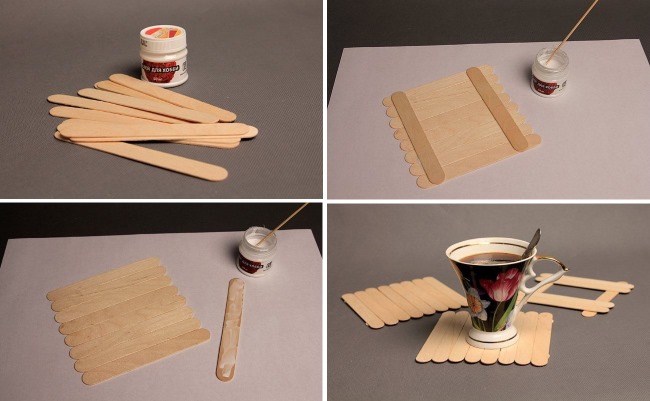
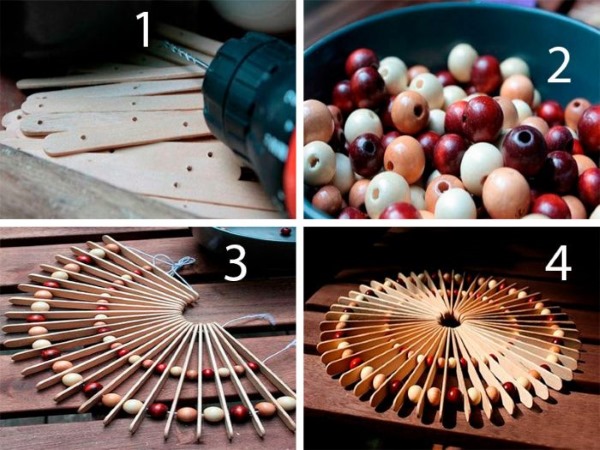
The stand is easy to make and will serve for many years. If the paint peels off over time, it can be easily renewed.
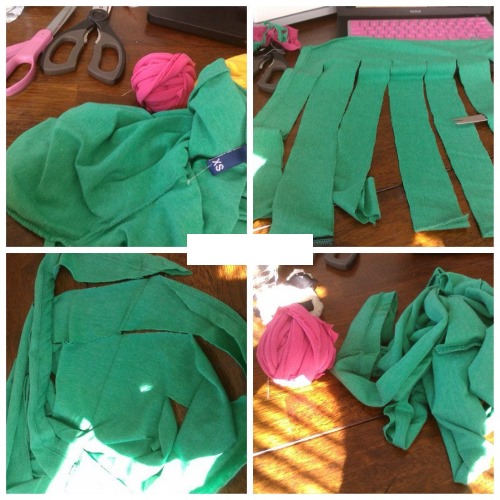
Rug made from unnecessary things
To make a rug, you need fabric, a needle and thread. First of all, you need to decide on the size of the future rug. This will help to clarify how much material is needed to make it.
Stages of creating a rug:
- Old T-shirts and towels need to be cut into strips that will be braided. The optimal width of the strip will be 10-15 cm. The greater the width, the thicker the rug will be.
- Start braiding a pigtail from the cut strips, weaving new pieces of fabric into it. As a result, you should get a long, solid pigtail. This pigtail needs to be twisted in a circle into a large circle.
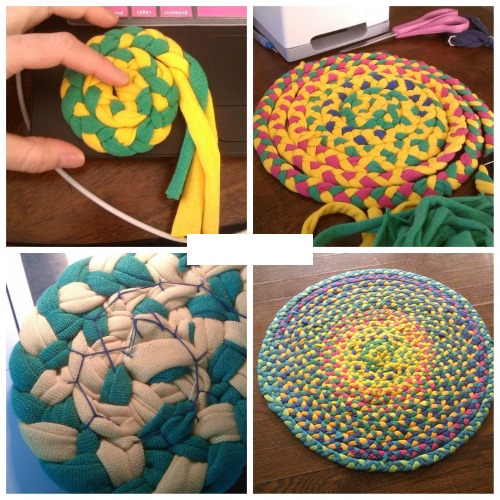
- Next, you need to take a needle with a strong thread and sew the parts of this pancake together. The stronger the thread, the more durable the resulting carpet will be. Before sewing, you can pin the parts of the braid together. This will simplify the sewing process.
- Place the resulting rug on a towel and cut a circle from the towel with a diameter corresponding to the rug. The towel is also sewn to the bottom of the rug, which will ensure its durability.
Using materials of different colors, you can create rugs that match the interior of a particular room.
Garland and candlestick
To decorate a candlestick with a garland, you will need: a candlestick, a garland, a glue gun or small zip ties.
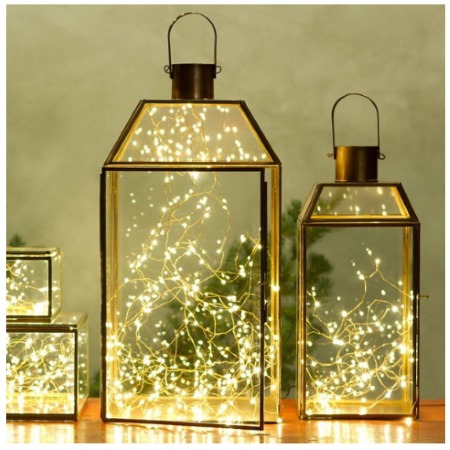
The whole work is done in 1 step. It is necessary to fix the garland on the body of the candlestick with a glue gun or ties and connect it to the power grid. If you choose a yellow garland for the work and light the candles, the craft will give a romantic yellowish light, reminiscent of the burning of several dozen candles.
It is important to keep an eye on the fire hazard craft, as a burning candle can light the garland. This is why you should attach the garland at least 5 cm from the future candle flame.
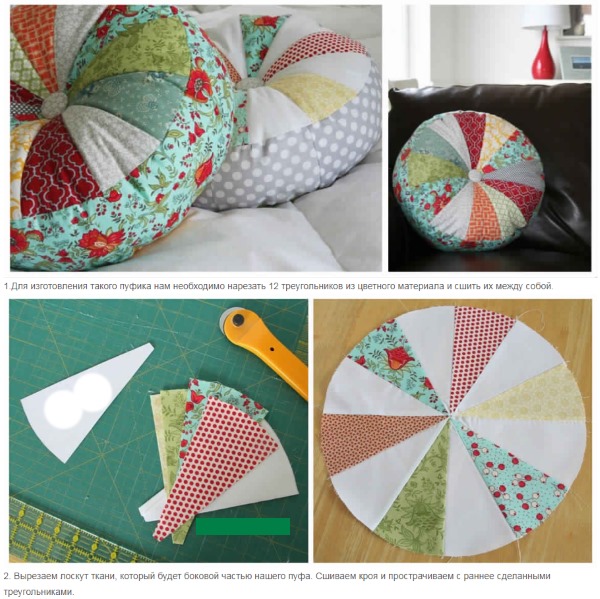
Pouf in patchwork technique
To work you will need:
- scraps of colored fabric;
- filler;
- needle and thread (sewing machine).
Progress of work:
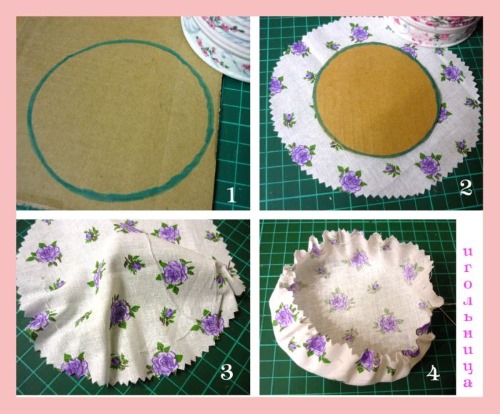
- First, you need to prepare the patterns. To do this, you need to draw a circle on paper, the diameter of which will match the diameter of the pouf, divide it into 4 parts, and then divide each quarter into 3 more parts to get 12 identical parts.
- After this, you need to cut out the fabric pieces using the templates you made, adding 2 cm to each piece for seams.
- Next, you need to sew the parts together one by one. After that, you should iron them.
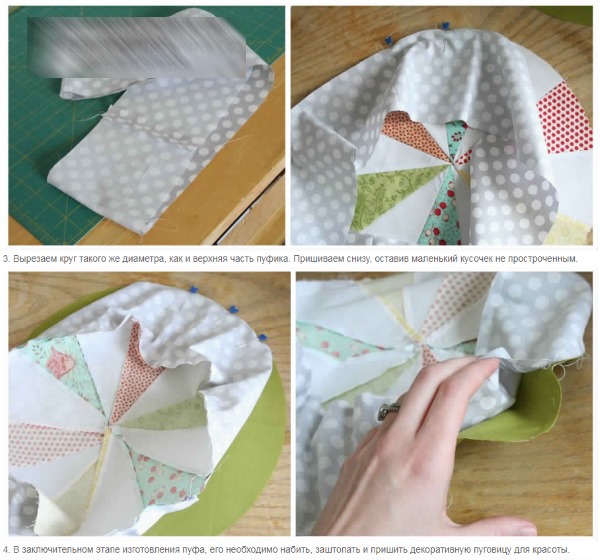
- After this, you need to repeat steps 1 and 2 and make the second part of the future pouf.
- Next, the 2 parts need to be turned inside out and sewn together, leaving a small gap for stuffing.
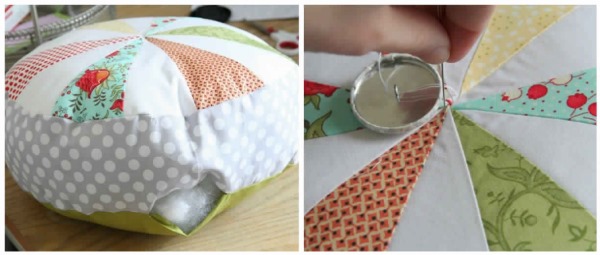
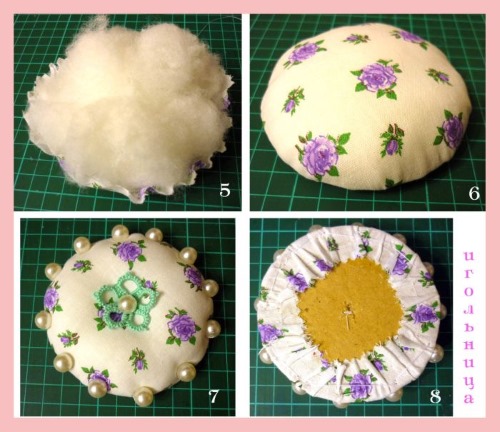
- After this, the workpiece needs to be turned inside out, stuffed with filler and carefully sewn up the remaining hole. The pouf is ready.
By following a series of simple steps, you can make several poufs of different sizes and colors yourself. Some of them can be placed on the sofa to add color, and some can be made larger and placed on the floor.
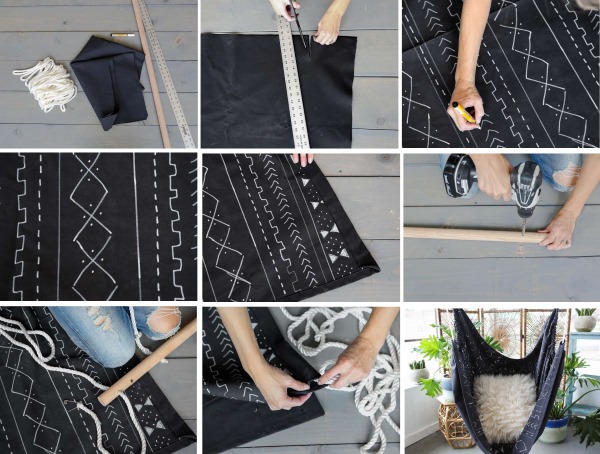
Hammock chair
A hammock chair can replace regular chairs and armchairs due to its convenience and unusual appearance.
To make it you will need:
- fabric measuring 1.5x1.5 meters;
- strong threads;
- sewing machine;
- straps;
- pencil;
- chalk;
- ruler;
- scissors;
- wooden rod;
- rope;
- carbine;
- dowel hook;
- hammer drill.
Progress of work:
- First, you need to cut out a trapezoid-shaped piece from the fabric with bases of 1.5 and 0.8 m. All edges need to be folded over by 2 cm and stitched with a machine. After that, you need to sew straps to the inside of the piece at each corner so that loops are formed at the corners.
- Make spacers from a wooden rod between the front and back parts of the workpiece. To do this, drill 2 holes in the rod and tie the loops of the straps to the spacer through them, leaving the end of the rope behind the tree. Repeat this for each side.
- Next, you need a third spacer - a transverse one. The ends of the rope remaining on the edges of the longitudinal spacers must be tied to the edges of the transverse one, following the rule: right to right, left to left.
- The hammock is ready, all that's left is to hang it. To do this, you need to drill a hole in the ceiling with a hammer drill and install a dowel hook in it. It's worth remembering that the more powerful the dowel hook, the more weight it can withstand. Next, you need to throw a rope over the hook and tie its ends to the ends of the crossbar.
It is important to remember that the strength and safety of a hammock directly depends on the quality of the materials used.
That is why, for your own safety, you should take a material that is more expensive, but much stronger.
Popcorn boxes
Crafts for the home from improvised means can be very easy to make, for example, a popcorn box. To create it, you will only need cardboard, scissors and glue.
Manufacturing:
- From sheets of cardboard of different colors, you need to cut out 4 trapezoids with a side of 11 cm, a lower base of 7 cm and an upper base of 9 cm. After that, at each of the vertices, you need to mark and cut out squares with a side of 1 cm. Bend the resulting petals at a right angle. These will be the walls of the box.
- For the bottom of the box, you need to cut a square with a side of 7 cm out of cardboard. After that, repeat the procedure that was done with the walls and also make petals.
- Spread glue on all the petals and glue all the cut out figures together.
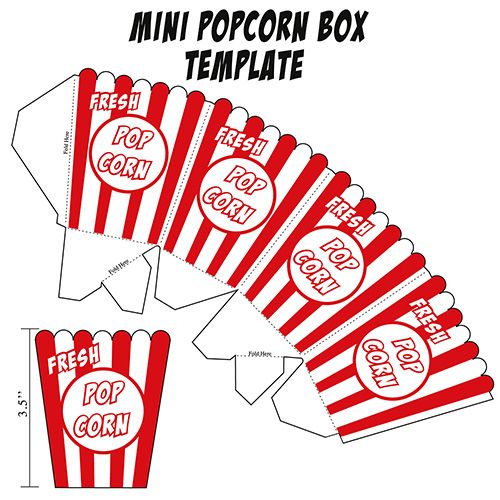
The result is a box in the shape of a truncated pyramid. Also, those who have artistic talent can glue a pyramid from white cardboard and, at the end of the work, paint it with markers themselves.
Vases from glass jars
You can make shiny vases, decoupage vases, multi-colored vases and other unusual vases:
- To create a glittery vase you will need double-sided tape and glitter.
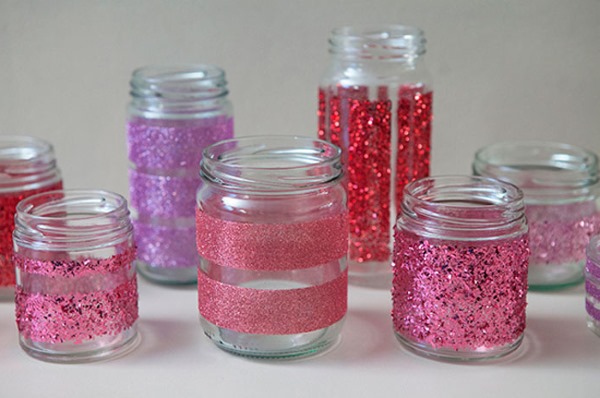
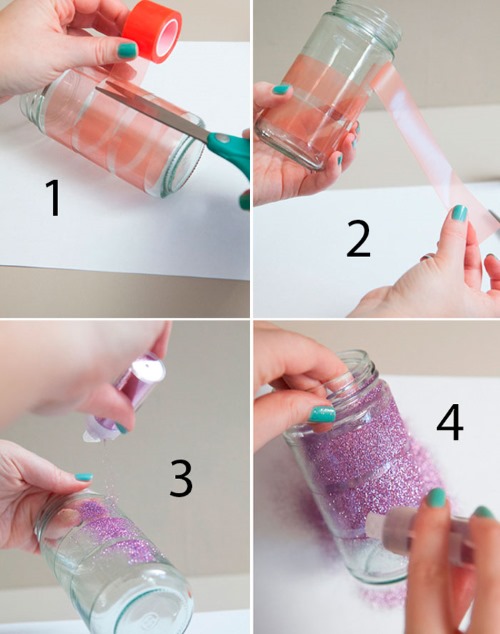
On the outside of the can, you need to stick strips of tape, remove the top protective layer and sprinkle with glitter. For more extravagant individuals, there is an opportunity to create a whole composition on the outside of the can from double-sided tape and glitter.
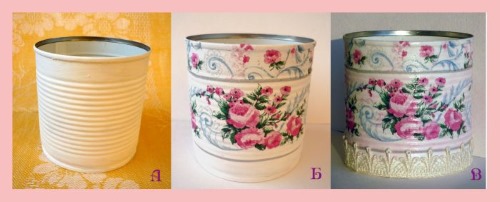
- For a vase using decoupage technique you will need:
- jar;
- acetone;
- cotton pads;
- patterned napkins;
- sponge;
- acrylic paint;
- PVA glue;
- acrylic varnish.
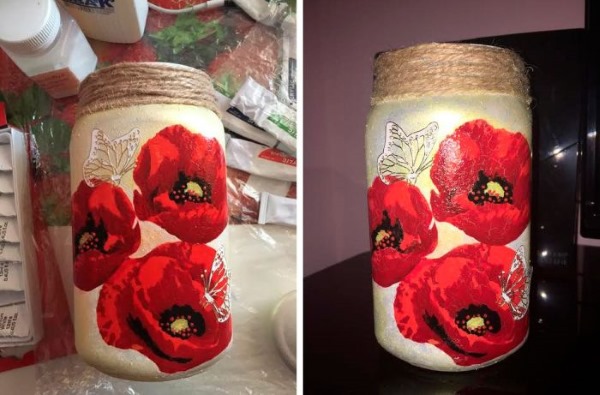
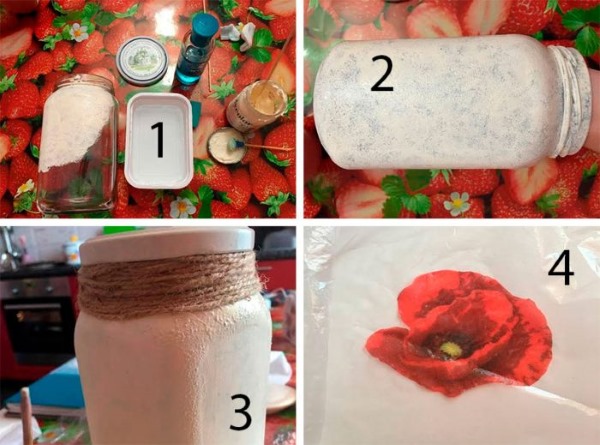
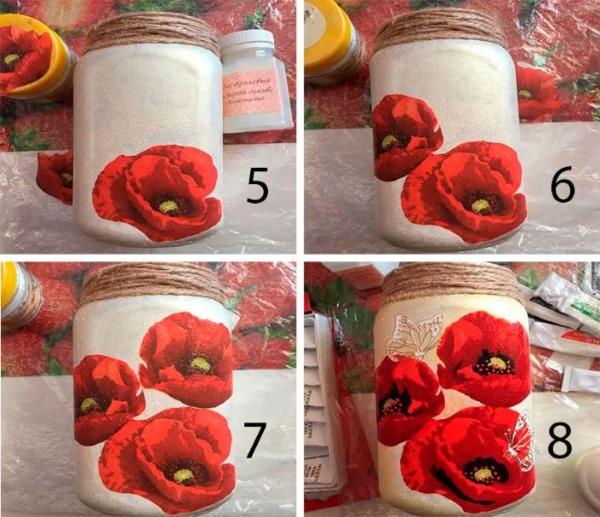
Using a cotton pad and acetone, degrease the surface of the jar. After that, cover the jar with white paint and wait until it dries. Cut out a pattern from napkins and glue them to the jar. Cover the vase with acrylic varnish. The vase is ready.
- For multi-colored vases you will need acrylic paints, a jar and newspaper.
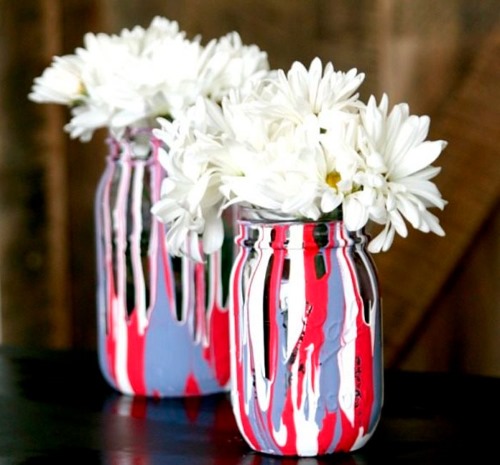
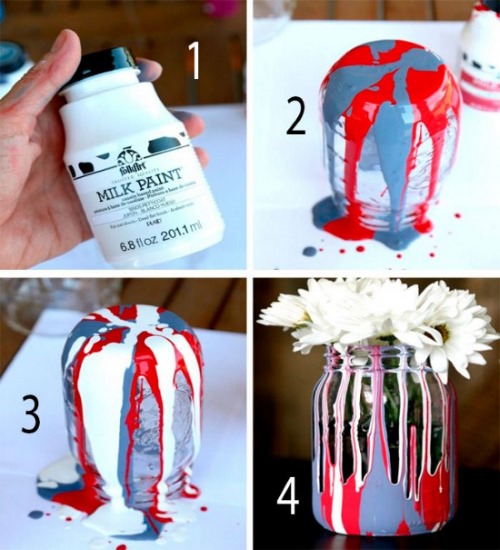
The jar needs to be placed upside down on a newspaper and poured with paint on top. Then you need to wait until it dries completely and you can use the new vase for its intended purpose.
- For an unusual vase you will need M8 nuts, metal glue and a sheet of paper. From the sheet you need to cut out a circle with a diameter corresponding to the diameter of the jar neck. This will be a template.
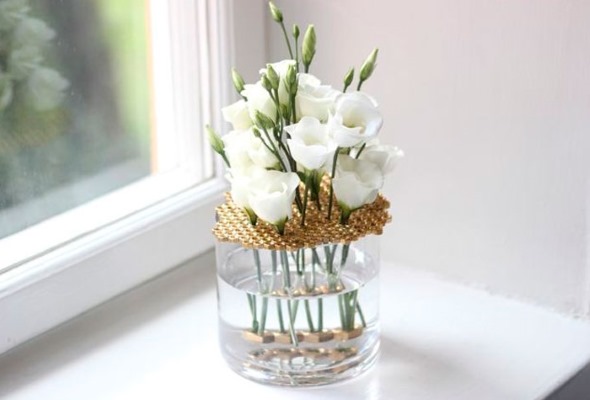
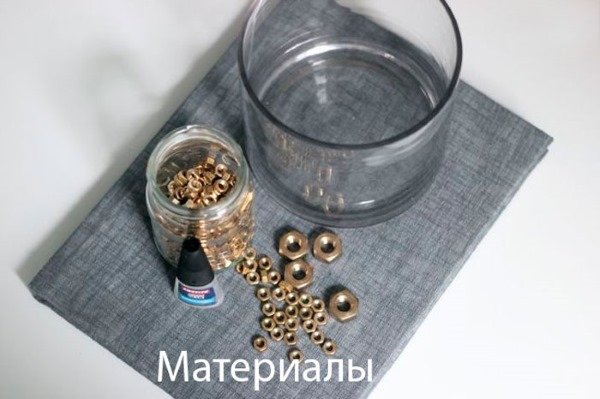
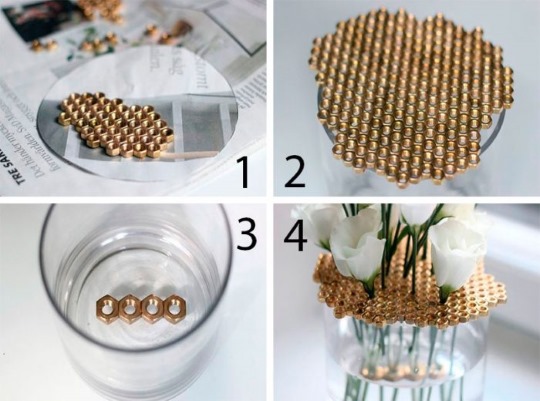
Next, using glue, you need to glue together the M8 nuts using the template and add a few pieces that extend beyond the template. This is necessary so that the lid does not fall inside the jar. After that, the lid made of nuts must be glued to the neck of the jar, and small flowers can be inserted into the holes in the nuts. The vase is ready.
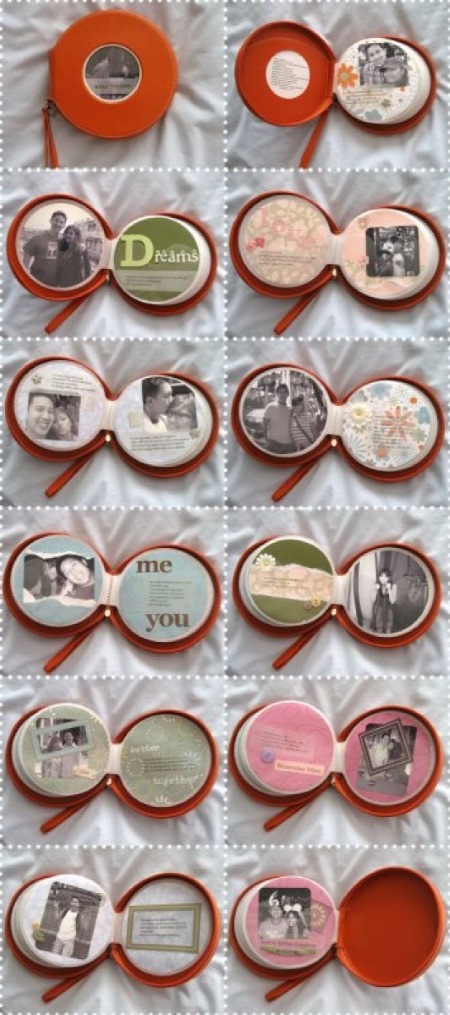
Box from a metal can
Using improvised means, you can also create a craft for your home, such as a jewelry box.
To work you will need:
- tin;
- primer;
- putty;
- varnish;
- cardboard for crafts (children's);
- boxboard;
- cable insulation 5 mm;
- PVA glue;
- superglue;
- sandpaper;
- napkin;
- brush;
- paper;
- scissors.
Progress of work:
- First, you need to wash and thoroughly degrease the jar.
- Cut a circle out of a sheet of cardboard, the diameter of which will be 1 mm smaller than the diameter of the bottom of the can. The cut out circle must be glued to the bottom, thereby hiding the metal bottom. Possible cracks must be filled with putty.
- We glue the inside of the jar using PVA glue and paper.
- A piece of insulation must be cut out equal to the length of the circumference of the inner sharp edge of the can. Then you need to cut it lengthwise, pour superglue inside and put it on the sharp edge of the can. If the insulation is slightly shorter than necessary, you can add a piece.
- After this, the jar needs to be primed, dried, painted and dried again. If desired, you can glue a pattern cut out of a napkin or a piece of wallpaper onto the wall of the jar. Cover the entire workpiece with varnish. You can glue braid, beads, glitter or sequins around the circumference of the jar.
- To make the lid, you need to cut 2 circles out of the boxboard. The diameter of the first should be equal to the diameter of the can, and the diameter of the second should be equal to the diameter of the inside of the can (minus the thickness of the insulation).
- These 2 circles need to be glued together and the edges filled, the workpiece dried and sanded. After that, you can cut out and glue a pattern from a napkin or a photograph onto the lid. After that, everything needs to be varnished. The lid is ready.
The result is a box in which you can store jewelry or other small items.
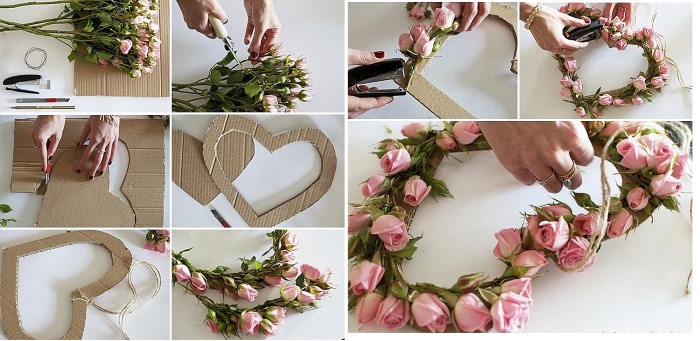
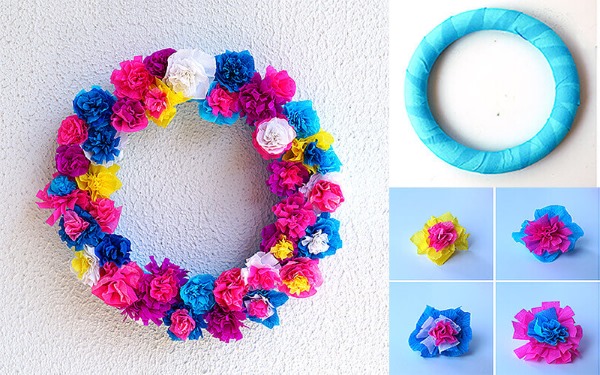
Decorative paper wreath
Crafts for the home from improvised means of this type do not take much time, effort or money, but can become a decoration of any room, regardless of the interior.

Materials:
- corrugated paper of various colors;
- scissors;
- glue;
- wire.
Progress of work:
- You need to take the wire and start winding the green tape of corrugated paper on it. These will be the future stems of the flowers. The beginning and end of the paper tape must be coated with glue for fixation.
- Make a leaf for the flower from a rectangular piece of paper.
- Cut a rectangle out of green paper and fold it like an accordion. Cut the paper into a semicircle on one side and a triangle on the other. Unfold the resulting accordion, apply glue to the bottom and wrap it around the already made stem. Carefully curl the petals with a pencil. Glue the leaf. One flower is ready.
- Make a few more flowers of different sizes and colors.
- Assemble a frame for the wreath from wire and cover it with corrugated paper.
- Use a glue gun to attach the flowers to the wreath.
Crafts from plastic spoons
From ordinary plastic spoons you can make both beautiful roses and a panel with a photo in the center.
To make a rose you will need:
- green tube;
- 10 red spoons;
- glue gun;
- scissors.
Progress of work:
- You need to cut off the handles from 9 spoons, and leave 1 whole, it will be the base of the flower. Next, using a glue gun, you need to glue the deep parts of the cut spoon to the whole one, thus forming a flower.
- Put a green tube on the spoon handle and glue it. The flower is ready.
You can make one or several roses, then assemble them into a full bouquet and put them in a vase.
To make the panel you will need:
- cardboard;
- spoons (their number depends on the size of the panel);
- glue gun;
- compass;
- scissors;
- photo;
- spray paint;
- PVA glue.
Progress of work:
- You need to cut a circle out of a sheet of cardboard. This will be the base.
- Cut off the handles from all the spoons and glue them to the cardboard using a glue gun, starting from the edge to the center. The spoons must be glued in a checkerboard pattern. Leave space in the center for a photo.
- The entire composition needs to be painted using a spray can in the desired color.
- Cut out the desired geometric figure from the photograph and glue it into the center of the composition.
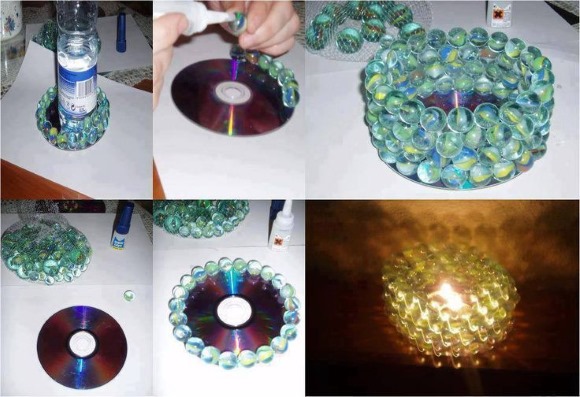
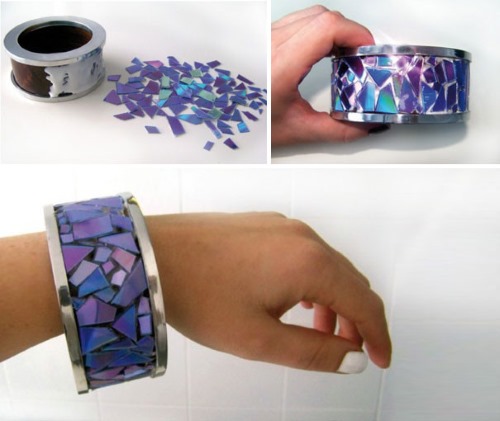
Crafts from disks
There are many options for using laser discs to decorate things.
Among them:
- finishing of walls, doors, refrigerators and other surfaces;
- decoration of women's handbags, clothes;
- decorate vases, hangers, even a guitar can be covered with pieces of laser discs;
- disco ball, Christmas tree ball, paintings, fridge magnets.
To make all these crafts you will need disks, scissors and glue. The disks need to be cut into small pieces and glued to the place that seems gray and nondescript.
Crafts for the home from improvised means, useful for children:
- Pencil box.
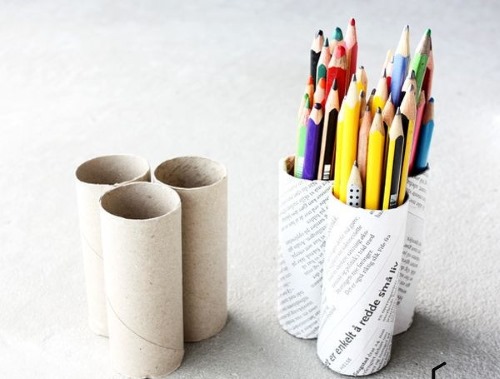
To make a box you will need colored cardboard, glue and scissors. You will need to cut out the blanks from the cardboard and glue them together.
- Soft toys made from socks.
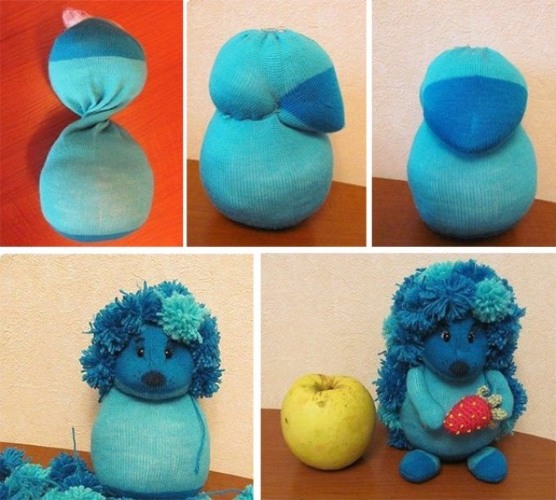
To make soft toys you will need socks, a sewing machine and stuffing. Cut out 2 animal-shaped blanks from a sock and sew them together, leaving a small opening. Turn the future toy inside out through this opening, stuff it with stuffing and carefully sew it up. If you use white socks, you can ask your child to draw a face and other body parts for the animal.
Other original ideas for home crafts
| Main material | Finished product |
| Paper | Bookmark |
| Garland | |
| Volumetric fruits | |
| Postcards | |
| Laser discs | Jewelry stand |
| Disc stand | |
| Curtain Tieback | |
| Wire | Animals from chenille wire |
| Flower | |
| Tree |
Anyone can start making crafts for the home from improvised means. Even a child can make many of them without the help of adults.
Article formatting: Natalie Podolskaya
Video about crafts from improvised means
Crafts for the home from improvised means: