Modeling with plasticine is included in the list of compulsory classes in school programs in many countries. Working with the material has a beneficial effect on the development of the child. In the 1st grade, children can make crafts of varying levels of complexity, according to their strengths and talents.
The benefits of modeling with plasticine, how to captivate a child
Pediatricians, speech therapists and teachers recommend modeling with plasticine as an effective activity for child development.
| Benefit | Description |
| Development of fine motor skills | Kneading plasticine in your hands, creating parts of different shapes and fastening them together involves the pads of your fingers. Thanks to this, fine motor skills of the hands are developed, which are directly related to the work of the brain. This has a beneficial effect on the child's coordination of movements, speech, memory and logical thinking. The classes help prepare the hand for writing. |
| Improving health and emotional state | Working with plasticine has a positive effect on the nervous system: stress is relieved, mood is improved, excessive activity and excitability of the student is reduced, and his sleep is normalized.
In the process of creativity, not only positive but also negative emotions are released: anger, malice, resentment, excitement, anxiety. With the help of modeling, you can effectively overcome the child's fears. To do this, you need to mold a character that inspires fear in the child, and then crush the figure and make something positive out of plasticine - the sun, a cute animal, a colorful flower. |
| Personality formation | Creativity gives a child the opportunity to develop his or her “I”, to reveal hidden abilities and to see one’s own uniqueness. Thanks to the classes, the student’s self-esteem increases and a sense of beauty is instilled.
The child is not afraid to experiment with plasticine, since this soft but durable material allows you to create different figures, easily change errors, add new details or completely remake the craft. |
| Development of mental abilities | During modeling, both hemispheres of the child's brain work simultaneously. Therefore, classes increase the level of intelligence, develop memory, as well as abstract, figurative and logical thinking. The imagination and creative abilities of the student are formed. |
Most often, children themselves enjoy modeling. But there are cases when they have no interest in the process. In this case, they need to be captivated by the end result. If you mold something practical, which you can then play with or give to friends or parents - this is much more interesting.
In order to interest a schoolchild in creativity, it is also necessary to find out the reason for the reluctance to sculpt and then eliminate it.
The main reasons are:
- The material is too hard. The child may have difficulty kneading a hard piece of plasticine. Therefore, he should be helped - knead the plastic material well.
- Lack of self-confidence. To believe in yourself, you need to start with simple figures and only gradually move on to more complex things.
Preparing for the creative process
Modeling with plasticine (1st grade program for children is not complicated) requires a certain organization of the place, the choice of convenient and safe plasticine and auxiliary materials.
Before the lesson, it is necessary to prepare the workplace: lay oilcloth on the table or put a board for modeling, place the necessary tools and plasticine. In order not to stain clothes, children should put on oilcloth aprons and armlets with elastic bands.
Schoolchildren should be reminded of the rules of modeling:
- You should work with plasticine carefully and only at your workplace;
- do not touch clothes or each other with your hands;
- After work, wash your hands with soap.
When choosing plasticine for regular creative activities, you should pay attention to the following characteristics:
- Quality material does not crumble or dry out. It does not contain harmful synthetic additives, information about which should be placed on the product box.
- Good plasticine does not remain on your hands as a greasy film or bright paint. It is easily washed off with warm water.
- The material should not contain a strong unpleasant odor.
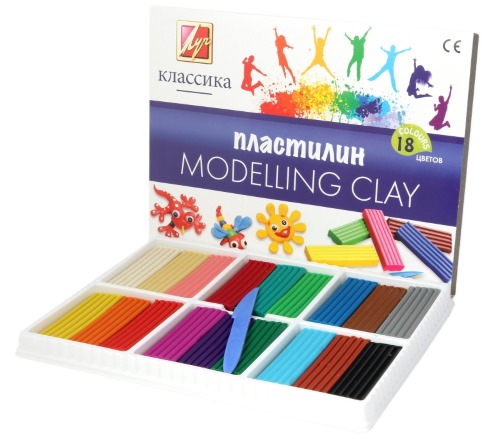
There are different types of plasticine: classic, ball, hardening, art plasticine, sculptural. Classic plasticine is most often used for lessons.This soft material based on clay and wax is highly flexible, making it ideal for use by younger students.
Various tools are used for the work, the most necessary for sculpting products are:
- Modeling board. It protects the table from getting dirty and simplifies the creation of shaped parts. Boards can be plastic or silicone, smooth or with a partially ribbed surface.
- Stack. With its help, plasticine is applied to the surface of the application, reliefs are formed, and drawings are created. For younger schoolchildren, it is safer to use light plastic stacks.
There are additional devices that simplify the work and make it possible to further improve the crafts:
- Knives. The tools are designed to divide the block of plasticine into parts and remove excess material. There are also figured knives that make it possible to apply patterns and give relief to products.
- Ruler. Its use simplifies the determination of the proportions of plasticine and the measurement of parts.

- Rolling pin. This is a necessary tool when creating postcards, paintings and panels, when you need to roll out the mass into a smooth and even layer.
- Molds. They are designed to make figures by pressing the mold onto plasticine. This way it is easy to make identical small flowers, berries or leaves with the smallest textured details.
- Textured sheets. To make an interesting detail of an applique or a background of a painting, it is necessary to press a sheet onto a rolled out plasticine layer or blank.
As auxiliary improvised means you can use different elements: textured buttons, cocktail straws, nut shells, cosmetic bottles. In addition to plasticine, you can use additional materials for work: pine cones, seeds, feathers, wooden branches, cardboard, compact discs.
Simple DIY plasticine crafts for 1st grade. Step-by-step description of lessons
Class 1 plasticine modeling should include all types of crafts: appliques, three-dimensional figures, compositions with additional materials.
Winter
To make a plasticine applique you will need:
- compact disc;
- plasticine in blue, white, brown, green and yellow colors;
- rolling pin;
- stack;
- modeling board.

Step by step description:
- Apply blue plasticine to the upper half of the disk. Use a rolling pin to make the surface smooth and even. Use a stack to cut off the material that extends beyond the edges of the disk. You will get a blue evening sky.
- Cover the lower half of the disk with white plasticine - snow. Its upper edge should be thicker than the blue layer, slightly raised above it.

- Roll out brown plasticine into sausages of the same length. Place the bars one above the other to form the frame of the house.
- Make a roof for the house. You should roll out a layer of mass and cut out a triangular roof from it with a stack, draw transverse stripes on it.
- Roll 2 sausages out of white plasticine and place them on top of the roof, imitating snow.
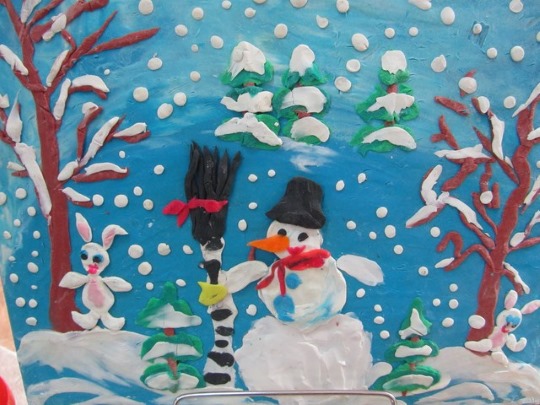
- Make a window, a moon and stars in the shape of circles from yellow plasticine. Attach the window to the house and other details to the sky.
- Make an oval out of green plasticine and use a stack to cut out a tree from it. Glue it near the house.
Autumn
To draw autumn with plasticine, you will need the following tools and materials:
- sheet of cardboard;
- plasticine set;
- stack.
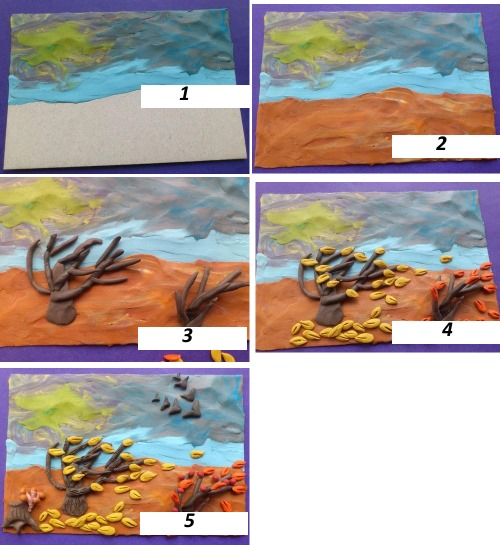
Step by step description:
- Apply a sky image to the top half of the cardboard. To do this, mix blue plasticine with a small amount of yellow, as well as blue and gray mass.
There is no need to achieve uniformity. Using a stack, first spread the blue-yellow mixture on the left side of the cardboard so that yellow patches of sun break through the blue mass of the sky. Then continue the background with a blue-gray mass - a cloudy sky with clouds.
- On the lower half of the cardboard, depict the ground with yellow grass and fallen leaves. You should lightly mix brown and orange plasticine and distribute the mass over the canvas, carefully joining it with the sky.
- Attach a brown tree trunk and bush branches to the base. Use a stack to draw rough bark on the trunk.
- Glue orange leaves and some of the leaves falling to the ground onto the tree.
- Place red rose hips on the branches of the bush and mushrooms on the grass.
- Make several “check marks” out of black plasticine, depicting a flock of birds flying away in the sky.
Hedgehog
To work you will need:
- plasticine in beige and black shades;
- stack;
- modeling board.
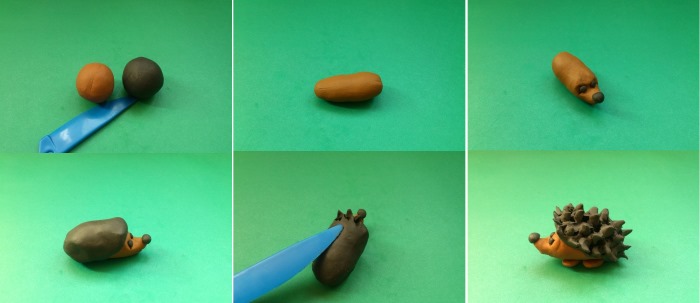
Step by step description:
- Roll a ball out of beige plasticine. Turn it into an oblong body with a pointed tip, onto which stick a black ball-nose.
- Using a stack, press the plasticine in the place where the eyes will be. Place the black eyes.
- Attach a thick layer of black plasticine to the beige body, leaving the muzzle and lower part uncovered.
- Make sharp thorns with a stack. Move the tool along the back, pushing portions of plasticine out with the tip. Press the protruding triangles with your fingers until sharp needles form.
- Attach beige paws to the bottom of the craft.
Dolphin
Necessary materials and tools:
- grey and black plasticine;
- stack;
- modeling board.
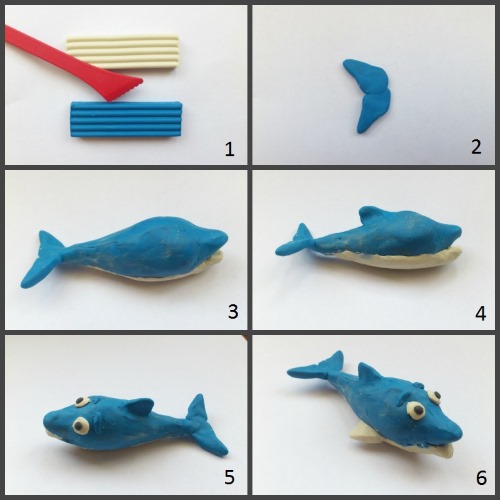
Step by step description:
- Knead the grey plasticine and roll it into a ball. Press it with your palm onto a hard surface and roll it out so that one side is larger and the other is narrower.
- In front of the frontal (larger) side, create a pointed dolphin nose and attach black eyes.
- Make triangular fins from grey plasticine and attach 1 to the back and 2 to the sides.
- Attach a double tail by cutting strips of webbing along it with a stack.
Cat
Modeling a cat from plasticine can be done using different techniques. In the 1st grade, children should learn how to make one of the more complex versions of the craft.
To work you will need:
- orange, black and white plasticine;
- stack;
- modeling board.
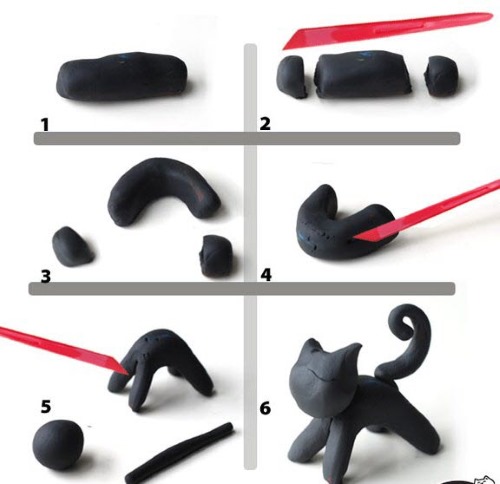
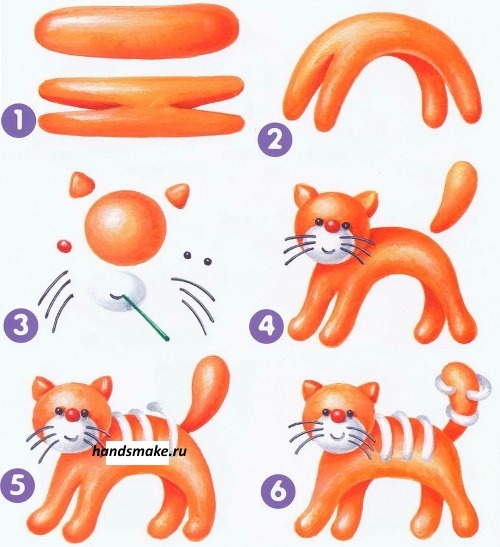
Step by step description:
- Divide the orange plasticine into 3 unequal parts: a large one for the body, a medium one for the head, and a small one for the ears and tail.
- Roll out a sausage from a large piece. Cut it on both sides along the length of the sausage. This way, the 4 paws of the cat are designated. It is necessary to give them a rounded shape and smooth out the unevenness. Bend the animal's body into a semicircle.
- Make a cat's head from a medium ball of plasticine. Roll a sausage-shaped tail from the remaining material and mold 2 triangular ears.
- Roll a ball out of the white mass, flatten it and glue it to the cat's muzzle. Also attach the black eyes, nose and thin whiskers to the head.
- Fasten all the parts together.
- Decorate the animal's back and tail with white sausage stripes.
Dog
Necessary materials and tools:
- plasticine of white, brown and black colors;
- stack;
- modeling board.
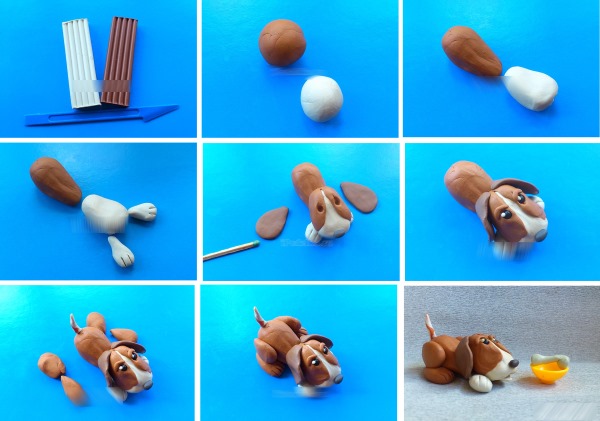
Step by step description:
- From half a block of brown plasticine, mold an oval dog body.
- The second part of the bar should be divided into 4 parts and rolled into sausages. One end of each part should be bent, forming a foot with toes. Attach the paws to the body.
- Make a head from white mass. It is necessary to stretch one side of the oval part. Attach white flat cakes-ears and a black ball-nose to the head. Use a stack to mark the mouth of the animal. Also make black round eyes and place white dots on them. Install the head on the body.
- Attach a white tail to the body. To do this, roll out the sausage, sharpen it on one side, then bend the part.
- Using the smearing technique, apply several white spots to the dog's body.
Butterfly
To make a butterfly you will need:
- plasticine set;
- toothpick;
- stack;
- modeling board.
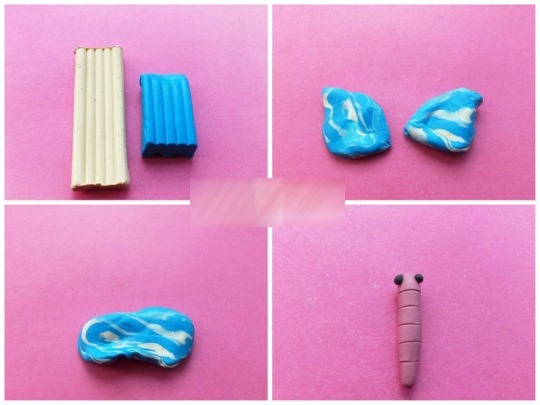
Step by step description:
- Make 3 parts of the body from dark plasticine: a round head, an oval body and a long tail. Connect all the parts by sticking a toothpick or wire through them. Use a stack to draw longitudinal cuts on the tail.
- Make eyes and antennae from the black mass and attach them to the head.
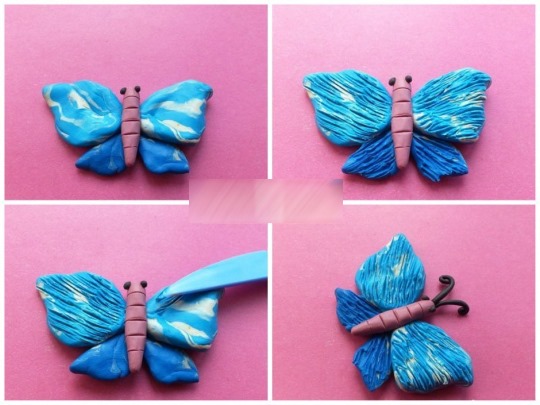
- Make butterfly wings from bright plasticine: 2 large and 2 smaller. To do this, flatten the plasticine ball and pinch one side of the circle with two fingers. Then repeat the action with the other parts.
- Randomly stripe the surface of the wings with a stack.
- Attach the wings to the body of the insect and decorate them with bright spots.
Caterpillar
To make this craft you will need:
- plasticine of green, yellow and orange colors;
- modeling board.
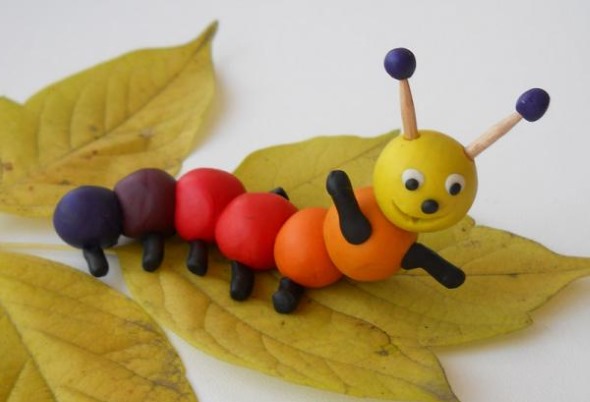
Step by step description:
- Roll 6 identical balls and 1 slightly larger one from green plasticine.
- Attach small yellow circles to identical balloons and connect all the balloons together.
- Make a head from a larger ball, attaching orange eyes and horns to it.
- Connect the head to the body and place the caterpillar on a sheet of plasticine.
Snail
Necessary materials and tools:
- plasticine set;
- modeling board.
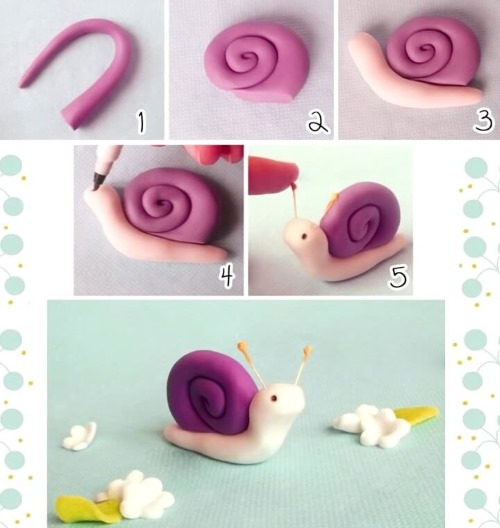
Step by step description:
- Make a snail body from beige plasticine – a long sausage, tapered at one end. Make the snail head by lifting the thick part of the body upwards.
- Make a green sausage and roll it into a spiral. Attach the shell to the body.
- Make balls from the white mass and flatten them. Glue tiny black balls into the middle of the circles. Place the eyes on the snail's head.
- Roll up the red sausage and connect its ends. Stick the mouth to the head.
- Make a long black sausage, the ends of which are twisted into a spiral. Glue the middle of the part to the snail's head, raising the horns upwards.
Pumpkin
For creativity you will need:
- green and orange plasticine;
- stack;
- modeling board.
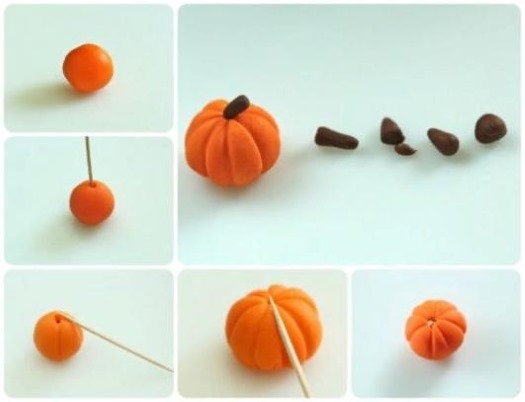
Step by step description:
- Roll the round orange fruit and press it lightly with your palm.
- Using a stack, make wide longitudinal grooves on the pumpkin, starting from the top center point.
- From the green mass, mold 2 flat cakes and use a stack to cut out leaves from them. You should also make thin long sausages and a small stalk.
- Attach a stalk to the pumpkin, and then attach leaves and curved tendrils to it.
Mushroom
For modeling you will need:
- plasticine in white, brown and green shades;
- stack;
- toothpick;
- modeling board.
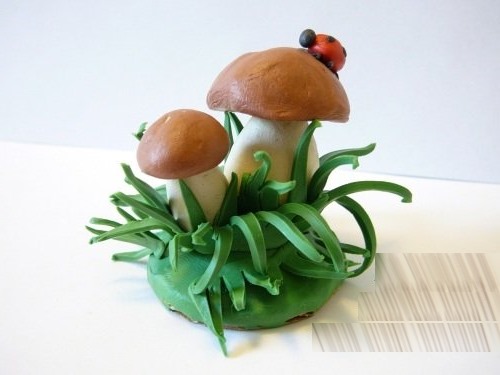
Step by step description:
- Press a ball of brown plasticine onto the board and press with your fingers on the piece from all sides, forming the mushroom cap.
- Attach a white flat cake to the flat side of the piece and use a toothpick to poke holes in it, creating a porous structure for the bottom of the cap.
- Pull a white piece of plasticine into the stem of the mushroom, making its lower part thicker. Roll green plasticine grass stems and attach them to the base of the stem.
- Attach the stem to the mushroom cap.
Eggplant
Necessary materials and tools:
- purple and green plasticine;
- stack;
- modeling board.
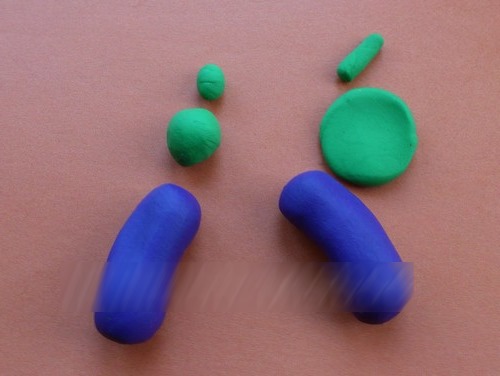
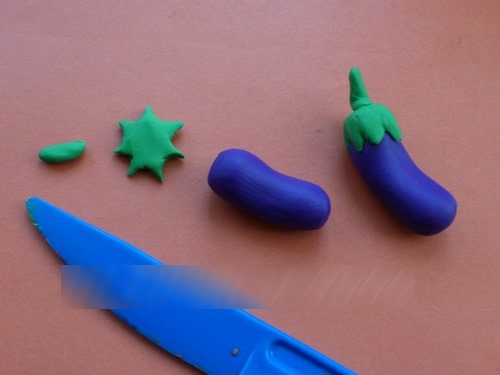
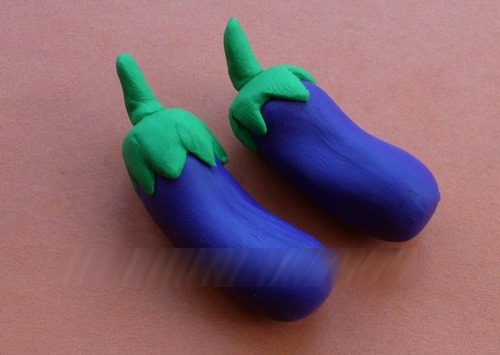
Step by step description:
- Press the ball of purple mass onto the board and make an oval eggplant blank out of it, one part of which should be narrower than the other. Then slightly bend the fruit.
- Use a stack to cut out a star-shaped sepal from the green flatbread. Also mold a small stick.
- Attach the sepal to the narrow part of the eggplant, then glue the stalk.
Basket with vegetables
Modeling from plasticine of the 1st class should include compositions of several three-dimensional figures. A suitable option is a basket with vegetables.
To make it you will need:
- plasticine set;
- stack;
- modeling board.
Step by step description:
- Make the base of the basket. To do this, flatten a brown plasticine ball. Then attach 5 sticks perpendicular to the bottom.
- Roll several thin sausages from the brown mass and alternately weave them between the sticks, starting from the base and moving towards the top of the basket.
- Make the handle of the product. You should intertwine 2 thin sausages. Then bend the handle and attach its ends to the basket.
- Make carrots from orange plasticine. It is necessary to give the mass an oval shape, then sharpen one end. Using a stack, draw short grooves, and cut out leaves from green plasticine.
- Form potatoes from the beige mass. The balls should be slightly lengthened and grooves should be marked with a stack.
- Make cucumbers by rolling short green sausages.
- Fill the basket with vegetables.
Machine
To work you will need:
- plasticine in blue, white, yellow and black colors;
- stack;
- modeling board.
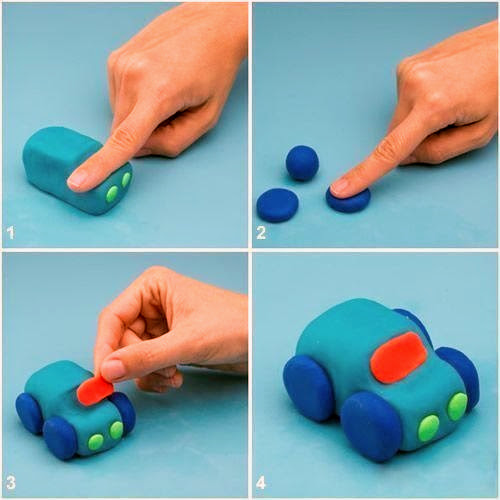
Step by step description:
- Mold a rectangular parallelepiped from the blue mass, carefully smooth out the edges and corners. Press one of the sides with your fingers to make the hood. The other side should be rounded and form the body.
- Make black wheels by pressing 4 balls to the board. Stick them to the base of the car.
- Form a thin oval pancake from white plasticine for the windshield, and attach 4 yellow balls in place of the car headlights.
Airplane
Necessary materials and tools:
- plasticine in yellow and blue shades;
- modeling board.
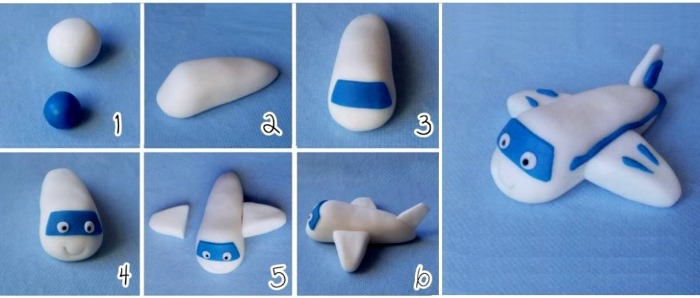
Step by step description:
- Make the body of the plane from the yellow mass. To do this, you need to turn the rolled ball into a long piece resembling a fish. Press the end of the wide part with your finger and form a recess.
- Make the tail of the unit from blue plasticine. Roll 3 balls, flatten them into a pancake and cut out triangles with a stack. Attach the parts to the sharp part of the cone.
- Similarly, make 2 triangular wings and attach them to both sides of the plane.
- Make a blue oval cake and stick it on the windshield, and 6 circles in place of the portholes.
Classes in the 1st grade should teach children to combine different techniques of plasticine modeling, convey the characteristic features of form, details and proportions, and also give students positive emotions and expand their horizons.
Author: Inna Chaplich
Article formatting:Natalie Podolskaya
Video about modeling from plasticine
Plasticine modeling for children: