Scissors appeared about 3.5 thousand years ago. They are a device used to cut thin fabrics and materials. In addition to their main purpose, scissors are widely used in everyday life: they can be used to tighten screws, and also used in cooking - as an auxiliary tool.
Drawing scissors is quite simple - both adults and children can handle the step-by-step process.
Pencil drawing
Scissors (drawing for children in pencil) are used in various spheres of life. There are many types of scissors, including: paper scissors, hair scissors, manicure scissors, dressmakers' scissors, garden scissors, surgical scissors, culinary scissors and others.
Pencils, paper and supplies
To draw scissors you will need:
- sheet of paper;
- eraser;
- sharpener;
- simple pencil.
If desired, you can use scissors as a template. The tool must be applied to the paper and traced with a simple pencil, and then the resulting base must be detailed.
Step by step process of execution
Drawing scissors with a pencil is quite simple:
- On a thick sheet of paper, using a compass or any other round-shaped elements, draw 2 circles of different diameters. The distance between the geometric figures should be about 1 cm.
- Inside each circle, draw another circle of a smaller diameter.
- From the circle of larger diameter, draw a diagonal line, and, stepping back a small distance, draw a parallel line that is slightly longer than the previous one.
- Connect the ends of these lines with a straight line. This will create sharpened blades of scissors.
- On the other hand, perform similar manipulations to create another blade.
- When creating another blade, you need to take into account that the elements overlap each other. Using an eraser, remove the lines running along the top of the previously drawn element.
- Draw a small nail at the junction. It looks like 2 semi-ovals.
This version of the drawing is suitable for small children, since in the process of execution there is no need to draw elements manually, and add light and shadow.
Step by step process of execution
Older children can also draw scissors with a pencil.
The step-by-step process of completing the drawing will be a little more complicated than in the previous version:
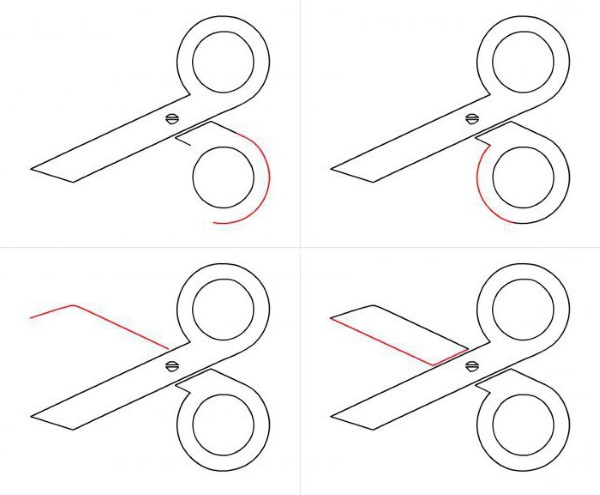
| Stage | Description of the stage | Image |
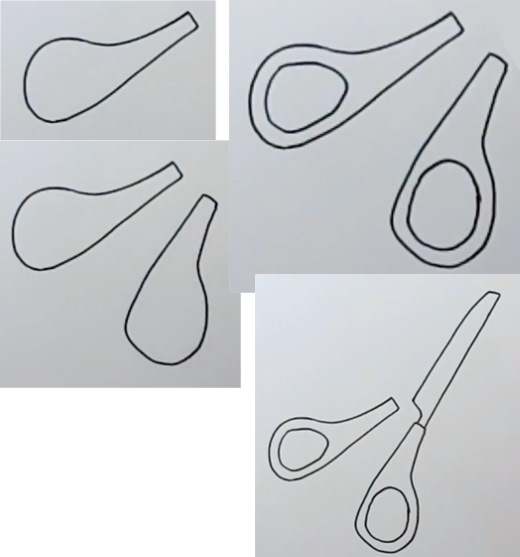
| 1 | First, let's look at the tool itself and its parts. The scissors consist of 2 blades and a hole for the fingers, as well as a nail. On a white sheet of paper, draw one of the blades and add a rounded element to represent the finger hole. When working, use rectangular shapes and add an oval to get a similar image. | 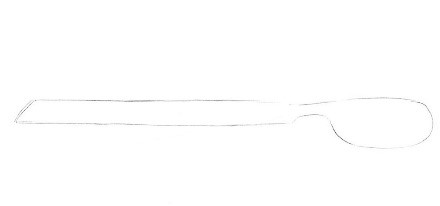 |
| 2 | When the first blade is ready, draw the other half of the scissors. In this case, you need to watch the arrangement of the elements, since part of the drawing overlaps the previous one.
When working, it is important to use light lines that can be later removed with an eraser without damaging the resulting image. | 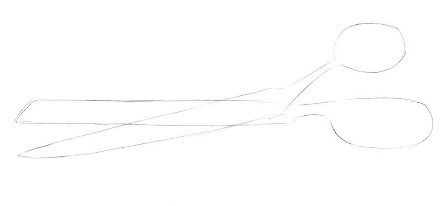 |
| 3 | Using clear, straight lines, draw out the blades of the scissors to create a sharp angle. It is also important to make the image more voluminous, so you need to add additional lines that will indicate the thickness of the elements. At the junction of the blades, in the upper part of the drawing, draw a voluminous screw that fastens the elements of the device. | 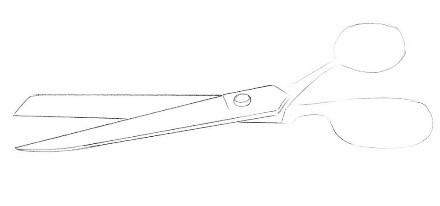 |
| 4 | Using the same clear lines, draw the holes for the fingers. They can be either oval or perfectly round, different in diameter or similar - depending on the type of scissors. | 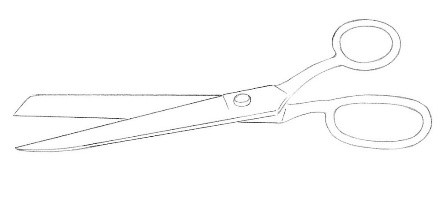 |
| 5 | Using hatching techniques, fill in the resulting drawing with small dots and light strokes in the shadow areas. Use a pencil to fill in the finger holes and the sides of the scissors.
The shadow not only creates a more natural look for the resulting image, but also conveys the texture of the object. A simple pencil is used for shading. | 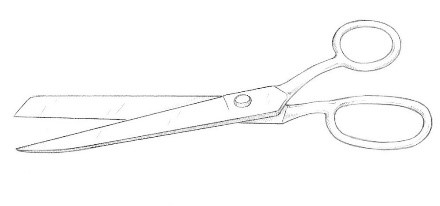 |
In the process of doing the work, you can use different types of scissors as an example. Depending on the area of application, the finger hole and blades of the scissors change. In this case, tailor's scissors are presented.
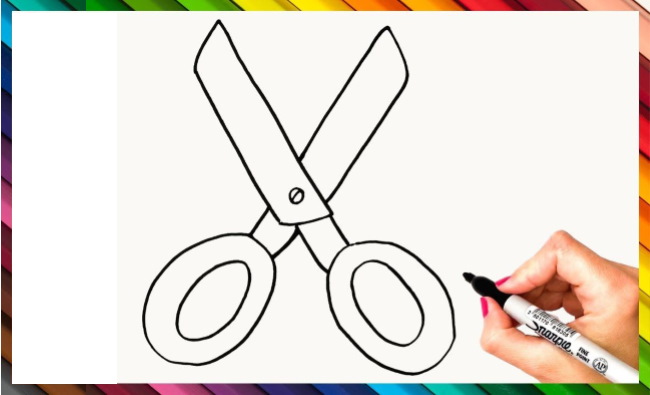
With colored pencils
Scissors (picture for children) can be colored with colored pencils. This option is suitable for children 2-4 years old, as pencils are easy to use, do not stain clothes and space, and are easy to apply.
Pencils, paper and supplies
To complete the work you will need:
- a set of colored pencils (you can use small sets of 4-6 shades, or use a large range of colors);
- simple pencil;
- black marker;
- white sheet of paper.
Several blank sheets may be required during the course of the work.
Step by step process of execution
Stages of work execution:
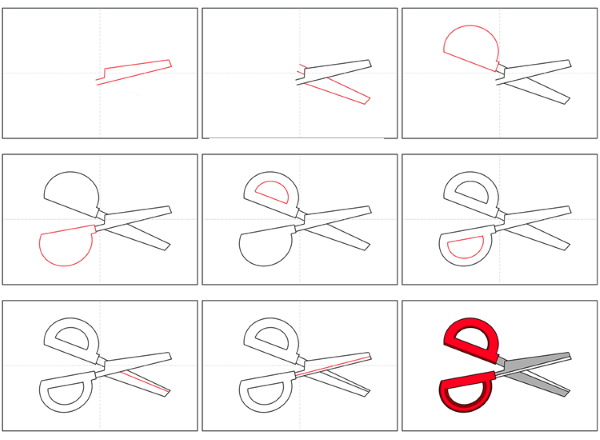
- On a clean sheet of paper, draw a figure resembling a drop with a straight start. This element should deviate more to the left side and have a flat edge on the right side. In this way, you can form the ears of the scissors.
- Similarly, draw another eyelet on the right side of the drawing. In this case, you need to create a larger deviation to the right side and a flat left edge.
- Inside each drawn element, draw small ovals that will form the holes for the fingers. You can use a compass to create perfectly even circles.
- Working with the upper part of the previously drawn ears, draw an elongated uneven rectangle from the beginning of the drawn drops, resembling a knife in shape.
- From the other eyelet, also draw another blade so that they are crossed. At the junction of several blades, depict a small oval screw that fastens both elements.
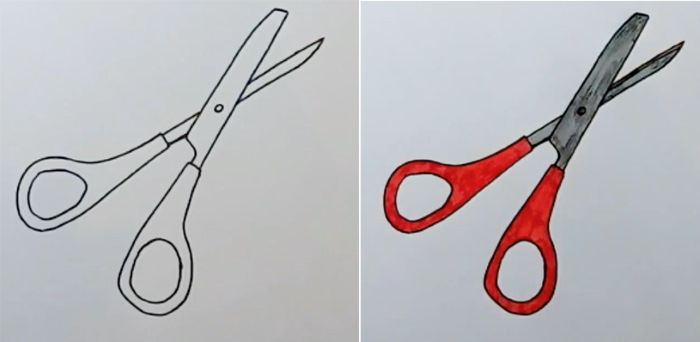
- The main template is ready. Color the large details of the drawing with a felt-tip pen along the outline.
- Fill in the ears of the scissors with red (or any bright pencil), without touching the finger holes.
- Using active movements, pressing on the pencil, paint the screw that holds the blades together black.
- Using any hatching methods (or chaotic movements), fill the blades with a black pencil. You only need to press lightly on the lead to get a gray shade.
For greater brightness, you can duplicate all the colors, or color the resulting image with felt-tip pens. In the process of doing the work, you can use watercolor pencils. The difference between watercolor pencils and regular ones is in the lead.
The lead is made of pressed watercolor paint. This pencil creates softer and brighter lines.
When working with such material, it is necessary to use the following recommendations:
- you need to use thick paper. First you need to fix the sheet on an easel or tablet;
- Working with watercolour pencils requires subsequent blurring of the paint. For this, soft and thin brushes are used, with which the paint is spread over the entire surface of the sheet;
- it is necessary to blur from light areas to darker ones;
- to leave denser and clearer lines, they need to be blurred with a small amount of water;
- When the drawing is ready, it is necessary to dry the sheet completely so as not to spread the paint;
- Once the drawing has dried, it is necessary to draw small details using well-sharpened watercolor pencils.
Working with watercolor pencils is suitable for older children, as it requires perseverance and attention.
Gouache
Scissors (a drawing for children in gouache) can be drawn in a closed position. In this version, simpler shapes are used than in the previous ones.
Pencils, paper and supplies
To complete the work you will need:
- simple pencil;
- gouache set;
- palette;
- brushes and brush accessories;
- a thick sheet of white paper.
When working with paint, it is necessary to study the safety precautions and rules for using the material.
Step by step process of execution
Step-by-step process of completing the work:
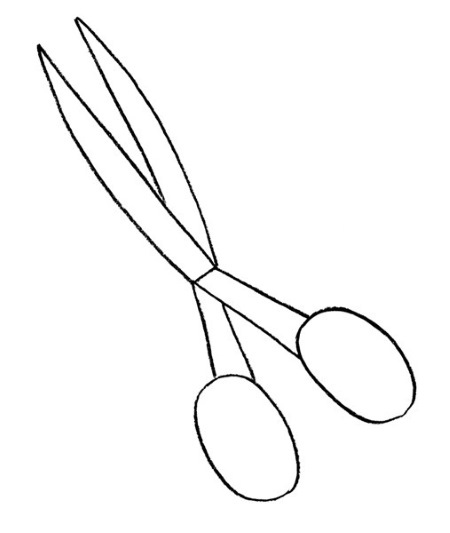
- On a sheet of paper, draw 2 ovals that fit tightly together. In doing so, you need to observe the sizes of the figures - the diameter must be the same.
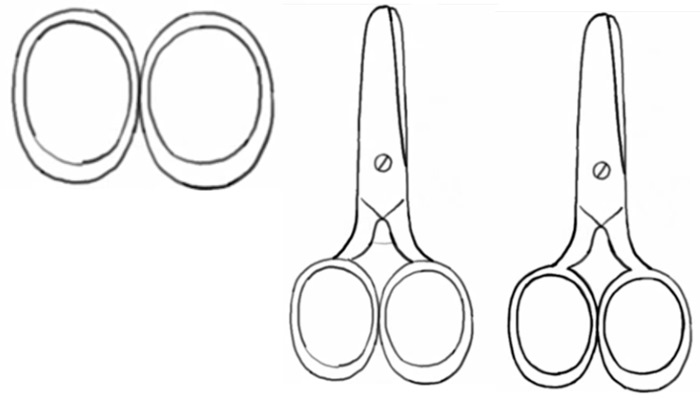
- Inside each oval, add a smaller shape to form holes for the fingers.
- From the resulting elements draw a long blade. In shape it resembles an oblong oval, which separates into 2 sides closer to the beginning.
- When working with this element, you must refer to the presented image.
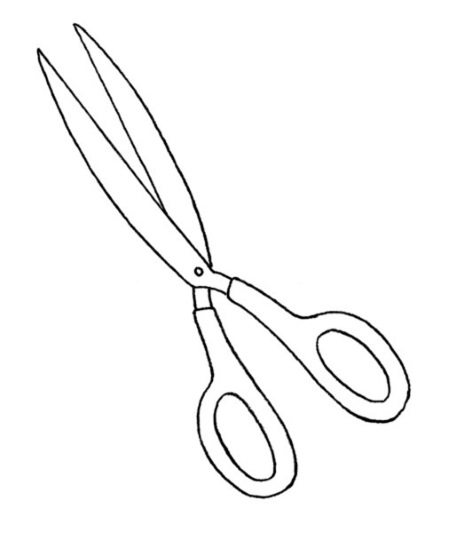
- When the blades are ready, draw a small circle at the junction of the blades and divide it in half.
- Using an eraser, remove unnecessary elements from the resulting drawing. The basic shape of the scissors can be duplicated using a well-sharpened pencil or a black felt-tip pen.
- Mix a small amount of black and white paint on a prepared palette. Add a little water to the resulting mass and stir until you get a creamy consistency.
- Fill the entire surface of the blades with the resulting gray shade, without affecting the screw area.
- The paint should be applied in a light layer so that it does not crumble during the drying process.
- Also, you shouldn’t make the shade dark, as the paint may darken during the drying process and spoil the overall picture.
- Paint the finger rings with a bright shade (green or blue). It is best to use a thin brush.
- Using a small, thin brush, load it with black paint and trace the outline of the scissors, and also paint over the screw on the blades of the scissors.
If desired, you can use the remaining amount of gray shade, mixing it with more liquid. The resulting watery mass can be spread (depending on the light in the picture), creating a slight shadow.
Step by step process of execution
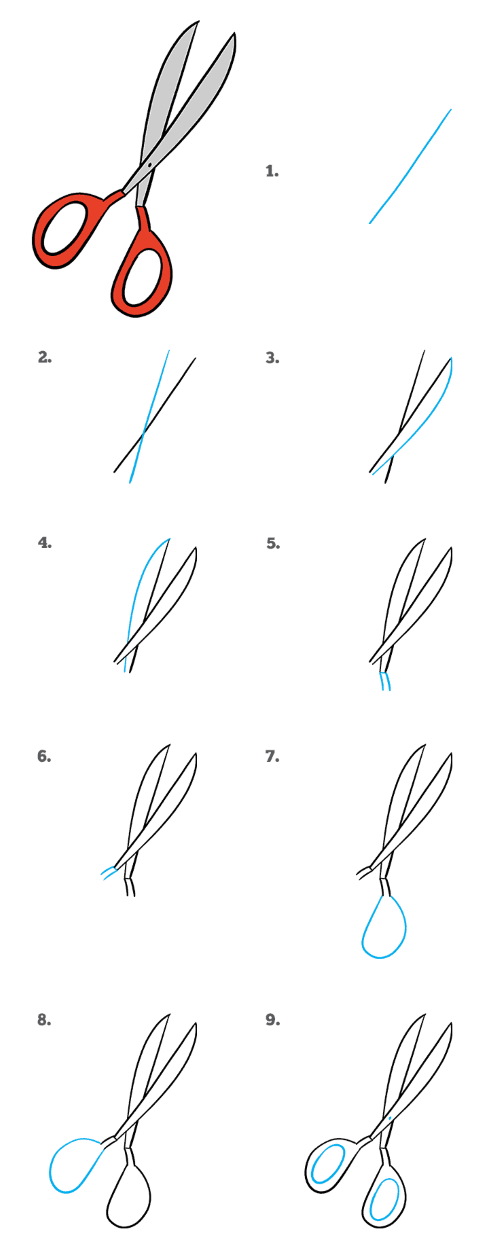
You can also draw scissors much more simply:
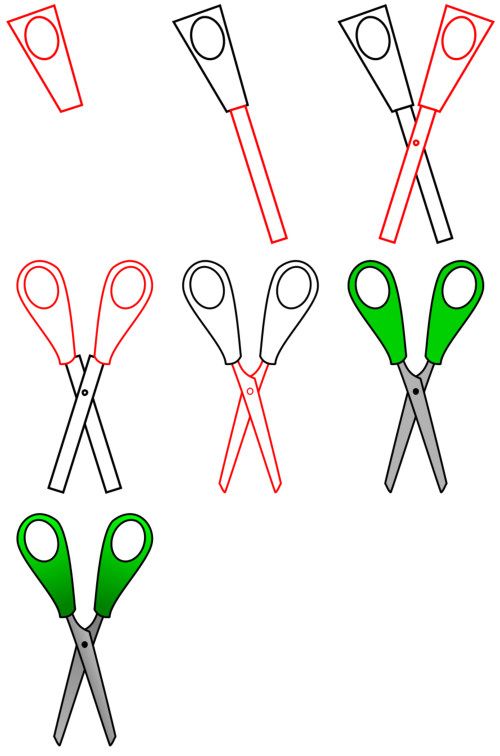
- On a clean sheet of paper, draw a visual vertical line. Along this vertical line, draw a long line that smoothly turns into a small oval.
- On the left side, add an arched line - as shown in the picture, and then form a ring with a circle inside. This way, you can get one of the parts of the scissors.
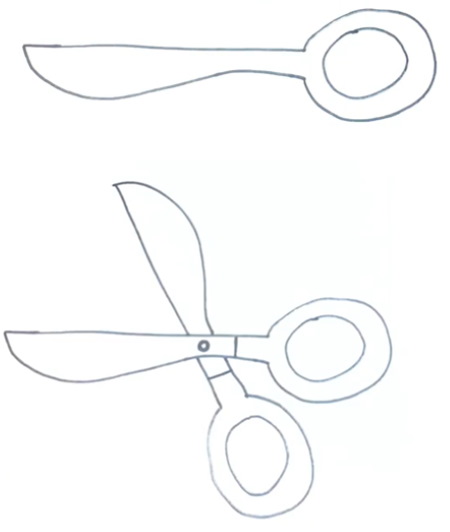
- Using the same technique, draw the rest of the scissors in a different position.
- At the junction of the blades, add a round element, which will act as a fastening screw.
- Use small lines to separate the blade areas from the scissor eye area.
- By mixing a small amount of white and black paint on a palette and adding a little water until you get a creamy consistency, you can get a light gray shade.
- Spread the resulting mass over the surface of the scissor blades.
- Using a bright paint as an accent, apply a red, blue or green shade to the ears of the scissors.
- Using a thin brush, pick up a small amount of black paint and spread it over the outline of the drawing, and also draw a nail on the blade.
When drawing this image, you can use rulers and a compass to make the lines more even.
Watercolor
Scissors (watercolor drawing for children) can be depicted in more detail, observing all the rules of light and shadow. Such an image will turn out more natural and neat.
Pencils, paper and supplies
When working on a drawing, you will need the following set of tools:
- watercolor paints;
- palette;
- easel;
- a sheet of thick white paper;
- sharpener;
- eraser;
- simple pencil.
Also, during the process of doing the work, it is necessary to follow the rules for using watercolor paint.
Rules for working with watercolors:
- When working with watercolors, it is necessary to use clean brushes that do not have a large amount of liquid on them;
- if the paint turns out too watery, it will mix when interacting with other shades;
- after finishing working with watercolors, it is necessary to thoroughly rinse the brush and dry it with a napkin or cloth;
- With watercolor you can achieve a darker or lighter shade using water or black paint.
Also, the technique of drawing plays a big role when working with watercolors. There are more than 7 different techniques that are recommended for children to use.
Step by step process of execution
Stages of work execution:
- On a clean sheet of paper, in the lower part of the space, draw 2 elongated ovals. The distance between them should not be more than 0.5 of the size of the figures. It is also necessary to observe the location of the ovals - they should be slightly inclined to each other.
- From the upper part, as shown in the figure, draw a rectangle that narrows as it moves away from the oval.
- Using slightly curved lines, draw the blades of the scissors, tapering to a point. The tips of the scissors should be on the same line with the inner edge of the previously drawn circles.
- Inside each oval, draw a figure of the same type, but of a smaller diameter. Using smooth lines, connect the ovals and rectangles to get the ears of the scissors.
- At the junction of the blades, add a small rounded dot, which will represent the screw that secures the blades.
- When working, it is important to apply light pressure on the pencil so as not to leave obvious traces of the lead.
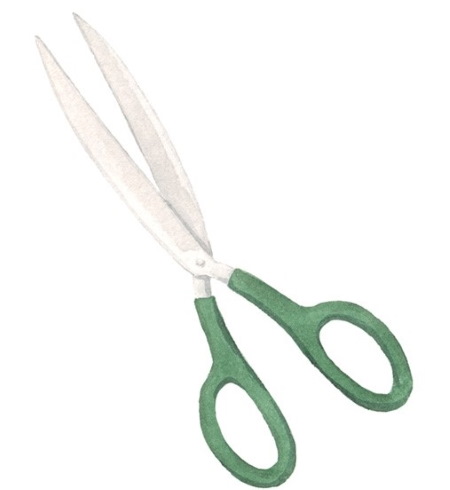
- Take a small amount of white paint on a medium-sized brush. Lightly distribute the resulting mass over the surface of the scissors blades.
- Do the same with green paint, spreading it over the surface of the scissors ears.
- When the paint has dried slightly, mix a small amount of black, brown and white until you get a light beige shade. Spread the resulting mass over the surface of the scissors blades, leaving a little white paint in the glare areas.
- After mixing paint on the palette to obtain a gray shade, go over the edge of the screw with a thin brush, as well as the edges of the scissors in some places - as shown in the picture.
- After slightly darkening the green color, apply the resulting shade along the inside of the finger holes, as well as along the inner edges of the scissors ears, to create a three-dimensional effect for the resulting design.
- The finished image must be dried.
You can use other colors as you go along. The scissors of today and the ancient device have almost nothing in common. It is believed that the oldest scissors were discovered in Egypt. They are tweezers made of fastened blades with Egyptian hieroglyphs depicted on their surface.
The most common form of scissors can be found in the Middle East in the 12th century: a small blade and a long handle decorated with ornaments and figures. You can draw similar historical options, as well as classic scissors, using step-by-step instructions. The article presents various options for children of different ages.
Video about drawing
Scissors drawing for kids: