For beginner needlewomen, the task of knitting such a product as a blanket seems impossible. However, having an idea of the quality of the material for work, the types of knitting, the types of creativity from scraps of yarn or fabric, the simplest knitting patterns, getting the thing of your dreams is not difficult even for amateurs who have recently decided to try their hand at this activity.
The right choice of yarn and knitting needles
When choosing a material for knitting, it is worth first deciding for what purpose the resulting product is planned to be used. To work on a blanket for a newborn, It is necessary to make sure that the threads are hypoallergenic and as natural as possible and, as a consequence, the presence of pleasant sensations when in contact with the body.
In this case, merino wool would be the ideal choice. It is hypoallergenic, non-prickly, warm, soft and does not require special care. When choosing yarn for a product designed to protect a sofa from wear and tear, It is important to pay attention to the strength and density of the threads.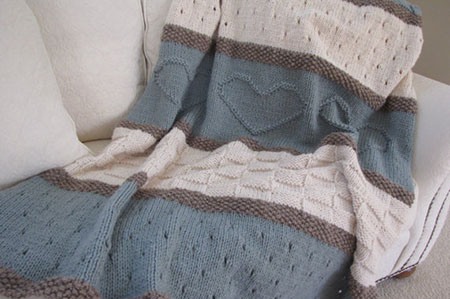
To obtain a warm, damage-resistant and able to minimize the risk of damage to furniture, the best choice would be high-quality acrylic. When knitting a blanket used as a blanket, when choosing threads, it is worth deciding on the time of year when it will be used most often.
If you need to cover yourself with the resulting product in winter, it is best to use wool or cashmere yarn.
The above-mentioned types guarantee not only heat retention in the cold season, but also pleasant sensations when they touch the body. For the summer version, it is better to use cotton threads. It is worth considering the fact that a blanket made entirely of cotton may be too stiff.
To avoid getting an uncomfortable product, it is recommended to knit from combined yarn: cotton + acrylic in a ratio of 50:50. When studying the question of how to knit a blanket with knitting needles, the principle of choosing the tools used may become unclear for beginners. Here again, everything depends on the intended pattern on the product, the purchased yarn, and so on.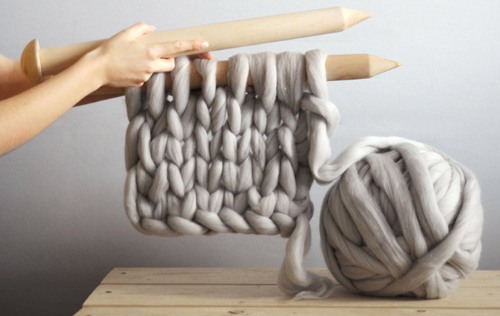
The most common patterns for knitting blankets are using circular needles No. 7,3.5,5 and straight needles No. 6,3.5,2.5,3. These types are the most suitable for obtaining the required density of the product and are easy to use even for beginners.
It is important to pay attention to the manufacturer's notes. selected threads and the preferred knitting needles for working with them, indicated on the label.
Methods of knitting a blanket
Before starting work, it is worth understanding the basic statement: a blanket can be a product made by connecting separately connected elements or be a single piece of fabric. Such connecting parts can be the simplest geometric figures (square, rhombus, triangle, etc.) or unusual details (zigzag, braid, etc.).
For beginner needlewomen, the most optimal in terms of complexity and labor intensity will be creating a canvas from squares or knitting a whole blanket.
Technique for knitting a whole blanket:
- There should be an odd number of loops on the knitting needles.
- Work the first row completely using the classic knit stitch method.
- Turn the product over and knit a row of knit stitches again.
- When starting work on the third stage of knitting, it is necessary to remove the loop intended for creating the edge and knit it with a front loop using the method for the front wall.
- Slip the yarn without knitting from the front of the stitch.
- In this way, knit the entire row and turn the knitting over.
- In the 4th row, remove the edge loop and knit the first loop purlwise behind the front wall.
- Slip the yarn without knitting, leaving the yarn behind the loop.
- Knit the fourth row in a similar manner.
- Knit rows 5 and 6 with knit stitches.
- Knit rows 7 and 8 as in rows 3 and 4.
- Alternating the techniques described above, repeat until you get the product of the required size.
- Close the loops.
Technique of knitting a composite fabric:
- Cast on an odd number of stitches.
- Calculate the size of the side of the square (the side is equal to half the length of the typesetting row).
- Work the entire first row with knit stitches.
- The second and all other rows, multiples of two, located on the front side, knit with front loops, connecting the middle 3 loops of the row, leaving the one in the middle on top.
- The 3rd and all other odd rows (wrong side) are knitted, leaving the loop obtained from joining the three in the previous step unknitted.
- Continue the algorithm until the last 3 loops remain on the needle.
- Knit them together with a front loop.
- Break the thread, pass the end through the last loop, and tighten.
- In this way, create the required number of squares, then sew them together.
Using circular knitting needles
This type of knitting needles is used when it is necessary to obtain a seamless product or when regular knitting needles are not long enough.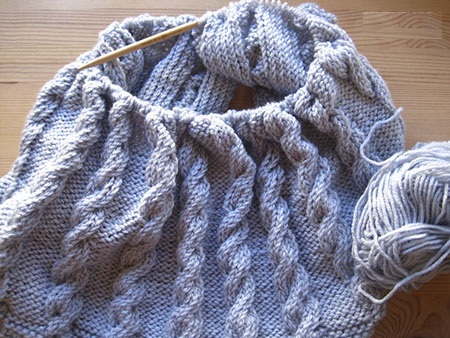
The principle of circular knitting:
- Cast on the number of loops corresponding to the size of the intended blanket.
- The knitting needle with the last loop cast on should be in your right hand, and the first one in your left hand.
- Knit the loops together, alternating, for example, 2 front and 2 back loops, dropping the excess loops that interfere with knitting onto the fishing line between the knitting needles.
- Repeat this knitting algorithm until you get the required size of the product.
- Close the loops.
When using circular knitting needles, it is important to keep in mind that this usually only creates the front side of the blanket.
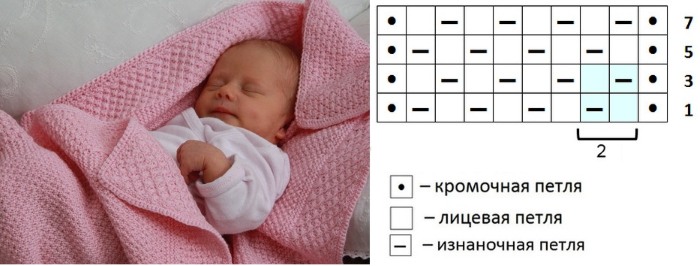
How to knit a blanket for a newborn
The question of how to knit a blanket with knitting needles for beginners will disappear after studying the following diagrams for creating a product for a newborn using the "big tangle" method:
- Cast on the number of loops corresponding to the size of the intended blanket.
- Knit several rows of garter stitch, turning the piece over one by one (front rows only).
- Remove the edge loop, knit the same number of stitches as the stitches cast on in the previous step.
- Knit the rest of the row, alternating purl and knit stitches, finishing the row with the same number of knit stitches as in the previous step.
- Turn the product over and repeat the above-described pattern for creating a row.
- Follow the algorithm until you get the required size of the product.
- Close the loops.
How to knit a baby blanket
Scheme:
- Cast on 175 stitches.
- Knit 11 rows in garter stitch as described above.
- Knit the first stitch through the back wall.
- Make 11 knit stitches, yarn over, 18 knit stitches.
- Repeat point 4 8 times, continuing with a yarn over, 13 knit stitches, a yarn over, 7 knit stitches.
- Knit 7 stitches on each side of the next row, then create the selected pattern using a separate pattern.
- Create 264 rows.
- Close the loops.
How to knit a plush blanket with knitting needles
Knitting a plush blanket, as well as creating other knitting items, can be a completely feasible task for beginners who have learned the basics of knitting.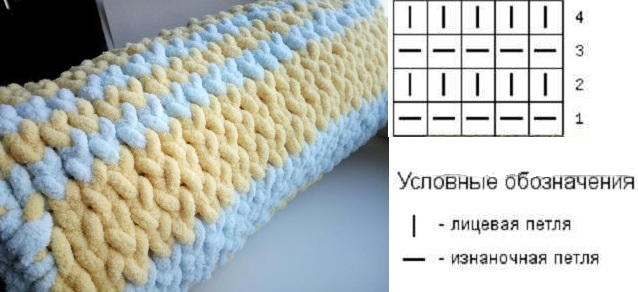
The simplest algorithm for knitting a plush blanket:
- Cast on the number of loops corresponding to the size of the intended blanket.
- Remove the loop used to create a straight edge.
- Knit the first row with knit stitches, ending with a purl stitch.
- Make 4 front loops for the border (repeat in each subsequent row at the beginning and end).
- Knit a row with purl stitches.
- Turn the product over and knit a row with front loops.
- Repeat the 4 rows described until you get the required size of the product.
- Close the loops.
A product made of multi-colored stripes and squares
Knitting pattern for a blanket made of multi-colored stripes:
- Cast on 34 stitches.
- From 1 to 7, all odd rows of the product must contain: 4 purl and 6 knit stitches repeated along the entire length. Finish each row with 4 purl stitches.
- Second and all other rows that are multiples of two: alternate 1 knit, 1 purl stitch. It is important to move the pattern in every 2nd rapport (repeating part of the pattern) by one stitch.
- In the ninth row, knit 4 purl stitches (3 loops should be on the auxiliary tool), 3 face loops. Knit the loops left on the “assisting” needle.
- Repeat step 4 along the entire length of the piece. Finish the row with four knit stitches.
- Repeat the third point.
To understand how to knit a blanket with knitting needles for beginners, you need to familiarize yourself in detail with the knitting technique. - Close the loops.
- Knit several strips using the described pattern.
- Sew the resulting parts together using a knitted stitch.
A detailed pattern for knitting a blanket from squares can be found in the section on methods for knitting a blanket.
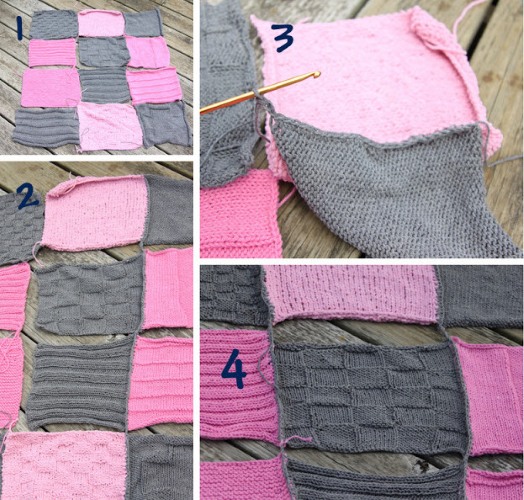
Patchwork blanket
How to knit a blanket with knitting needles is already clear enough for beginners to begin learning how to create a blanket in the patchwork style (in addition to sewing the knitted parts described above, this term also implies connecting elements, usually geometric shapes, made from pre-prepared patches).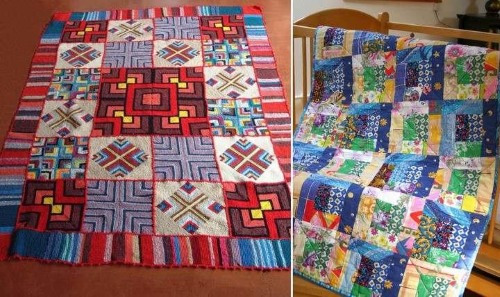
Scheme:
- Cut 2 strips of the same width from the pre-prepared fabric.
- Place one on top of the other, stitch along one edge.
- Cut out a strip of a different color, equal in width to the two previous ones together.
- Place the narrower strips face to face and sew the third strip onto them on both sides.
- Cut out isosceles triangles, unfolding them to form squares.
- Lay out the resulting pieces in any way (zigzag, snake, diamonds, etc.).
- Sew the pieces together. Iron the seams.
A blanket made from fabrics of different sizes, sewn with contrasting threads
Knitting a blanket with knitting needles is not the only option for beginners to get a unique product made with their own hands. For this work, you will need several skeins of yarn (the amount depends on the size and purpose) and 3 skeins of woolen threads, contrasting to the main color, to tie the canvases together.
Scheme:
- Cast on stitches onto the knitting needle.
- Remove the first (edge) loop.
- Knit a row with face stitches.
- The last stitch in the row should be a purl stitch. Pass the knitting needle behind the stitch, catching the thread located in front.
- Turn the product over and knit the second row in the same way.
- Knit according to this pattern until you get the required size of the future blanket element.
- Close the loops.
- In a similar manner, create several pieces of different sizes.
- Connect the parts using a contrasting thread threaded into a needle. Sew the parts along the edge, hooking the loops under the edge row, without tightening too much.
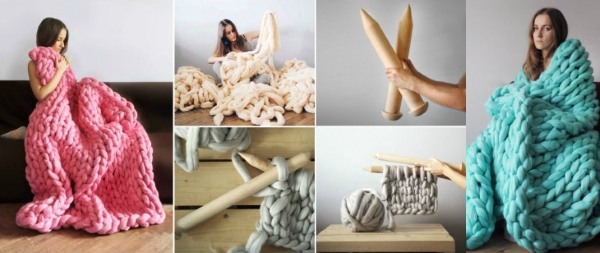
Methods of knitting with large knitting
When you see a large knit product, the question of how to knit a blanket with knitting needles immediately arises in your head. For beginners, it is important to know that in addition to using special giant wooden knitting needles, which are most often sold in online stores, you can create a large knit blanket with your own hands.
In addition to knitting tools, in this particular case, the needlewoman will also need special bulky merino wool yarn.
In the following volumetric diagrams, abbreviations will be used for ease of perception:
- pt (loop(s),
- lpt (front loop(s),
- kpt (edge loop(s),
- ipt (purl stitch(es).
Scheme:
- Cast on the number of working points corresponding to the desired dimensions of the product.
- Remove the first classic KPT.
- Knit a row of lpt.
- Turn the knitting over.
- Repeat steps 2,3.
- Knit using this algorithm until you get a blanket of the required size.
- Close the knitted sts.
Blanket from leftover yarn
Having figured out how to knit a blanket with knitting needles, the next logical question for beginners will be what to do with the remaining yarn.
Surprisingly, such leftovers can be used to make bedspreads, blankets, and throws.
Scheme:
- Cast on any number of sts onto the needles.
- Knit the strip using any method described above.
- Similarly, make the maximum number of multi-colored stripes - the components of the future blanket.
- Connect the stripes together, connecting the edge part of the elements with contrasting threads, picking up and connecting the existing sts under the edge.
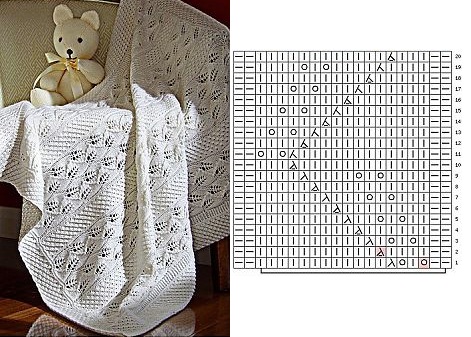
Plaid with openwork patterns
To create the simplest openwork pattern (8 stitches repeat, including edge stitches) on a blanket, you need:
- Cast on 32 sts.
- At the beginning of each row, remove 1 st.
- The first row should consist entirely of free and stretched upwards.
- Start the 2nd row by knitting 5 stitches together (from left to right).
- Without tightening the resulting stitch, put it on the knitting needle and knit the front stitch, then remove the loops.
- Repeat steps 4 through 5 4 times.
- Next comes 1 lpt.
- Repeat this algorithm five times, given in the fourth and fifth points.
- Until the end of the row, alternately knit 1 st and 5 sts together five times.
- At the end of the row there should be 1 lpt, 1 standard kpt.
- Turn the product over.
- Row 3: Make completely knit stitches.
- Row 4, similar to row 3, knit lpt.
- Row 5 must be knitted with the same elongated stitches as the first row.
- At the beginning of the 6th row, as in the previous rows, remove the st.
- Knit 2 sts together, placing the resulting st on the left needle. Knit lst. Slip the remaining sts.
- The next step is to make 1 lpt and then recreate the 5 pt rapport 5 times. Then knit 1 lpt and again repeat the actions described in points 4 and 5 5 times.
- You need to finish the row with 1 sl st, 3 sl sts knitted together 3 times and 1 standard sl st.
- Rows 7 and 8 are knitted entirely with knit stitches.
- Repeat the given algorithm until you get an openwork pattern of the required size.
- Close created pt.
Using braids and harnesses
When creating a blanket with additional elements, you should use any of the above methods in the main knitting, and in some places adhere to a certain algorithm for creating a pattern (braids, plaits).
To decorate the product with a “slanted” pattern:
- Cast on a number of loops corresponding to the size of the intended blanket pattern.
- Remove the first KPT.
- Knit first the second st, then the first st.
- "Throw" the stitch onto the knitting needles.
- Repeat the above steps to obtain a second thin braid, but knit the lpt not one st at a time, but two: first the two furthest ones, then the closest ones.
- Slip st onto needle.
- Repeat step 3.
- Repeat until you get the desired number of braids in the product pattern.
- Complete the row with ipt.
- Close Fri.
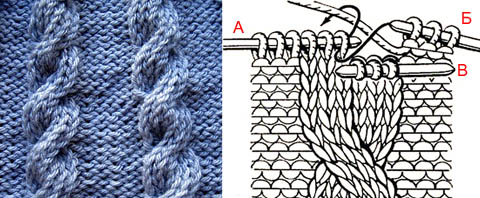
To create “strands” on the blanket:
- Cast on 28 sts, including 2 sts.
- From the first to the eighth row - 2 purl loops, 2 - opposite sts alternately throughout the entire row.
- Row 9: 2 purl stitches, 2 opposite stitches, 2 purl stitches. Drop 8 stitches onto a side needle and leave behind work. Work 6 stitches from left needle: 2 knit stitches, 2 opposite stitches, 2 knit stitches. Return the remaining stitches to the needle and knit: 2 purl stitches, 2 knit stitches, 2 purl stitches, 2 knit stitches. Finish the row by knitting: 2 purl stitches, 2 knit stitches, 2 purl stitches.
- Rows 10-16: repeat step 2.
- Row 17: 2 purl stitches, 2 knit stitches, 2 purl stitches. Skip 8 sts and insert the needle into the next 6 sts. Remove all sts from the left needle, picking up the remaining sts. Complete the row: 2 lpt, 2 ipt, 2 lpt, 2 ipt, 2 lpt, 2 ipt, 2 lpt, 1 ipt.
- Rows 18-25 repeat point 2.
- Repeat the above sequence of actions until you obtain the required size of the cord pattern on the product.
- Close the loops.
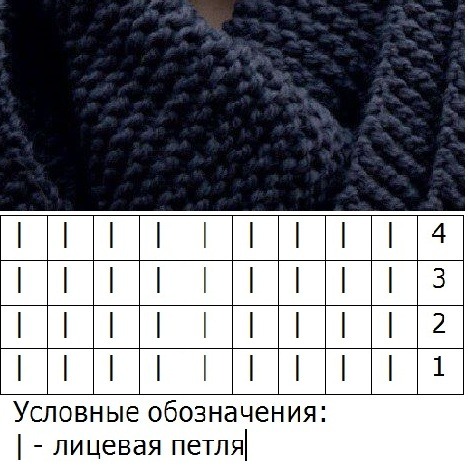
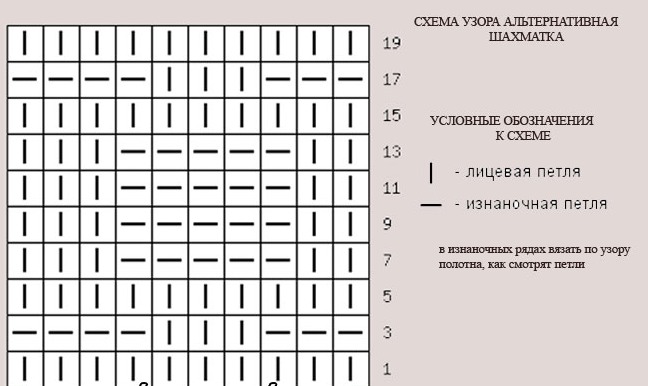
How to knit a blanket with a relief pattern of front and back loops
To create a simple checkerboard pattern on a blanket (pattern repeat is 14 rows):
- Cast on the number of loops corresponding to the required size.
- The first row includes: 6 knit stitches, 5 purl stitches behind the back wall, 5 knit stitches, 5 purl stitches, 5 knit stitches, 1 purl stitch.
- Go to the reverse side of knitting.
- The second row should contain: 1 knit stitch, then knit stitches throughout the entire row.
- The third, fifth, seventh rows must be worked in the same way as the first.
- In the fourth and sixth rows, repeat the sequence of sts knitted in the 2nd row.
- Row 8: 6 lpt, 5 ipt behind the back wall, 5 lpt, 5 ipt, 5 lpt, 1 ipt.
- Turn the product over.
- Row 9 should consist entirely of lpt.
- Knit rows 10, 12, 14 based on the pattern of row 8.
- Rows 11, 13 repeat 9.
- Repeat this algorithm until you get the required size of the pattern on the blanket.
- Close the loops.
Technique of bias knitting
To create a diagonal pattern on a knitted blanket, you need:
- Cast on a number of loops corresponding to the size of the product. It is important to keep in mind that this figure should be a multiple of four (plus 1 loop at the end for the edge).
- The first row should be worked from the front side: 1 knit, 3 sts together, knit together, yarn over, 3 sts, knit together. Drop all sts from the left needle. Next: 1 knit, 3 sts together, knit together, yarn over, 3 sts, knit together, 1 knit.
- Continue knitting to the end of the row, following the given algorithm.
- Row 2 should be completely knitted with ipt.
- Row 3 from the front side: 2 knit stitches, 3 sts together, knit stitches, yarn over, 3 sts together, knit stitches. Discard all available sts. Next: 1 knit stitch, 3 sts together, knit stitches, yarn over, 3 sts together, knit stitches, 1 knit stitch.
- Repeat the suggested sequence of stages of skew knitting until there are no “extra” sts that do not fit the rapport. Knit the remaining sts as lpt.
- Turn the product over.
- Knit the 4th row with classic ipt.
- Turn the knitting over to the front side.
- Row 5: 3 lpt, 3 sts, knitted together lpt, 1 lpt. Repeat until there are sts remaining that are not part of the pattern. Knit the “extra” sts as lpts.
- Turn the product over.
- Row 6: Make all purl stitches.
- Row 7 (front side): repeat (3 sts knitted together, 1 knit st), repeat to end of row. Knit remaining sts knit sts.
- Turn the future blanket over.
- 8 row knit ip.
- Repeat the given sequence of work using the bias knitting technique until you get a blanket of the required size.
- Close Fri.
How to knit a large blanket without seams
To obtain a seamless fabric, you can use the pattern described below:
- Dial the required number of points (a multiple of 5 + 65).
- Row 1: Slip 1 edge st, 4 knit sts, slip 5 stitches through back thread, 4 knit sts, slip 5 stitches through back thread. Repeat sequence to end of row. Finish row with 4 knit sts and 1 purl st.
- Turn the product over.
- Row 2 should consist entirely of ipt.
- Row 3: slip 1 st, 4 sl st, slip 5 sts through back thread. Repeat the above pattern to the end of the row. Finish the row with a classic sl st.
- Turn the knitting over.
- Row 4 is knitted entirely from ipt.
- Row 5 is done in the same way as rows 1 and 3.
- Row 6: 4 lpt, 1 ipt, 4 lpt, i1ipt, 4 lpt. Repeat the sequence to the end of the row, finishing with ipt.
- Starting from the 7th row, repeat the sequence given above from the 1st to the 6th row. Continue knitting, relying on the given description of the rapport until you get a seamless blanket of the required size.
- Close existing points.
The step-by-step patterns in the article will be useful not only for beginner needlewomen learning the basics of elementary patterns on knitted items, but also for professionals wondering how to knit a blanket with knitting needles using an unusual technique (oblique, large knitting, patchwork).
Video: How to knit a blanket with knitting needles for beginners
Find out how to knit a simple blanket with knitting needles in the video:
Knitting a baby blanket with knitting needles:
Beautiful blanket, but I want to knit something simpler. Suggest some options.
Thank you for the interesting information!
Every needlewoman can knit a blanket with knitting needles. The main thing is to be patient and choose the right yarn