Ribbon embroidery – is a way to decorate clothes and interior items. Beginners need to know how to properly perform basic stitches, understand the tools for work, and also read step-by-step instructions for making simple compositions.
Selecting fabric for the embroidery base
Beginners are advised to do their first work on Aida No. 14 canvas. This material is rigid and holds its shape well. Simple ribbon compositions on such canvas can be embroidered without a hoop. When the skill improves and the stitches become neater, you can use other fabrics.
The table below shows the names of fabrics suitable for ribbon embroidery:
| Cotton | Linen | Silk | Woolen |
| Rohozhka | Harsh canvas | Chiffon | Crepe |
| Satin | Thin fabric | Silk tulle | Tweed |
| Muslin | Scrim | Chesucha | Jersey |
| Velvet | Linen homogeneous fabric | ||
| Batiste |
It is important that the color of the fabric or canvas matches the intended ribbon pattern.
When choosing a canvas, you need to pay attention to its density. If the material is too thin, it will be see-through and the back of the embroidery with knots and blind stitches will be visible.
To embroider on thick fabrics (drape, velvet, printed fabric), you will need an awl, which is used to make holes for the needle and ribbon in advance. If you do not pierce the fabric, the needle will go in very hard. And the ribbon may stretch or deform.
Selection of tapes
Satin, silk and nylon ribbons are suitable for embroidery. These are synthetic materials that do not fade when finished works are washed and can withstand heat treatment (ironing, steaming).
The width of ribbons suitable for embroidery varies from 2.5 to 16 mm. They drape well and are easily pulled through the fabric. Narrow ribbons are used for regular stitches, and wide ones are used to create voluminous petals and leaves.

Satin ribbons differ from others in that the texture of the front and back sides has a different weave. Sometimes you come across hard ribbons that can also be used for embroidery. Before starting work, you need to cut the ribbon of the required length from the skein and knead it into crayfish.
Silk ribbons are used when creating a design with small details or with complex stitches. Their texture is the same on both sides. The material from which such ribbons are made is soft and elastic.
Nylon ribbons are needed to give embroidery a special texture. They are stiffer than satin and silk ribbons, and also thinner. There are transparent veil ribbons that decorate individual sections of embroidery. They can have a metallized insert at the edge or in the middle, as well as a printed pattern.
Markers
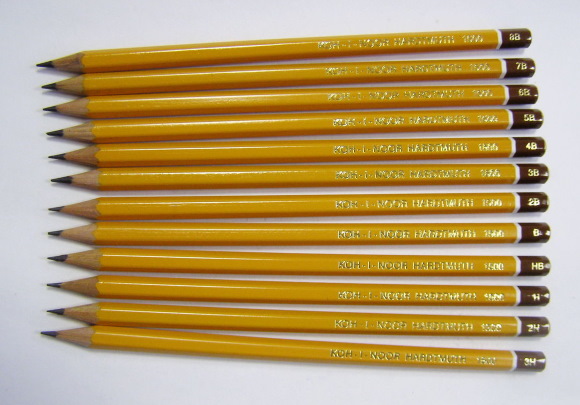
To accurately transfer the outline of the drawing onto the canvas, you can use simple pencils of hardness B, B2 or B3. For other fabrics, it is better to use special water-soluble markers.
They can be purchased at craft stores. The design is transferred to the fabric, embroidered along the markings, and when the product is completely finished, it is washed in cold water and all the drawn lines completely come off the fabric.
Framework
Special frames are purchased to stretch the fabric on which the embroidery will be done. The device that holds the fabric is called a hoop. They can be round or square. When buying such frames, it is better to give preference to wooden products.
It is important to inspect and check the quality of the paintwork, and also to ensure that there are no defects (small chips and burrs). Poor quality painting can ruin the work, leaving stains on the canvas, and minor defects on the frame often damage the fabric and ribbons.
What needles are suitable for the job?
Simple needles are not suitable for ribbon embroidery. The eye of the needle should be wide and long, and the tip thin but rounded, so that it can easily pass between the weave of the fabric without tearing it.
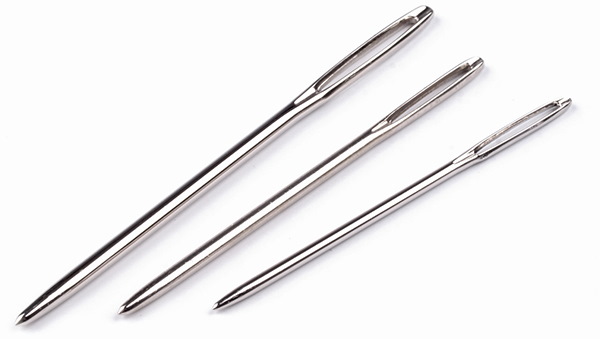
Most often, ribbon embroidery masters use needles with numbers:
- No. 14.
- No. 18.
- No. 20.
- No. 22.
- No. 24.
- No. 26.
The higher the number, the narrower and thinner the eye. It is important that the tape does not wrinkle in the needle, but does not fall out either. For example, needle No. 18 is suitable for tapes 7 mm wide.
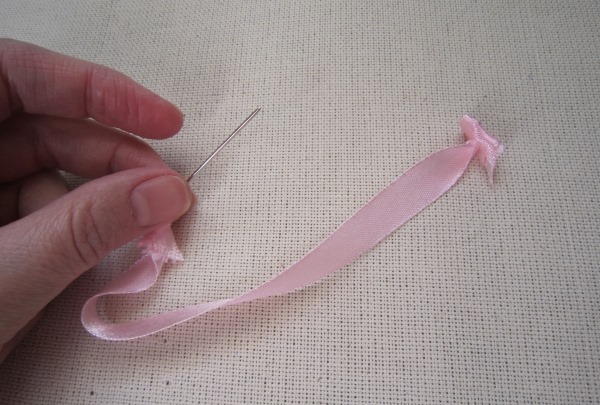
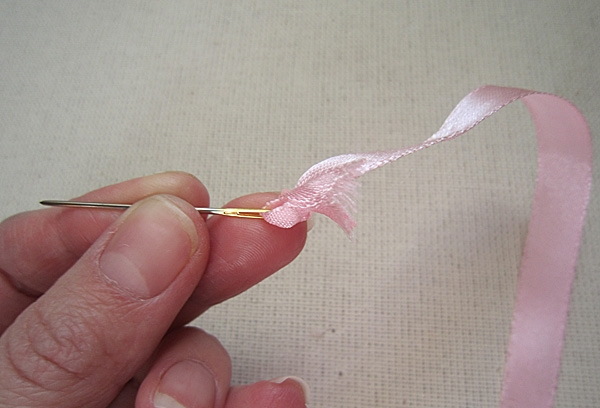
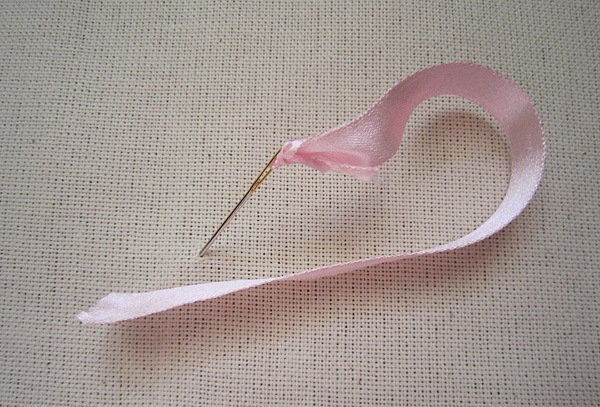
How to insert the tape into the needle
The ribbon must be properly secured so that it does not slip out of the needle, and is also securely attached to the back of the embroidery. Beginners should practice on small pieces of ribbon of different widths.

Step by step instructions:
- The edge of the tape must be cut obliquely.
- The resulting angle is inserted into the eye of the needle.
- Pull the tape so that the shaped edge extends by 3-4 cm.
- The needle must be inserted into the center of the tape, 5 mm away from the oblique cut.
- Hold the needle with the fingers of your left hand and tighten the free edge of the tape with your right hand.
This way the tape will be securely fastened and will not slip out during work.
Methods of processing the edge of the canvas in 1 minute
The canvas can be carefully hand-stitched or processed on an overlock. But there are 3 ways that will not take more than 1 minute.
Methods of canvas processing:
- Coat with PVA glue.
- Treat with clear nail polish.
- Cover with masking tape or scotch tape.
Such methods of processing the canvas edge are suitable only for small works or for those items that are not planned to be washed. In other cases, it is necessary to stitch the edges.
Basic stitches, technique of their execution
Ribbon embroidery (for beginners, step-by-step instructions are described further in the article) should be done according to the rules:
- The stitch length should be longer than the ribbon width. Otherwise, it will be difficult to straighten the ribbon.
- To get a three-dimensional pattern, you must not tighten the stitches too much.
- The free edge of the tape must be held with your hand so that it does not twist.
Unsuccessful stitches should not be unraveled. After inserting the needle from the flight, a hole will remain in the fabric. It is better to cover the defect with a new seam. Below are described the main types of stitches that are important for beginners to learn.
Chinese knot
This stitch is used to decorate the center of open flowers.
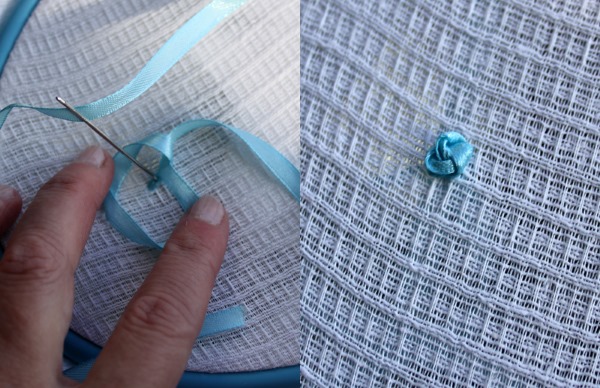
How to do it correctly:
- The needle is inserted from the wrong side and the tape is pulled out.
- A loop is placed around the needle.
- The needle with the tape is inserted into the center of the loop, into the fabric, next to the place where it entered the first time.
- First, the needle is brought out to the front side, then to the back side and the knot is tightened.
In addition to creating the center of flowers, Chinese knots can be used to embroider pictures by choosing the right shades of ribbons.
Double Chinese Knot
This knot is used in embroidery in the same way as the previous one:
- After bringing the needle out from the wrong side to the front side, you need to step back 3-4 cm on the tape from the point of withdrawal.
- This section of tape needs to be folded into an accordion.
- Pass the needle through all the layers in the middle.
- Then a loop is placed around the needle and inserted into the fabric through the middle of the loop, bringing the needle out to the wrong side.
The knot at the end should be tightened a little looser than in the classic version.
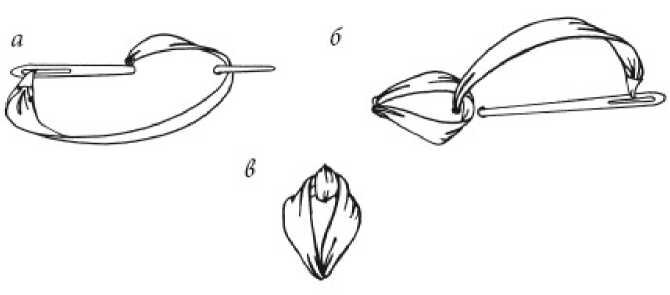
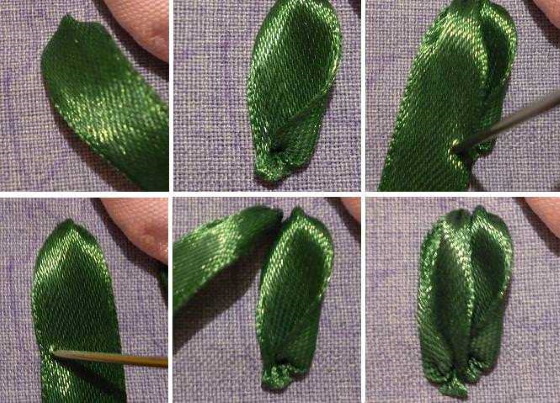
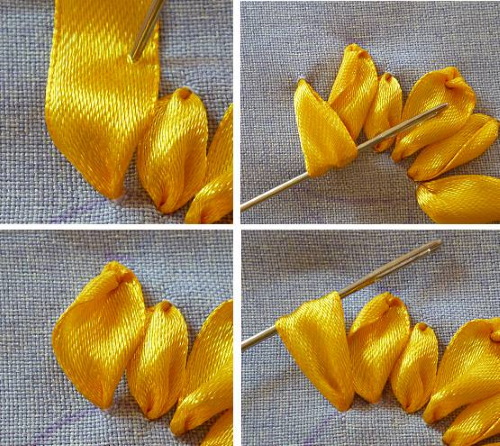
Ribbon stitch
The ribbon stitch is used to embroider stems and small leaves. Its peculiarity is that the edges of the leaves are bent, like those of real flowers.
Execution of the seam:
- The tape is inserted from the wrong side and pressed with the thumb of the left hand to the fabric at the distance of the finished seam.
- The needle is inserted between the base of the stitch and the canvas, and the top edge of the tape is pulled slightly over the needle.
- Now use a needle to mark the center of the ribbon and insert it, carefully pulling it to the inside of the embroidery.
You need to pull carefully until the edges of the ribbon are completely curled.
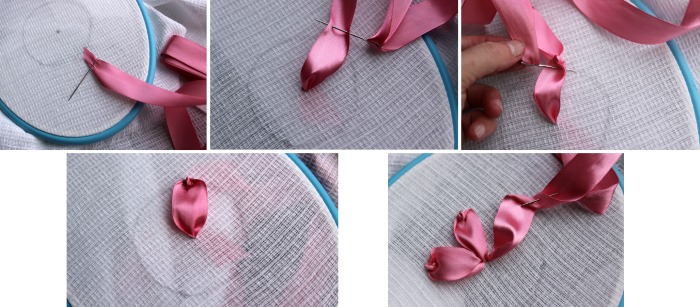
Loop in a circle
This stitch is used to create open flower petals:
- Insert a needle with a ribbon from the inside, and then, stepping back 2 cells on the canvas from the place of exit, you need to make a puncture and start threading the ribbon inside out.
- There should be a small loop left. To fix the size of the loop, you need to insert a pencil or a peg inside.
- Now the new needle exit to the front side is placed next to the exit to the back side.
- Points 1 and 2 are repeated.
- The loops need to be placed in a circle, and at the end of the work, the stitch is secured with a knot on the back side, and the pegs are pulled out.
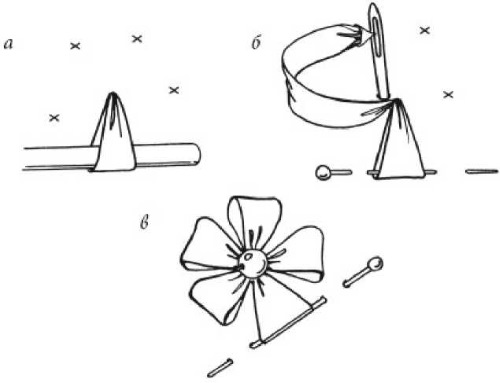
The center of such a flower is decorated with a Chinese knot or a bead.
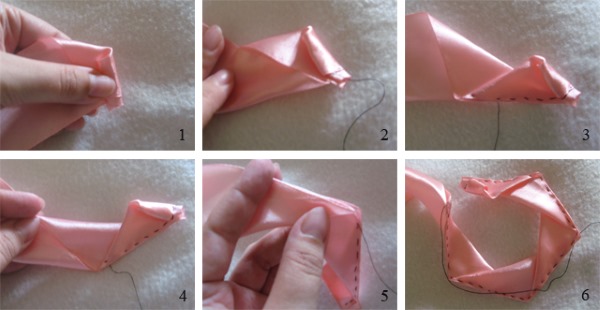
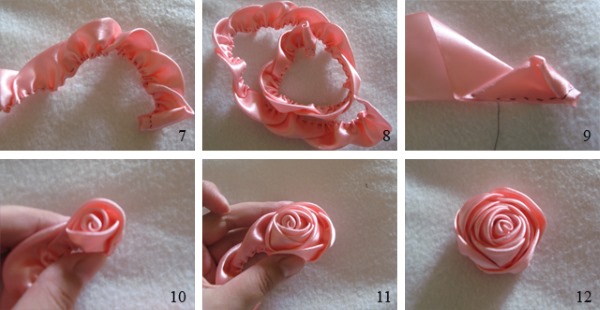
Zigzag
This stitch is suitable for creating a lush flower:
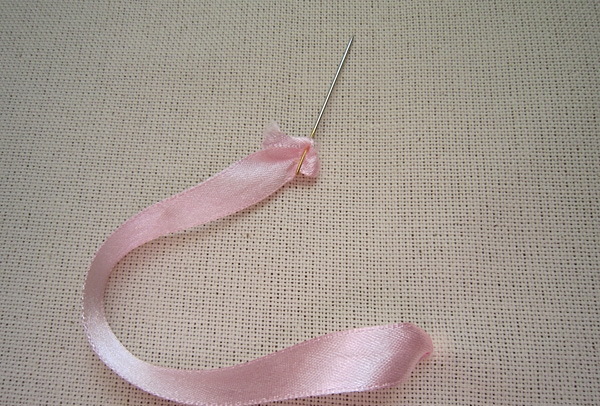
- A piece of the required length is cut from the tape.
- Using chalk or a water-soluble marker, draw a zigzag line in the middle of the tape.
- Using a needle and thread that matches the color of the ribbon, make a forward stitch along the marked lines.
- Carefully pull the tape, there is no need to tighten it too much. It should look like an accordion.
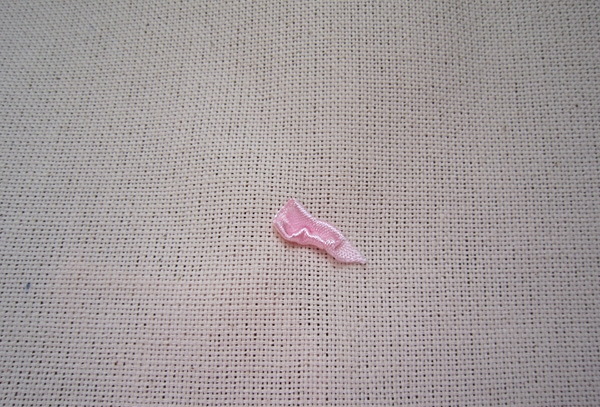
- The edges of the tape are sewn into a circle.
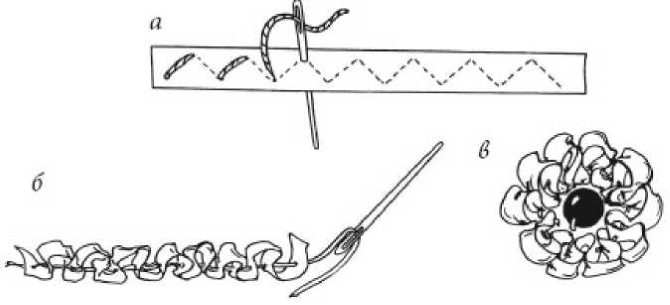
All that remains is to sew the wavy ribbon to the fabric. The center of the flower is decorated with knots or rhinestones.
Chain stitch attached
The stitch is used to create large and small leaves and petals:
- The needle is brought out to the front side, and then 1-2 cells are retreated from the point where the needle was inserted and the needle is pulled inside out, leaving a loop.
- The next insertion of the needle from the back should be at the end point of the loop.
- With a small straight stitch the end is fixed and pulled tight, bringing the needle inside out from the top of the loop, at a distance of 1 canvas cell.
The last stitch is called the fastening stitch. It allows you to secure the end of the loop so that it does not move to the sides.
Step-by-step diagram and description of rose embroidery for beginners
Ribbon embroidery (for beginners, the embroidery technology is described step by step further in the article) more often contains floral motifs than other patterns. One of the most popular flowers is the rose. Before starting work, you need to make markings with a simple pencil, transfer the outline of the flower to the canvas.
Securing the tape at the beginning of work
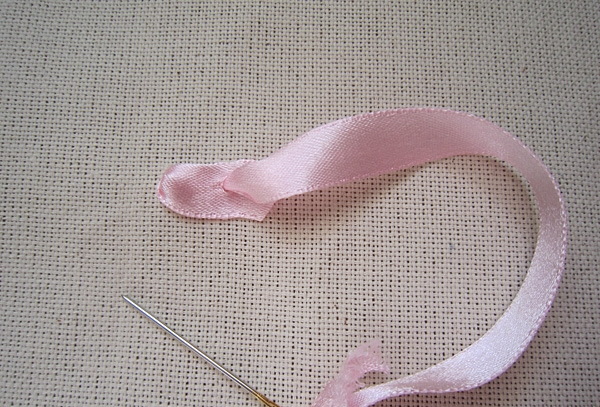
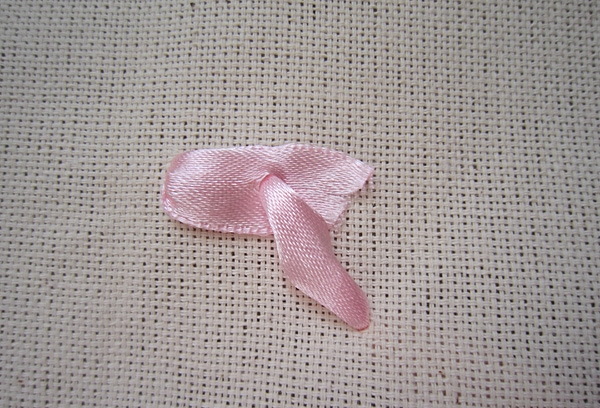
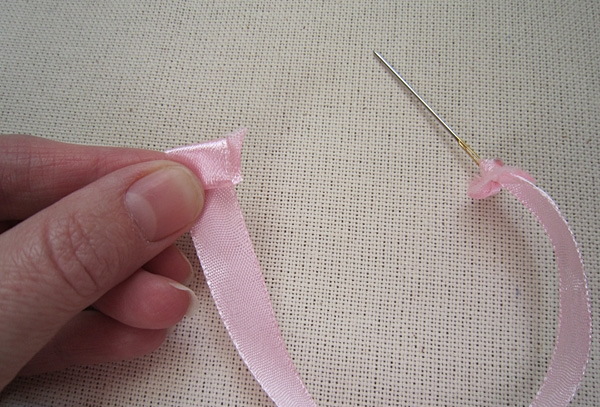
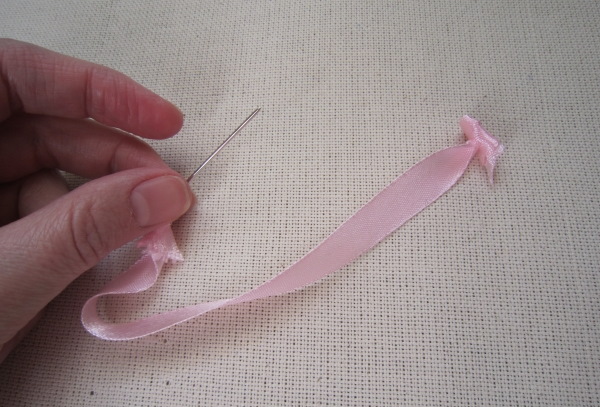
To secure the ribbon to the canvas, you need to make a flat knot:
- Step back 1 cm from the edge and fold this section in half, bending it towards you.
- You need to pass a needle through the resulting loop, piercing both layers through and through.
- The ribbon is not threaded all the way through. You need to leave a loop with a diameter of a finger.
- A needle is inserted into the loop and the ribbon is carefully pulled from above.
The flat knot will be located on the back side of the embroidery.
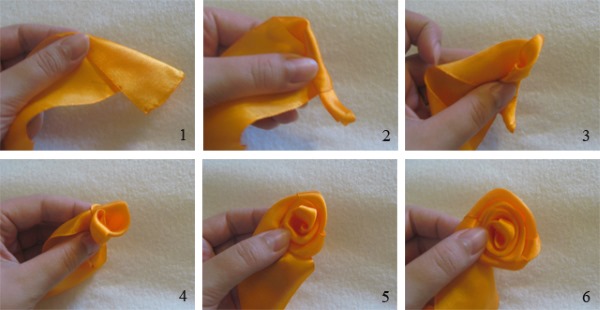
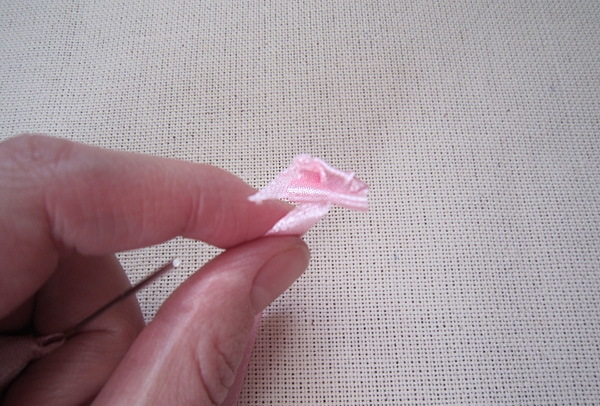
Making the inner rosebud
The inner rosebud is made from satin ribbon, which will be a shade darker than the main flower:
- You will need a tape 3 to 5 mm wide. You need to cut off 5-7 cm from it.
- From this piece you need to roll a bud, twisting the ribbon in a circle.
- The edges of the future bud are slightly turned inside out.
- To prevent the flower from falling apart, its base is stitched with floss of a suitable color.
All that remains is to sew the blank to the canvas or fabric with thread.
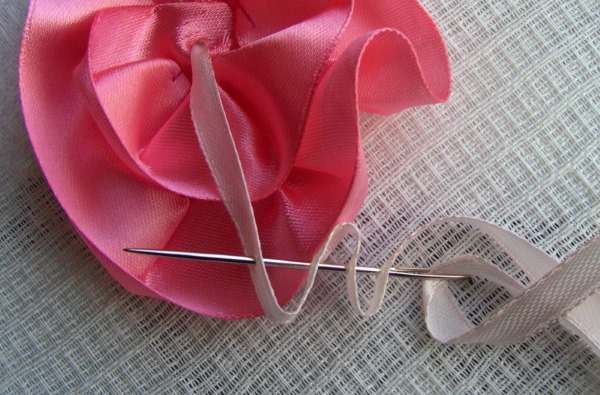
Making the flower itself
To embroider a lush flower you will need about 2 m of ribbon, and for a small rose 50 cm is enough:
- From the back side of the embroidery, you need to insert the needle to the exit from the front side as close as possible to the base of the bud.
- Pull out the ribbon, straighten it and, leaving 1-2 cm around the bud, thread the needle inside out.
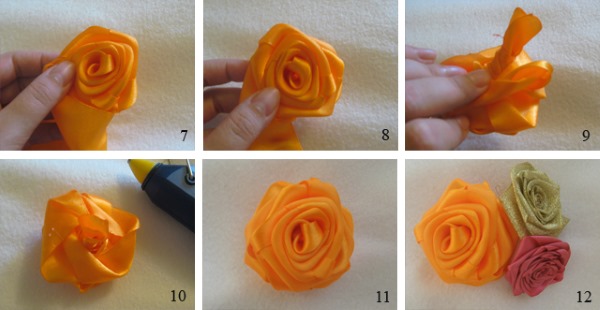
- The loop needs to be secured with a small stitch.
- Repeat steps 3 and 4 until the tape runs out.
The resulting petals need to be straightened. It is important that the front side of the ribbon faces up.
Leaves of flowers and calyxes with unopened buds
The stem of the flower can be done in 2 ways:
- Sew with straight stitches.
- Twist a narrow ribbon into a bundle and sew it to the canvas with thread.
Small leaves and unopened buds are embroidered with chain stitches, connecting them at one point.
Finishing the work, finishing the back side
Experienced craftsmen design the back side beautifully and evenly. Beginners should not worry when the back side of the embroidery does not look very neat at first - this is normal. You just need to know how to remove minor flaws and securely fix the pattern.
The cut threads are fixed with small knots or neat stitches from floss of a matching color. When making a flower arrangement, it is not recommended to constantly cut the ribbon.
Securing the tape without a knot on the reverse side:
Securing the ribbon with a knot on the reverse side:

From 1 to 2 flowers, you can make small stretches from the inside. The main thing is that the ribbon does not twist. The cut ends must be carefully set on fire with a lighter so that the ribbons do not unravel.
Master class of volumetric embroidery of peonies for beginners
Ribbon embroidery (for beginners, the stages of work are described step by step later in the article) of a three-dimensional flower may seem difficult for beginners, but if you follow the instructions, the peony bud will turn out beautiful and lush.
For embroidery you will need:
- Thick (preferably starched) canvas.
- Tapes for buds 3, 6, 10, 25 and 40 mm wide.
- Needles of different sizes.
- Lighter.
- Scissors.
- Pencil or marker.
- Hoop.

Procedure:
- Finish the edges of the canvas and stretch it onto the hoop.
- Decide on the location of the flower and draw a circle with a diameter of 1-2 cm. This will be the center of the bud.
- The needle with the thinnest tape is inserted from the inside, from the center of the circle.
- The circle must be completely filled with elongated loops. Their length must be the same 1-1.5 cm.
- Having secured the thread on the back side, some loops in the middle can be carefully cut and the ends singe with a lighter. This step is optional.
- Now you need to sew the middle with loops in a circle using a wider ribbon.
- The 10 mm wide tape needs to be cut into a semicircle shape (edge) and singe.
- The tape is brought in from the front side and stitched through the fabric, pulling it out again to the front side.
- These actions are repeated in a circle.
- From a 25 mm wide ribbon, you need to cut petals. Their edge is designed in the shape of a heart and singe.
https://www.youtube.com/watch?v=4cMECufOfMI
- To make the petals curved, you need to bend them slightly in the middle towards you and hold them over the fire for a few seconds.
- Now you need to carefully sew the petals to the bottom of the flower, passing the thread through the fabric. It is important that the leaves bend towards the center of the flower.
- Several large petals are cut from a 40 mm tape, making their edges 3-toothed. Then they are singe and given an oblong shape.
- Just like the last petals, the large ones are sewn to the bottom of the flower with threads, but the bend of the petals should be directed from the center of the bud.
- On the reverse side, tighten the knots and cut off the long ends. All that remains is to singe the edges.
The result is a lush bud made of ribbon. The satin color can be monochrome and smoothly transition from light to dark. Some craftsmen embroider peonies from white ribbons, and then tint the flower with a brush and batik paint.
Combined embroidery method
This is an interesting way to combine several types of embroidery. Experienced craftsmen often make paintings with three-dimensional elements embroidered from ribbons. For example, a painting depicting a flower field and forest is cross-stitched. At the top, in the field area, the craftsman embroiders flowers from ribbons.
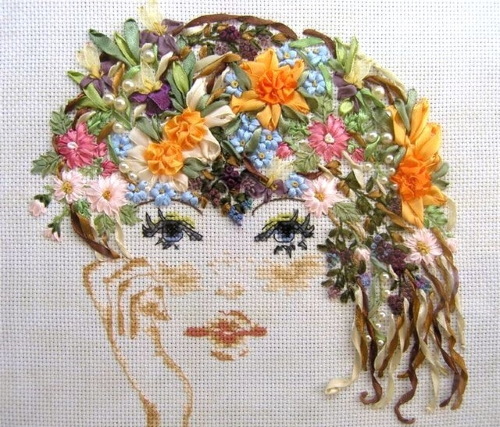
For thread embroidery, select ribbons that match the overall tone and mark the locations of the flowers with chalk. Embroider in the same way as on an empty canvas. The result is beautiful panels and paintings with a three-dimensional pattern.
Embroidery in Brazilian technique
The Brazilian technique resembles simple ribbon embroidery. The main distinguishing feature is this is the use of thin ribbons that are twisted clockwise into a ropeThis type of twisting is called Z-shaped.
The ribbons from which the cords are made are made of silk or satin. Thanks to this technique, the embroidery is dense and textured. Brazilian embroidery flowers look good on outerwear or decorative pillows, as well as panels.
Ornaments on clothes and jewelry
Ribbon embroidery is used to decorate clothes or make individual accessories. For example, a peony bud, the master class for making which is described above, can be made into a brooch. To do this, the flower is embroidered in the usual way.
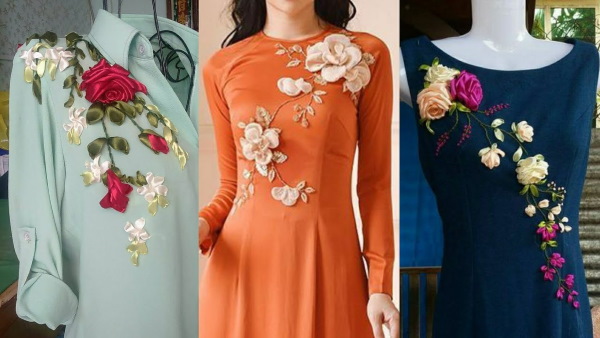
And then carefully cut the canvas in a circle, leaving 1-2 cm to fix the flower on the clasp. The cut edges are processed and a suitable clasp is selected to which the bud will be attached.
When doing embroidery on clothing, it is important to pay attention to the fabric of the product. It should be dense and have a wide weave. On thin and smooth fabrics, such as raincoat fabric, the embroidery will be stretched and unattractive.
Ribbon embroidery patterns and descriptions
Beginners can practice embroidering simple flowers. Below are step-by-step instructions for the simplest ribbon embroidery options.
To create such flowers you will need:
- Canvas.
- Scissors.
- Lighter.
- Needles.
- Markers.
Ribbon embroidery (diagrams, photo confirmation) involves choosing ribbons and floss threads by color and width depending on the design.
Sunflower
To embroider a sunflower you will need yellow (12 mm) and green (6 mm and 25 mm) ribbons.
How to embroider:
- On the canvas you need to draw a schematic silhouette of a flower.
- From the center of the bud, petals are embroidered in a circle with yellow ribbon, using a ribbon stitch.
- The stem of the flower is made from a twisted ribbon 6 mm wide. The needle with the ribbon is inserted from below. The ribbon is pulled out. Twisted into a bundle and the needle is inserted under the bud.
- The leaves are embroidered with a 25 mm green ribbon using a ribbon stitch.
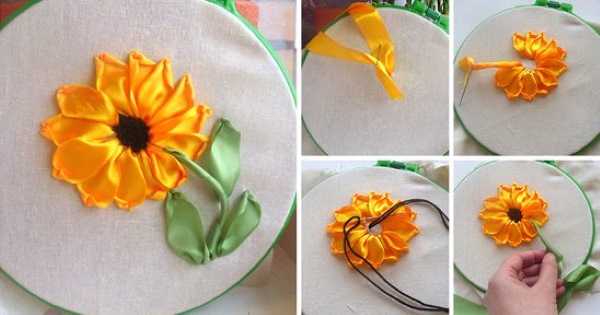 The center of the flower can be filled with embroidery from floss threads. To do this, embroider tight French knots closer to the center, and tighten them more loosely towards the edges.
Butterflies
The easiest way to embroider a butterfly is to depict its flight from the side. You will need 5 mm and 10 mm ribbons, as well as brown floss.
Step by step production:
- You need to embroider the body of the butterfly with thread using a running stitch.
- Then embroider the antennae, making French knots at the ends.
- The front wings are embroidered with a narrow ribbon using the stitch "loop with a fastening". You need to make 2 loops, the upper one is slightly longer than the lower one.
- The lower wing is embroidered with a wider ribbon using a ribbon stitch.
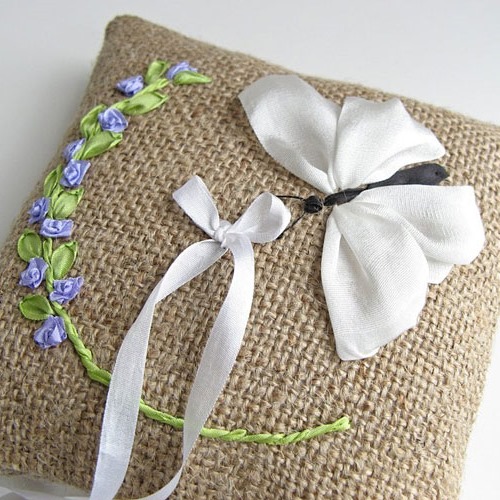
If you take ribbons 10mm and 20mm wide, the embroidery will be more voluminous.
Chamomile
It is very easy to embroider a daisy. You will need a white ribbon 5 mm wide and a green ribbon 5 and 10 mm wide.
Step by step production:
- The center of the flower is marked on the canvas.
- The petals are embroidered in a circle with a white ribbon using a ribbon stitch.
- The stems are embroidered from a narrow green ribbon using a running stitch.
- The leaves need to be embroidered with a ribbon stitch from a wide green ribbon.
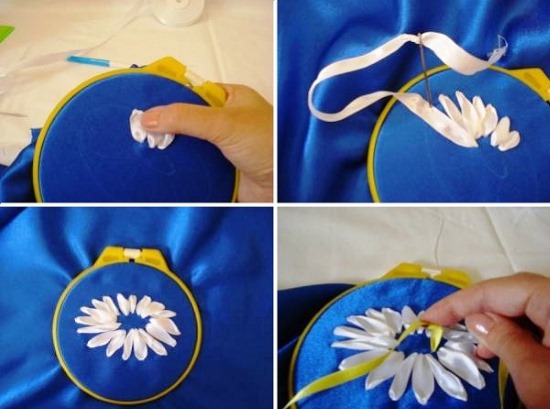
The center of the flower is filled with embroidery made of yellow floss, filling the void with French knots.
Orchids
To embroider an orchid flower you will need white ribbons 10 mm and 40 mm, as well as red ribbon 5 mm and yellow ribbon 3 mm.
All embroidery is done with a ribbon stitch:
- First, embroider three petals from a thin white ribbon. The leaves should look in different directions.
- Large petals are embroidered from a wide ribbon. They should come out of the center of the flower and be placed on the sides of the upper small petal.
- The middle is embroidered with a red ribbon between the 2 lower thin petals.
- Using a small stitch, add a stamen in the center by sewing the ribbon stitch through the red ribbon.
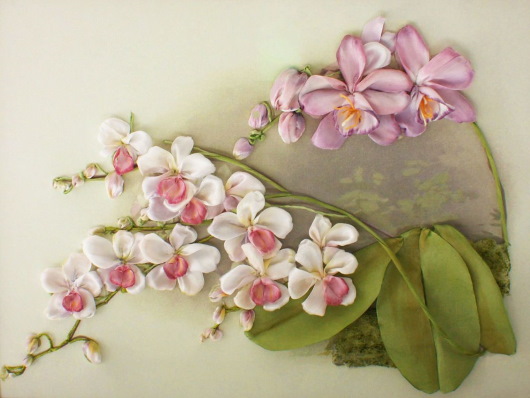
White petals can be tinted with batik paints.
Heart
It is very easy to embroider a small heart. You need to use a 10 mm ribbon. The heart consists of 2 ribbon seams that come out from one point., and the edges look to the sides. Forming the top.
Tulips
Tulip buds are embroidered with straight stitches:
- The first stitch should be in the center.
- The second one comes out from the same point as the first one. The needle is brought out to the wrong side slightly to the left and lower than the top of the previous stitch. The ribbon should be placed so that it covers part of the central petal.
- The third petal is embroidered in the same way as point 2, on the other side.
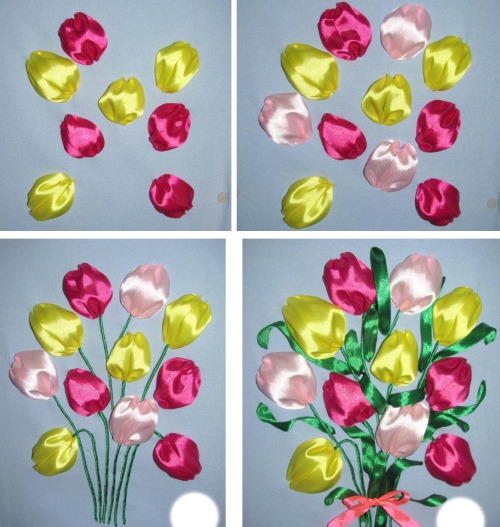
We have a flower bud, all that remains is to embroider the stem and leaves using a ribbon stitch.
Poppies
The poppy head is most often assembled from separate parts. You will need a wide red ribbon, dark brown and red floss threads, and a wide green ribbon.
Step by step production:
- First, you need to assemble the flower. To do this, cut the red ribbon into 10 cm pieces.
- The ends are singe and the corners are folded over on each side, then stitched to prevent them from unbending.
- The resulting petals are curved. They need to be sewn together to form a bud, which is sewn to the canvas.
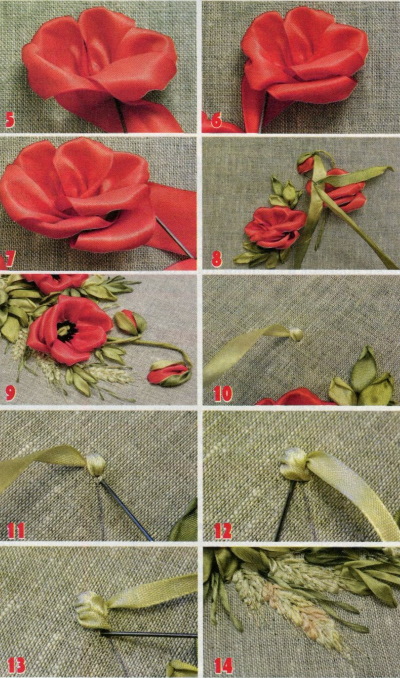
- A small ball of cotton wool is wrapped in a wide green ribbon and the ribbon is tied. The excess ends are removed.
- The resulting ball is tied crosswise with brown floss several times. A knot is tied.
- The upper layers of threads are cut off. They should fall apart and form stamens.
- The middle is sewn into the center of the bud.
Poppy leaves can be cut out of green ribbon. They should be jagged and narrow. The cuts are singe with a lighter and the leaves are sewn to the canvas.
Lilac
Individual lilac flowers are embroidered with loops and fastening. The flower consists of 3 petals.
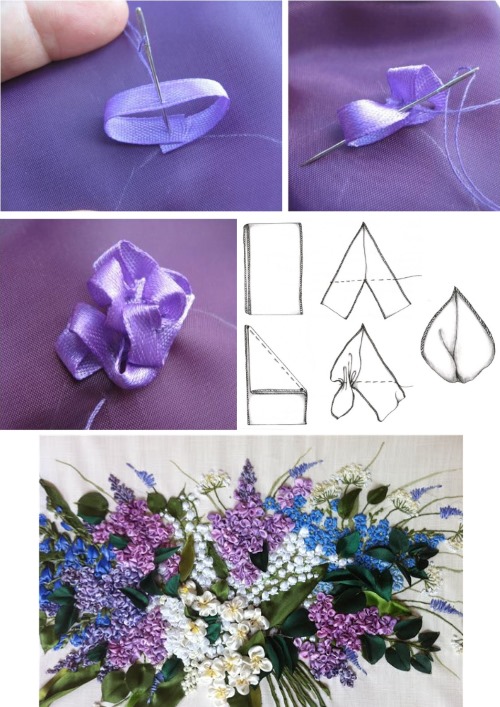
Therefore, the stitches should come out from 1 point, but have different tops. To embroider a lilac branch, you need to place a group of flowers in several rows close together.
Bouquet of cosmos
To make such a bouquet you will need ribbons 5-6 mm wide, batik paints and green ribbons 3 mm wide:
- The fabric is stretched onto a hoop and a bouquet is sketched out.
- The centers of the flowers are painted with yellow and brown paint.
- The ribbons are cut into strips 6 cm long. The edges are made semicircular.
- Insert the ribbons into the needle and thread them under the middle of the flower so that 3 cm ends remain on both sides.
- For one bud you will need 4-5 pieces.
- From the reverse side, the ribbons are sewn to the fabric using floss threads.
- The petals are singed, bending away from the center of the flower.
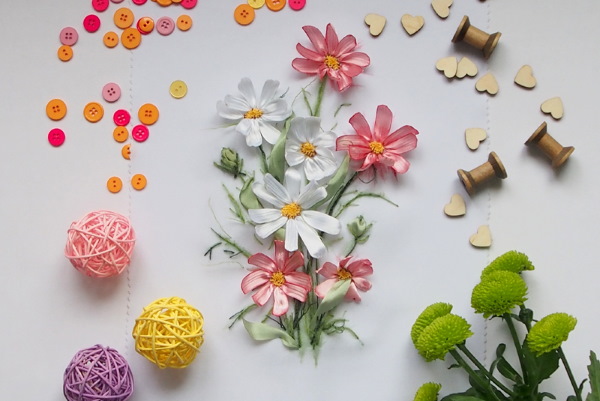
To get a bouquet, you need to embroider several flowers. The stems are embroidered with green ribbon using a running stitch.
Tree
You will need a green tape 5 mm wide and a brown tape 10 mm and 5 mm wide:
- The trunk and branches are schematically drawn on the fabric.
- The trunk is embroidered with a wide brown ribbon using a straight stitch, and the branches are embroidered with a narrow one.
- The foliage should be embroidered with a ribbon stitch. Green leaves fill all the empty spaces, forming a crown.
You can use yellow and orange ribbons to create an autumn tree.
Scenery
Beginners are advised to start embroidering landscapes with combined embroidery. Craft stores sell cross stitch kits with various landscapes.
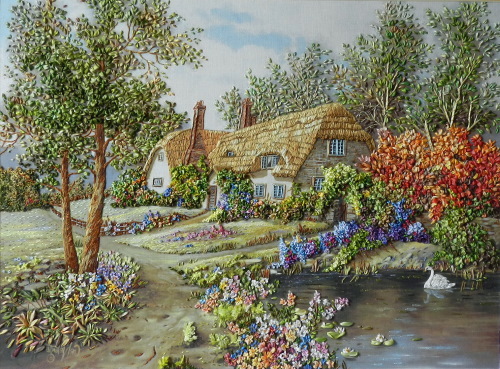
You need to embroider the main picture with floss threads, and add only a few volumetric details with ribbons. For example, decorate tree crowns or embroider flowers in a field.
Ribbon embroidery templates
Ribbon embroidery (for beginners, different patterns are presented step by step) is done according to the instructions. The drawing is first made on paper, using symbols. This is necessary in order to imagine where and what flower will be placed. Also, the color of the ribbon with which a particular detail needs to be embroidered is indicated on the templates.
Embroidering with ribbons is not difficult. For beginners, it is important to learn the basics of embroidery and practice by doing your first work using templates. and step-by-step instructions. At first, 1 small work will take from 30 minutes, gradually the skill will be honed and it will be easier to do embroidery.
Video about ribbon embroidery
Ribbon embroidery - patterns, photos:
https://www.youtube.com/watch?v=OeGwjVnB9aQ