When starting to knit a new product, you should think not only about the quality of the yarn, the selection of tools for the work, but also about how all parts of the product will be sewn together.
One of the types of seams used in joining models is used by needlewomen most often. The seam is called a serger stitch and is used in crocheting.
Selecting Needles
When choosing needles, it is very important to focus on their size, since specialized stores sell a variety of tools for the job. The characteristics of some needles that can be used to sew parts are presented in the table.
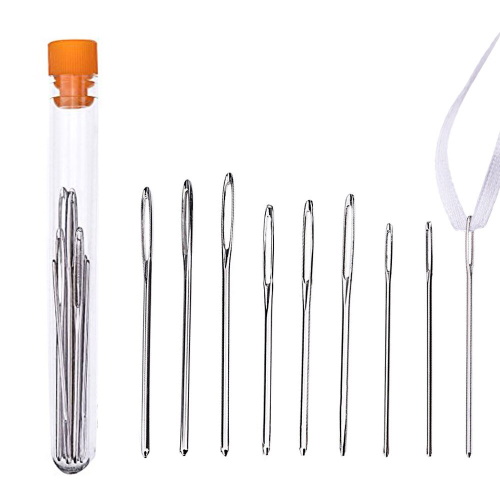
| Needle name | Characteristics, why it is suitable for sewing overlock seam |
| Tapestry | The needle can be used by a craftswoman, as it has a large eye and a rounded end. This allows her not to pierce the threads, but to spread the fabric. They can be sold under different numbers - the larger the number, the smaller the size and diameter of the needle. |
| Embroidery | If you can't get another needle, you can use an embroidery needle. Its eye allows you to spread the threads rather than pierce them. |
| Knitted | This type of needle is most often used for overlock stitches, as it has a wide eye and a rounded end. This helps to avoid snagging on the fabric and thread breaks. |
| Wool needle | They are thick, medium length, have a wide eye and a round end. |
Without special knitting needles, it is impossible to make a blanket stitch. Such needles differ from the tools used in embroidery and sewing. A knitting needle can be made of plastic, it should have a wide eye so that the yarn thread can easily pass through it.
Another difference between a knitting needle and a sewing needle is that its tip looks like a knitting needle, it is not as sharp. The rounded end of the needle helps to avoid piercing the yarn, it pushes the threads apart. Thus, the thread does not deform or split into pieces.
Needles can be made of plastic or metal. The advantage of metal needles is that they are stronger and do not break as often. Plastic needles can break quickly during the knitting process.
Application and features of the seam
The overlock stitch in crochet is considered one of the types of knitted stitches that are used to connect small knitted parts and the main fabric.
So, with the help of this seam you can attach:
- Collars;
- Pockets;
- Cuffs;
- and other small clothing items.
It can also be used for hemming hemlines, sleeves, adding inserts and other details that are most often knitted separately from large parts. The peculiarity of the seam is that it is embroidered on open loops.
Among craftswomen, the term "kettelevat'" is also common. It means joining one part to another using a kettel'ny seam. In addition, this knitted seam can be used to process horizontal cuts, to secure a loop in the last row.
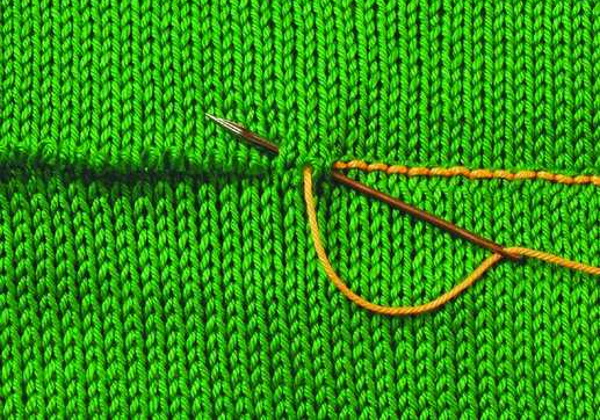
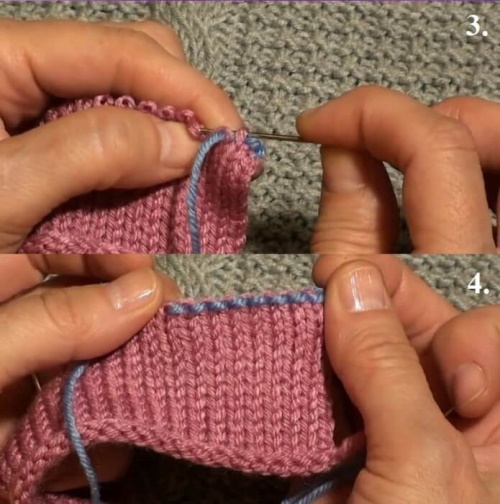
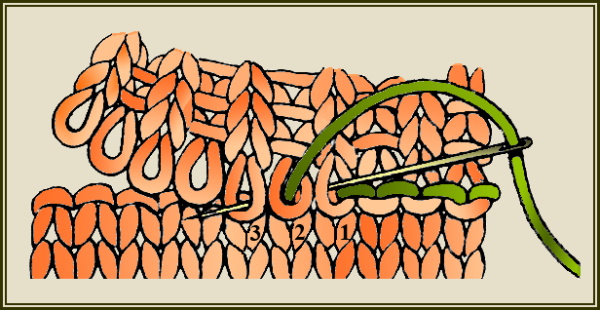
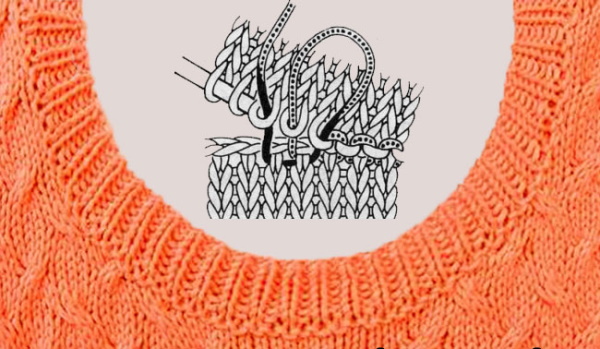
However, its most common use is to process the neck of a knitted product. There are 2 types of overlock stitch - figured and regular. The principle of making a knitted stitch is similar to the technique of creating a back stitch.
The classic way
Often the edge of the product needs to be processed with a piece that is knitted separately. It may be called a piping or collar. It is knitted from top to bottom, without closing the loops of the last row. Then the neck is slit using a needle.
In a crocheted item, you can make a blanket stitch by placing the piece on the edge of the finished fabric and sewing the needle back with a regular stitch. It is recommended to use a plastic or metal needle with a large eye.
The yarn or thread used to make the seam should be the same color as the product itself.
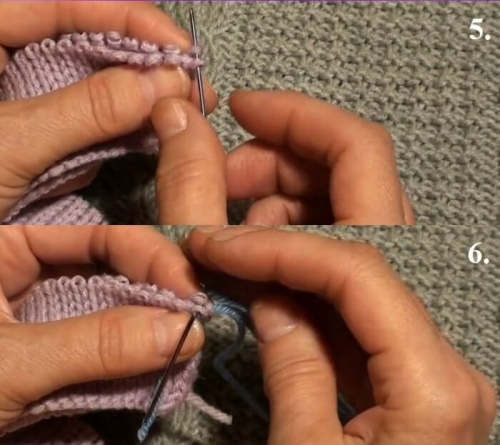
The principle of performing a regular overlock stitch is that each time the needle should be inserted into the open loop of the collar. This allows not only to perform a stitch of seams similar to machine ones, but also to secure all previously unused loops in the piece.
It is very important to ensure that the knitted piece does not unravel. To avoid this, you should knit an additional row with loose loops of a different color. Then the row is gradually unraveled, and the free loops in the collar will be those from which the additional thread was removed.
Bilateral
If you need to beautifully decorate the neck of the product, you can use classic tacking. In order to successfully perform it on the product, it is necessary to make the future collar two-layered. To do this, you can knit additional 6 - 8 rows at the end of the collar or finish it with an elastic band.
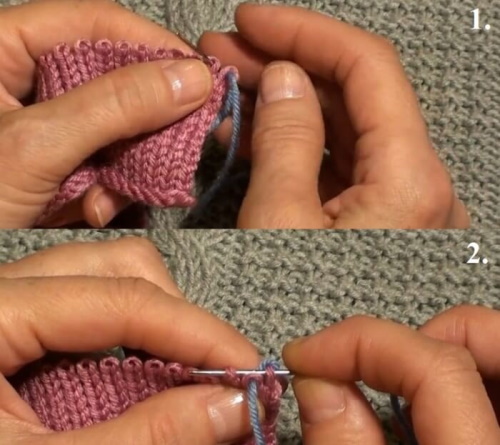
After this, the piece can be sewn on, securing the loops on the front side of the garment, and then joining the edge and the back side. The garment itself should not be pierced completely, as in this case the back seam may be visible on the front side.
If a hollow elastic band is used, free loops will remain on both the front and back sides. If the workpiece is folded in half, 1 edge will be closed. In this case, the craftswoman has a choice: either sew the part, securing the unused loops on the front side of the fabric, and the closed ones on the back side.
Or you can unravel the first 2 rows to form free loops on both sides of the product. In this case, you can unravel the edge only when the other edge is already sewn to the product.
For Beginners
The overlock stitch in crochet can be used by both experienced and novice needlewomen. Those who have not used the overlock stitch before should follow all the steps for performing this type of knitted stitch.
This type of seam treatment can be used to treat vests, jackets, sweaters and dresses:
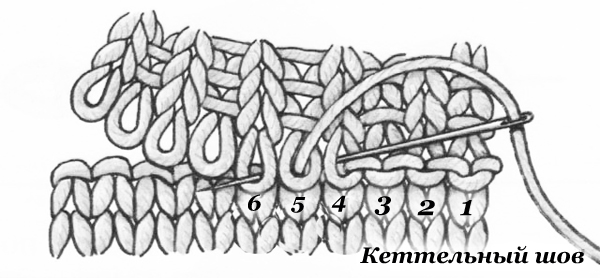
- If you use a regular overlock stitch, you need to place the edge with open loops on the edge of the main large fabric, baste them and sew each loop with an overlock stitch.
- Insert the needle from the wrong side from the bottom up into 1 loop in the open row and, having pierced the main fabric, bring it out to the front side.
- Insert the needle from the wrong side, bring it to the front side through the 2nd loop and return it from the front side to the wrong side through 1 loop in the row.
- To close all the loops in a row, you need to repeat the actions described in the previous steps.
This method is very simple, and can be used by inexperienced needlewomen who have not previously closed loops in their work with a blanket stitch. There is also a figured blanket stitch, however, its execution is somewhat more difficult than the execution of a regular blanket stitch.
Elastic
Despite the fact that almost all methods of processing the neck with a blanket stitch imply a tight connection of the fabric and the neck, craftswomen have come up with a way to imitate a blanket stitch if it is necessary to maintain the elasticity of the connection.
It may be needed, for example, for a sweater for a small child. In such situations, you can resort to the so-called imitation of kettling. From one edge of the product, loops are cast on around the perimeter, a row is knitted with purl loops. These loops will give the appearance of a seam.
After this, the transition to elastic or knitting with the front surface is made. In the event that the edge needs to be made thicker, after a row of purl loops, you can knit a double length, fold the knitted in half, and sew free loops from the inside with a zigzag, piercing the fabric with a needle at a right angle.
The needle should enter the unused loop in the same row. The advantage of this seam is its neatness and preservation of the elasticity of the neck.
Decorative
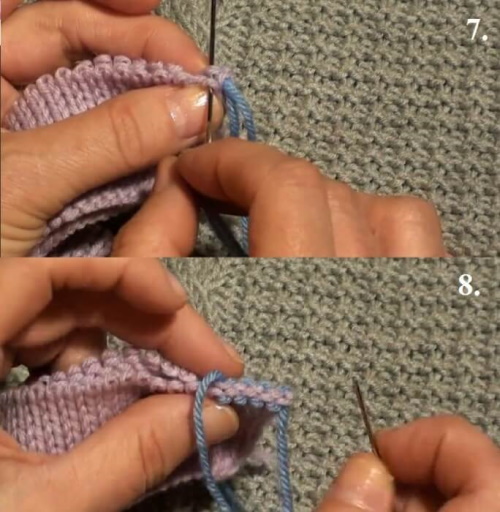
Using a blanket stitch, you can add more decorativeness to the product. The figured version of the stitch allows you to embroider small teeth on the product. The product can be decorated with either 2 or 3 teeth: the loops can be connected in 2 or 3 pieces at once.
To connect the loops by 2, you need to insert the needle on the wrong side, pass it to the front side in the 2nd loop and return it from the front side to the wrong side in the 1st loop. Then the 3rd loop is skipped, from the wrong side to the front side you should insert the needle in the 4th loop, and return it from the front side to the wrong side through the 3rd loop.
To continue the pattern, repeat the previously described steps. This will allow you to connect the loops, tilting them in pairs towards each other.
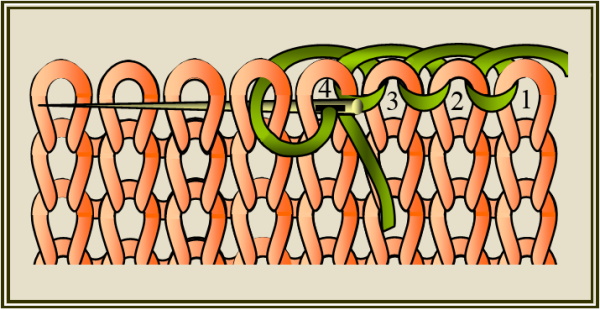
To make a shaped seam with a connection of 3 loops, the needle should be inserted from the wrong side to the front side in the 2nd loop and returned from the front side to the wrong side through the initial loop. Then from the wrong side to the front side, you need to bring the needle out through the 3rd loop and return from the front side to the wrong side through the 2nd loop.
After this, skip the 4th loop and bring the needle from the wrong side to the front side through the 5th loop, and return it from the front side to the wrong side through the 4th loop. Then bring the needle from the wrong side to the front side through the 6th loop, and return it to the wrong side through the 5th loop.
The pattern is considered to be done correctly if in each tooth the loops on the sides lean towards the central one, which remains straight.
Tips and tricks
It is very important for all craftswomen to learn how to correctly perform a blanket stitch, since it helps to give the product a resemblance to clothes made in factories and plants.
The overlock stitch in crocheting should be tight and strong, it should not stretch on the product. It is necessary to ensure that the seams are even and have the same size.
Recommendations:
- When choosing the thickness of the thread for shirring, you need to remember that the thread for this seam should be thinner than the entire thread with which the entire product was knitted.
- If you are using wool thread for a knitted seam, you may have difficulty threading it into the eye of the needle. To thread a thick thread into a needle, you can fold the thread in half and place the fold over the narrow part of the eye of the needle you are using.
Then you need to pinch the eye between 2 fingers of your left hand and pull the needle out, pulling the ends of the threads tightly. This action will smooth out all the fluff and fluffy parts of the thread on the bend. After this, you need to slightly unclench your fingers and insert the bend of the thread into the eye.
- It is not recommended to break off the ends of the threads that remain from the set of loops. They can be used to sew the parts. Even if they are short, you can start the seam, as this will give the edge of the work a more even and neat appearance.
- If the parts are to be sewn together on the wrong side, then when doing them, it is recommended to knit the so-called loop track, knitting it along the front side with purl loops, and along the purl loops - with front loops. Adding such a loop track makes the process of sewing the parts more comfortable.
At first, when performing a crochet overlock stitch, you may encounter a number of difficulties. However, mastering this stitch will allow the needlewoman to improve the quality of finished products. The knitted stitch can also give the work more decorativeness. To do this, you can connect several loops to each other.
Video about knitting
Overlock stitch in crochet: