Painting is a fun, relaxing process that allows you to fully express your creativity. In the beginning, people of all ages are advised to choose simple materials and paints that allow you to explore several different painting techniques.
For example, gouache is great for beginner artists, and step-by-step lessons will help you understand the specifics of its use.
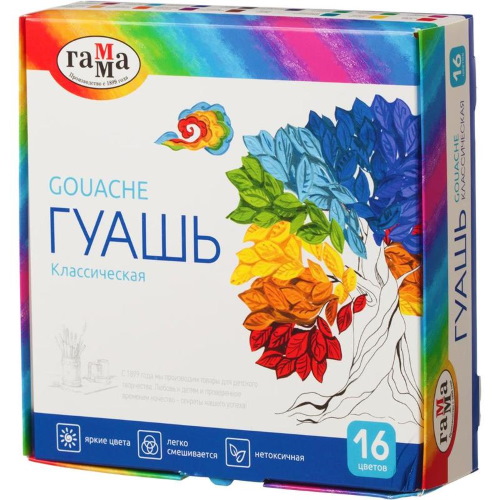
Types of gouache, how to choose for beginners
Gouache is a paint used not only by children in drawing lessons or at home, but also by professional artists and handicraftsmen. For different purposes and skill levels, you need to choose the appropriate type of gouache.
| Varieties of gouache | |
| Name | Characteristics |
| Artistic, Lux, Premium | Thick consistency, high plasticity, a large selection of shades close to natural ones. The price of such paints is higher than that of other types. |
| Ordinary gouache | Paints that do not have special markings. They contain more synthetic binders, and their plasticity is lower. The color palette is smaller, as is the cost of the material. |
| Gouache for children's creativity | Almost 100% natural composition. Bright, quite liquid, convenient for drawing directly from the jar. The fewer preservatives in the composition, the higher the price. |
| Paints with additional effects | These can be mother-of-pearl shimmers, imitation, glow in the dark. They mix poorly with classic types of gouache, they are applied either to an already colored base or to a dried layer. |
Gouache painting for beginners (step-by-step lessons are described further in the article) will be a pleasant activity with artistic, high-quality paints. Regular gouache is suitable for children's creativity, one-time projects for study or as a relaxing activity without claims to high artistic results.
Gouache is usually sold in 20-40 ml jars and 4-16 colors per set. Some manufacturers produce larger sets of up to 24 colors, but their cost is much higher (and it is not a fact that all the colors will be used in the end).
For lovers of a varied palette, there are separate jars of gouache, which can be found in art stores. Here you can choose exactly the shades you need, and in the appropriate volume - up to 500 ml.
Selecting brushes and paper
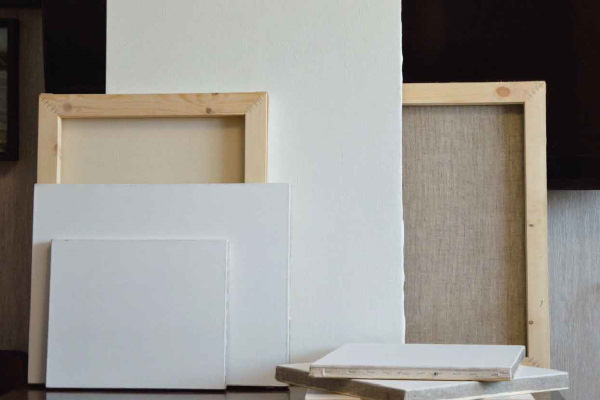
Gouache is a water-based paint, which means the paper for it must be thick. Manufacturers of art materials do not have special canvases marked “for gouache”, so here you should rely only on the characteristics of the paper base.
Tips for choosing a quality canvas for gouache:
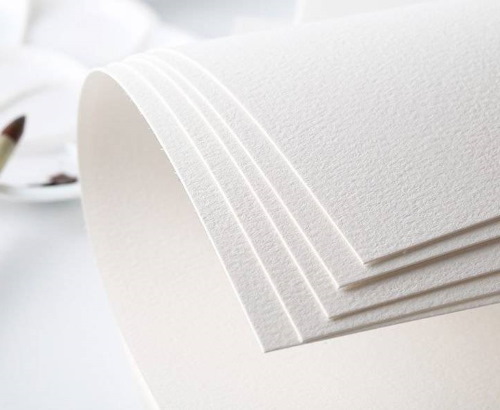
- The higher the paper density, the better. For the selected paint, values of 200 g/m2 are suitable.2 and 300 g/m2. Good density is important for both wet and dry gouache painting techniques.
- The texture of paper for gouache paints is coarse and medium grain. A smoother texture is used for drawings with fine detail.
- The material also differs in composition – there is cotton and cellulose art paper. A painting on cotton paper will retain its original color for a long time, and the saturation of colors on it will be high. Cellulose paper is suitable for schoolchildren and students, as well as beginners honing their skills.
- The bluish tint of the canvas indicates the moisture resistance of the final work, resistance to “fading” in the sun’s rays – such paper is often used by professional artists.
Beginners may find it difficult to understand the different manufacturers and purposes of drawing paper. To be sure you don't make a mistake, you can start with coarse-grained watercolor drawing paper.
Gouache painting for beginners, as step-by-step lessons often suggest using standard materials, may ultimately seem like a not very artistic process. To avoid disappointment, it is worth taking care not only of paints and paper, but also of brushes.
General criteria for choosing brushes:
- the pile should be even, tightly pressed against each other, and not crumble when in contact with surfaces;
- the metal rim should fit as tightly as possible to the brush, not wobble, and hold the bristles firmly in place;
- The brush handle should be comfortable, without roughness (to avoid getting splinters), and of a comfortable length.
As for gouache brushes specifically, it is worth paying attention to the painting technique.
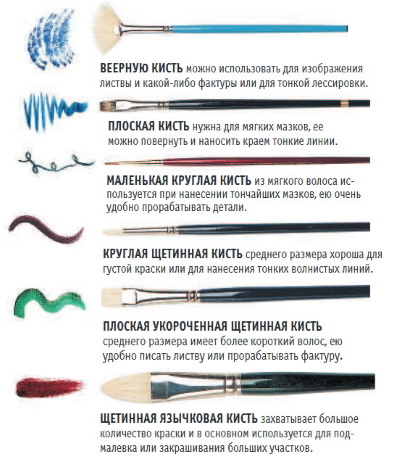
For example:
- For dry painting and impasto drawing, bristle brushes are suitable. As a rule, they are made from pig hair;
- Water techniques and glazing involve the use of softer brushes, such as synthetic or natural kolinsky;
- Detailed drawings are done with a round thin brush, background filling is done with a wide flat brush, and painting is done with a flat brush of smaller width. Large round brushes are also used in different techniques.
The easiest way is to buy a basic set of different brushes - one medium-sized hard brush, one wide flat brush for painting the background, several medium-sized brushes of different hardness and a thin brush for contouring and drawing small details. The missing brushes can be purchased later, having decided on the appropriate gouache painting style.
Gouache painting techniques, methods for practicing skills
Gouache painting (for beginners, step-by-step lessons will be of primary help) is distinguished not only by the ease of applying paint and its quick drying, but also by a pleasant velvety, matte finish. Different techniques of applying paint will help to achieve various additional effects in the finished work.
Glaze
One of the most interesting, but at the same time simple painting techniques is glazing. It is used with different paints, and therefore, having honed the skill on gouache, you can act according to the same scheme with watercolors.
The essence of this technique is the successive application of layers of paint of varying transparency onto a pre-prepared background. With the help of glazing you can fill the background of the painting, make it more voluminous in terms of shadows and halftones, more airy due to the transparency of brushstrokes, add ideal color gradients.
Glazing can be used to paint landscapes, especially forests, bodies of water, and fog.Gouache for this technique is mixed generously with water in different proportions, depending on the transparency of the intended layer. The brush, accordingly, should absorb and release moisture well - squirrel hair is suitable, the size is best chosen for a specific format of the drawing.
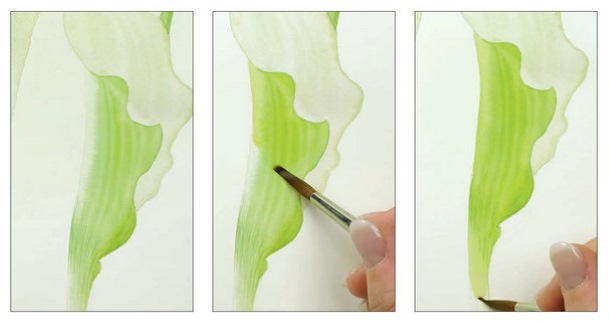
A little advice for beginning artists: before using the "wet" technique, you should degrease the sheet of paper, that is, simply wet it with water over the entire surface. This will help to avoid "swelling" of the glazed areas next to the dry ones.
Paste technique
The impasto technique is most often used when painting with oil paints or acrylics. Here, paint is applied in thick layers, undiluted with water or other thinners, onto the canvas in strokes.
Paintings painted in this way are maximally textured. The final color, depth of the image, features of light and shadow - all this will depend not only on the chosen palette, but also on the size and direction of the paint strokes. By lighting the painting from different angles, you can also achieve different, for example, a more dramatic effect.
Gouache should be used with care for the impasto technique. A thick layer of regular paint of this variety cracks and crumbles when completely dry. In this case, layers should be applied in small strokes, wait for them to dry, and then apply new ones.
Sgraffito
Another technique used with different paints, and not only with them, is sgraffito. It is used to create accent details, highlight volume, contour and special textures. Such accents look especially impressive in the foreground of the painting.
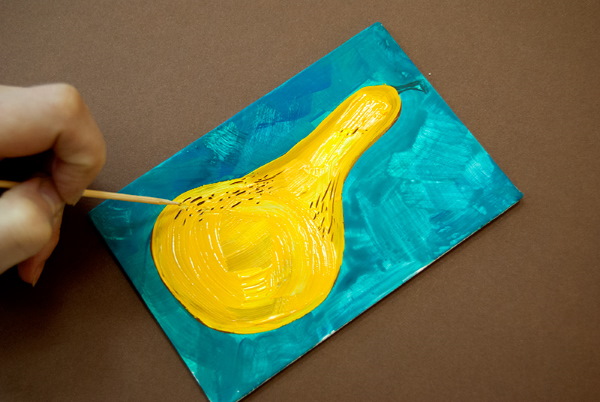
Since gouache dries quite quickly, unlike oil and acrylic, you need to work with it in the sgraffito technique as quickly and confidently as possible. A fresh layer of paint, not too liquid, is applied to a previously prepared and dried background, and then, according to a certain idea, part of the paint is “scratched” with a toothpick, the tip of a knife, the sharpened back end of a brush, etc.
Mixed media
Gouache is a fairly versatile paint that can be used to paint in a mixed style. This applies to both the use of different techniques and different materials.
The background of the painting can be filled with glaze, for example, for a smooth transition of sunset shades. Then, using the same technique, add images of trees, bushes, houses in the background, using a dark color diluted with water.
The details of the painting are drawn using the impasto technique - individual leaves in the foreground, paving stones on the path, ears of grass. Sgraffito will help to highlight interesting accents in the lighting of the landscape.
Mixed technique also involves the use of different paints on one canvas. Gouache goes well with acrylic, tempera, watercolor and pastel. This type of paint can serve both as a background fill and as a drawing of the main plot of the painting.
Step-by-step master classes in gouache painting for beginners
Gouache painting for beginners (step-by-step lessons with photos and videos help to learn coloristics, feel the depth of the composition, use different techniques of applying paint) is recommended to be mastered with simple paintings.
Still life
To paint a still life, it is important to remember not only the basic techniques of working with paints, but also the rules of composition. For beginners, the easiest option is to paint a still life from life, putting together the objects that are at home or easy to buy in a store. The easiest option is to use fruits or vegetables.
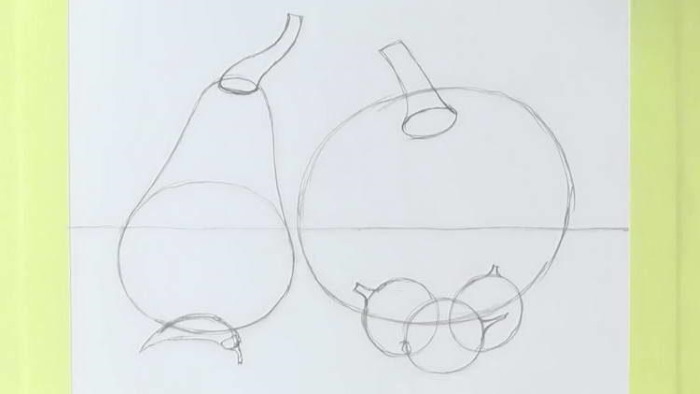
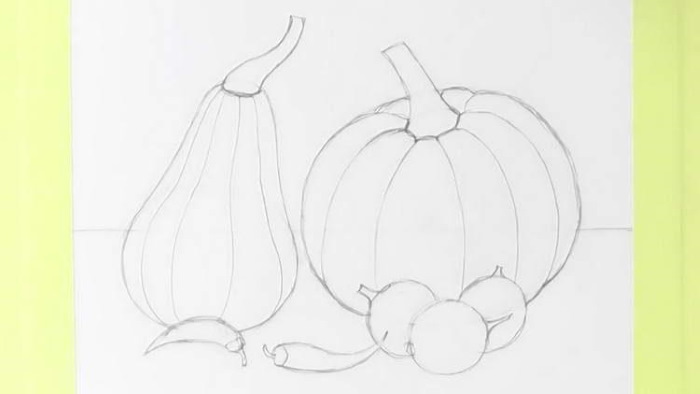
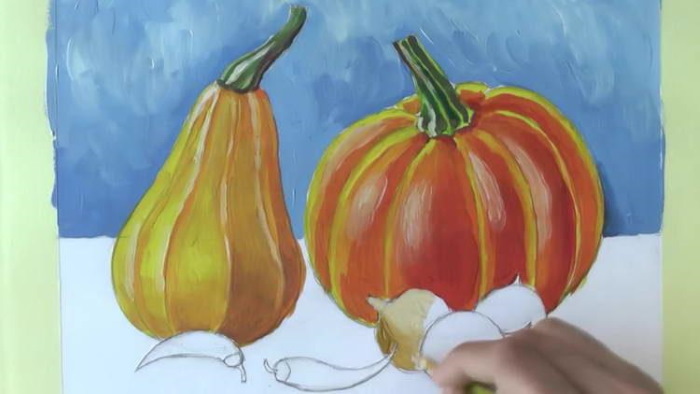
How to paint a still life with pumpkins, onions and chili peppers using gouache:
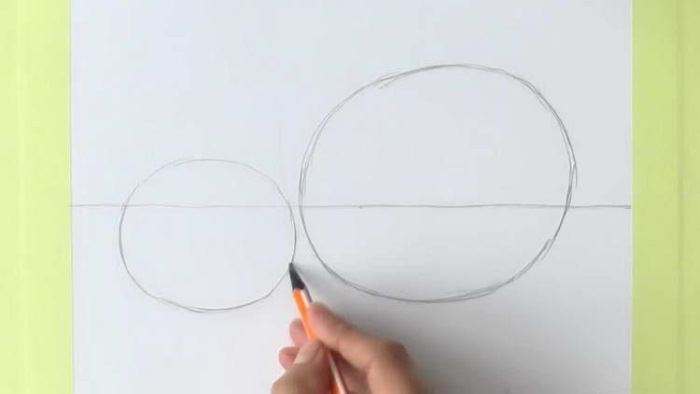
- Drawing a sketch begins with defining the plane of the table. Here it is important to remember the rules of perspective.
- The objects are placed on the table, one by one, from farthest to nearest. If the drawing is done from life, it is easier to maintain proportions. Large objects (two pumpkins) are placed at the back, onions and chili peppers will be in front of them.
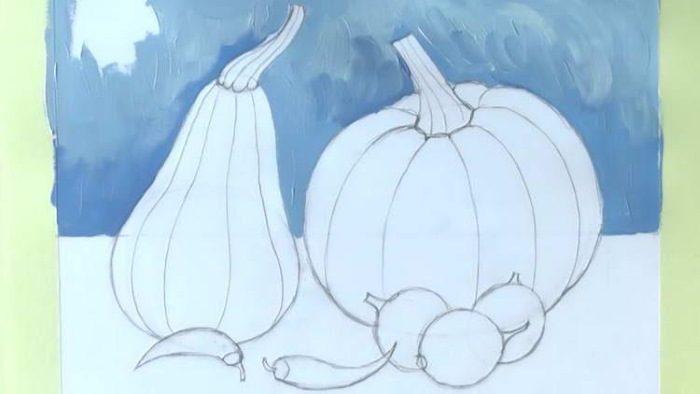
- It is easier to start painting from the background, not forgetting about working with light and shadow - some areas will be lighter, others darker. It is better to choose a color that contrasts well with the colors of the composition.
- When painting pumpkins, it is important to highlight the depressions on the surface of the vegetable with dark shades of orange and brown; well-lit parts can be painted with yellow and ocher.
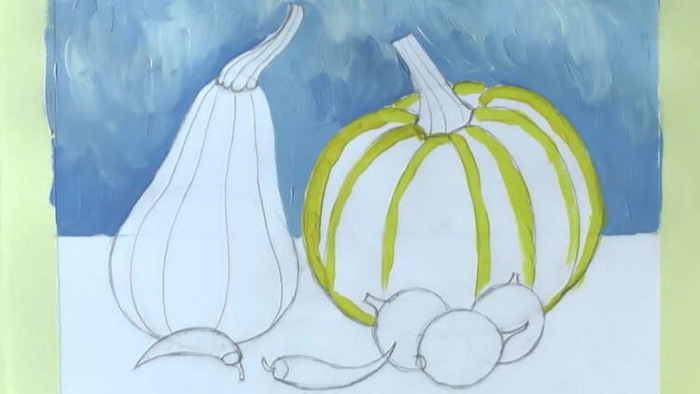
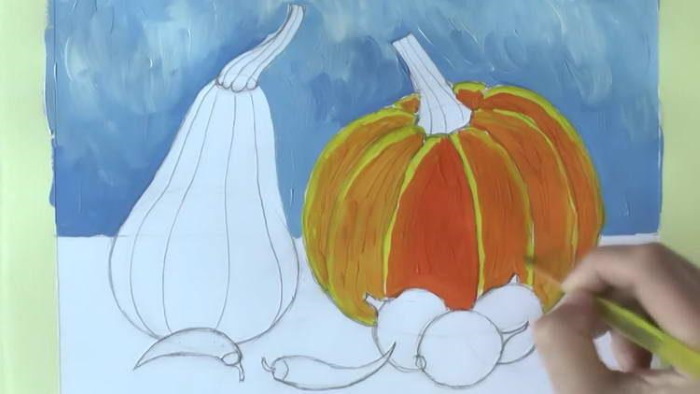

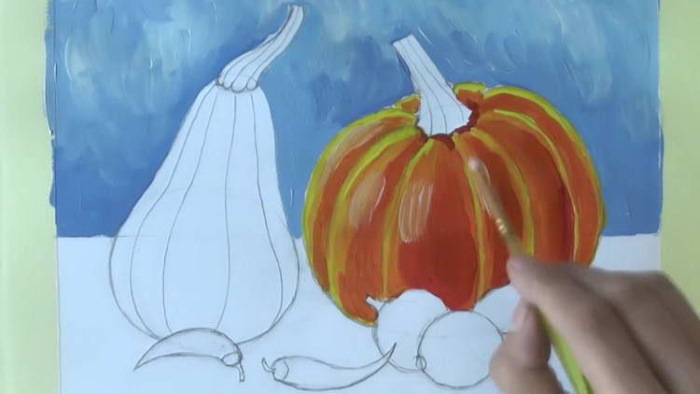
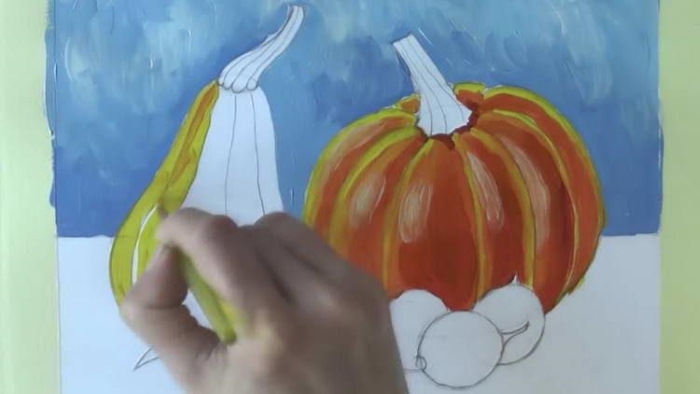
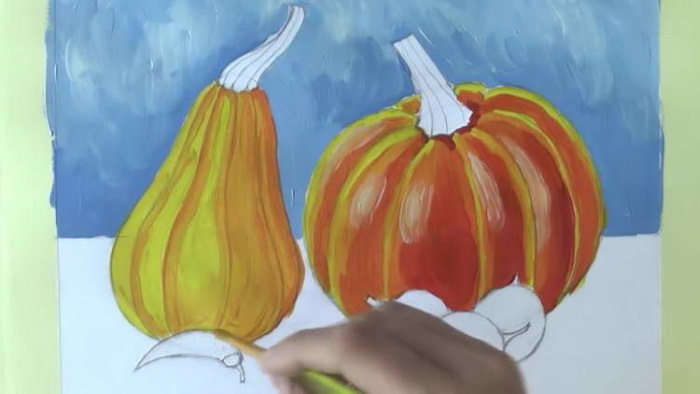
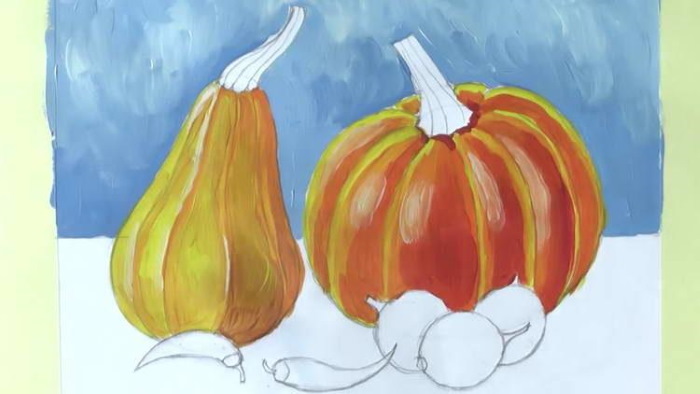
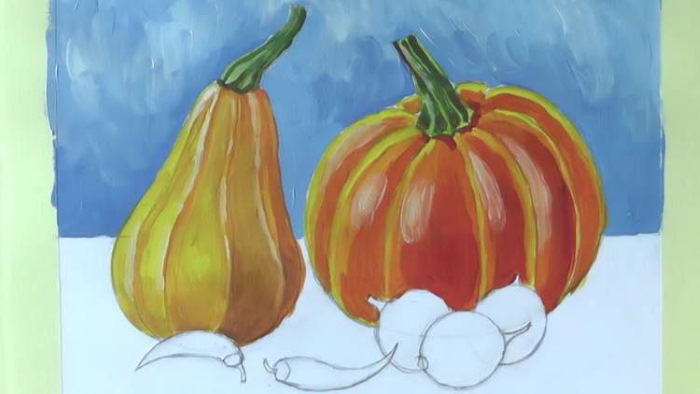
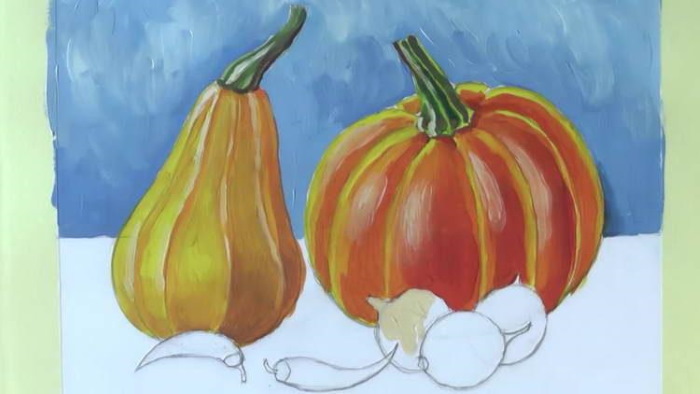
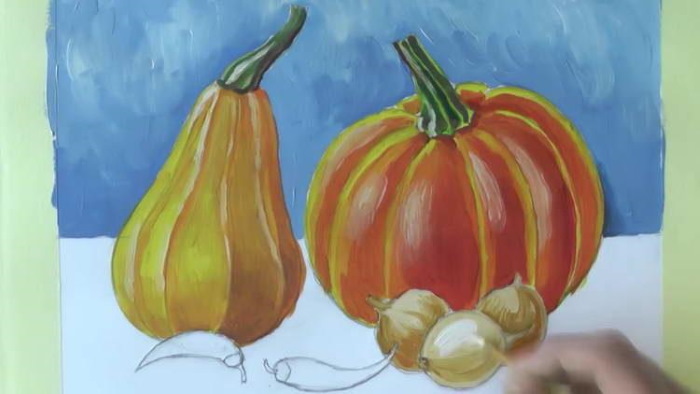
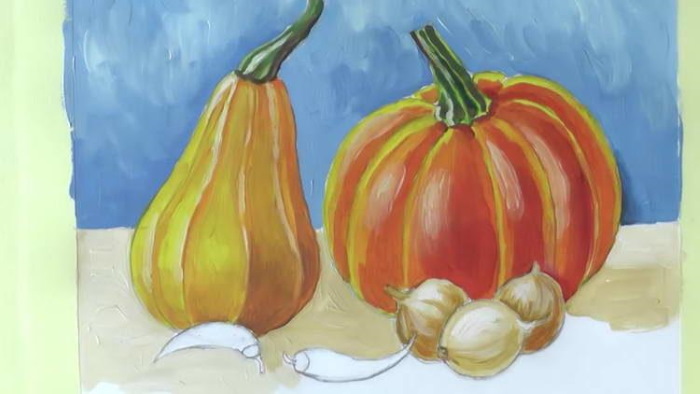
The color transition should be smooth. On the most convex parts, add translucent highlights of white color. When painting the vegetable stalks, you also need to take different shades of green gouache.
- After the pumpkins, the table is painted, it is important to make it more textured, adding thin strokes of different shades, creating the feeling of a wooden surface. Shadows from the pumpkins are added.
- For painting onions - the same principle, ochre, white, light yellow colors will do. A shadow is also added to this vegetable from the background, a color glare from the light orange pumpkin may appear.
- For chili peppers, dark shades of red are needed, with a highlight of light pink, almost white, applied to the lightest areas. Pepper stems will be a slightly lighter green than pumpkin stems.
- On the table, you now need to add shadows from both the onion and the pepper. You can include reddish or yellowish shades. On the background (wall), you should also make darkening along the border with the vegetables, on the opposite side from the light source.
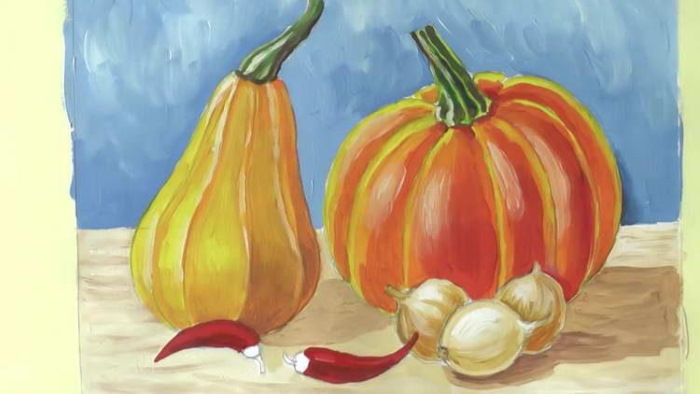
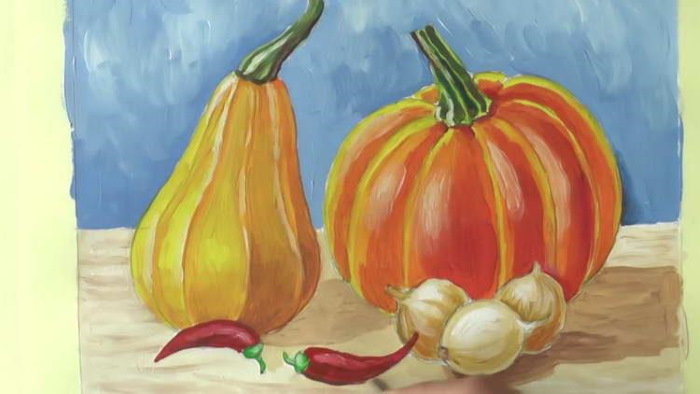
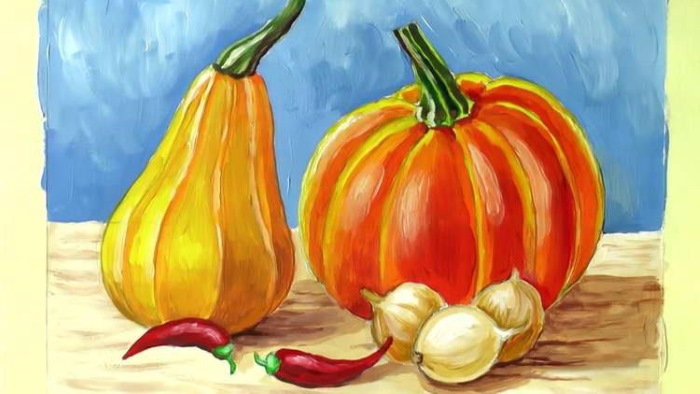
The texture of objects is created, among other things, by the direction of brushstrokes. Spot application of paint with “stuffing” movements is suitable for rough textures; for glossy textures, sweeping strokes in one direction are suitable.
Scenery
Painting landscapes with gouache is very easy, especially when combining several paint application techniques. Beginners will appreciate paintings with a small number of details, but with rich shades and contrasts.
How to paint a savannah landscape at sunset with gouache:
- The main part of the painting is the sunset sky. You will need shades of yellow, orange, red, pink. From top to bottom, 2/3 of the sheet is filled with a gradient of these shades, starting from red-pink to light yellow. You can leave a semicircle in the center of the sheet, like the sun going beyond the horizon - yellow or light pink.
- The horizon line is drawn, the canvas is painted to the end. You can use dark brown or black colors, create the effect of hilly land with the help of shades and strokes of different directions.


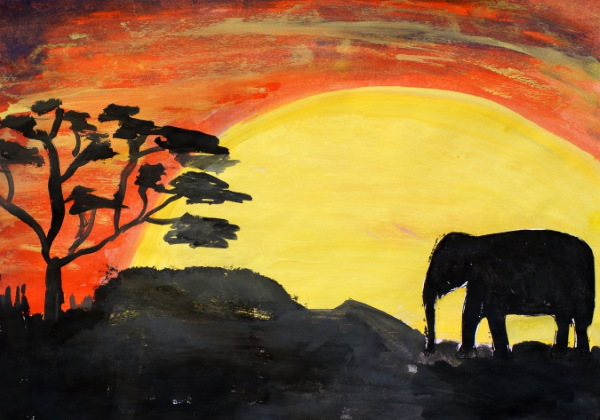
- In the foreground of the painting, the bushes, tree and birds will stand out. The shade of these elements can be the same, the darkest (black or brown).
- The tree on the left side of the composition is branchy, tall, and its crown extends beyond the canvas. The trunk and branches are drawn with confident lines of varying thickness. The leaves are quickly drawn with a sponge using dabbing motions.
- The bushes on the right side of the painting are also painted using a sponge and dark paint.
- Birds in the sky are a good addition to the overall composition. No need for detailing, just a couple of curved "ticks".
The same principle can be used to paint pictures of a night forest, sunset on a lake. Pictures with a "daytime" plot require more detail.
Space
Drawings of space are a field for the imagination of children and budding artists. It can be depicted as seen from the earth (dark sky with myriads of stars), with schematic planets, in the genre of science fiction, repeating color schemes from photographs of galaxies.
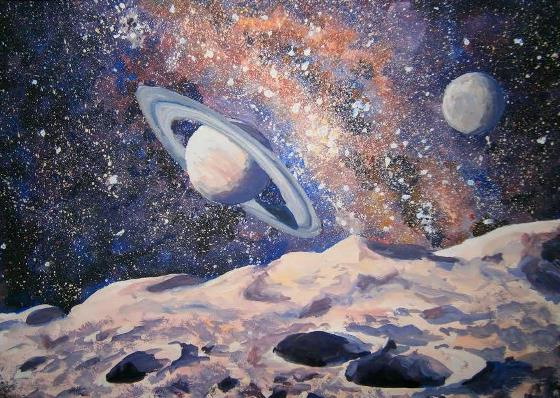
Space drawing "Bright Galaxy" step by step:
- The canvas is placed horizontally. The border of the "galaxy" is indicated - an ellipse strongly elongated to the opposite corners.
- Without painting over the part with the ellipse, the drawing is filled with dark blue or black, the closer to the center, the lighter the shade should become.
- The "Galaxy" is painted in different colors, from the edges to the center - light blue, blue, purple, soft pink. In the center is a yellow core with a very light core. The transition between colors is best made as blurry as possible.
- Stars can be easily imitated using white, light yellow or light blue paint. Take a stiff brush (even an old toothbrush will do), dip it into the paint, then use your finger to spray drops of paint from the bristles onto the canvas.
The selection of shades for space drawings can be very different. The easiest way is to get inspired by satellite images and the works of digital artists.
Abstraction
Abstractionism in painting is the absence of objects, realism, time and space. At the same time, the plot and meaning of the work are still laid down at the discretion of the artist.
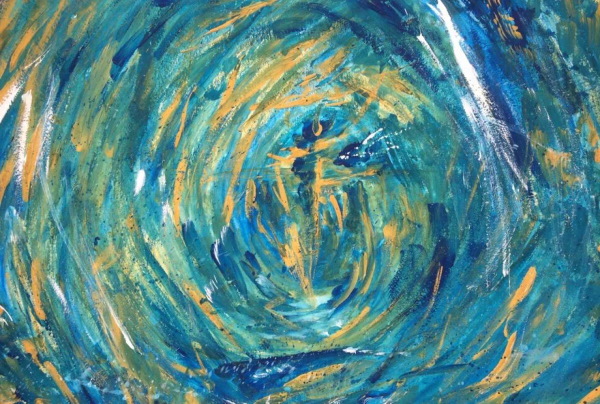
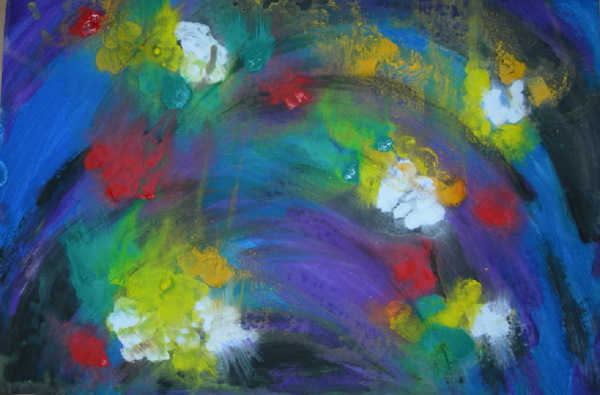
Abstract painting with gouache:
- Often, abstraction in painting reflects the mood of the author, his vision of the moment, event. It is important to choose colors that will harmonize not so much with each other, but with the idea of the painting.
- The strokes can be applied using the impasto technique, one after another, smoothly mixing colors or creating clear contrasts. Another option is to dilute the paint with water and paint "blots" on the canvas with a large brush. The foreground will help add a plot to the painting - a schematic image of a flower, a person's face, a bird, etc.
- In geometric abstraction, it is important to highlight contours and use chiaroscuro. With its help, you can give the picture a special mood - bright, cheerful, or sad, tense, frightening. In this case, the rules of perspective can be forgotten, the genre allows such liberties.
- Another option is a schematic image of flowers, animals, household items. In this genre, you can even draw a still life. Similar drawings are obtained by children, poorly detailed, but recognizable.
Such pictures are often suggested to be drawn during therapy with a psychologist – it helps to release emotions, think about problems from different angles, and identify your true desires.
Sea
Painting landscapes with gouache is an ideal option for beginners. But it is especially convenient to use these paints for depicting the sea.
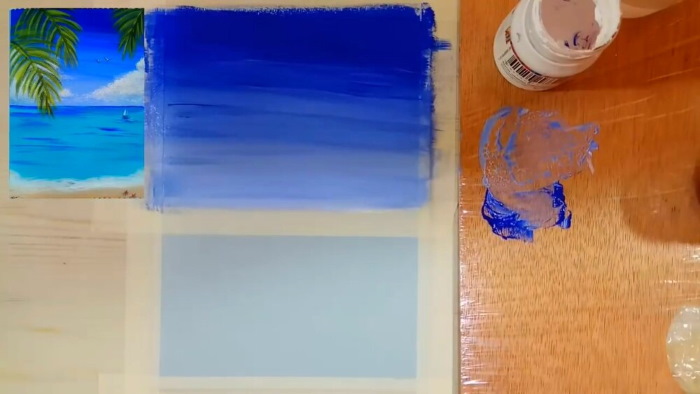
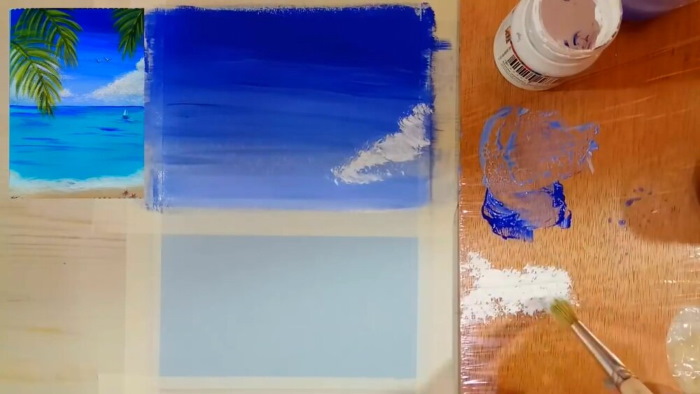
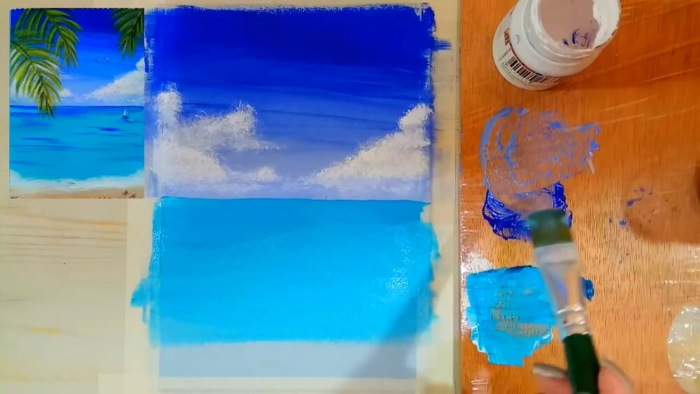
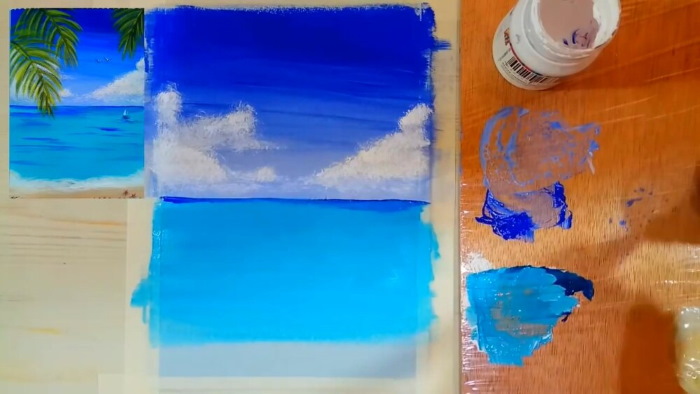

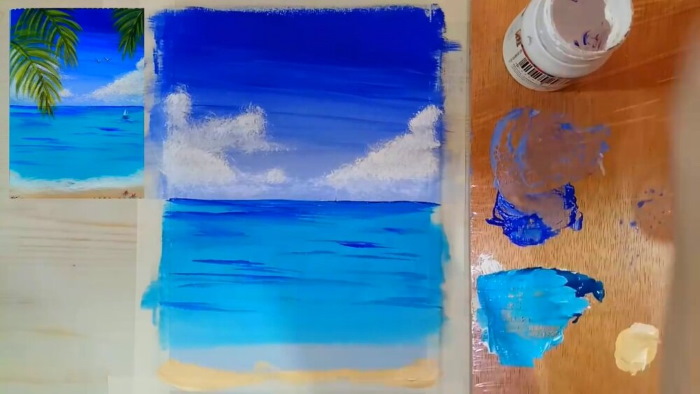
Step by step seascape drawing lesson:
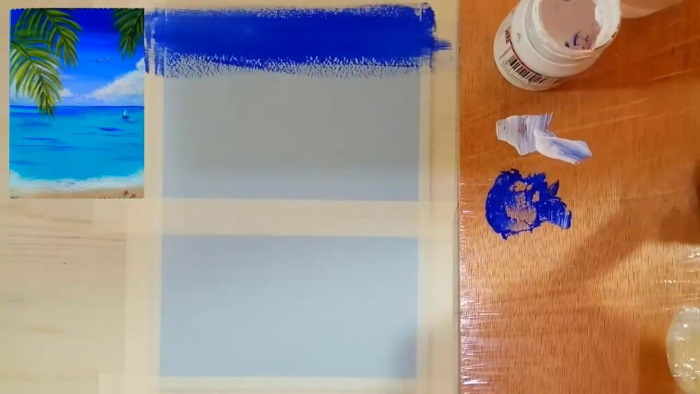
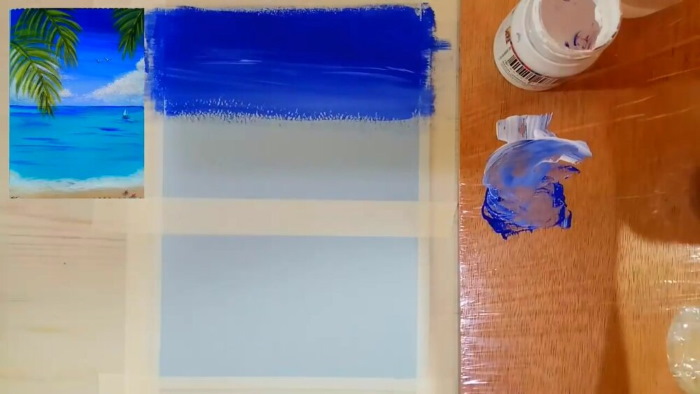
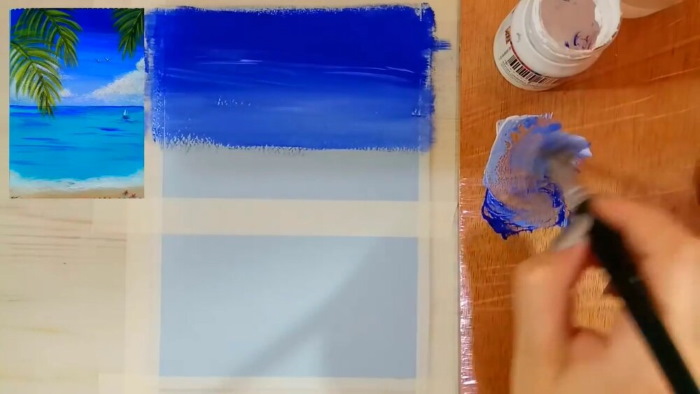
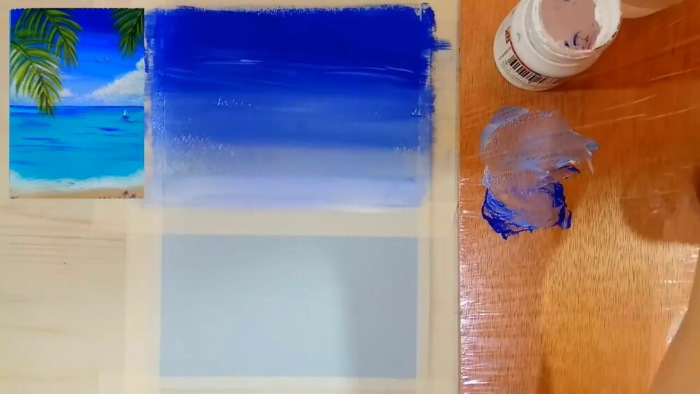
- We divide the canvas into three parts - the sky, the sea, the coastline. The largest part will be occupied by the image of water with a wave in the foreground.
- We paint the background using the watercolor technique - liquid paint on a damp sheet. The sky is a solid blue, turning into white, the sea is blue, the coastline is ochre.
- While the first gradient layer is still wet, use a thin brush and slightly thicker blue paint to paint distant mountains against the sky. From the left edge to the right, the peaks should become lower and more blurred, indistinct. You can add clouds with white gouache in a free space.
- Below the mountains is the water line. It is also drawn on wet paper, in dark blue.
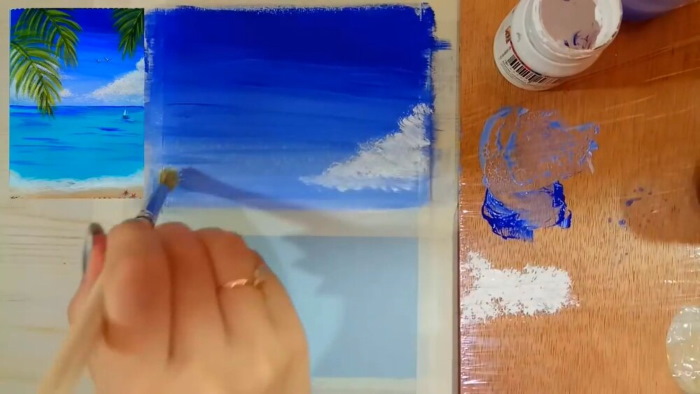
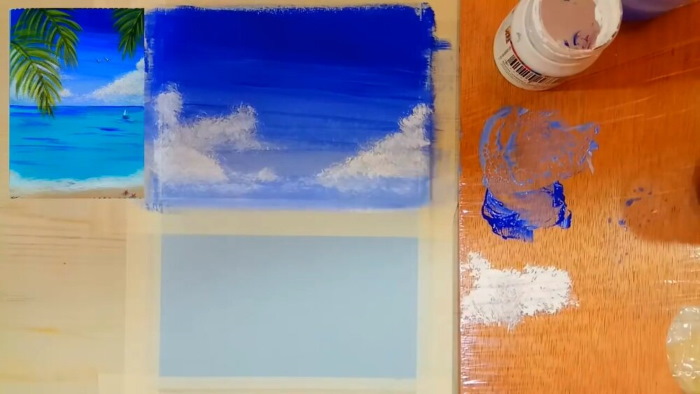
- The main part of the composition will be occupied by the wave. The strokes should not be too sweeping, twisted in the shape of the wave, all in one direction. The direction of the wave itself is diagonally from the mountains in the upper left corner to the middle of the right edge of the canvas.
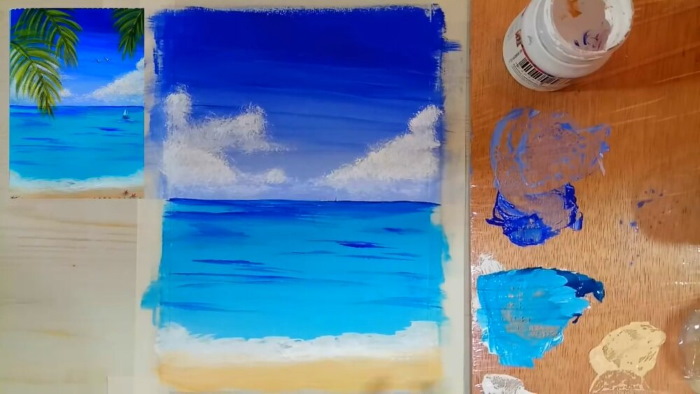
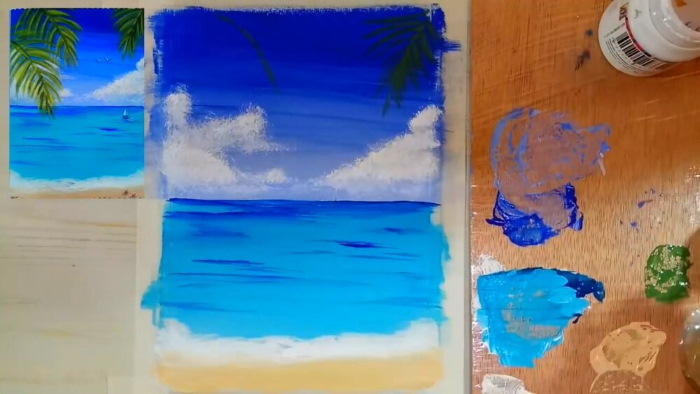
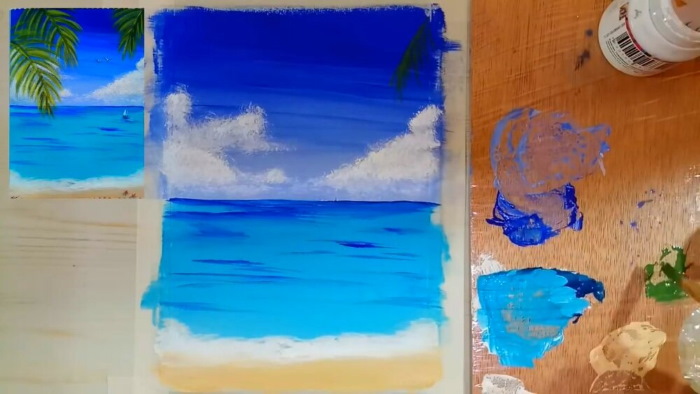
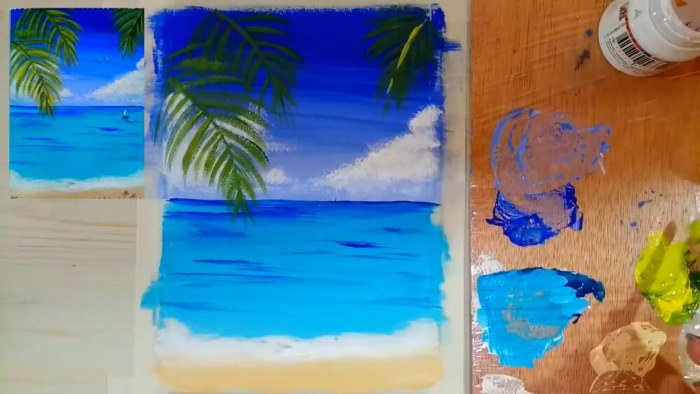
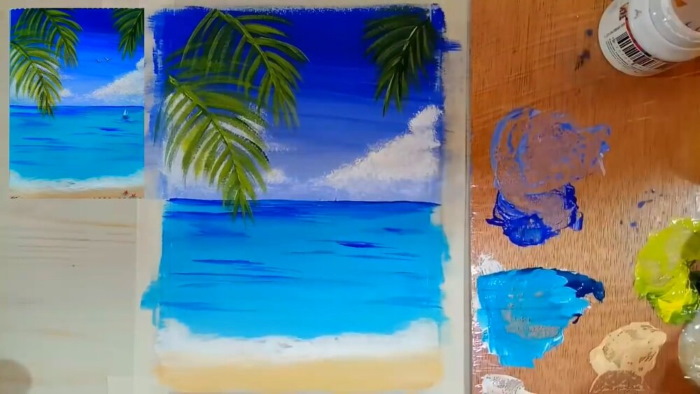

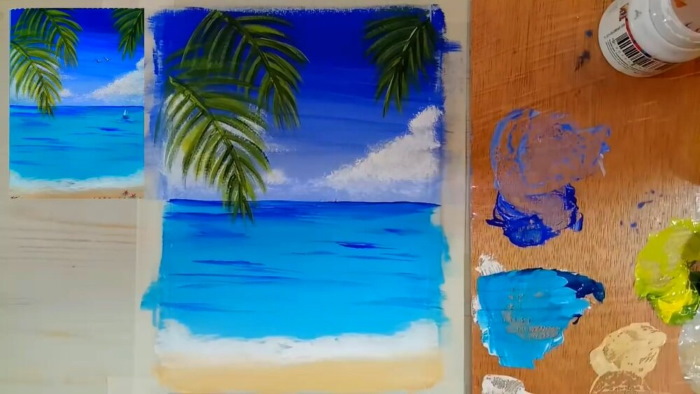
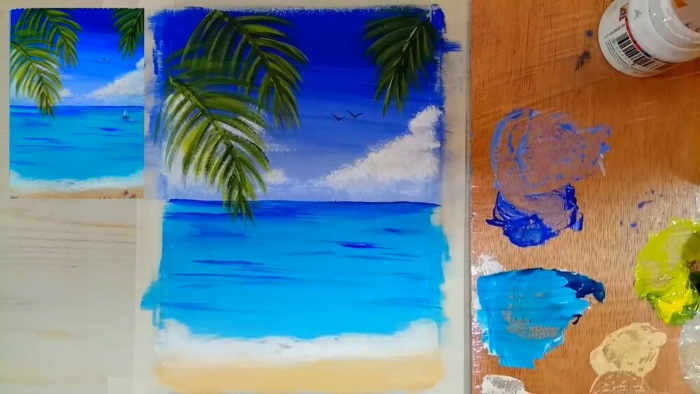
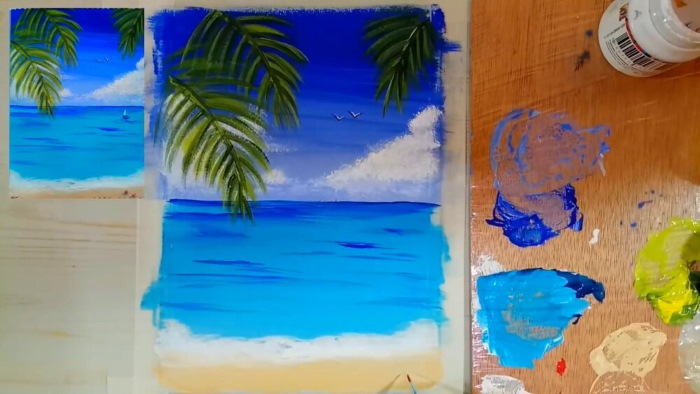
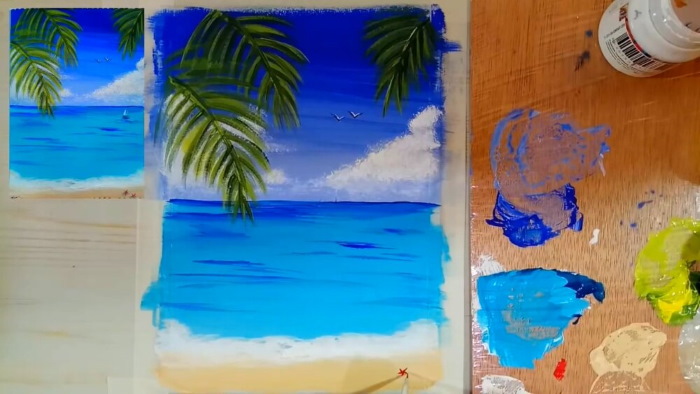
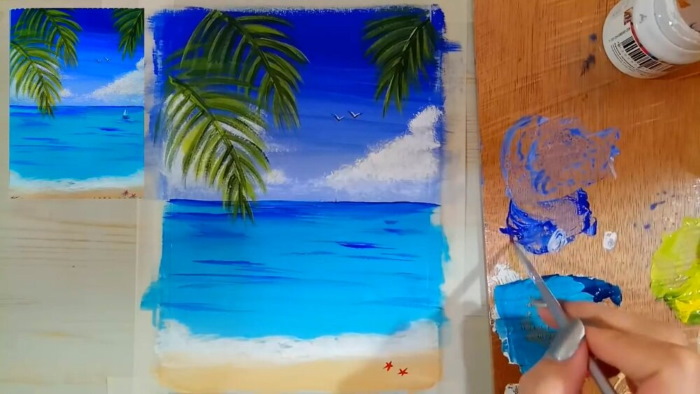
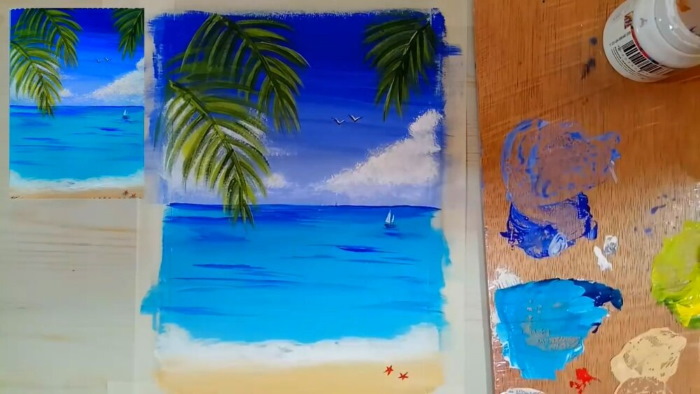
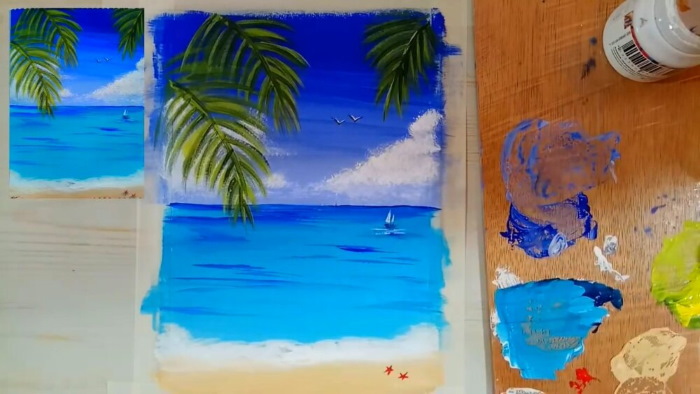
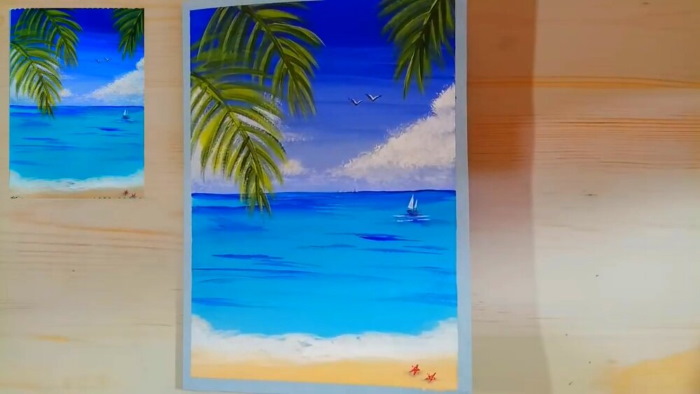
- It is worth adding not only blue, blue colors to the wave, but also greenish, turquoise. The crest of the wave is drawn with white paint, a little chaotically.
- Spatter and foam imitation can be done using white paint and a stiff bristle brush (like the "stars" in the previous tutorial).
- The base of the wave should smoothly transition to the shore. Here you can add many small wave crests, barely distinguishable in color from the shoreline.
Waves and clouds can be painted using the impasto technique. For gouache, you can combine a watercolor background and large, textured strokes.
Tree
For more realistic landscapes, it is worth learning to draw vegetation in more detail. A tree drawing can be done in any technique with gouache, but it is better to use a mixed style.
How to draw a tree with gouache:
- The trunk and main branches of a tree are drawn in the sgraffito technique. To make the drawing realistic, it is worth choosing different tones of brown, ochre, and adding relief using the play of shadows on the trunk.
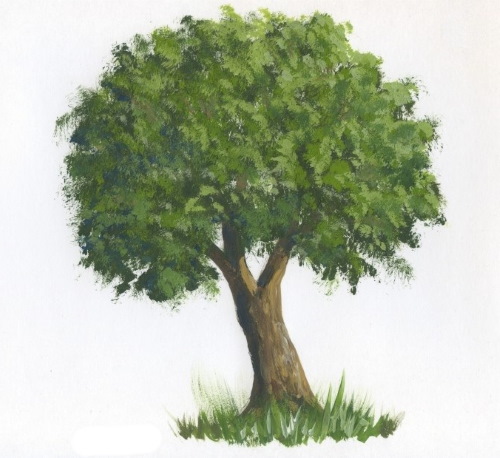
- The shape of the crown is indicated. Here it is better to make a translucent layer of the desired green shade.
- Leaves are drawn with small textured strokes. It is not necessary to make them too small, you can give them "lushness" in another way - first draw the first layer of leaves with a dark color, then go over the crown with a lighter shade again.
- Small tree branches are added in the right places on top of the leaves, then some leaves are added on top of these branches. The image should end up being quite three-dimensional.
The technique with a porous sponge and paint splashes from a brush can also be used in such drawings. The main thing is not to forget about the rules of perspective.
Sakura branch
The classic version of the sakura branch design is soft pink flowers against a blue sky.
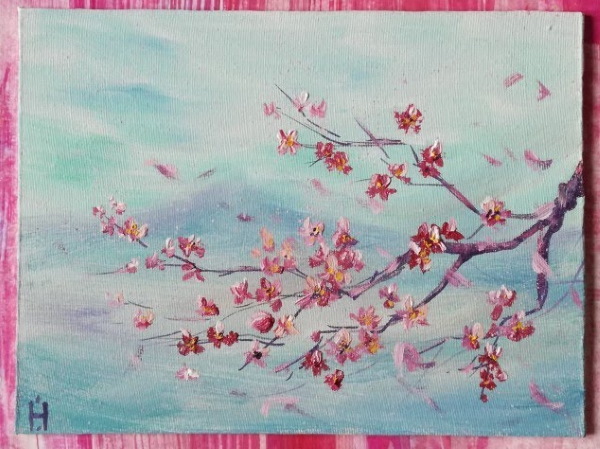
It is not difficult to create such a drawing with gouache:
- For the background, use a fill of water-diluted gouache. You can add a small gradient.
- Using the same principle as in the tree lesson, draw the main branch and several branches off to the sides.
- Five-petal flowers are not too densely located on the branch - you can add 2-3 large blossomed flowers and 5-6 buds of different sizes. When painting flowers, you need to remember about shadows and highlights.
- To fill the background and make the painting dynamic, you can add large splashes of white or light lilac. They can be added before you start drawing the branch, and then small splashes on the flowers. This will give the painting additional volume.
Gouache painting is a great way to relax for both beginner artists in adulthood and for children. Step-by-step lessons will help you master the basics of using different paint application techniques and the nuances of coloristics, and will also inspire you to create new, unique drawings.
Video about drawing
Gouache painting for beginners:
Great!