Almost every woman should have cutting and sewing skills so that she can do your own clothing repairs in the form of lengthening, shortening things, installing a patch or a zipper in trousers. Further in the article you can get acquainted with the features of sewing a fastener with a valance into trousers of women's and men's cut.
Materials and tools
Not only experienced but also novice craftsmen are capable of sewing a zipper into trousers.
To do this, you should prepare the required materials and tools:
- trousers with a valance;
- pins;
- zipper;
- needle with thread material;
- ruler or centimeter;
- chalk or soap;
- scissors;
- a rectangular piece of fabric required to obtain the slope;
- iron;
- sewing machine.
If the fabric material is very dense, it is additionally recommended to prepare a thimble to avoid injuring your fingers when working with sharp objects.
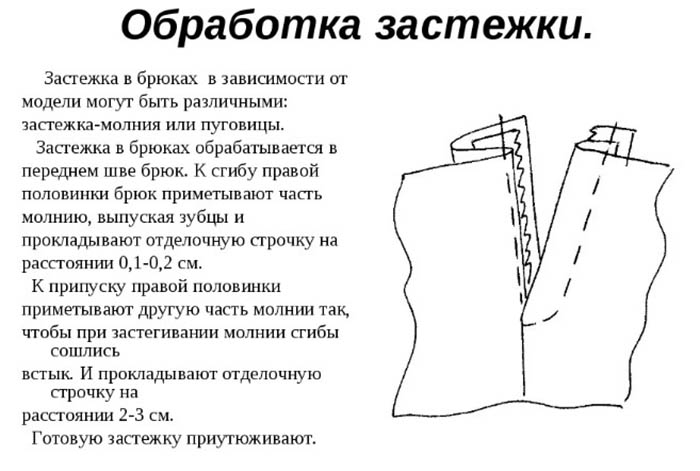
How to sew a zipper into fly pants
It is permissible to sew a zipper into trousers in a non-hidden and secret way. In the first option, the fastener will go through the middle of the garment, disguised under a fabric strip. As a result, the zipper will not be noticeable. Such a rectangular element is called a fly.
Additionally, there is a second strip, which is called a bevel. This detail will cover the zipper at the bottom so that the skin or material does not get caught in the teeth.
The process of sewing a fastener into men's and women's pants is almost the same, but there are some differences. Before sewing, you need to prepare the clothes in advance so that the pockets are sewn on and the darts are stitched.
Technology of sewing a fastener into women's trousers:
- First, make a pattern for the hem from the material that was used to create the pants. Using chalk, draw a rectangular strip on the material, the width of which will be like 2 flys and with an identical length. As a result, the size of the part should be 10x20 cm, the corners at the bottom should be rounded. After cutting, fold the part in half so that the wrong side is inside. Overcast the edges.
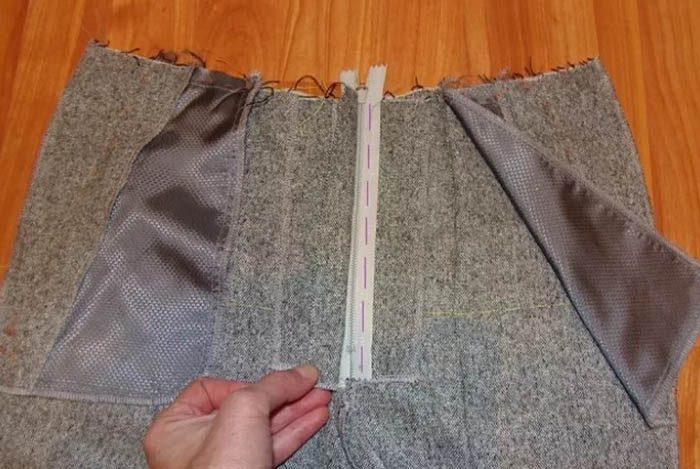
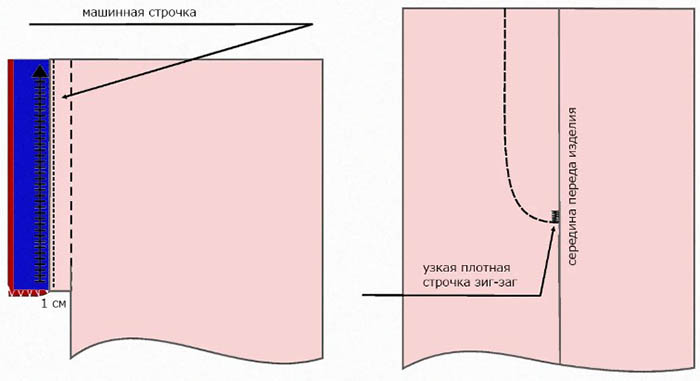
- Mark the center stitch line on the front of the pants, stepping back 1 cm to the left from the seam and drawing a parallel line. This line should be located near the outer edge of the valance. Turn the wrong side inward and baste.
- Place the zipper under the resulting allowance so that the edges of the teeth are visible. Secure with pins. Leave a few millimeters between the top point, from which the seam allowance begins, and the fastener. As a result, the fastener will not form unnecessary folds when closed.
- Carefully place the bevel so that the extended outer sides coincide with the edge of the fastener. The upper edge should be at the waist level of the pants. Initially, baste with threads, then stitch.
- When folding the 2 parts of the trousers, the lines of the middle stitches should match. From the same edge, sew the right part of the zipper tape to the valance.
- Along the edge, overcast the fly, having first turned the trousers inside out.
- On the outside of the garment, draw a strip with chalk along which the fly will be stitched.
- Make a decorative stitch along the marked strip. Stitch the bottom part in a zigzag pattern.
- After finishing the treatment, iron the garment.
This method can be used to make a fly not only on pants. It is acceptable to create a fly on shorts, jeans and some styles of skirts.
On men's trousers, the valance must be placed on the left.
Technology of sewing in the clasp:
- First, iron the fold, folding the fly allowance to the wrong side. Do not iron the right side.
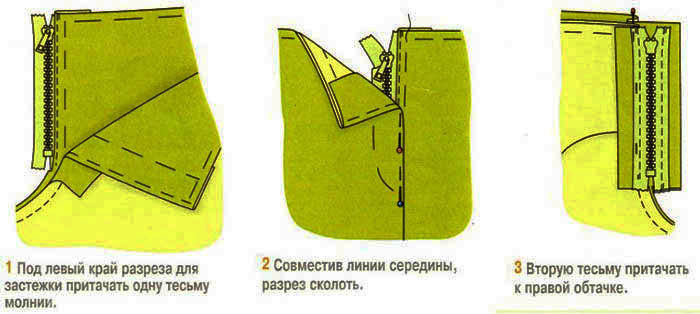
- Align the front part of the zipper with the fly allowance on the right side of the trousers so that the edges match. Place the fastener stopper 1 cm from the bottom and side edges of the valance. Sew the fastener on the right side, stepping back 3 mm from the teeth and moving near the fly border. Turn right side out and fold the stitched piece to the wrong side.
- Place the two halves of the trousers together so that the right sides face each other, and fold back the ironed hem. Secure the distance from the groin area to the stopper on the fastener with pins. Stitch this area on a sewing machine.
- Turn the pants inside out, unzipping and zipping them several times.
- Sew the second part of the zipper to the left half of the trousers, folding the seam allowances of the valances and making a notch with scissors a few millimetres wide along the ironed fold along the upper border of the 2 halves of the trousers.
- Turn the garment over so that the unsewn fastener tape is positioned at the top right. Sew the piece to the valance.
- Turn the garment inside out and fold it carefully to make it easier to trace the outline of the fly with chalk.
- After finishing the valance, create a decorative even seam by going over it in the lower area with a zigzag stitch.
If the fastener is broken, it can be easily replaced with a new one. To do this, you need to carefully rip off the old zipper and sew the new one into its original place along the old lines. This process does not take much time.
It is permissible to sew a zipper into trousers if the garment was not originally cut to include a fastener. For this purpose, you need to rip open the middle seam from the front area, which will be used to sew in the zipper.
The trousers need to be placed horizontally, then the fastener should be placed on top and the areas where the zipper will be located should be marked. In this case, the fly will be missing. In this regard, it is necessary to make indentations of 2 cm from the right mark and cut off unnecessary material.
Afterwards, the garment must be turned inside out and the sewn-in element must be secured with pins. First, the first side must be stitched, then the second. Upon completion of the work, a stitch must be made along the seam and the pants must be ironed.
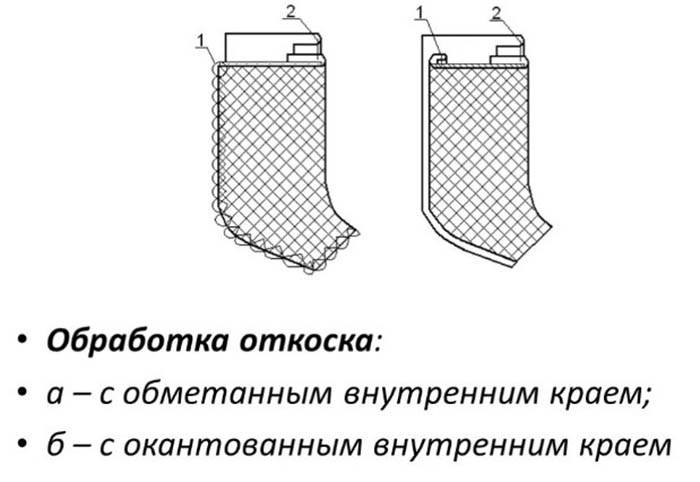
Processing of the zipper, fly and hem
Trousers of both male and female types may have a fly, presented in the form of a slit to the waist, which can be fastened with snaps, buttons or a zipper. In the process of sewing clothes, this detail is often placed in the middle line of the front area of the item. Such an element of clothing should be processed before sewing the belt, as well as stitching the crotch and side seams.
There are 2 ways of facing the valance:
| Type | Peculiarities |
| Set-in | It is presented as a separate piece of fabric that needs to be sewn directly to the fastener. |
| One-piece | In this case, the detail must be laid in the process of creating the pattern. To do this, in the front area of the garment, along the middle line, you should add a rectangular element. The width should be 5 cm, and the length - 19 cm. These sizes are considered standard. |
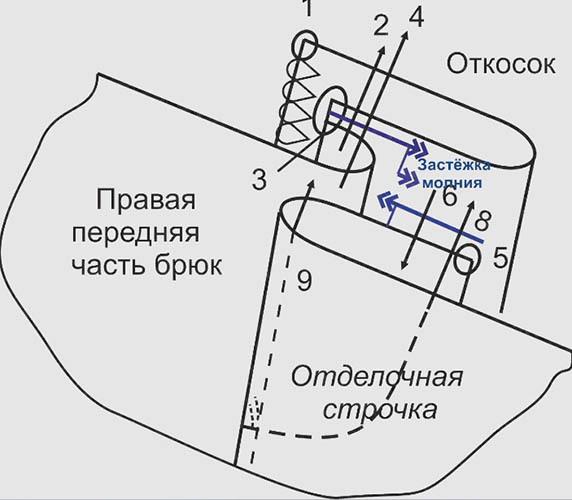
When designing women's trousers, the facing should be placed on the right, men's trousers - on the left. The fastener additionally has a slope, presented in the form of a fabric strip, hiding the fastener from below. At the same time, this detail will protect the body with clothes from getting caught in the teeth of the zipper.
The process of processing the zipper, fly and hem using the set-in method:
- Fold the material in half so that the front part is inside. Make a pattern for the front part of the garment, keeping a 1 cm allowance on the middle seam. The length of the allowance should correspond to the length of the fastener plus 3.5 cm. Thanks to this allowance, the second part of the garment will completely hide the fastener after sewing on the edge. If desired, it is permissible to duplicate the allowance on the inside with a shared edge.
- For women's trousers, the seam allowance should be cut on the garment part that is located on the right. The cuts of the two halves should be processed on an overlock.
- Cut out the facing of the valance from the same material as the pants. The length of the rectangle should be equal to the length of the allowance, and the width – 4 cm, while rounding one corner.
- Duplicate the element using interfacing and process the rounded part on an overlock.
- To create a bevel, cut out a rectangle, the width of which should be 8 cm, and the length should be equal to the length of the allowance on the front element of the garment.
- The element, folded into 2 parts lengthwise with the right side inward, is stitched along the shortened side with a straight seam. It is permissible to stitch slightly diagonally so as not to create a right angle.
- Cut off the allowance and turn the bevel inside out so that the wrong side is on the inside. Finish the free edge with an overlock or bias tape.
- Place the facing of the valance and the right part of the garment face to face, leaving 0.5 cm from the edge of the facing. Stitch to the mark where the fastener begins.
- Turn the facing back and stitch, leaving 0.3 mm of space between the facing and 2 cm of the edge.
- Place the two front pieces together so that the right sides are inside. Stitch the middle line, not reaching the 1 cm border and the lining facing by 1 cm. The edge of the facing should be folded.
- On the left side of the garment, cut a line together with the seam allowance, which should be perpendicular to the beginning of the seam. Do not reach the line by 2 mm. Due to this, it is permissible to iron the seam without problems, so that nothing sticks out. In this case, it is permissible to turn the seam to the right and topstitch.
- Place the fastener on the left side of the garment border with the wrong side facing up. Place the material stop at the bottom at the mark that was originally made. Using the foot on the sewing machine, stitch the fastener as close to the teeth as possible.
- Place the bevel on top, joining the borders and marking. Unfold the piece and lay the seam to the limiter at a close distance to the edge.
- Move the bevel to the side and fix it with tailor's pins. From the outside, align the valance in the middle. Fix it with pins or baste it along the border.
- Turn the pieces inside out and join them together. Secure the valance facing with the fastener using pins.
- Sew the fastener to the facing with 2 seams: close to the teeth and near the edge of the zipper.
- Sweep the strip of the valance facing stitching from the outside. Initially, sew a straight seam vertically along the marked strip, finishing near the beginning of the rounding. Release the bevel from the pin and return it to its original place, laying it flat. Sew along the marked rounded line, also sewing the bevel in this part.
- On each side of the rounded part, make fastenings using a dense stitch in the form of a small zigzag.
If the fastener is extended, before cutting off unnecessary ends, it is recommended to initially remove the limiters from the top and move them to the optimal level. In this case, in this area, you need to remove 1 tooth from each part of the fastener, from the upper border of the clothing down by 1.5 cm.
Sewing a zipper into trousers is possible using a simpler method of processing the hem with a set-in facing, which is suitable for beginners:
- On the overlock machine, process the edges of the middle line of 2 parts. On one part, duplicate the 1 cm allowance using an adhesive edge.
- Duplicate the valance facing with interlining, then hem it with an overlock. Sew the edge element.
- Attach the fastener to the bevel, aligning the side and bottom edges of the zipper along the edges of the bevel at the bottom and sides. Sew the fastener close to the teeth.
- Place the bevel on the element with the allowance downwards, while the outer part of this part should look upwards. Align the edges and stitch, moving the sewing needle to the left by 1 mm if possible. As a result, the seam securing the bevel with the fastener will remain to the right of the main connecting seam.
- Attach the facing of the valance to the part without allowance with the right sides facing each other. After joining the edges, stitch at a distance of 7 mm from the border, if the middle line has an allowance of 1 cm. Then bend back the allowances on the facing and make a topstitch on the outside at 1 mm from the border.
- Cut off the seam allowance of the valance facing, leaving 3 mm.
- Fold the clothing pieces with the outer sides facing inward and secure with pins. Sew the middle line 1 cm from the edge.
- Finish the seam at the bottom of the fastener stop line. Iron the areas where the zipper parts are sewn together.
- Place the valance evenly on the front side and pin it near the edge. Turn inside out and join the garment parts together evenly. Pin the unstitched fastener tape to the facing of the valance.
- Sew the fastener to the facing so that the seam is located as close as possible to the edge of the fastener tape.
- Place a decorative stitch. Bend the bevel to the side and lay a seam along a straight line, finishing near the curve and making a fastening at the end.
- Return the bevel to its original place and continue stitching along the rounded element, securing it at the middle line.
- Shorten the allowance so that it can be hidden behind the edge. If the material is fraying heavily, initially process the allowance on an overlock with a center stitch.
The one-piece type of valance facing should be laid down in the process of pattern design. A rectangle 20 cm long and 5 cm wide should be added to the middle line of the front element. This detail can be rounded at one corner from the bottom or kept straight.
Processing process using the one-piece method:
- Stitch the middle line to the zipper cut mark. To do this, fold the 2 front pieces of clothing together so that the right sides are inside.
- Cut off excess material on the left side of the zipper allowance, leaving 1 cm.
- Cut out a 6 cm wide bevel, the length of which will be equal to the length of the allowance. Round off the lower corners.
- Fold the bevel in half so that the wrong side is on the inside. Finish the rounded part with bias tape or an overlock.
- Sew the zipper under the left edge of the fastener. Sew the bevel under the zipper, joining the edges. Baste each layer.
- Sew a seam 2 mm from the edge over the zipper.
- Perform processing of the one-piece facing of the valance on the right side using an overlock, then make a turn-in and iron it.
- Attach the facing to the zipper tape.
- Make a turn-up on the inside of the zipper tape with a bevel for ease of stitching. Then turn the garment inside out and mark the decorative seam line.
- Stitch along the marked line. Secure the bottom of the valance facing. A frequent narrow zigzag stitch is suitable for these purposes.
Sewing a zipper into women's pants is practically no different from the technology of sewing a fly fastener into men's pants. In this case, you will only need to change the direction. At the same time, the process of processing clothing parts does not require performing complex elements. In this regard, novice seamstresses can handle this work.
Video about sewing a zipper into trousers