Crafts using the quilling technique are beautiful and unusual. Various master classes with diagrams show how to make them. They are useful for beginner needlewomen.
Materials for working in the quilling technique
To create works using the quilling technique, you will need the following tools and materials:
- paper strips;
- roll making tool;
- glue or glue gun;
- stencil ruler;
- scissors;
- tweezers;
- safety pins;
- stationery knife;
- ruler;
- a base for gluing parts of a composition together.
Paper strips can be purchased ready-made in the store. Another option is to cut the purchased colored sheets yourself with a stationery knife, fixing the width with a ruler. The paper density should be from 120 g/m2.
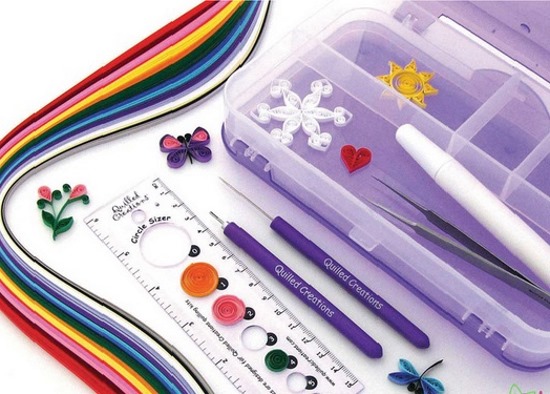
A stencil ruler is necessary for creating elements of the same diameter.Scissors and tweezers should be chosen with sharp edges. They are necessary for creating fringe and precise placement of elements in the composition.
Safety pins are used to secure the pieces of the craft during gluing for greater accuracy.A cork mat is recommended as a base for gluing., since paper elements treated with glue are not glued to it. It can be replaced by a piece of foam plastic of the required size, wrapped in thick cellophane.
Useful tips for quilling
For those just starting to master the creation of crafts using the quilling technique, it is important to carefully study the patterns and listen to the advice of experienced craftsmen.
For more color when creating flowers It is recommended to combine stripes of different shadesA harmonious combination of different types and shapes of curls and rolls will help make the work extraordinary.
If the strip is not long enough, you need to glue the two strips together and press them tightly. This way, the transition will be almost invisible.
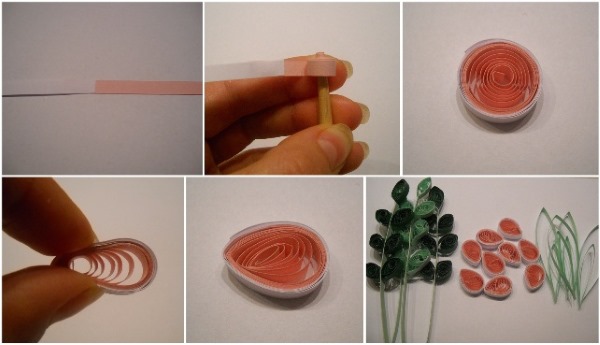
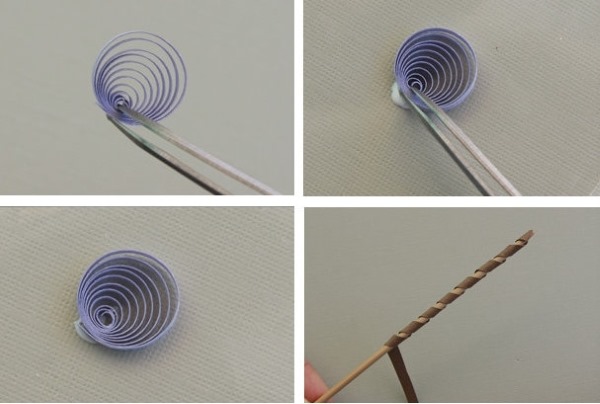
Quilling for Beginners: How to Make a Drop
The basic element of quilling is a drop. To create it, you need a minimum of materials: a paper strip of the required width and a quilling tool.
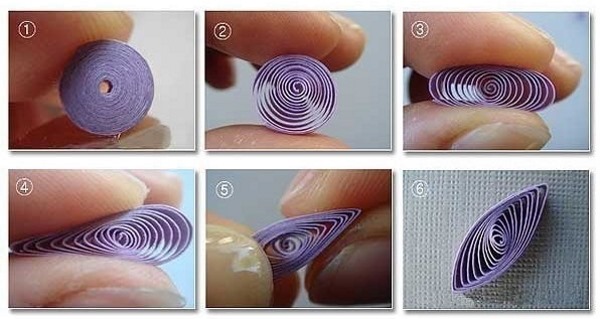
The procedure for creating it is as follows:
- One edge of the strip must be curled with a fingernail or a ruler.
- Thread it through the slot of the quilling tool and begin to roll it tightly into a roll.
- Remove the blank and lower it slightly (the size of the drop depends on the degree of unwinding). Secure the free end with glue.
- Gently squeeze the workpiece with your thumb and forefinger from one edge, forming a sharp end.
Simple flowers using quilling technique: step-by-step instructions
Quilling crafts for beginners, patterns on how to make a simple flower, available to everyone.
To create it you need:
- paper strips 0.6 cm wide;
- glue;
- tweezers;
- quilling tool;
- stencil ruler;
- bead.
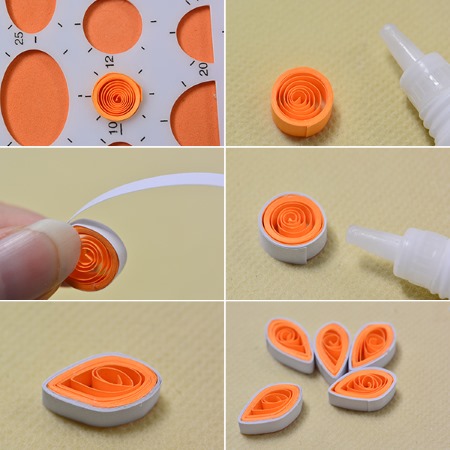
From paper strips, using a tool and a ruler, it is necessary to form 5 identical spirals (according to the principle of creating a drop). Secure the free ends with glue.
Using tweezers or your fingers, create a petal shape in the form of a "boat" from the blank. Do the same with the remaining spirals. The petals should be the same length.
Glue the first two petals at the very base so that they are opposite each other. Then carefully glue the remaining three. Glue a bead into the middle of the flower.
Volumetric flowers: chamomile, sunflower
To create a voluminous chamomile you will need:
- paper strips of white (10-12 pcs.) and yellow (1 pc.) color;
- green paper circle with a diameter of 2 cm;
- scissors;
- quilling tool;
- glue;
- wire;
- Florist's tape - green.
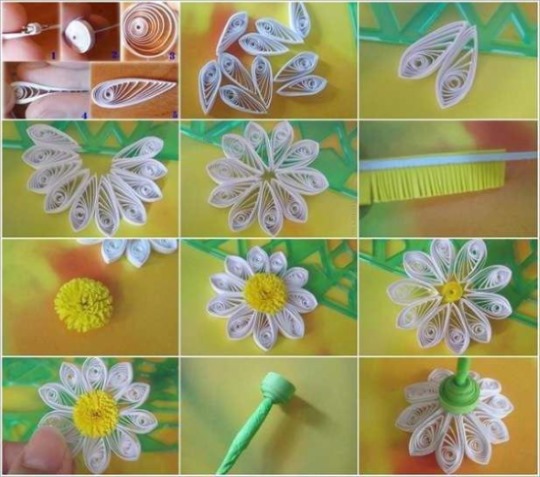
Form elongated drops from white paper strips 3-5 mm wide. Cut a fringe from a yellow strip 8-10 mm wide in 1-2 mm increments. Twist the core using a quilling tool. Seal the free edge with glue.
Cut the paper circle to the middle and glue it into a cone at a large angle. Glue the petals tightly to each other along the edge of the cone.
Wrap the wire with floral tape and pierce the base of the cone. Put the yellow core on the end of the wire. For additional strength, coat its bottom with glue and press it to the cone.
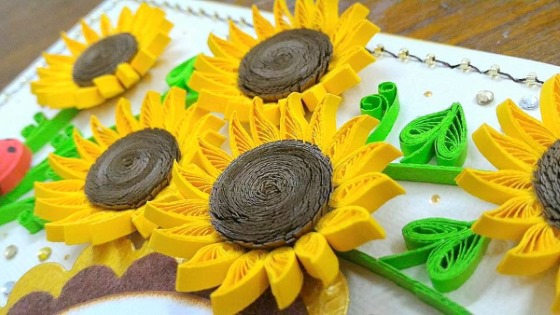
To create a sunflower you will need:
- paper strips of yellow, black and green;
- stencil ruler;
- quilling tool;
- wire;
- floral tape (green);
- safety pins;
- green cardboard circle with a diameter of 3-3.5 cm;
- glue gun and PVA glue.
Roll up the yellow strips using a quilling tool. Lower them to a diameter of 3 cm (for convenience, it is recommended to use a stencil of a suitable size in a ruler). Secure the free edge with glue.
Shape the finished spiral into a drop. Use safety pins to move the center of the spiral to the elongated edge. Fix with a drop of PVA glue.
When it dries, remove the pins and squeeze the opposite edge of the workpiece with your fingers. It should become sharp. There should be at least 25 such petals per flower. The width of the strips is optional - from 3 to 7 mm.
From black strips 3 mm wide, it is necessary to twist tight rolls and fix them with glue. Make them convex, slightly pushing out the middle. They must be made at least 20 pcs.
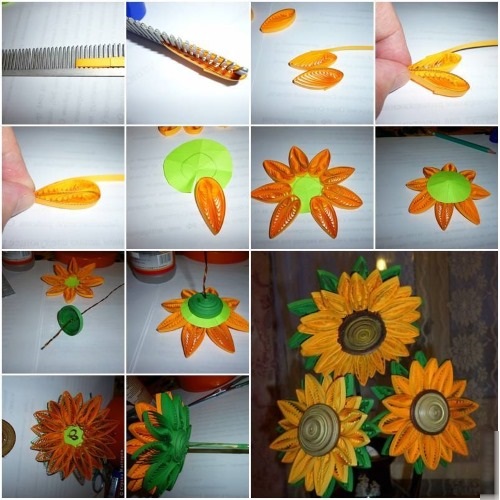
Make a cone from a green cardboard circle. Pierce its base with a wire wrapped in floral tape. Using a glue gun, attach the black spirals tightly to each other in the middle of the cone. In this case, you should leave 0.3-0.5 cm of free edge on which the petals will be glued.
They need to be placed in close proximity to each other, but not tightly. In two layers, one on top and one on the bottom of the cone. At the convex base of the cone, twisted green paper strips 3-5 cm long and 3 mm wide are glued in a circle.
How to make a chrysanthemum
Quilling crafts for beginners - diagrams on how to make a chrysanthemum are very clear.
To work you will need:
- white paper strips 3 mm wide;
- scissors;
- tweezers;
- quilling tool;
- glue.
Step-by-step video instructions for creating a chrysanthemum using the quilling technique:
Cut a large quantity of paper strips into 9, 7, 5 and 3 cm pieces. Fold them in half. Use a quilling tool to curl the ends of the strips by 0.5-1 cm on each side.
Glue two 9 cm strips crosswise. Consecutively glue the remaining blanks at a slight angle, forming the first layer of the chrysanthemum. Then make the second layer from 7 cm strips; the third - from 5 cm blanks; the core consists of 5-7 strips of 3 cm.
Each subsequent layer requires fewer blanks. It is recommended to cut the paper in stages, as each layer is filled.
Snowdrops from quilling
Snowdrop in quilling technique is one of the easiest flowers. You need paper strips of white and green colors of any width, glue and a white sheet of paper.
Using a quilling tool, form 3 identical spirals with dense filling. Flatten them on both sides to form a boat. Glue them together at the base.
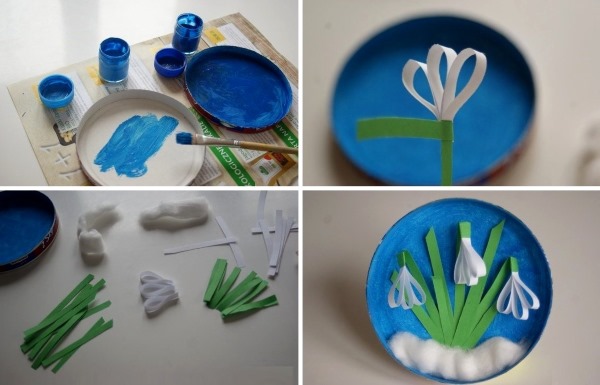
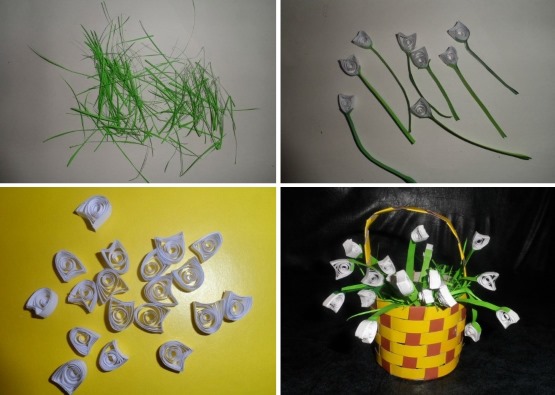
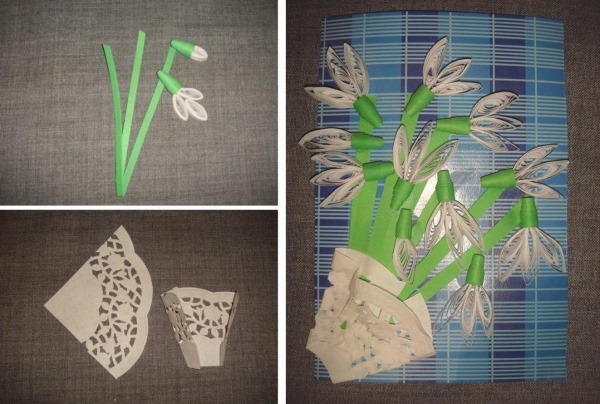
Twist a tight spiral from a green strip and use your fingers to form a crescent shape. Glue the petals and green base onto a sheet of paper. If desired, you can make a stem and leaves from the green stripes and glue them on.
Flower bouquet in paper plastic technique
An unusual design of a flower bouquet using the quilling technique can be created from unnecessary fashion magazines.To do this, you need to select the brightest and most contrasting sheets. Cut them into strips 4-6 cm wide, then cut the strips themselves into fringe.
A thick wire is wrapped with a ribbon of any color you like. A cut strip is wound onto it, coated with glue at the base. A bouquet is formed from such flowers, which can be placed in a tall cardboard box covered with gold paper.
Quilling step by step: tree from napkins
To create a tree from napkins using the quilling technique you will need:
- napkins of different shades of green, brown, orange;
- quilling tool;
- glue;
- dense base fabric.
It is necessary to cut the napkins into strips 40 mm wide. Fold each one twice and twist it into spirals using a quilling tool. Secure with glue. Press some of the brown spirals with your fingers on both sides to form a “boat” shape. They are used to form a tree trunk, gluing them together using the mosaic technique.
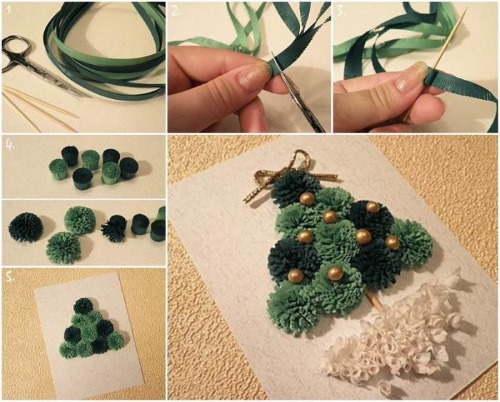
The crown is formed from round spirals of green and orange shades, glued in a chaotic order, tightly to each other. If desired, it is possible to make several layers in the crown.
Making a butterfly using quilling technique
A butterfly in the quilling technique is made from 4 teardrop-shaped, 1 round and 1 oval rolls. Teardrop-shaped spirals (wings) are glued to the oval blank with the round end. A round blank is glued on top, imitating the butterfly's head. Strips-antennae twisted on both sides are attached to the head.
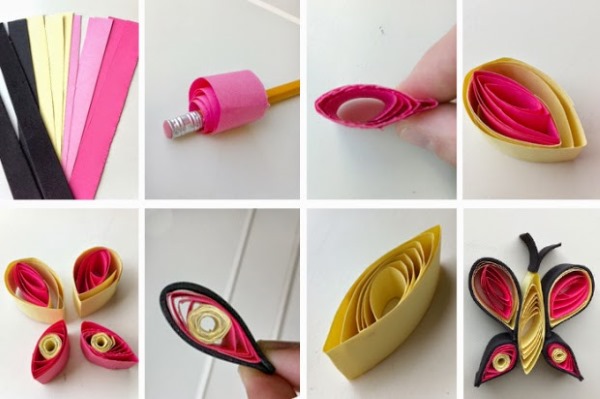
It is recommended to use bright, rich colors for the stripes used to create the butterfly.
Master class on contour quilling: a bunch of grapes
To create a bunch of grapes, you need 15-20 pieces of tightly twisted spirals of purple-lilac flowers. They need to be glued to paper in the form of a bunch of grapes.
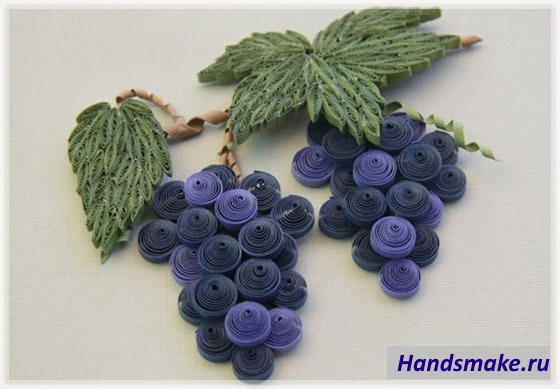
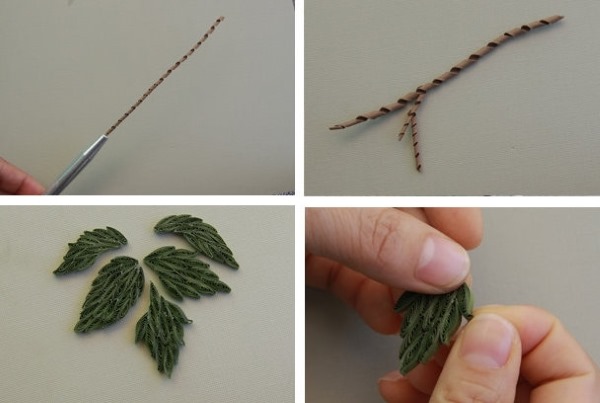
If desired, it can be made more voluminous, in several layers. Grape leaves are cut out of green colored paper and glued to the base of the bunch.
Easter decor: Easter eggs using quilling technique
Easter decorations using the quilling technique allow you to beautifully decorate your table. The simplest option is to prepare many small round and teardrop-shaped elements.
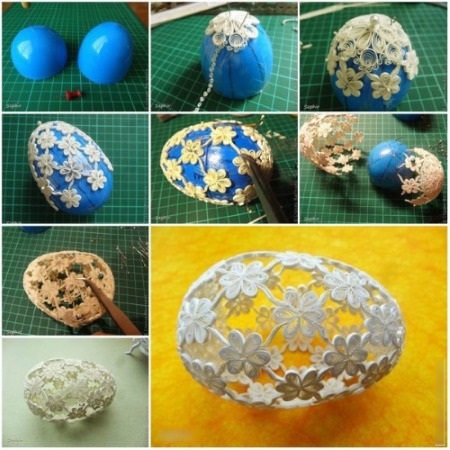
Using a glue gun, the blanks are attached to a plastic egg (which toys are usually sold with), forming flowers and any other decorative elements. If desired, such decor can be used to decorate an edible Easter egg.
Paintings using paper rolling technique
Pictures made using the paper rolling technique can be flat or three-dimensional. The subject of the paintings depends only on the depth of the author's imagination. It can reflect feelings, thoughts, mood. Gradient, abstract paintings in the quilling technique are beautiful and unusual. Such works can be given for holidays, birthdays to friends and relatives.
Picture "Owl" in quilling technique: step-by-step description
To create an owl you need to have:
- paper strips of black and brown colors;
- glue;
- sheet of paper;
- quilling tool.
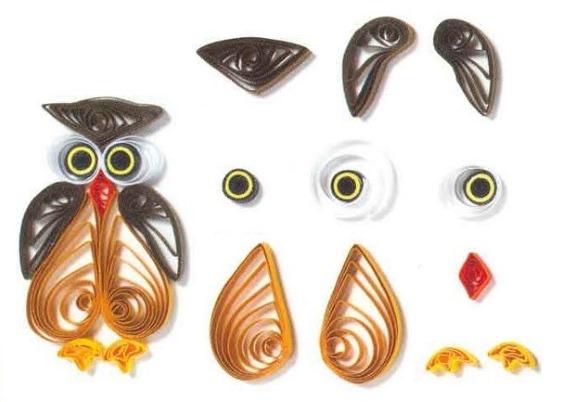
From the strips, you need to create round and teardrop-shaped blanks. Round spirals are glued together, forming the owl's head. Two teardrop-shaped elements (the owl's ears) are attached to the head at the top, with a sharp base. Two white circles with black dots (the owl's eyes) are glued in the middle of the head.
The body and wings are formed from elongated, teardrop-shaped brown blanks, which are glued together opposite each other according to the mosaic principle. The owl's paws are drawn in black paint or a marker.
Quilling snowflake step by step
To create a snowflake, you need paper strips of sky-blue shades. Rolls are twisted from them and teardrop-shaped, diamond-shaped, square elements are formed. For greater strength, they must be glued with glue in several places. From the available blanks, you must create a snowflake at your own discretion.

You shouldn't glue the elements together right away. It is recommended to first simply make up the snowflake, and then gradually glue the adjacent blanks.
Quilling crafts: paper animals
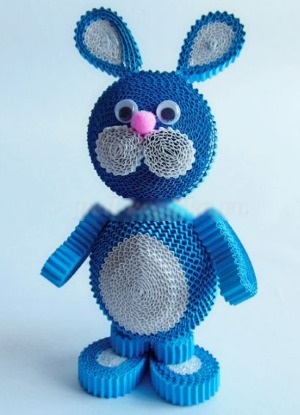
Quilling crafts for beginners - a diagram of how to make a hare will help in its creation.
It is necessary to roll tight rolls in the shape of a drop from two colors - white with a pink center, in the amount of 2 pieces - these are the ears of the hare.
One large white roll of slightly flattened shape is the body. Two teardrop-shaped white rolls, bent at an angle are the front legs.
One small round roll is the tail. Two medium teardrop-shaped rods (two of them are slightly larger) are the hind legs.
Using a glue gun, all parts of the composition are carefully glued together. The nose and eyes can be twisted or cut out of colored paper.
Marine quilling: fish
Quilling crafts for beginners - the scheme of how to make a fish will be clear to everyone. To create it, you will need one large blank in the shape of a "boat" - the body of the fish, and several of the same small ones - fins.

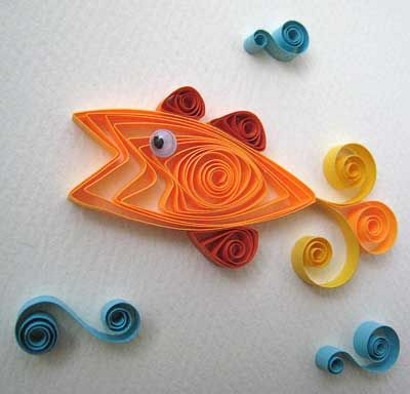
One fin is glued to the top and bottom, and two to the tail. It is recommended to choose a contrasting color of fins relative to the body. - this will add attractiveness to the work. The eye for the fish can be cut out of ordinary paper.
What else can be made from quilling?
Using the quilling technique, large capital letters are created for holidays and theme parties, three-dimensional figures, and figurines. All kinds of bouquets of flowers will delight those around you for a long time.
A gift made with your own hands using such an unusual technique will be appreciated by the birthday boy more than one bought in a store. At the same time, it can be meaningfully related to the person's hobbies.
Crafts in the quilling technique are inexpensive. Even a beginner can master their creation according to the proposed schemes. The activity can captivate for a long time. And the finished works will decorate the walls and add coziness.
Article formatting:Natalie Podolskaya
Video about crafts using quilling technique
Video about quilling crafts for beginners - diagrams and how to do:
My children and I often make crafts in the quilling style - it’s interesting and entertaining, and most importantly, the children are very happy with the results.