Weaving figures from rubber bands is very popular among children and teenagers. To learn how to create things from rubber bands yourself, you do not need expensive equipment and special skills. Before you start weaving, you only need to buy the following tools: a slingshot; rubber bands of different colors; a machine; a hook (plastic or for knitting).
The creator of this type of handicraft is Chong Chun Ng. Together with his family, he started manufacturing weaving machines. His children tried to weave rubber bands into figures and bracelets, but they had difficulties. To help his daughters, he invented a machine that was a board with nails on it.
Instead of rubber bands, Chong took pieces of straws of different colors. The master's invention helped his children improve their weaving skills. To support the man, his family invested all their savings in this project. To help future buyers, family members filmed master classes in video format.
Features of weaving figures on a slingshot
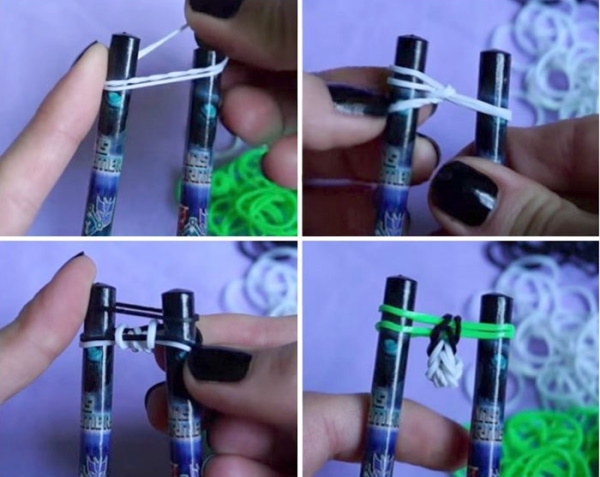
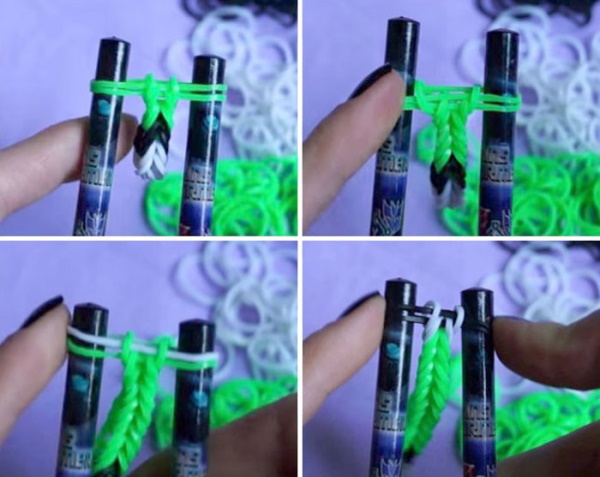
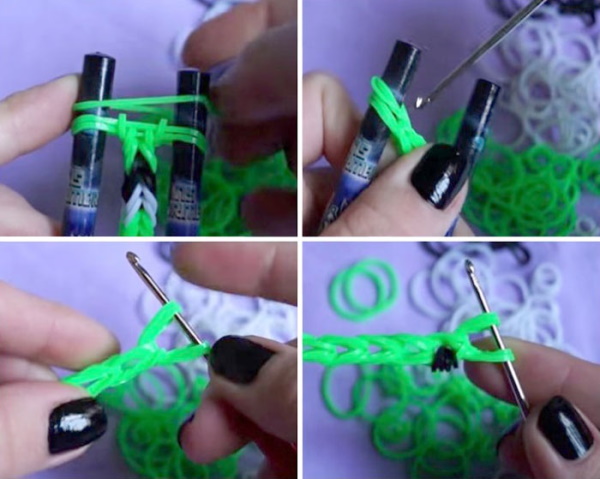
Rubber band figures can be made without having complex structures. A slingshot will do, since only 2 posts are used when weaving. When working with a machine, a larger number of posts must be used.
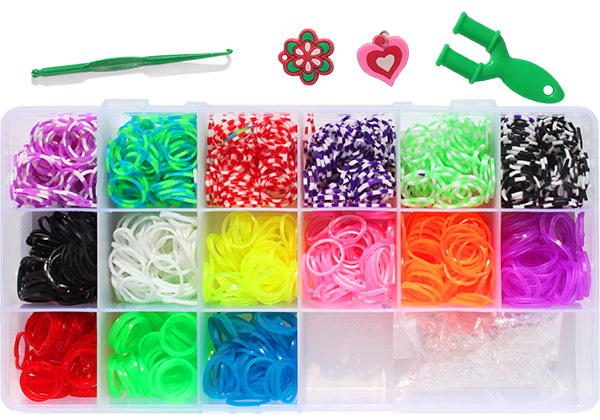
The slingshot can be purchased at any craft store. It is sold together with rubber bands of a certain color. The small loom is a plastic slingshot with two horns and a handle that allows you to hold it. To prevent the rubber band from twisting during weaving, the horns of the slingshot have the shape of concave grooves. Before you start weaving, you need to hold the loom by the handle.
The rubber band kit includes a slingshot and a plastic hook. This hook is used to remove the finished figurine or bracelet from the slingshot. If this device is not included in the kit, you can use a crochet hook.
Most often, a slingshot has 2 columns, but there is also a more complex version - 4 columns. More voluminous figures are woven on a more complex tool. Both types of slingshots have grooves that help to grab the rubber bands using a hook. To prevent the rubber bands from slipping off the machine, there are limiters at the top and bottom.
When placing rubber bands on the slingshots, do not twist them, as this will spoil the appearance of the craft. If you make a mistake during the work, the entire weaving will have to be redone. In order not to break the hook when throwing off several turns at once, it is better to use a thicker device. The hook must be placed with the open part away from you so that the loops do not slip off.
Simple figures for beginners
Beginner craftsmen can weave such figures as:
- ball;
- heart;
- star.
You don't need a machine to weave the ball. You need to twist the rubber bands around the cotton pad so that they fill all the empty spaces on it. The first rubber band needs to be secured 3 times in a figure eight. The intersections of the second and subsequent rubber bands with the first should form a cross.
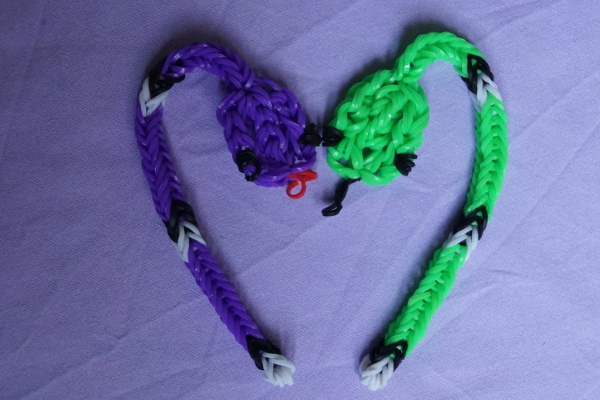
Rubber band figurines, the weaving of which does not require special skills, are quite popular at the moment. However, many inexperienced craftsmen wonder which bracelets or figurines to start weaving with. A figure such as a heart will suit beginner craftsmen.
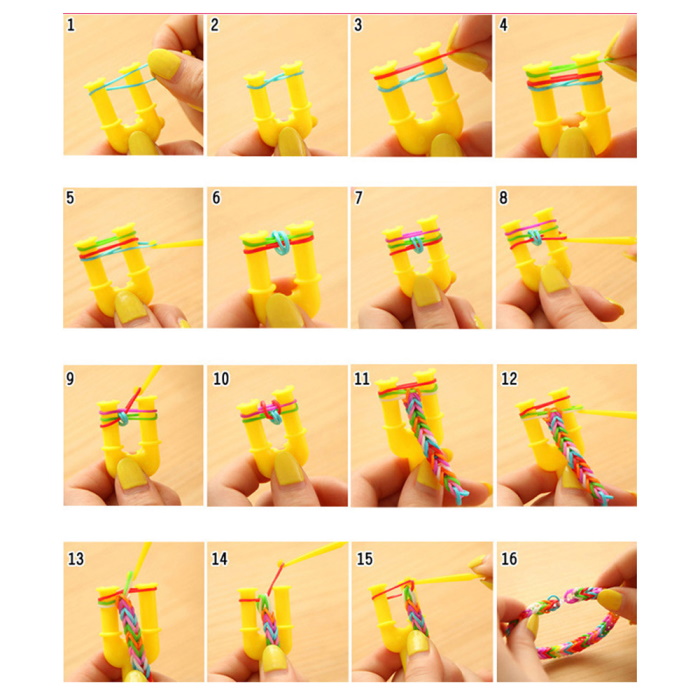
To weave a heart you will need:
- Wrap the rubber band around the right side of the slingshot 3 times.
- Place 2 rubber bands on the machine.
- Use a crochet hook to remove the elastic bands from the right column that were placed earlier.
- Put a couple more rubber bands on the tool, remove the loops from two posts.
- Move the already woven rows down and put on another pair of elastic bands.
- Remove the rubber bands from both sides, put the rubber bands back on the horns and throw them off.
- Place the remaining pair of rubber bands over the 2 columns, then repeat the steps from step 6.

- Move the rubber bands from the left to the opposite side of the slingshot.
- Take the end of the braided pigtail and throw the end of the pigtail over the right column.
- To weave the second part of the heart, you will again need 10 rubber bands. Put the first pair on 2 posts of the slingshot at once.
- Move the loop from the left side of the tool, lower the weaving down. Throw on the next 2 elastics.
- Throw off the rubber bands, throw on a couple more rubber bands.
- Using the hook, drop the rubber bands. Place the last pair of rubber bands on the tool.
- Throw off the rubber bands, then transfer the top rubber bands from the right side of the machine to the left.
- Insert the hook into the very first elastic band in the work. Pull it onto the right column and move the entire weave down the slingshot.

- Place 2 rubber bands on 2 columns at once, and drop the top rubber bands from the right side of the slingshot onto them.
- Place a pair of rubber bands on both parts of the slingshot and drop all the rubber bands from the two columns onto them.
- Place the last elastic band over the columns and drop the loops from two columns onto it.
- To secure the edge of the woven heart, move both loops onto the hook, then pass one through the other.
- Leave the resulting loop so that the figurine can be used as a keychain.
Rubber band figures, which are woven by both adults and children, can decorate a bag or backpack. By making a pendant in the form of a three-dimensional five-pointed star, you can get a bright and beautiful keychain.

To weave a star, you need:
- Prepare rubber bands of 2 colors: green and red.
- Wind a red elastic band onto the right column and twist it 3 times.
- Place 2 red rubber bands on both parts of the instrument at once.
- Using a hook, place the elastic band put on at the beginning of the weaving in the center. Then twist it 2 times on the right column.
- Add 2 red rubber bands.
- Bring the red lower turns and the green turn down to the center of the weave.
- Place a green rubber band, twisting it twice, onto the right side of the slingshot. Add a new pair of red rubber bands.
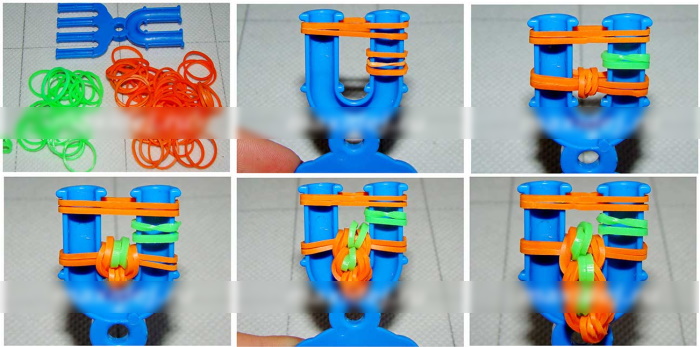
- Using a crochet hook, move the red bottom and green elastic band into the space between the posts. The first ray of the star is woven.
- The 2nd top and the 3 subsequent ones are made in the same way.
- Place the green elastic band on the right column again, put 2 red ones on both columns.
- Drop the green coils and the lower red coils from the two parts of the slingshot.
- Place the green elastic band on the right side and add red elastic bands.
- Once again, drop the red bottom and green coils into the center.
- Put on 2 red rubber bands and lower the lower red rubber bands onto them.
- Insert the hook into the top 2 green elastic bands. Throw them onto the left column of the tool.
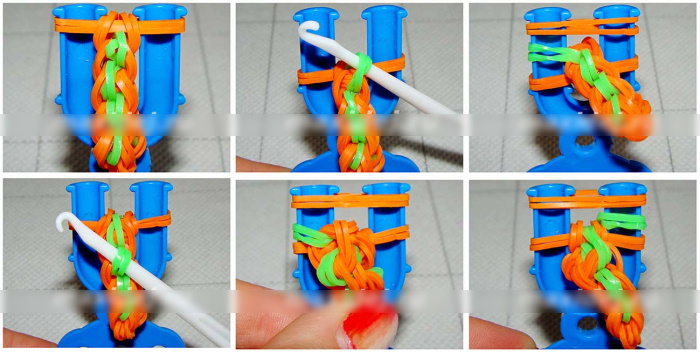
- Put on 2 reds, then drop the left greens and bottom reds from the two posts.
- Insert the hook into the second green loops from the top.
- Throw them on the left column again. Also throw 2 red ones on both parts of the slingshot.
- Lower the left green and bottom red ones to the center of the machine.
- Once one top of the star is ready, you need to repeat the same steps to weave the next tops.
- After the 4 tops are ready, you need to return to the beginning of the weaving and insert the hook into the green elastic band, which is the second from the bottom.
- Throw it over the left part, adding a couple of red ones. Lower the green elastic, then the lower red ones.
- Then insert the hook into the remaining green rubber band, throw it onto the left side of the slingshot. Put on 2 red rubber bands.
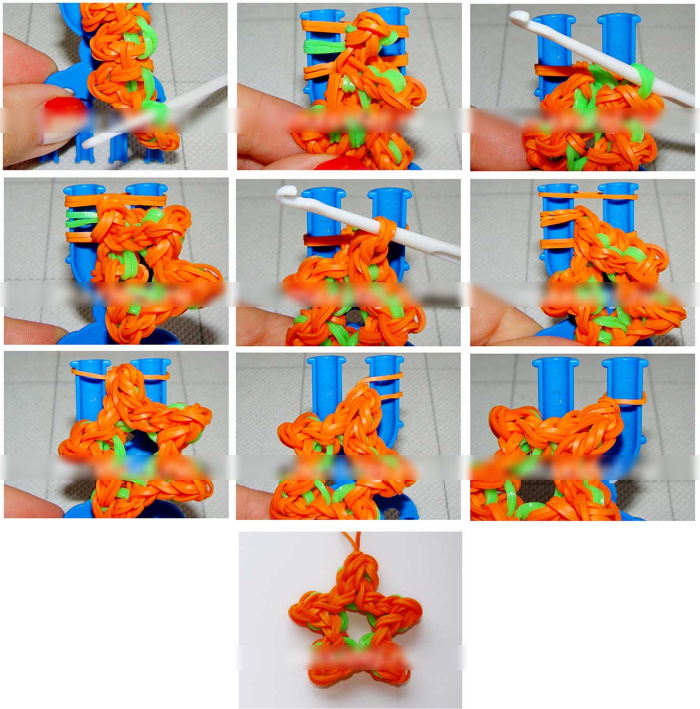
- Remove green from two columns and red from two columns.
- To finish weaving, insert the hook into the elastic band from which the weaving began and throw it over the left column.
- Place one red elastic band on both parts of the tool at once and move the lower loops into the space between the posts.
- Move one of the rubber bands to the opposite side of the slingshot.
- Remove the bottom one from the column.
- Tighten the last loop, straighten the star.
How to weave keychains
Rubber band keychains are very bright and unusual souvenirs that can decorate a bag, backpack, or become a gift for a holiday. They can also be woven on a loom, a slingshot, or a fork. Weaving on a loom is a more complex level of handicraft. Beginners are recommended to weave either on a slingshot or a fork.
For example, you can weave a pendant for a bag in the shape of a cherry.
To do this you need:
- Twist the elastic band on the right post 3 times.
- Place 2 red rubber bands on top of both parts of the instrument.
- Remove the elastic band from which the weaving began and add a new pair of red ones.
- Remove the 2 bottom loops on the left side.
- Do the same on the right side.
- Add 2 red rubber bands.
- Remove the bottom turns from the columns.
- Transfer all loops from the left side to the right.
- Hook the elastic band with which you started weaving onto the left column.
- Throw on a new red pair.
- Remove all 3 turns.
- Move the upper turns to the left side.
- Add 2 rubber bands to both posts at once.
- Remove all 4 loops from the left side of the machine.
- Fix the woven elements on the left column.
- Repeat the steps in the points above.
- Place the loop from which the weaving began onto the left column.
- Repeat the steps performed earlier. Move the last loop to the right, as before.
- To create the tail, place a green elastic band over 2 posts, remove all loops from the right post.
- Add 2 green elastic bands, remove the bottom loops.
- Throw on another elastic band, remove the loops that are at the bottom. Continue weaving in the same way. Finish weaving when the cherry tail is the desired length.
- Transfer the loops to one column.
- Remove the lower loops from the column and tighten. Weaving of one of the cherries is finished, the second one is woven in the same way.
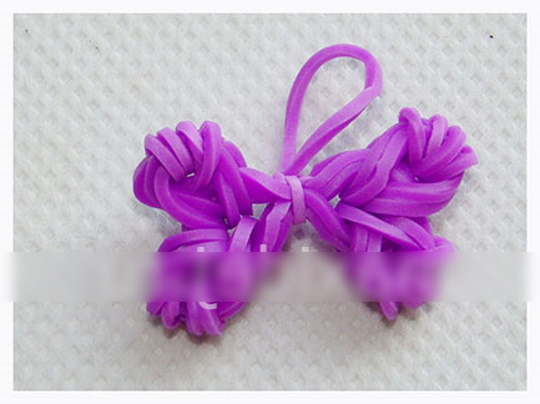
Rubber band figures, the weaving of which allows you to create unusual accessories, can decorate a bunch of keys. For example, you can weave a bow from multi-colored rubber bands.
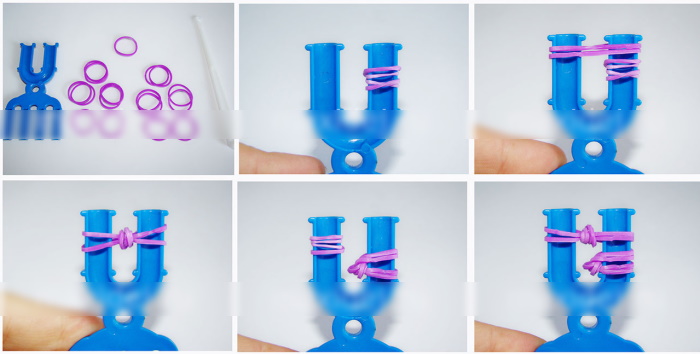
For weaving you will need: a slingshot, rubber bands of any color, a hook:
- Place the first elastic band on the right column, twisting it 4 times.
- Put a pair of rubber bands on both horns at once. Move all the turns to the middle of the weave.
- Move the rubber bands from the left side of the slingshot to the opposite side. Throw another rubber band, twisting it 4 times.
- Once again, throw a couple of rubber bands on 2 posts at once. Move the rubber band twisted in 4 turns to the middle of the weaving.
- Put 2 rubber bands on both posts, move everything to the center. This helped to form the first part of the bow.
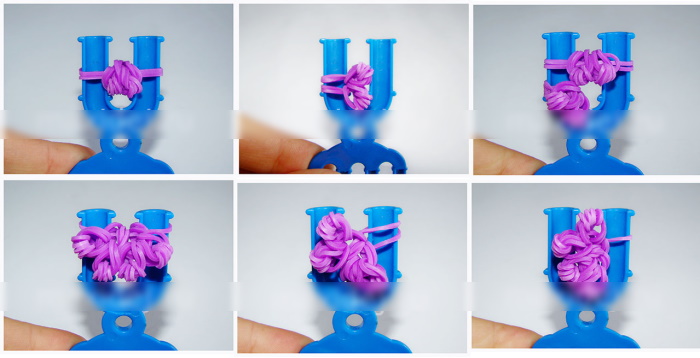
- Repeat steps 1–5 to weave the second half of the bow.
- To connect the halves, put on an elastic band, onto which move all the elements from the tool.
- Move the rubber bands from the left side to the right, and move the lower ones to the center. Remove the braid from the slingshot.
Weaving animal figures
Rubber band figures, which were first woven in the United States, have also become popular in other countries. Initially, they were used to weave bracelets on fingers, and a loom was invented to make them easier to weave.
Animal figures can be given to a child for a holiday or used as a keychain. These products can be woven both on a loom and on a slingshot consisting of two columns. For example, you can weave a small snake.
The weaving of the snake is done as follows:
- Twist the elastic around the left column 4 times. It can be any color, for example, white.
- Add a couple of rubber bands of the same color, remove the rubber band with which you started weaving and place it between the posts.
- Throw on a black elastic band, remove the lower loops from all parts of the tool.
- Add a second black elastic band.
- Place the bottom loops onto the second added elastic band.
- Add rubber bands of the main color to the loom, for example, green. Weave, repeating steps 1-5, until you get a tourniquet of the desired length.
- To make the snake's "scales" more interesting, you can weave in rubber bands of different colors.
- The snake's head consists of three parts. At the beginning of weaving the head, it is necessary to put two rubber bands on both columns without twisting them.
- Remove the bottom hinges.
- Repeat this action 5 times. Then proceed to creating the eye.
- Twist a black elastic band onto the right post.
- Place all the pieces over the black elastic band you put on in step 11.
- Place the black elastic band on the green loops, placing it on the side.
- Put on 2 more green rubber bands.
- Remove the turns from the right and left posts.
- Transfer all the loops from the left side to the right. A third of the head is ready.
- To weave the second element, hook the first turn of double green rubber bands onto the left column.
- To make room for adding new rubber bands, lower the already woven parts down. Throw on 2 green rubber bands, then move the turns from the left side of the tool.
- Continue weaving until you get an element of the desired length. From the left column, transfer the loops to the opposite one.
- The third and final element of the head is braided in the same way as the first. It is also necessary to throw on and twist a black elastic band.
- Transfer the three braided parts of the head to the right side. Twist the red elastic band onto the right column and remove the loops from it.
- Throw the red loop from the left column onto the right one, remove the loop that is at the bottom. This step completes the weaving of the snake.
Tips and tricks
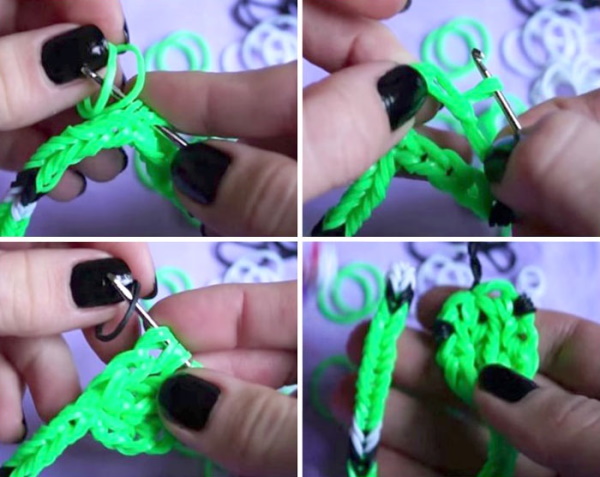
The smaller number of columns on the slingshot than on a large loom makes it much easier to weave on it. When weaving, you need to connect the rubber bands together. This is done by throwing one loop over another. A hook helps with this.
Beginners need to remember the following points:
- You shouldn't skimp on the materials for weaving - rubber bands. If you buy cheap ones, they can easily break if you stretch them too much. This can prevent you from twisting the rubber bands around the slingshot several times.
- Hooks and slingshots sold separately from rubber band sets are of better quality than those included in the sets.
- To make one or another element tighter, the rubber band should be wrapped around the slingshot twice. To make the element looser, 2 rubber bands should be thrown over 2 posts.
- If you can't buy a slingshot, you can weave using a regular fork.
- If it is not possible to buy slingshots and hooks separately, the most profitable option would be to buy a ready-made kit, which already contains everything you need for weaving.
Weaving figures from rubber bands can be called a meditative activity. It will allow you to spend more time with children, will help develop fine motor skills. However, rubber bands should not be given to children under 3 years old, as they can swallow them. The result of weaving will please everyone, as a toy or bracelet can be a gift for any holiday, for example, for a birthday or New Year.
Video about drawing
Rubber band figures. Bracelet weaving: