Drawing a modern military aircraft helps develop artistic skills, fine motor skills and creative thinking. To draw it, it is recommended to follow a certain action plan, as this is a rather complex technique.
Necessary materials and tools
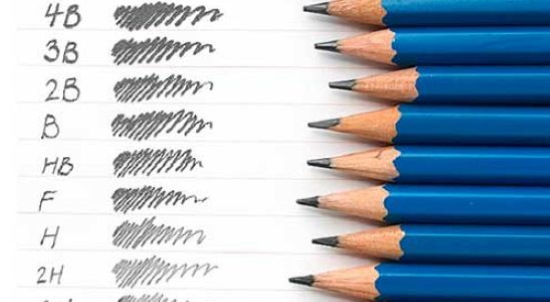
When choosing a pencil for drawing, you need to pay attention to their quality - it should fit comfortably in your hand and leave a clear and even mark on the paper. It is important to consider the degree of hardness or softness of the lead depending on the desired result.
There are several basic types of pencils that can be used for drawing:
| Types | Brief description |
| Graphite | The most common. They differ in the hardness or softness of the lead, which is designated by the letter "H" for hardness or "B" for softness. The higher the number after the letter, the harder or softer the pencil. |
| Coal | These pencils come in different types and are used to create various artistic effects. Special charcoal canvases are used to draw with them. |
| Sanguine and sepia | Pencils used on rough paper create soft tones and shade transitions. |
For work you will need other materials and tools besides pencils.
With their help, the artist creates unique works.
| Tools and materials | Brief description |
| Paper | It should be dense and resistant to abrasion. It can also differ in the level of smoothness or roughness. Paper grade "HB" is a universal option for any type of pencil, and also allows you to draw a line of varying intensity. There are special grades of paper designed for use with certain types of pencils and to achieve specific effects. |
| Stencils | Used to give a drawing clear boundaries of various shapes or to speed up the drawing of repeating elements. Stencils can be used with pencils. |
| Rulers | Simple rulers are universal drawing tools, suitable for constructing right angles and measuring distances. Set squares are rulers that have an angle of 90° and allow you to construct right angles and perpendicular lines. Protractors are tools used to construct and measure angles. |
| Nag | This is a soft rubber tool in the shape of a cone. It is designed for partial lightening of a drawing created with charcoal, sepia, graphite. When working with a kneaded eraser, it is important to be careful, as it can leave marks on the drawing. |
| Eraser | It should be soft and not leave marks on the paper. Erasers of various shapes and sizes allow you to correct the drawing and make the necessary changes. |
| Sharpener | There are mechanical sharpeners with several blades inside, capable of sharpening a pencil quickly and accurately. Compact automatic sharpeners make the sharpening process easier due to the quick change of blades and the work without using extra effort. |
Master classes
Drawing military aircraft with a pencil is a complex and interesting activity that requires attention to detail and a clear understanding of the shape and proportions of the object.
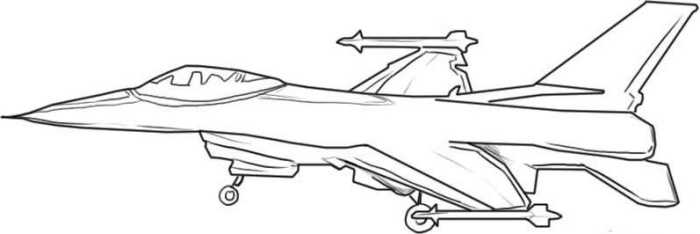
Multipurpose Su-35
The Su-35 is a combat aircraft used to protect borders from attack. It has high speed and maneuverability. The Su-35 also has modern weapons that can hit targets at a great distance.
The military aircraft in the picture includes several key parts, the image of which is considered step by step:
- Use a complex polygon of an elongated and flattened shape at one end as the basis for the body of the aircraft. At the other end, the body should end with a nose section. It is important to consider the proportions of the nose section.
Particular attention is paid to the pitch of the nose section, as it affects the flight characteristics of the aircraft, its stability in the air depends on it. It is impossible to create too sharp angles on the body - this can lead to turbulence and deterioration of aerodynamic qualities.
- Designate the rear and supporting wings. They should smoothly protrude from the body and, crossing, form a single structure. They are located symmetrically relative to the body.

- Show a rounded bulge on the top of the body, indicating the pilot's cabin.
- Draw the tail stabilizer protruding from the rear of the body. To create a complete image, give it a curved shape.
The tail section of this jet aircraft is aerodynamic, meaning that adjustment is made using a movable horizontal oval stabilizer.
- Designate the 2nd supporting wing, symmetrically located relative to the 1st at the other end of the hull. It should connect to the sides of the hull and cross the 1st wing.
The wings of this model are horizontal. They are used not only as a supporting plane, but also as a means of control, providing the necessary lifting force and thrust.
- Divide the cabin with a vertical line along the body. This technique will visually divide it into 2 sections. Use the viewing angle that most accurately reflects the position of the aircraft in space due to the angle.
- Add a curved line that extends from the forward point of the fuselage and ends the forward fuselage in the side view. This movement will give the aircraft the correct aerodynamic properties.
- Work on the flaps on the leading edge of the main wing. This detail is of great importance for aircraft control and is especially important during landing.
Flaps should be in harmony with the proportions of the body and wings. The deployed position of the flaps adds dynamics to the overall appearance and emphasizes the functional capabilities.
- Draw a tail stabilizer. It provides stability and control of flight. The tail stabilizer of a modern jet aircraft is a delta wing.
Add flaps to the tail stabilizer design using smooth curved lines. Under the tail stabilizer, mark the space for the engine compartment, which will be hidden from view.
- Draw clear lines on each main wing to show the location of the rear flaps.
- Imagine the exhaust pipe as an extension of the engine and draw it under the cockpit. Use segments to indicate the shape of the pipe to visually reflect its length.
- Place the missiles on the outer ends of each supporting wing. Emphasize them with transverse lines to create a volumetric effect. This will create the impression of a weapon secured at the right moment.
- Mark the position of the fuel tanks under different parts of the fuselage: under the wings and the main part of the body. Use chiaroscuro or gradient to visualize their volume.
- Install jet engines on the wings. The Su-35 has 2 turbojet engines located on pylons on both sides of the fuselage.
- The nose of the plane contains an antenna and sensors. These details must be small compared to the overall scale of the plane.
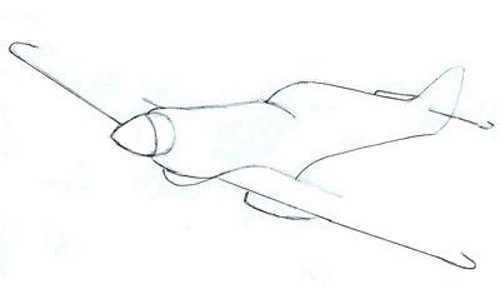
British Supermarine Spitfire – fighter aircraft of World War II
Britain had its own legendary aircraft during World War II – the Supermarine Spitfire. It was remembered for its reliability and excellent flight characteristics.
Supermarine Spitfires were fast and well armed, which helped them in air battles with Nazi aircraft during the war.
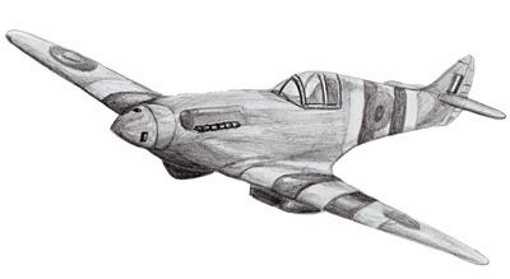
The military aircraft in the drawing requires respect for relative proportions and basic shapes, while avoiding complex details:
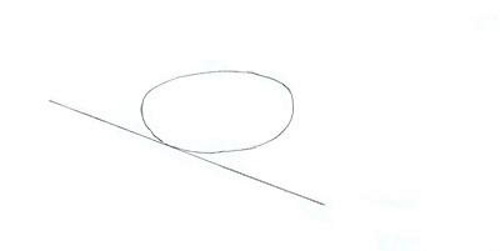
- Mark the main lines (oval and slanted line), taking into account that the aircraft has a long fuselage.
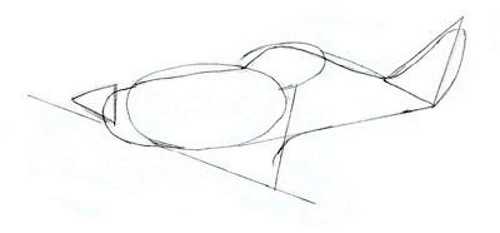
- Draw a tail that is “chopped” into a shape consisting of 2 intersecting planes.
- Draw the nose section, which should be pointed with a small protrusion for the pilot's cabin.
- Design the wings of the plane in the background. They should be located slightly below the centerline of the plane. Divide into the leading and trailing edges, the wingtip.
- Draw 2 small flaps on the tail - they are located on the upper part of the tail and have the shape of triangles, with the tip pointing upwards. One of them should be slightly lower than the other.
- Add landing gear fairings. Streamline the parts to match the aerodynamics of the fighter.
- Draw the vertical stabilizer and horizontal tail. They should be symmetrical relative to the vertical plane of the aircraft.
- If you plan to add a propeller, you need to draw it at this stage of the drawing. Consider the axis of rotation, blades and their span. The propeller should be balanced relative to the length of the wings.
- On the fuselage of the plane, draw a cockpit, shaped like a flask. It should protrude slightly forward and have a connecting element with the nose.
- Add wing mounts and stabilizer to the body. Draw landing gear fairings on the wings.
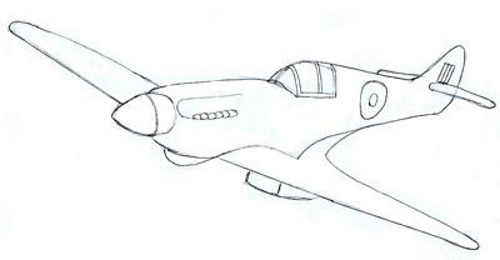
- Remove any extra lines that were used only to create the base of the drawing.
- Add shadows to the wing on both sides of the chassis.
- Choose colors that match the plane and color the drawing.
Parade of military aircraft
One of the bright traditions of celebrating Victory Day in Russia is the parade of military aircraft, which is held annually on May 9. This is not just a demonstration of technology and pilot skills.
The parade recalls the heroic past and sacrifices made by the Soviet people during the Great Patriotic War. It emphasizes the protection of the modern world and ensuring security.
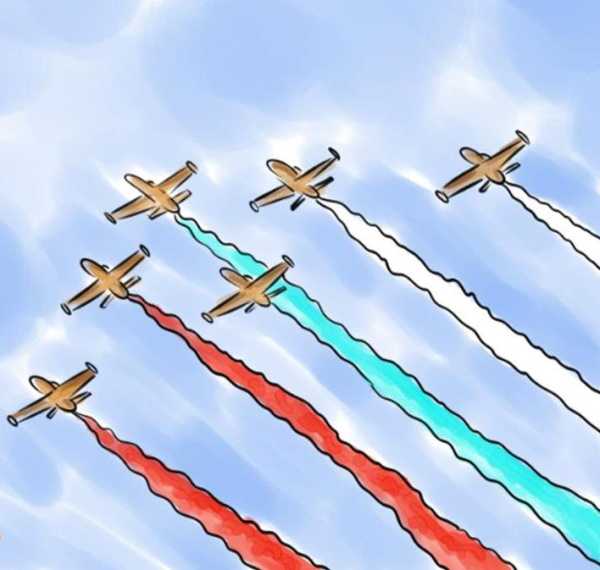
A drawing including an image of 6 military aircraft can be completed by following the sequence of actions:
- Determine the position of the aircraft parade on a sheet of paper. Mark the contours of 6 aircraft located at a certain angle relative to the bottom edge of the sheet.
- Start with the top plane. Draw an oval, which will be the main shape for the body of the plane. Add schematic images of the wings, tail and cockpit to the oval.
- Repeat this step with the remaining 5 planes.
- Add wavy lines from the tail of each aircraft that go down at a slight angle. This will create the effect of haze coming from the planes.
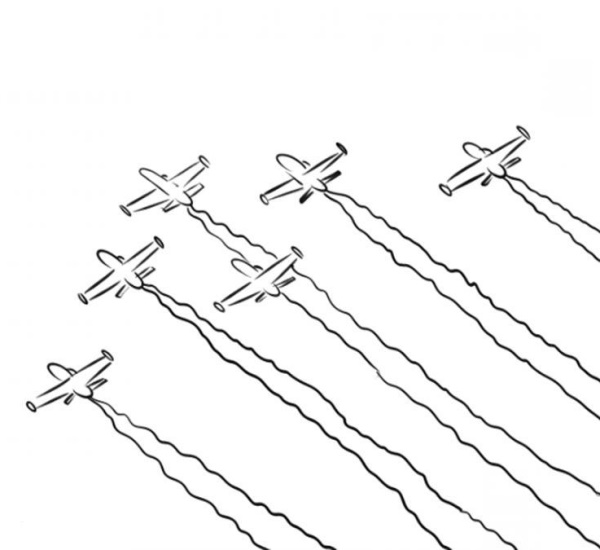
- Trace all the main contours and lines to give the drawing clarity and distinct shapes.
- Use shades of gray or brown for the main body and darker or brighter shades to highlight additional details.
- To create a multi-colored haze over the planes, use contrasting colors: start with white lines, add blue and red shades.
- Draw a colored sky. Choose a shade of blue or light blue that matches the overall tone of the drawing and cover the sky area around the planes and at the bottom of the sheet with it.
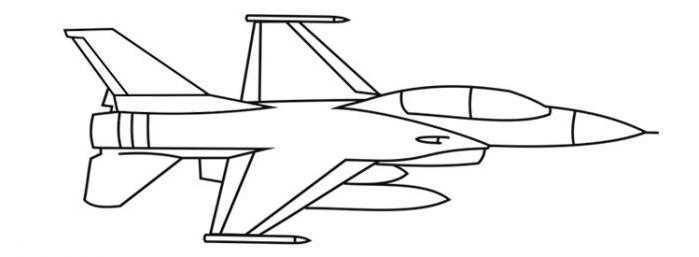
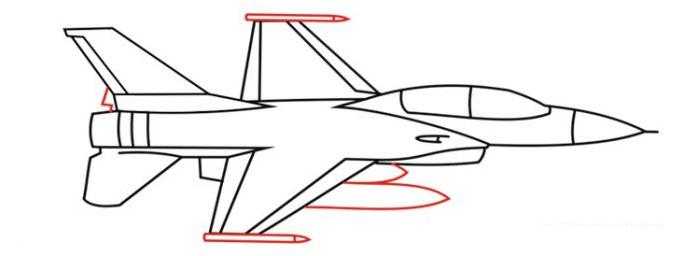
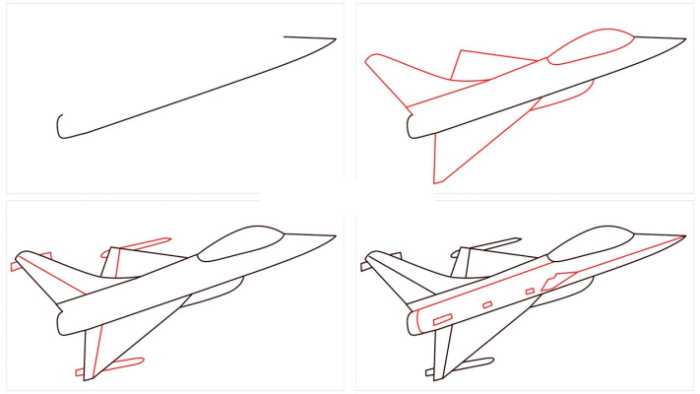
F-16 fighter
The F-16 is a US combat aircraft designed for air combat with enemy aircraft. It can quickly gain speed and reach high altitudes. The F-16 is equipped with modern weapons. Pilots value the F-16 for its maneuverability and reliability.
The military aircraft in the picture is very difficult to accurately reproduce.
However, it is possible to convey the proportions and general appearance of the fighter so that it looks like the F-16:
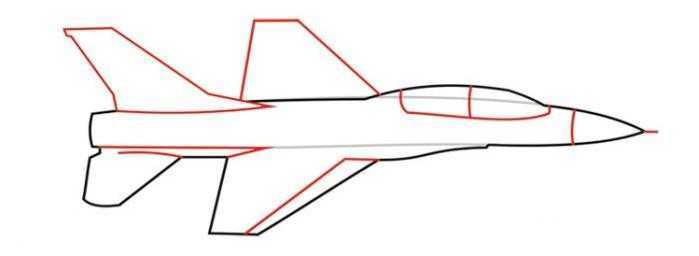
- Draw an axis of symmetry in the center of the future picture. Mark the outlines with thin lines using a simple pencil. In the outer contour of the F-16, highlight the bearing surfaces - wings, tail unit and fuselage.
These horizontal and vertical lines should correspond to the location of the center lines. The central part of the wings should have a noticeable downward bend. Draw the center lines so that they divide the fuselage and wings into 4 equal parts.
- Create the main silhouette - this will be the basis for further development of all the details. Draw the shape of the plane, evenly expanding from the cabin to the tail.
Add the F-16's signature features (like the delta wings). Use only light lines so you can easily adjust the drawing later.
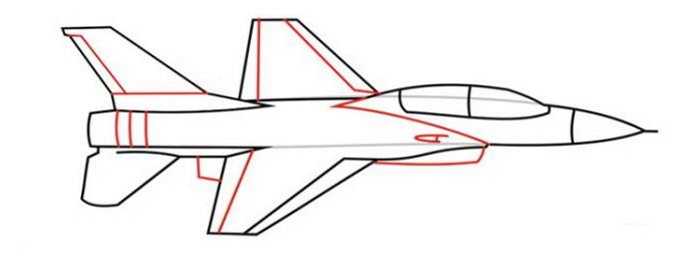
- Draw a clearer outline of the cockpit, the general outline of the nose and the location of the air intakes. The pilot's cabin should be made in the form of a rectangle located at the top of the aircraft and slightly inclined forward.
The nose of the aircraft is a trapezoid, tapering towards the nose.
- Work out the fuselage outline. Draw the middle section that will connect the cockpit to the wings and tail. Move on to the side sections. Detail the left and right sides, following the general shape of the plane.

Smoothly expand the lines from the central part to the end of the wings and tail. Do not make the line too sharp and clear, emphasize only the main outlines.
- Draw the wings based on their shape in the sketch. Divide each wing with lines into 2 parts: outer and inner. Add ring-shaped depressions to the outer part of the wing and a more pronounced relief to the inner part.
The inner and outer parts of the wings should be mirror images of each other. Form the lines of the flaps.
- Draw darker lines along the front part of the protruding tail.
- Add details to the tail to make it look more realistic. The F-16 fighter has a special tail shape with an upward deflection.
- The crew observes the surroundings, estimates distances and notices critical objects, so the windows must be of sufficient size. Draw them on the cockpit.
- Add powerful engine turbines on the sides behind the wings. Draw their outline, depicting the complex bends of the blades. A smooth transition from the body to the wings will create a harmonious combination of details.
- The F-16 fighter is equipped with different types of missiles, which allows it to perform a wide range of tasks. Draw the launchers and stabilizers. Fill their space with slashes, indicating the projectiles.
The missiles are located in the wing area between the body and the engines.
- Highlight the details that give the drawn F-16 fighter its recognizable appearance: the V-shaped nose with a sharp tip, the sharp angles of the tail and the contrasting stripes on the body parts.
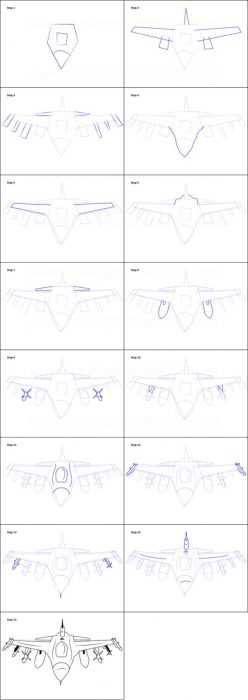
- Trace the outline of the object with a medium-soft pencil.
- Erase all auxiliary sketch lines so as not to disrupt the integrity of the painting.
Soviet during the Great Patriotic War
During the Great Patriotic War, Soviet military factories produced many aircraft that helped them fight the German army.
The most famous of them are the Il-2 and the Yak-9. The Il-2 was the only combat aircraft in the world that could withstand a direct hit to the hull. The Yak-9 was light, fast and could fight both air targets and destroy enemy armored vehicles.
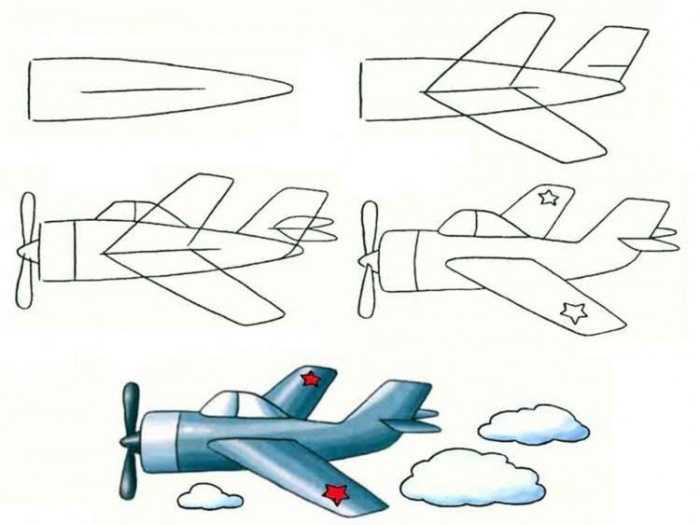
The military aircraft in the picture can be depicted using step-by-step actions:
- Draw the base of the drawing - a cone that is turned on its side. In its center, draw a horizontal line - it will become the basis of the wings. You can use rulers or straight lines on paper as a guide when creating the shape of the plane.
- Add wings, tail and horizontal line on the tail for flaps. Proportions and relationships of elements should be realistic according to the chosen scale.
- Place the cockpit, adding finishing details such as tail flaps, a propeller and a vertical line near the start of the cone.
- Place symbols, such as stars, on the wings of the plane. They complement the design and emphasize the belonging to a certain period of history.
- Remove extra lines.
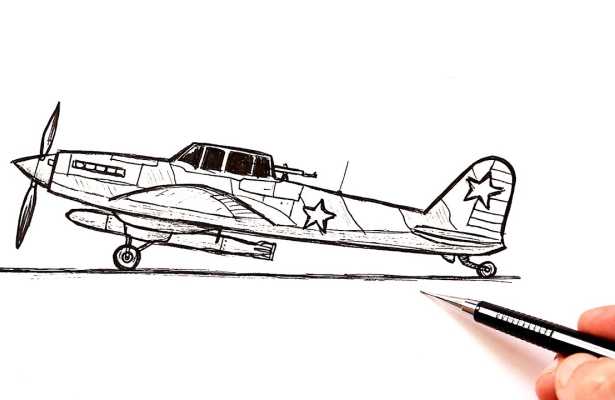
- Color the plane to give it volume. Draw background elements, such as clouds. Choose colors that are associated with the Soviet Union. For example, silver, blue or green.
Tips for Beginners
When drawing military aircraft it is necessary:
- Determine the format of the drawing: horizontal, vertical or square. Draw a middle line, which will be the axis of symmetry of the future aircraft. Decide how it will be located - vertically or obliquely.
- Start with the general proportions of the plane, outlining the main contours: nose, wings, tail. Gradually add more details taking into account the proportions: cockpit, engines, chassis.
Use a right angle to create lines, and a curve for soft contours. At this stage, do not outline the shape in too much detail.
- Smoothly outline the lines drawn in the previous step and add the necessary details. Emphasize the most important elements.
- Use soft pencils to create shadows on the wings, cockpit and other details. Consider perspective – shadows in the foreground should be thick, and in the background – transparent. Soften the contours of the shadows with light strokes.
- Check that the drawing looks harmonious. Correct mistakes using an eraser. If necessary, add details such as camouflage or identification marks.
Following the recommendations, you can create a realistic and expressive drawing of an airplane. Its depiction requires patience and practice. You need to start with simple military models and gradually move on to more complex ones, monitoring the correctness and realism of the proportions.
Video about drawing
Military aircraft - drawing: