Engraving is considered one of the varieties of decorative wood carvings. The master can create various ornaments with images and make inscriptions. It is permissible to work manually or with mechanical tools.
For easy wood processing, there are new technologies in the form of a laser, engraver and milling machine. As a result, the product will have an original appearance.
What products can be made?
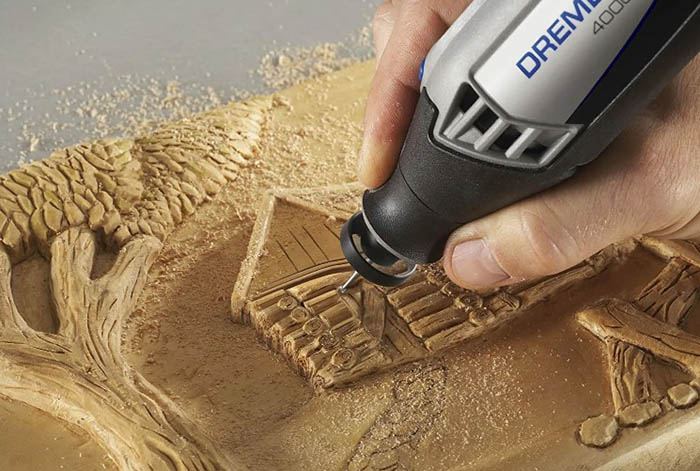
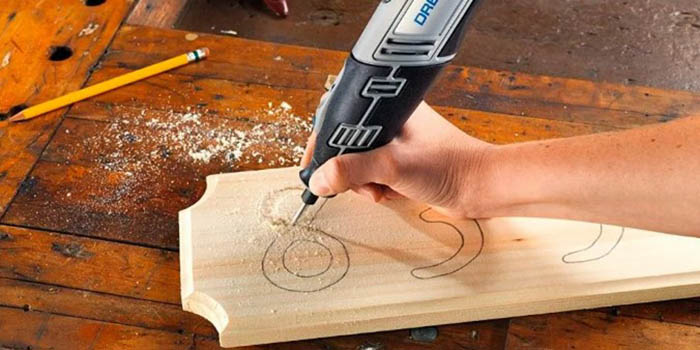
Wood carving by an engraver is considered an interesting creative process, during which it is permissible to create various patterns with images and inscriptions. Thanks to the advent of modern electric tools, wood processing will be easy, while it is permissible to create more original and complex images.
Wood carving by an engraver, as a complex form of creativity, is nevertheless in high demand in almost every country. For example, in Canada, where there are many forests, there are many skilled architects.
Using engraving it is possible to decorate:
- iconostases with icons;
- paintings with panels;
- bed headboards;
- furniture fronts;
- wooden platbands for baths and log houses;
- frames with icon cases;
- carved balusters;
- corner decors with keychains and knife handles.
The engraver is a device that has replaced manual application of patterns on wood. At the same time, this tool is suitable for grinding, polishing small parts and performing a long series of manipulations.
List of rules
Using an engraver, it is permissible to process both wood and plastic with bones, metal, glass, leather and stone. To obtain high-quality work, it is necessary to first familiarize yourself with the principles of the tool and follow safety rules.
This applies not only to beginners, but also to experienced carvers. As a result, the master will be comfortable decorating the product.
If you have no experience, it is recommended to initially use a hand-held device, but not an electric one. This is necessary so that your hands get used to it. In this case, you can create furrows, ditches and simple figures.
When processing a wooden product with a hand engraver, you need to prepare a set of tools:
- a lamp with a lens glass;
- substrate for the workpiece;
- punches to draw dots with a dotted line;
- chisels;
- gravers with thin steel rods (can be flat, angular and V-shaped).
Beginners are advised to initially study with professionals or use tutorials that present ready-made patterns with images and the technological process of design.
Requirements for working as an engraver:
- During engraving, the device must be kept at a small distance from the face to prevent wounds from appearing on the skin;
- If the device is working, it is prohibited to change or remove the nozzle;
- the device must be kept out of the reach of children;
- Do not swing the device in different directions, hit it on the work surface or play with it;
- it is necessary to prepare a special table lamp with soft lighting;
- The work table should be cleared of unnecessary objects so that nothing gets in the way.
For ease of access to the required consumables, it is recommended to place all cutters with attachments and devices in drawers and shelves.
Preparing the workplace
Wood carving by an engraver is considered an interesting but dangerous activity. Therefore, it is necessary to properly arrange the workplace and adhere to safety precautions:
- Protective glasses should be worn over the eyes to avoid the risk of sawdust or chips getting in.
- The carver's clothing should not have an apron with long wide sleeves. At the same time, a scarf or hat should be worn on the head to prevent strands of hair from hanging from the shoulders or forehead.
- The sharpness of the cutters should be checked not with your fingers, but on wood. If the sharpening tooth is very sharp, the engraver will vibrate strongly. In this case, it is necessary to reduce the speed.
- Before work, you need to check the electrical cord for integrity. At the same time, you need to make sure that the wire is not twisted.
- The surface of the work area must be level, and the furniture must not wobble.
It is essential to have a first aid kit on hand, containing the means necessary to provide first aid.
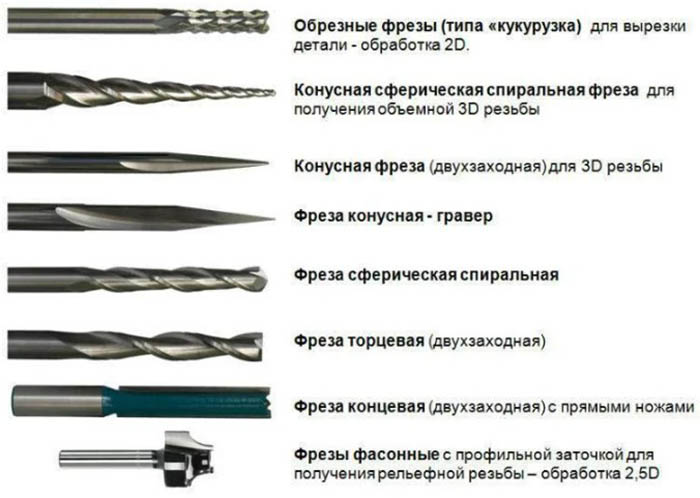
How to choose a nozzle?
Wood should be processed with an optimal drill that meets 2 main criteria - the number of revolutions of the main rotating spindle and power. For ease of cutting, it is recommended to use an engraver that has a speed switch.

In this case, the power should be no less than 250 W, otherwise you will need to constantly turn off the device so that it cools down completely. For this reason, the work will be interrupted. When choosing attachments, you need to consider the type of thread.
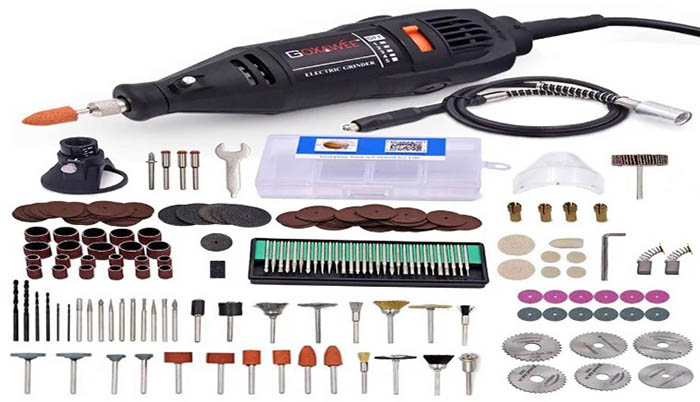
The engraver kit should include the necessary attachments:
- polishing felt material;
- drills;
- collets;
- cutters with cutters;
- grinding cutting rings.
Each manufacturer has its own set of engraver attachments. At the same time, beginner carvers will be able to choose the optimal set for engraving with the device. If you have experience, it is recommended to use cutters with diamond coating. However, such cutters may not be included in the set with the device, so you need to buy them separately.
To make it convenient for a beginner to work with a drill, it is necessary to buy a flexible shaft, as well as a tripod for hanging the tool. The flexible shaft affects the speed of the device's motor, reducing the power by almost half.
Wood carving kits made in China are inexpensive, unlike other manufacturers. However, cheap drills can make a loud noise, and the cutters included in the kit are not sharp enough, so they can quickly become dull.
Professional craftsmen always prepare additional attachments. Inexperienced carvers can use a Chinese-made set to master the basics of artistic engraving.
In this case, you need to choose attachments that are suitable for wood processing. For example, due to the sharpening angles, sharashki intended for metal carving are not capable of processing wood.
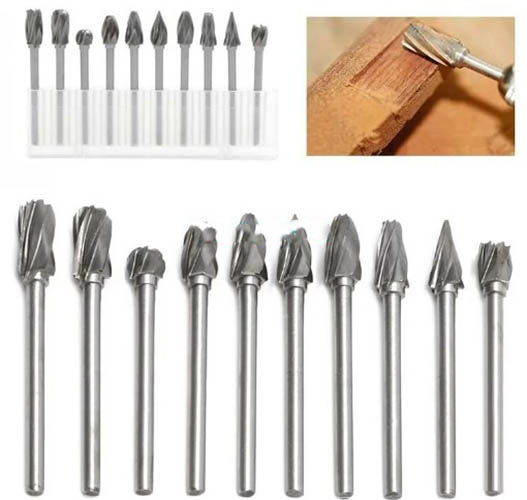
The design of the nozzles has 2 parts:
- working, which is used for processing the material;
- tail, which is clamped in the device’s chuck (the diameter can vary from 0.8 to 8 mm).
The classification of equipment is based on 2 main parameters:
- by the type of material used for their production;
- by area of application.
There are several types of engraving cutters, depending on the material:
- Abrasive. Often used for processing ceramic, glass, metal and stone workpieces.
- Felt. Allows you to polish the wood surface.
- Disc holders. Rubber, cutting and felt wheels are suitable for equipping. The choice will depend on the properties of the processed element and the features of the process.
- Made of steel with diamond coating. Suitable for performing basic manipulations with various workpieces. Such attachments are of very high quality, and can be included in a set that is inexpensive.
- Combined. They are characterized by a hard-alloy working part and a steel shank. The scope of their use will correspond to the material of the head.
- Rubber with corundum. Suitable for processing metal products.
- Carbide. They have large and small working elements, the notches on which can be of different types. Such attachments can be used for preliminary and intermediate processing of products of different hardness. Attachments made of hard alloys are considered durable and high-quality, so consumables will be expensive. The type of tips will determine the scope of their purpose. With the help of peak cutters, it is permissible to process plastic and bone products, as well as to perform tracing, marking the boundaries of the ornament.
On sale you can often find a set of engraving attachments, the elements of which will be marked with a certain shade indicating the degree of sharpening.
If the marking is applied in black, it means that the cutter is maximally productive. Blue and green shades indicate medium sharpness. If the attachment is marked in yellow, such a cutter can be used for final processing of the product.
Classification by thread
Wood carving by an engraver is represented by several varieties, each of which has its own characteristics:
| Name | Brief description |
| Openwork | Since ancient times, this type of engraving has been in great demand among carvers, because people used to believe that windows and doors decorated with openwork ornaments would protect the house from evil spirits. Ghosts are unable to enter the room because they will get tangled in the lace. Today, this type of carving is used to decorate various products, dishes, partitions and furniture. This type of engraving has an original and elegant look, especially in the form of through or sawn carving. |
| In the Baroque style | This style appeared in the 16th century in Italy. It is dominated by a huge number of different decorative elements. Often, wooden products have plant ornaments in the form of lilies or roses. When fully mastering this technique, it is permissible to apply drawings of birds, fish, foliage and flowers to wood. |
| Eastern | It is an elegant decoration because the images have thin curls. To create such ornaments, you will have to spend a lot of time. In this regard, you need to be more patient to master the technique. |
| Geometric | Geometric engraving is in great demand among beginners because it is simple and quick to understand. Finished ornaments will be presented in the form of simple geometric figures. Often, simple wedge-shaped notches are made to decorate products. |
| Rounded | When cutting, the master creates two-sided deep recesses with rounded edges along the edges of the image. Often, the recesses will be more sharply rounded on the side of the drawing forms than on the side of the background. In the latter case, the recesses will be sloping. In rare cases, the background is rounded so that it is not flat. In this case, it can be located below the plane of the pattern. Such a background is called cushion, and the engraving is called rounded with a cushion background. |
| Contour | It is considered a simple technique that can be mastered by beginners. The difficulty is that you will have to use a thin cutter. The finished ornament often contains thin lines that are cut along the borders of the pattern. |
| Kudrinskaya | This technique originated in the late 19th century thanks to the carvers who worked in the Abramtsevo estate, located near Moscow. Many craftsmen came from the village of Kudrino, which is why this type of engraving received its name. With the help of carving, it is permissible to decorate various household items with souvenirs. Today, this technique is in high demand among wood carvers. It is permissible to depict patterns on wood based on foliage and branches, constantly repeating. Between the plant elements, you can place patterns of flowers, fruits, birds, fish and animals. Linden wood is often required for working in this technique. |
| Volumetric | This technique allows you to create a beautiful small sculpture from a piece of wood, so this type of carving is suitable for decorating furniture, overlays, balusters, stair railings and mirror frames. |
| Embossed | A relief drawing made on wood will rise above the overall composition. Such images have a spectacular and realistic appearance. With the help of relief engraving, it is permissible to decorate details of gates, doors, house friezes and platbands. However, this type of carving is suitable only for experienced craftsmen. |
| Scandinavian | It is especially popular in northern countries. The products are mainly decorated with national motifs in the form of simple ornate ornaments and deer. It is also permissible to carve drawings of different runes on the wood. |
Master classes for beginners
Wood carving by an engraver initially requires the choice of wood. Pine is not suitable for engraving because it consists of several layers: soft layers will be combined with hard ones.
Master class on applying a design to a wooden Easter egg:
- First, sand the surface of the workpiece with sandpaper so that the product is smooth.
- Afterwards, transfer the selected design to the surface of the workpiece. Movements should be careful.
- Insert the grinding attachment into the device and make several notches. If the speed is high, the wood workpiece will burn slightly. To prevent this situation, it is recommended to move the tool back and forth over the applied image.
- When you are finished, use an eraser to remove pencil lines.
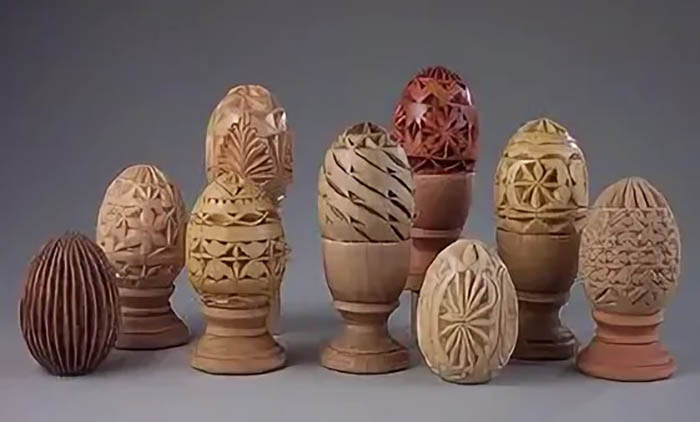
In order for the finished craft to have a beautiful appearance, the product must be painted. For this purpose, it is permissible to use stain of various colors. Using a brush, you need to apply the coloring pigment to the workpiece and do not touch it until the product is completely dry.
After some time, the surface should be treated with sandpaper to create an unusual effect. Then the product should be treated with varnish and left to dry.
Using an engraver, you can decorate an old wooden shelf with various patterns or images to give the furniture an updated look.
Step by step description:
- Select a suitable image and fix it on the wood using PVA glue.
- When the drawing is completely dry, you can start cutting. In this case, it is recommended to prepare a nozzle with a thin tip with a diamond coating.
- The speed of the tool should be low, no more than 20,000 revolutions. Carefully outline all edges of the image with the device and remove the stencil.
- To remove traces of glue, use a damp cloth.
- When using light wood, the image may be unclear. To correct this, use a stain to highlight the texture.
Wood carving is a complex, labor-intensive process that requires preliminary preparation and safety precautions. At the same time, the success of the work will depend on the correctly selected engraver and optimal cutters. As a result, the created composition will be original and beautiful.
Video about wood carving
Master class: cutting out a grape vine with an engraver: