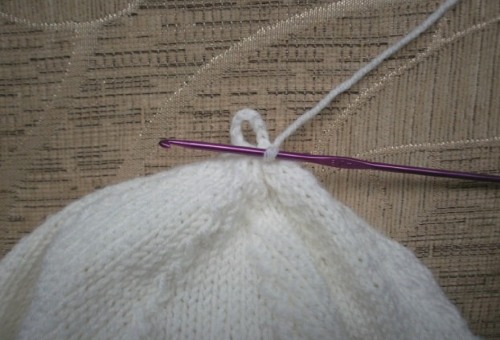
Despite the abundance of knitwear, hand-knitted items still find their admirers. Knitted patterns are distinguished by their unique beauty. Instructions with descriptions and diagrams allow you to create incredible patterns with your own hands, which can be used to create scarves, sweaters, hats and berets, sleeveless jackets, children's clothing.
Knitting a snood and a scarf
Snood
Both warm, dense and soft, airy yarn are suitable for knitting a snood. The product can be worn as a headdress, a simple scarf (or a scarf-collar), a cape for an evening classic dress. It is advisable to choose a pattern that harmonizes with the rest of the clothing.
To knit a light, airy snood, you need to take circular knitting needles ⌀ 5 mm. For a thick scarf, you can take ⌀ 7 - 8 mm (depending on the yarn).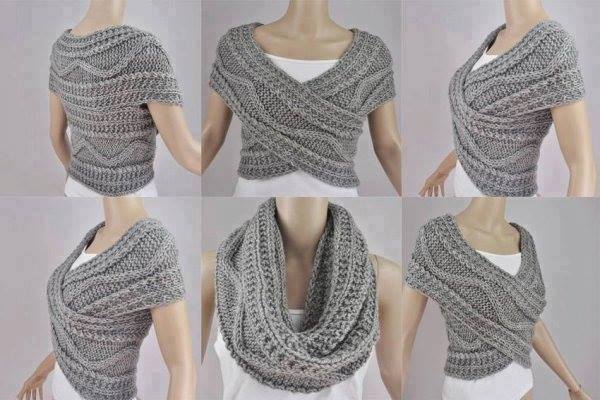
The execution scheme is quite simple, understandable for beginner needlewomen:
- 130 loops +1 (on the outermost one) are cast on and two rows are knitted with a simple garter stitch.
- In the third row, knit 2 loops with a garter stitch, after which pattern A - 1 begins (performed 1 time).
- Next, you need to knit 20 times according to pattern A-2, then move on to A-3 and finish by knitting the last 2 loops with garter stitch.
- The ornament is repeated 12 times (12 rows). The length of the needlework should be at least 40 cm. At the end of the work, having knitted 2 rows of simple stocking stitch, the loops must be closed. The front walls of the outer loops of both sides are sewn together.
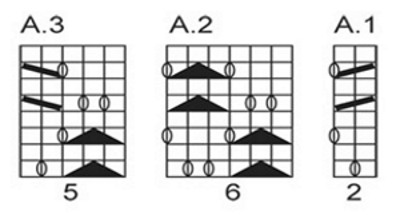
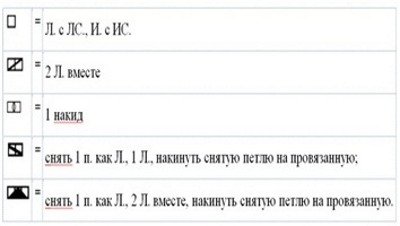
Designations on the drawing:
- L – front loop
- I - purl loop
Scarf
The principle of knitting a scarf is identical to the method of making a snood, with the only difference being that the latter should be 3 times longer (120 - 130 cm without fringe). 40 loops are cast on the knitting needles (2 loops for the edges of the work at the beginning and end of the row).
After knitting two loops, the pattern begins"rubber": 2 front, 2 back, finishing 2 edge loops. Next, you need to close the loops and use a hook to knit a fringe of any length (to your taste). The scarf is knitted with straight knitting needles ⌀ from 5 to 8 mm, based on the density of the yarn.
Socks
The most popular knitting system for socks is the 5-needle technique (circular knitting from top to bottom).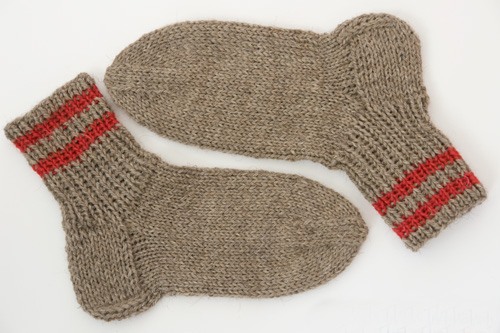
Materials needed:
- 1 ball (100 g) of semi-woolen knitting thread;
- knitting needles (5 pieces) with a diameter of 2.5 or 3 mm;
- needle for knitting threads.
First of all, the circumference of the leg from the little finger to the beginning of the big toe is determined (approximately 22 cm). To specify the number of loops 20 × 2 = 40, you need to dial 40 loops. 2 - means two loops in one centimeter. 10 loops are dialed on each knitting needle. 4 loops of the first knitting needle must be knitted with the end of the fourth to close the circle.
The classic pattern is made: one row of face loops, the other of purl loops. The top of the sock can be knitted with an elastic band (one face loop, the other purl loop). The length of the neck of the sock is 10-14 cm.
Execution of the heel
One pair of knitting needles is not working yet. 20 loops from the other two are transferred to one of the knitting needles, and a stocking stitch of 6-7 cm in length is performed. The heel should be 17-18 rows high. This is 7 cm. The height of the heel part is completed with face loops on the 17th row. From the 18th purl row, the reduction begins, with the formation of the heel.
Next, 20 loops need to be mentally divided into 3 halves, 2 loops remain in the remainder, they are added to the first and third halves. In the middle there should be 6, and on the sides 7 loops. Loops are reduced from the side edges, knitting with loops of the middle half, which is knitted without changes. The sock needs to be turned inside out.
Similarly, the loops of the middle half are made, and from the side halves they are reduced to the end of the loops. 6 loops of the central row are preserved. To them is added a loop, pulled out from the edge ones.
Mittens
In winter, it is cold for hands outside. If you follow the description and drawing provided to help the needlewoman, before the onset of cold weather, you can knit beautiful mittens with a beautiful pattern.
To knit mittens you will need:
- 100-120 g wool or semi-wool yarn;
- circular knitting needles (5 pcs.) ⌀ 2 – 2.5 mm;
- knitting needle.
The mitten is knitted starting from the cuff. To determine the number of loops, a small sample is knitted, where the number of loops is counted in one centimeter (for example, 5). The result is multiplied by the length from the wrist to the hand (10 cm): 5 × 10 = 50 cm. From 50, a number close to the smaller one is counted, a multiple of 4-48. This is the number of loops for the mitten.
48 loops are threaded onto two knitting needles, then divided into 4, distributed over 4 knitting needles. The circle is closed by tying two ends of the yarn. The cuffs are made with a "rib" pattern - knitted front and back loops alternately. The length of the cuff is chosen at will.
Once you have finished with the cuff, you can move on to the main part, which is knitted by adding one loop to each knitting needle up to the beginning of the thumb.
Performing the thumb
On the third spoke, you need to leave a hole for the thumb of your right hand, on the fourth - for your left hand. How is this done?
There are equal number of loops on four knitting needles (for example 12). On the 3rd knitting needle, the first loop is knitted, 10 loops are brought out on a pin or a pin, 10 air loops are collected on the right knitting needle (according to the sum of the loops previously collected on the pin), then the last loop is knitted (12 in a row). Now you need to continue making the length of the mitten to the little finger.
Having reached the height of the little finger, you need to start reducing the loops using the following method:
- Two loops of the first and third needles are knitted with a throw (at the beginning of the row), and two loops are reduced at the end of the second and fourth needles. Loops are reduced through the row so that exactly half of the initial number of loops remains on each needle. You can now reduce in each row. According to the calculations made above, after the decreases there are 8 loops left, which are tightened from the wrong side.
Knitting patterns with descriptions and diagrams are performed strictly according to the instructions. - To make the thumb, 10 loops from the pin are transferred to the knitting needle. When casting on air loops, edge loops have arisen, from which new links must be created so that their number is divisible by three. Having placed them equally on three knitting needles, you need to knit to the end of the thumb, decreasing the loops first through one row, and closer to the nail, make decreases in each row. When 6 loops remain on all the knitting needles together, you need to collect them and knit from the inside.
Attention! All calculations made above are conditional, they are taken as a sample. On their basis the size of a specific mitten is determined.
Beret
Fashion comes and goes, changes endlessly, but the popularity of berets does not decrease. You can knit them yourself, choosing the style and pattern to your taste.
For a beret you need to have:
- semi-woolen yarn;
- circular knitting needles ⌀2.5 mm (for knitting the elastic), ⌀4 mm (for the rest of the product);
- hook ⌀2.5mm.
You need to cast on 128 stitches on knitting needles (2.5 mm) and make a ribbing (front, back stitches) 2 cm high (approximately 6 – 8 rows). Having completed the ribbing, you can move on to the beret base. The first row is made with front stitches.
Now you need to add loops in the front rows, distributing them evenly so that on two knitting needles there are 12 additional loops, the total number of loops will be 152. Now you can change the knitting needles to 4 mm. The product is made with a simple stocking stitch. It is necessary to add loops evenly, continuing to knit to a height of 8 - 10 cm.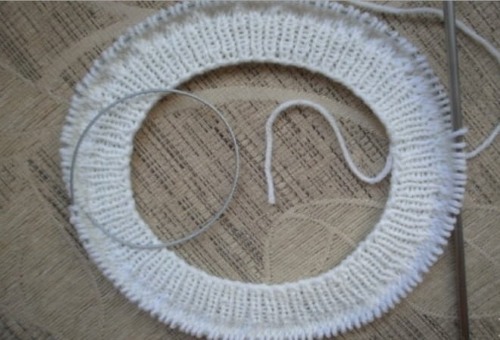
Next, the work is divided into 8 sections. In order for each of them to have 19 loops, it is necessary to take each 19th and 20th loop together with a face stitch through the back wall when working. It will serve as an indication of the beginning of each section. The next row is done with a face stitch. Continuing to knit, you need to move on to reducing the loops in each section.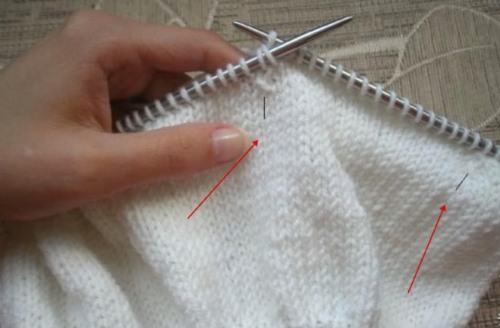
The first row is knitted with face stitch to the edge of the section (wedge), then the loop marking the wedge is knitted together with the previous loop. The same action is performed until the circle is completed. The second row is knitted with face stitches. In the third row, having reached the edge of the section with face stitch, the loop marking the wedge (section) and the loop following it are knitted together.
The row is completed by similar actions. Due to the above-mentioned method of decreasing loops on the edges of the wedges, nice teeth are formed. At the same time, the product is reduced. In each odd row, a reduction is performed, as indicated above, to 8 loops on one and the second knitting needles. In turn, they are reduced to 4 on each knitting needle.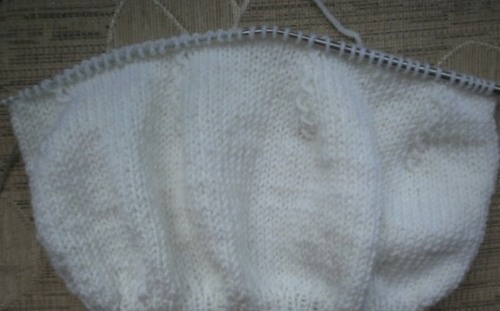
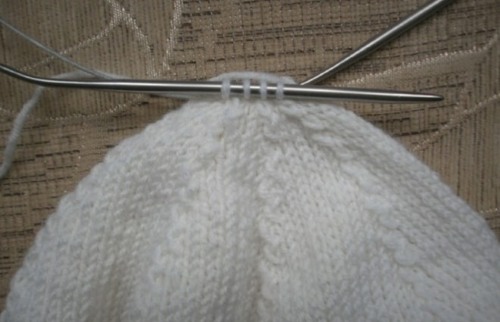
The working thread on the product is passed through the remaining loops, from which a loop is made with a hook, then the thread is secured. The beret is ready.
Children's things
Vest with Turkish Braid Pattern
For work you will need 150 g of semi-woolen (wool, acrylic) yarn, knitting needles ⌀ 4 mm. The vest will suit children of any age from 2 to 8 years. 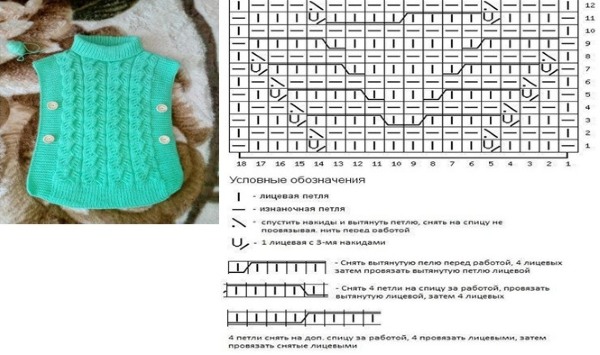 Dark colored yarn can be chosen for boys.
Patterns from front and back loops
We recommend knitting patterns with descriptions and diagrams, made with front and back loops, woven into various attractive patterns.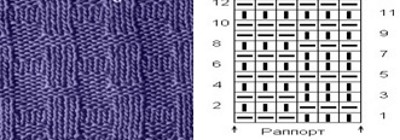
"Labyrinth" -very original, easy to weave pattern:
- (I) – front loop
- (—)purl stitch
The pattern diagram is presented on 12 rows. The number of loops for creating the pattern is 6. As a sample, you can take 12, 18 loops for a full display of the pattern. The description of the diagram is accessible even for beginner needlewomen. The pattern looks especially beautiful on sweaters, pullovers, children's sleeveless jackets.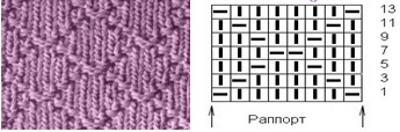
"Rhombuses" - popular design, especially on men's items:
- (I) – front loop
- (—)purl stitch.
The number of loops is cast on so that their number is divisible by 8, since the pattern appears when casting on eight loops and performing 14 rows. The pattern is performed in odd rows, and even rows are knitted according to the pattern.
Japanese lace with samples and diagrams
Japanese pattern stands out for its originality, and at the same time, simplicity of execution. Simple actions allow you to create a product with an original ornament in a short time using knitting needles. Below is a description and diagram of one of the Japanese patterns.
Openwork knitting "Zigzag":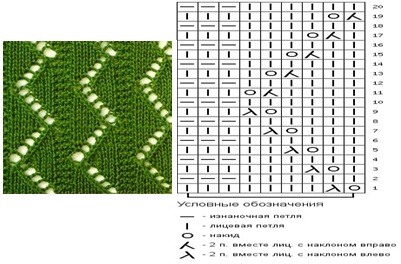
As a visual example, you need to cast on 9 loops. With the completion of row 20, the pattern will fully appear.
Braids
To learn how to knit the "braid" pattern, you must first understand the simplest type of pattern. You need to have a pin or a safety pin for additional loops at hand. The 8-loop braid is done as follows: 14 loops are cast on as a visual example.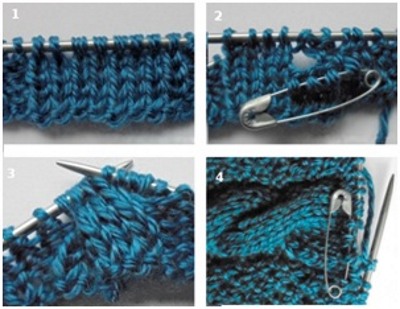
Then knit 4 loops with the front knitting. Then 4 loops from the pin are transferred to the left knitting needle and knitted with the front knitting. Rows 6–12 are knitted according to the pattern. Then knitting continues, starting with the fifth row. As a result, a braid appears, as in Fig. 4.
Rubber bands
Almost all knitted items are usually started with an elastic band, which gives the product a more flexible, elastic shape. The "elastic band" pattern is very convenient when making cuffs, the bottom of pullovers, necklines, scarves.
There are several types of knitted elastic bands:
- Simple elastic band 1x1. The sequence of work consists of knitting one front and one back loop. In all rows, until the end of the elastic, the work must be done according to the pattern.
- Simple elastic band 2x2. In odd rows, 2 front and 2 back loops are made. In even rows, you need to knit back loops over front loops and front loops over back loops, so that the pattern is not disturbed.
- Double elastic.It is used mainly to add density to the product. Then, the entire row is done similarly, starting with the 1st loop. In the second row, 1 purl is done, 1 loop is removed without knitting, the working thread is transferred behind the product. To the end of the row, continue according to the pattern. The third and subsequent ones are knitted like the first and second rows.
Rhombuses
This pattern, which gives austere beauty to the product, is very suitable for men's sweaters, hats, knitted from dark-colored yarn. The "expressive diamonds" pattern, made with knitting needles, has an understandable description and a simple diagram. 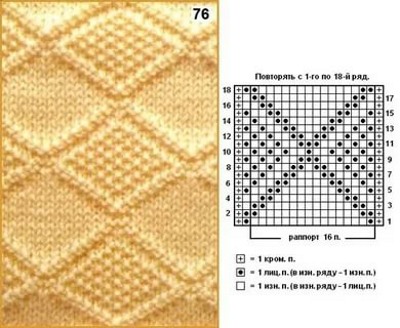 The ornament is drawn after completing the 18th row. Knit, following the pattern from the 1st to the 18th row.
Harnesses
Pattern diagram: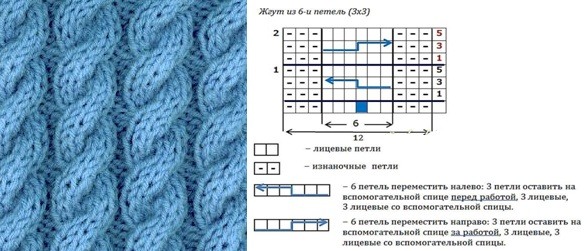
If you follow the pattern, even a beginner can make the design.
Knitting pattern "Harness"
The pattern is very similar to the "braid" not only visually, but also in the way it is knitted. Products made in the Irish style (jackets, sleeveless jackets, scarves, mittens) are relevant with such a pattern. The "tourniquet" can be successfully combined with other patterns. When performing combined patterns, a combination of different colors of yarn is not excluded.
Lace
Openwork knitting is always in fashion. Knitted lace products look great as women's evening dresses, summer blouses. You can knit an excellent summer top or a children's sleeveless jacket from light yarn with 2-mm knitting needles. Such patterns are also suitable for creating spring hats, light scarves. A description of some knitted patterns with descriptions and diagrams is offered.
Checkerboard
The number of loops to create this ornament is 10 (including 2 loops for the edges). The height of the pattern sample should be 12 rows, in order to fully display the ornament. 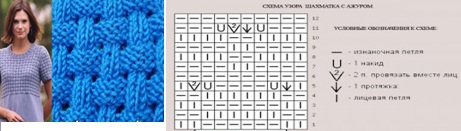 The diagram shows the front and back loops. 2 front loops together must be done with the right tilt of the knitting needle (you need to insert the knitting needle from the second into the first loop and knit them together).
Honeycombs
The theme of honeycombs is relevant in many knitted items. The pattern is created without much difficulty with knitting needles. The ornament, knitted with knitting needles, gives a beautiful, delicate look to women's sweaters, dresses. The main thing is that having a description and a diagram at hand, it is very easy to reproduce the picture on the product.
An even number of loops is cast on the knitting needles. As an example, you can take 8, knit 6 - 8 rows to get the pattern.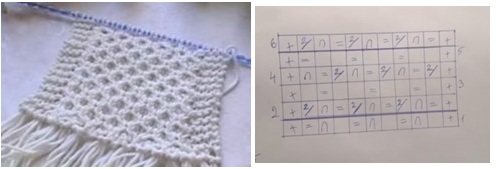
Designations:
- The (+) sign on the drawing means 2 edge loops.
- Number (2) – two front loops taken together.
- The image in the form of a horseshoe is a yarn over.
- (=) – Transfer the loop to the second knitting needle without knitting.
- An empty cell means a knit stitch.
The pattern is repeated until the end of the row. When finishing, remember to transfer the last loop without knitting.
Leaves
"A Path of Leaves"
This pattern is perfect for creating items with autumn motifs if you choose yarn in the appropriate color scheme. 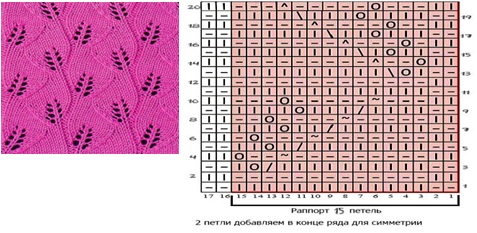 Having studied the above diagram, you can knit such a pattern.
Designations:
- The circle image on the drawing is a yarn over.
- (I) – front loop.
- (—) – Purl stitch.
- A dash tilted to the right – 2 knit stitches together with the needle tilted to the right.
- Left-leaning dash – 2 knit stitches together with a left-leaning dash.
- Wavy line – together 2 purl loops.
- Triangle sign – together 2 inverted purl loops.
Waves
An interesting, elegant ornament, easy to make. Numerous variations of the "wave" pattern give knitted items an extravagant look. A dress made of azure yarn, below the knees, made with the "wave" pattern, creates the impression of a waterfall falling from above.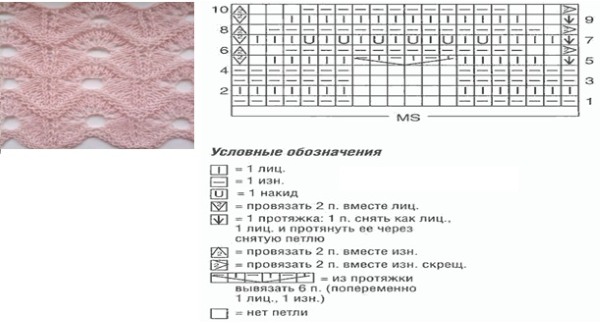
A drawstring is a decreasing loop (there may be several of them) that is removed from the left knitting needle to the working needle without knitting, then the next loop is knitted according to the pattern and pulled through the removed loop.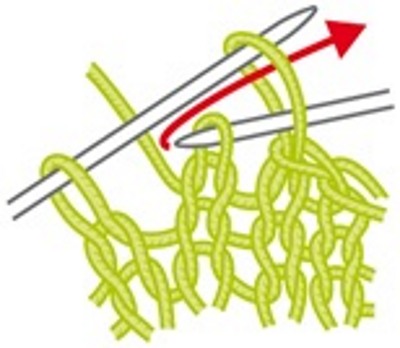
No loop - this designation on the drawings should be ignored, since during the execution of openwork ornaments, as a result of increases and decreases, the number of loops in a row changes. Empty cells are skipped.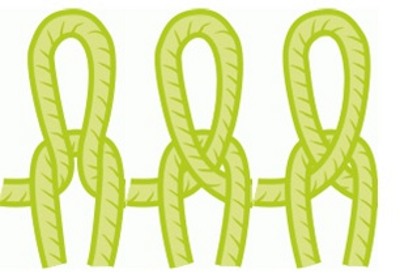
The picture above shows a sample of crossed loops. On the left is a simple loop, on the right are two crossed loops.
Paths
"Path" is a popular type of pattern used as the main ornament on the product, it can also be included in a clothing detail as an additional insert. "Path" looks great on children's sleeveless jackets. This pattern is worthy of the attention of women who are prone to being overweight. The chain of the pattern makes the figure slimmer, visually thinning it.
"Diagonal Path"
Scheme: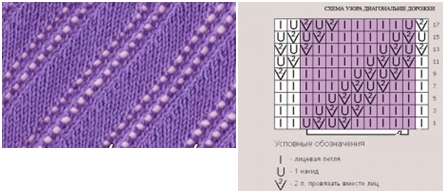
If you shift the yarn over by one loop, the pattern will be oblique.
"Relief path"
The number of loops to create this pattern is 8 (including 2 edge loops). 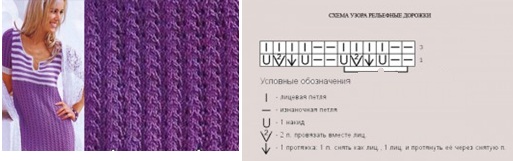 The basis of the ornament is a rib - 4 front, 2 back loops. You can easily knit the pattern, strictly following the instructions of the drawing.
Dropped stitch patterns
As a model, cast on 20 loops (including 2 edge loops). You need to knit as shown in the diagram, making 2 yarn overs before the purl loops in the second row. In the 5th front row, the yarn overs are dropped onto an additional knitting needle and loops are pulled out of them.
The ornament with dropped loops is rightly called a classic pattern that has recently gained great popularity.
Hearts
Description of knitted patterns depicting hearts with the proposed scheme will please modern fashionistas a lot. Knitted items with a pattern of "hearts" always in fashion. The number of loops for making the ornament is 15 (including edge loops). A loop in a puncture means: insert the knitting needle into the loop 4 rows down and knit it with the front knitting.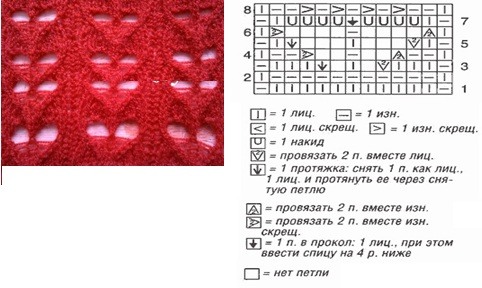
Handwork is always highly valued. Knitted items will never cease to be fashionable. And the huge number of design options gives wide scope for creativity. You can use not only ready-made ideas, but transform them, inventing new patterns, and on their basis creating the required clothing models, form your own style.
Video: knitting patterns with descriptions and diagrams
See the video for the knitting pattern of diamonds:
Celtic knitting patterns, watch the video:
In various knitted items I use a check with different methods of its execution. For example, I can make a check from elongated loops - then the knitting looks voluminous and expressive. At the same time, the fabric stretches well, which allows you to adjust the size of the product, it is dense and retains heat well.
The number of loops in the preparatory row must be divisible by 3. Another 2 loops are cast on for symmetry, and two more for edge knitting. In the first row, all loops are knit; in the second, they are purl, then alternation begins. In the third row, after two knits, one loop is removed (with the thread carried behind the knitting needle), and two knit loops are knitted again. In the fourth, the same thing, but the thread is placed in front of the knitting needle. In the fifth row, the same actions are repeated, starting from the first row.