Beading is popular among needlewomen. With the help of small beads, you can create various decorative items - from an original keychain to a beautiful brooch. The appearance of the product depends on the weaving technique used (mosaic, volumetric or parallel). What tools are needed for beading, as well as various patterns The creation of a butterfly from beads is described below.
Preparation of materials and tools
A butterfly made of beads, any weaving pattern can be used for it, it will turn out bright and neat and will retain its appearance for a long time, provided that the following recommendations are observed during its creation:
- When choosing beads, give preference to Czech ones. It is not recommended to buy Chinese ones, as they are of poor quality. Japanese beads received the highest rating, but they are also the most expensive. The Czech version is of good quality, but its price is not too high;
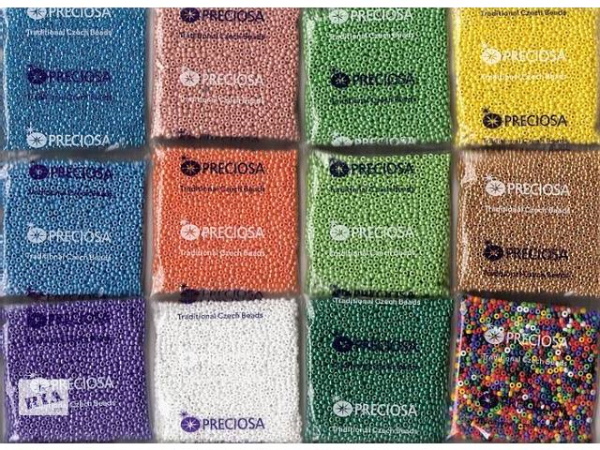
- When buying beads, check their size. In a set, they should be of the same diameter and color;
- pour the beads from the bags into small jars with a wide neck so that they are easy to take;
- The choice of bead material does not matter. You can use plastic, wood or glass beads. Colored glass beads are considered the most durable;
- Before buying, rub the beads against each other (you don't have to take them out of the bag). This will help you determine whether the paint will peel off the beads or not. If you buy beads with poor paint, they will lose their color during the weaving process;
- check the fishing line (or wire) for strength, and also make sure that the length of the butterfly base is enough to make the product;
- During the weaving process, monitor the tension of the line. If the tension is weak, the butterfly will not keep its shape, and if you overtighten the line, the butterfly will turn out crooked;
- For the first weaving, use simple techniques with ready-made patterns.
Before you start beading, you need to prepare the following tools and materials:
- beads. You need to immediately decide what colors you will need, as well as what size the beads should be;
- fishing line or wire (check that they are of a diameter suitable for threading into beads). If you use wire, the butterfly will hold its shape better due to the strong frame;
- scissors to adjust the length of the line. It is recommended to use small ones (it is better to take manicure scissors, with a bend);
- wire cutters. Used to cut wire;
- pliers. They allow you to pinch the end of the wire, preventing the beads from rolling off it;
- weaving pattern and design. You can come up with them yourself or use a ready-made one;
- ruler for measuring fishing line and wire of the required length;
- white cloth. It is needed to cover the table. Small beads are clearly visible on the white cloth;
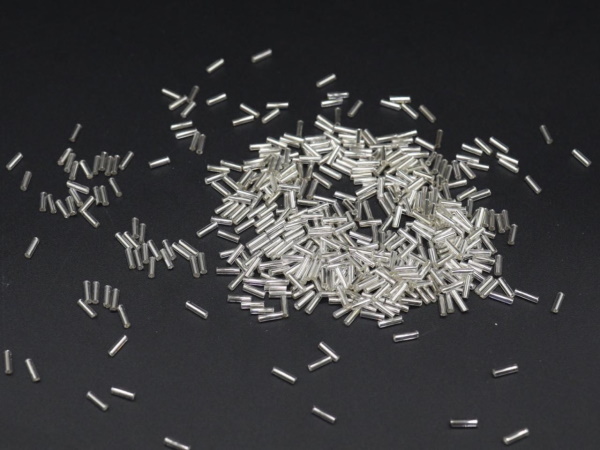
- glass beads (short thin glass tubes);
- lamp for good lighting.
It is important to prepare all the materials and tools at once so that during the weaving process you do not have to run to the store for fishing line or missing beads.
Tips for using beaded butterflies:
| Design and Application Ideas | |
| Keychain | It is recommended to weave a butterfly of compact size. It is used to decorate keys, bags. |
| Interior decor | The butterfly can be attached to a curtain, a night light, a chair (or other furniture), or even fixed to the wallpaper. |
| Barrette | A medium-sized beaded butterfly can be used by attaching it to a hair elastic. Smaller items can be secured with invisible hairpins and hair clips. |
| Brooch | It is recommended to attach the butterfly to clothing with a pin so that it can be easily removed when washing. |
| Pendant | It is recommended to weave a small butterfly and attach it to a string or beads made of large beads. |
| Bracelet | A butterfly can be used to decorate a bracelet made of beads or red rope. |
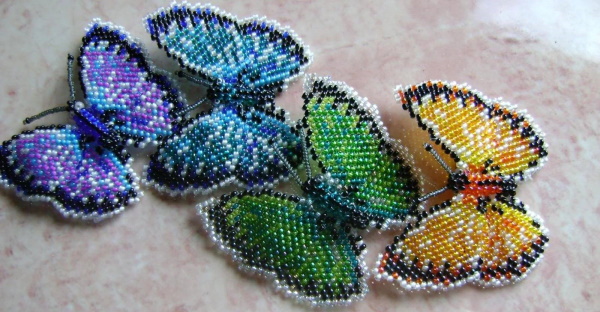
You can use any color scheme, from those close to real butterflies to those that look fabulous.
Easy Butterfly for Beginners
A beaded butterfly (the pattern for beginners is the simplest), despite the ease of manufacture, when choosing bright colors, can be used as a brooch or a decorative element for curtains or a floor lamp.
What needs to be prepared
To weave a butterfly using a simple pattern, you will need:
- beads. You will need at least three colors (body, eyes and wings), but you can use more to decorate the wings in different colors;
- thin wire of white or golden color. Its thickness should be such that it can be threaded through the bead twice. The length of the wire is about 35 cm;
- nippers and a white tablecloth.
It is recommended to make the butterfly in small sizes, since due to the hollow wings, large butterflies will look “empty”.
Butterfly weaving master class
The weaving technique for beginners consists of steps.
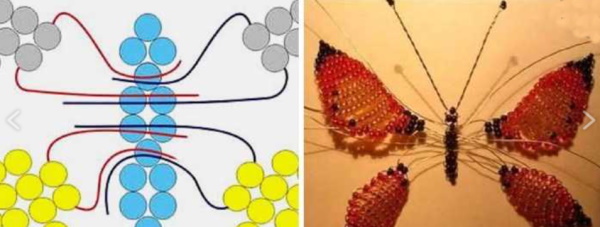
Creating the antennae:
- fold the wire in half, then straighten it (the bend in the wire will be needed later when forming the antennae);
- measure 15 cm from the end of the wire and bend it at a 90 degree angle;
- Place a dark colored bead in the fold;
- connect the ends of the wire near the bead and twist them to a length of approximately 1 cm;
- Similarly, measure 15 cm from the other end of the wire. Also place a bead and twist the wire;
- Continue twisting the wire near the beads until the twists intersect at the initial bend of the wire. The length of each tendril will be approximately 1 cm.
Formation of the butterfly head:
- connect the free ends of the wire and put one dark-colored bead on them;
- then separate the wires and string one black or blue bead on each;
- connect the ends of the wire again and put a dark bead on them. The butterfly's head and eyes are ready.
Formation of wings:
- spread the ends of the wire to the side;

- string 14 beads on one wire, choose the first one in a dark color (like the butterfly’s head);
- make a loop from wire with beads, bending it towards the butterfly’s head;
- pass the end of the wire through the first dark bead;
- now string 9 beads onto the wire, the first one should also be dark (like on the head);
- make a loop again and thread the wire through the first bead;
- similarly, design the second free end of the wire.
Formation of the end of the butterfly body:
- connect the free ends of the wire and string 2 dark beads on them;
- separate the ends of the wire, cut off the excess leaving about 1 cm;
- Pass the free edges through the last bead again.
To make the butterfly look more impressive, it is recommended to use beads slightly larger than the main ones for the body (these are the first beads when forming the wings and the last two).
Butterfly mosaic weaving
A beaded butterfly will turn out with spectacular colors if you use the mosaic weaving technique for weaving.
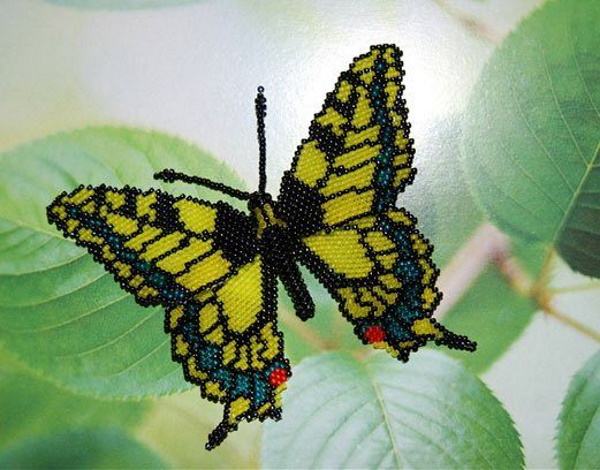
Any pattern schemes can be used.
What needs to be prepared
For the mosaic technique you will need:
- thick white thread about 2 m long;
- beads of the same size and 17 colors.
Also prepare scissors and a white tablecloth.
List of colors needed for this weaving pattern:
- White or milky.
- Black.
- Bright orange.
- Rich red.
- Light blue.
- Dark blue.
- Bright yellow.
- Brownish red.
- Deep blue.
- Pale yellow.
- Lilac.
- Violet.
- Burgundy.
- Bright brown.
- Pale brown.
- Dark brown.
- Bright gold.
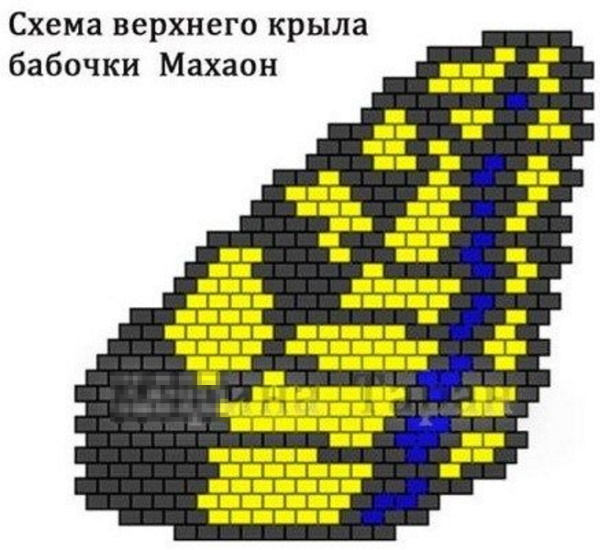
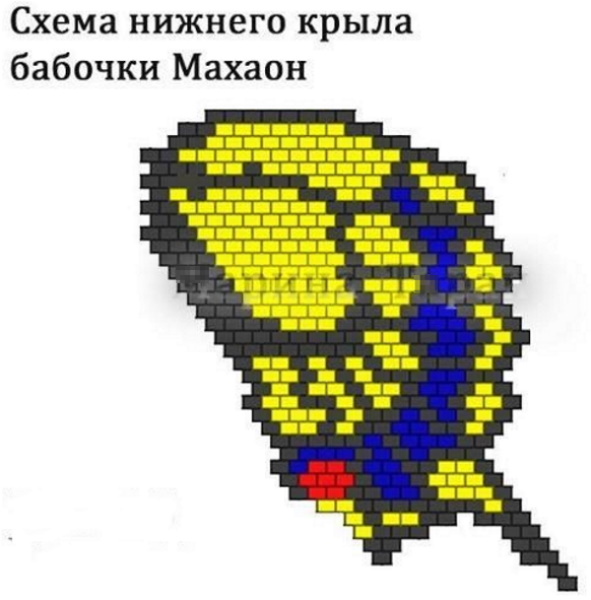
Further in the master class, the colors will be indicated by a numbered number.
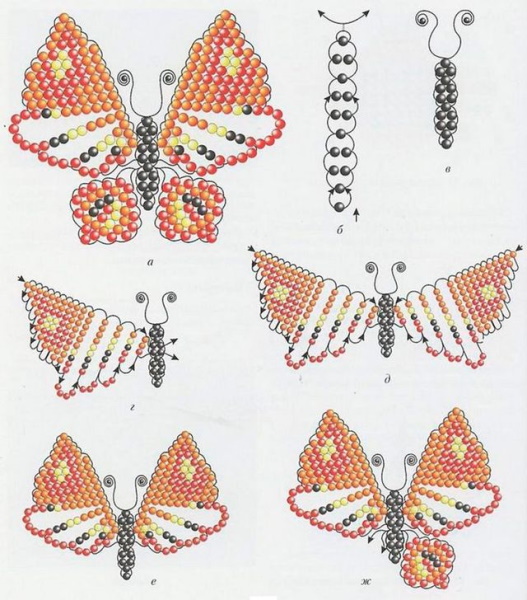
Butterfly weaving master class
The mosaic technique includes the following stages:
- String 8 beads number 17 and 3 beads number 14 onto the thread.
- From the bottom (starting with the first bead number 17), thread the end of the thread in the opposite direction through one bead. As a result, the beads will be arranged in a checkerboard pattern (or in the form of a mosaic), and the ends of the thread should be at the same length. The butterfly's body is ready.
- Divide the threads and string 7 beads number 17 onto one.
- Thread the thread in the opposite direction, starting from the sixth bead. One antenna of the butterfly is ready.
- Similarly, string beads on the other end of the thread and also return it back. This will be the second antenna of the butterfly.
- Next, you need to string beads on the long threads sticking out of the antennae in a checkerboard pattern (as when forming the body), forming wings.

- To do this, you need to string a bead on a thread, then pass the thread through the bead of the body.
- Similarly, put on 4 more beads, alternating free beads and beads from the body. The colors of the beads are selected and alternated at the discretion of the master.
- String 1 bead onto the thread and pass the thread through the bead from the first row of the wing in the opposite direction.
- Repeat the manipulations from point 8 using mosaic weaving.
- Again string 1 bead onto the thread and continue weaving in reverse order, alternating new beads with beads from the second row using 6 beads.
- Decorate the fourth and fifth rows identically using 8 beads.
- Weave the sixth and seventh rows in the same way, adding one bead at the beginning of the row.
- In the eighth and ninth rows, to give the wings a wave-like shape, new beads should be strung (alternating with beads from the previous row) only in the upper and lower parts of the wing, in the center the thread is simply threaded onto the beads of the previous row. The number of rows can be not only 9, but also a little more (depending on the desire of the master).
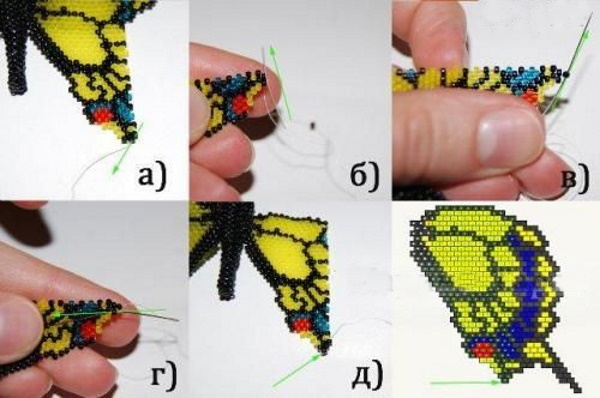
Similarly, design the second wing, keeping the pattern symmetrical. Thread the ends of the threads through the last bead and make knots.
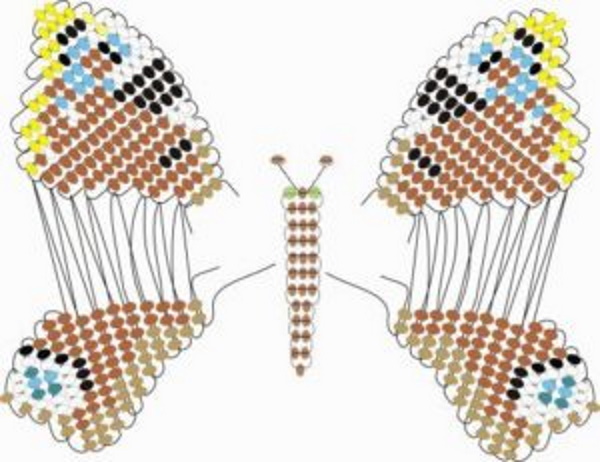
Parallel weaving
A beaded butterfly (the parallel weaving pattern is considered to be slightly easier than the mosaic pattern) made in this way has a more durable frame.
What needs to be prepared
For parallel technique prepare:
- white or gold wire. The diameter should be such that it can be pulled through the bead twice. The length of the wire depends on the desired size of the butterfly;
- beads. You can use 2 colors, highlighting only the body and wings. But if you diversify the color scheme, the butterfly will be more spectacular;
- nippers and a white tablecloth.
When choosing to make a butterfly with a pattern, it is recommended to use a ready-made pattern.
Butterfly weaving master class
Parallel technique consists of the following points:
- When weaving in parallel, it is recommended to weave the body with antennae separately from the butterfly wings.
- When weaving, you need to fold the wire in half and string three beads on the bottom.
- Next, pull the right end of the wire through the 1st and 3rd beads from left to right.
- Also pull the left end of the wire through the 1st and 3rd beads from right to left.
- Again, string a bead on the ends of the wire. Repeat steps 3 and 4, pulling the wire through beads 4 and 5.
- Similarly, make 2 more rows.

- String a bead onto the right end of the wire, making sure it goes through the bead on the left side.
- Thread the left end of the wire in the same way.
- String 7-9 beads onto the remaining ends, creating antennae as in mosaic weaving.
- Cut off excess wire and hide its ends in beads.
- Next, you need to design the wings. To create the upper wings, you need to first string 2 beads on the wire. One end of the wire remains short, and the other long.
- Bend the wire slightly to the side and put on 2 more beads.
- String 2 more beads onto the wire, arranging them so that they are parallel to the 3rd and 4th beads, and pass it through the first 2 beads. As a result, you should get 4 rows, the first 2 rows should consist of 1 bead, and the 3rd and 4th rows of two beads.
- String 2 beads onto the end of the wire again and pull the wire through the beads of the adjacent 3rd and 4th rows.
- String 2 beads onto the end of the wire again and pull the wire through the adjacent beads of rows 1 and 2.
- Repeat the manipulations until the bottom row consists of 4 beads.
- Next, you need to increase the rows in height, continuing the parallel weaving technique.
- When the height of the wing is 16 rows, you need to decrease the number of beads in a row in the reverse order (keeping the parallel weaving). The finished wing should consist of 22 rows.
- Design the second large wing in the same way.
- Next, you need to make 2 lower wings. The beginning of the weaving is similar. After the 12th row, you need to reduce the build-up of beads in the row. In total, the wing should contain 14 rows.
Using wire and the protruding beads on the wings and body, connect all parts of the butterfly.
Volumetric weaving
A beaded butterfly (the pattern of volumetric weaving is quite complex and requires the skill of the master) made in this way is not only bright, but also attracts attention with its shape. The method is used more often when weaving a butterfly brooch of small sizes.
What needs to be prepared
For volumetric equipment, prepare:
- beads. It is recommended to choose beads of the same size. The variety of colors is at the discretion of the master;
- fishing line. The length of the fishing line is determined by the size of the product. In this case, the thickness of the fishing line should pass through the hole in the bead twice;
- scissors and a white tablecloth.
To give the butterfly a body effect, it can be made from a large, oblong bead with a glossy finish.
Butterfly weaving master class
Features of volumetric weaving:
- In volumetric weaving, a parallel technique is used. A distinctive feature is the use of 2 fishing lines at once (wire is not suitable, since it can break due to frequent bending).
- First, string one bead onto each line.
- Next, you need to take the right end of the first line and thread it from left to right through the bead on the second line.
- Similarly, thread the left end of the fishing line through the bead on the second fishing line.
- In the same way, pull the ends of the second line through the bead of the first line.
- Next, string a bead on each end of the first and second fishing lines.
- Similar to the first row, connect the first and second lines by pulling the left line from right to left, and the right line from left to right through the top 2 beads.
- Continue weaving with increasing rows in height and width. At the same time, do not forget to gradually reduce the width of the wing by about 2/3 of the height.
- The body (if you decide not to use a large oblong bead) and antennae are designed in a similar way using parallel weaving and 2 lines.
Connect the body with the wings along the protrusions. To add charm to the butterfly, you can pull beads in one layer along the edges of the wings. To do this, you need to string a bead on the fishing line, then thread the fishing line through the bead on the edge of the wing, then string a free bead again. Continue until the edges of the wings are completely decorated.
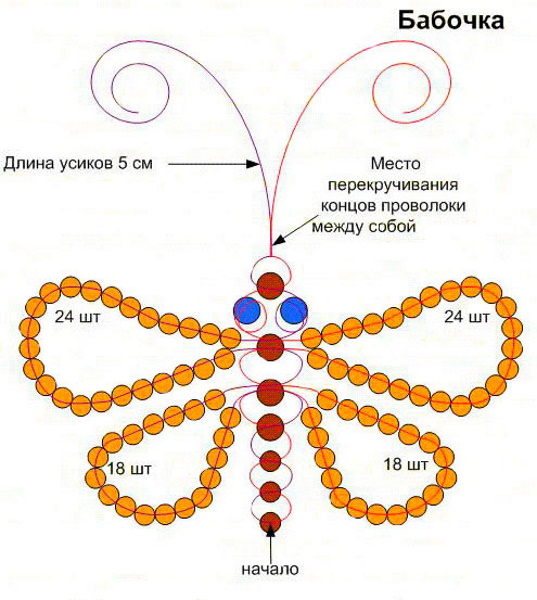
Loop weaving
Loop weaving is considered one of the simplest, but at the same time it allows you to create a spectacular butterfly.
What needs to be prepared
For loop weaving you will need:
- wire with a small diameter so that it can pass through the bead 2 times;
- beads. The number of colors is chosen by the master at his own discretion;
- nippers and a white tablecloth.
When using loop weaving, it is recommended to make butterflies of small sizes.
Butterfly weaving master class
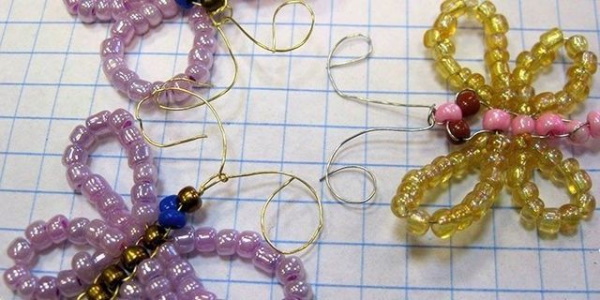
Stages of loop weaving:
- When loop weaving, it is recommended to make the body and antennae separately from the wings.
- To weave the body, string one bead approximately in the middle of the wire.
- Next, pass the right and left ends of the wire through 2 beads at the same time.
- Thread 2 more beads in the same way.
- Next, string one bead, also passing both ends of the wire through it.
- Repeat points 3 and 4, then 5, then points 3 and 5 again.
- Cut off excess wire and hide the edges in beads.
- When weaving the wings, bend the wire in half and string 1 bead on the bottom.
- Then repeat point 3 (from weaving the body).
- Then, in the same way, string 3 beads onto the wire.
- Continue to increase the number of beads until the height of the wing is 7-8 rows.
- Next, you should continue weaving with a decrease in the number of beads being strung.
- Cut off excess wire and hide the ends.
- Design the second wing in the same way.
- Attach the wings to the body using wire.
The butterfly wings will look more delicate if you symmetrically alternate increasing and decreasing the length of the rows.
A beaded butterfly is a unique decoration that can be used as a spectacular gift. At the same time, beginners are recommended to use simple weaving techniques. After acquiring the skill, you can use your own patterns with a variety of colors.
Video on how to make a butterfly from beads
How to make a butterfly from beads: