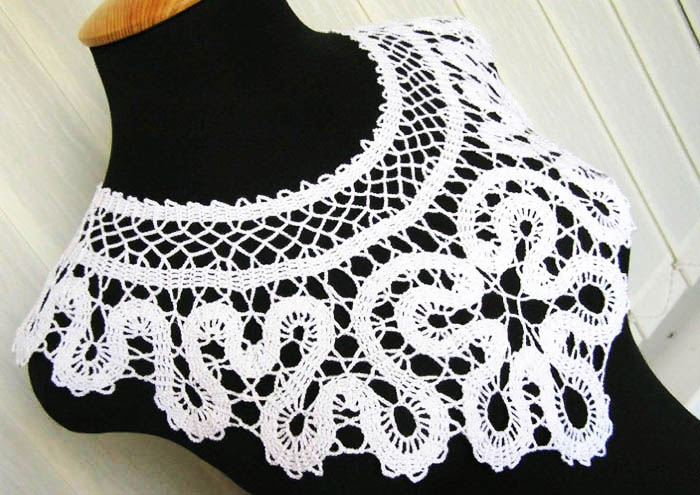
The patterns for knitting Bruges lace are simple, so they are suitable for both experienced and beginner knitters. When working with a crochet hook in this technique, you only need to understand the sequence of the process with the principles of connection, of which there are many. Minor difficulties may arise precisely with the connections.
When knitting Bruges lace crochet, you need to be careful and accurate in order to avoid mistakes.
Necessary tools and materials
Bruges knitting patterns lace requires the preparation of high-quality yarn, which can be made of cotton. However, this is not a mandatory requirement, so synthetic material will do.
You need to take the required shade of thread with an average thickness, approximately 300 m per 100 g. Additionally, you need to prepare a hook.
Often the size of the knitting tool is indicated by the manufacturer on the label of the thread material.
If the yarn is not new and there is no label, there are 2 methods to determine the required size:
| Way | Peculiarities |
| By length of material | It is possible to determine the thickness of a knitting tool by the length of the threads. However, in this case, a label indicating this parameter is required. |
| Universal | It is necessary to insert the thread material into the hook head and pull it slightly. Completely covering the recess with yarn indicates that the tool is thin. As a result, the working material will disintegrate into layers, which will lead to the creation of a very dense fabric. If the knitting tool is very large, the yarn will completely sink into the recess. When choosing the optimal hook size, the thread material should be located at the same level as the head of the knitting tool. |
Schemes with description of works for beginners
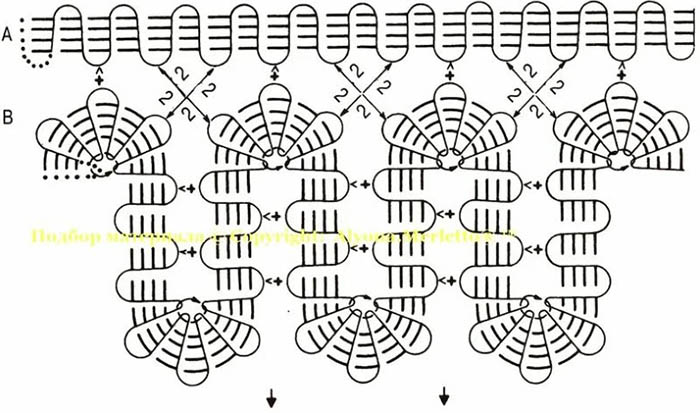
Bruges crochet lace (the patterns are provided to familiarize you with the knitting technique) has a main element in the form of a ribbon, which should be knitted not along the ring, but across, unlike standard napkins. During the work, this ribbon should be joined with other elements by the arches.
Intricate pattern
The main element of this technique is very, on the basis of which it is permissible to create an intricate ornament.
Step-by-step description of knitting:
- To create the ribbon, knit 5 yarn over stitches and 6 air loops in turn.
- Then make 10 air loops. Starting from the 6th element, make 5 columns with a throw.
- Turn the fabric and make 5 air stitches for the arch. Additionally, knit 5 columns with a yarn over.
- Using 6 air loops, create an inner arch.
- Then knit a single crochet, a half crochet and 2 single crochets.
- Make an outer arch with 6 air stitches. Additionally make 4 columns with a yarn over.
- As a result, there should be 4 narrow arches in the middle of the bend. These elements should be closed into one circle.
- Having knitted a new arch from 3 air stitches, alternately join the remaining internal arches with columns without yarn over. Insert the tool into the middle of the arch.
- Make 3 air stitches and close the elements into a circle.
- Again make an arch from 3 air loops, continuing to create the braid in a similar way.
Ring
Bruges crochet lace (the patterns are simple thanks to the detailed description) allows you to create a round napkin, on top of which you can put a vase or other beautiful dishes.
Step-by-step description of the scheme:
- 10 cm of yarn should be free. For 1 arch make 5 air stitches. After at the beginning of the yarn knit 5 columns with yarn over and 5 air loops for lifting.
- Continue knitting straight up to row 35. When making row 36, join the 1st row to close the band into a ring. Then cut the yarn.
- To fill the center section, make 1 chain stitch and pull the yarn through to tighten the fabric.
- Make 6 throws and pass the tool under the next 2 inner arches of the tape. Additionally, make a throw and pull out 1 loop.
- Alternately make 1 yarn over and 2 loops. Repeat this step 7 times.
- Continue knitting by inserting the tool into the next 2 arcs of the ribbon to create a new column of 6 yarn overs.
- When finishing the product, secure the thread material.
Chamomile
Bruges crochet lace (the patterns consist of simple elements, so they are suitable for beginner knitters) is recommended to be mastered initially with small motifs in order to learn how to create different types of braid. For example, you can make a napkin with a floral pattern.
Step-by-step description of the work:
- Do not touch 10 cm of thread material so that this length of yarn is free.
- To form the 1st arch, knit 5 air loops. Then make 2 columns with a yarn over, 1 air stitch and 2 columns with a yarn over on the saved length of the material. Additionally, form 5 air loops of lifting.
- In the 2nd row, knit 1 column with a yarn over on all stitches of the previous row and 5 air lifting elements.
- Similarly, make 47 rows. Then make a joining with the 1st line while knitting row 48. Cut off the piece of yarn.
- To fill the central area, initially make 1 chain stitch.
- Then make 4 yarn overs and pass the tool under 2 inner arches of the tape, which follow each other. Make another yarn over, pull 1 stitch and knit columns with 4 yarn overs (form loops 2 by 2). Make 4 air stitches, 1 connecting column in the 3rd element from the tool and an air loop. Repeat this step with alternation, connecting the next arches of the tape 2 by 2.
- Finish the work and secure the yarn.
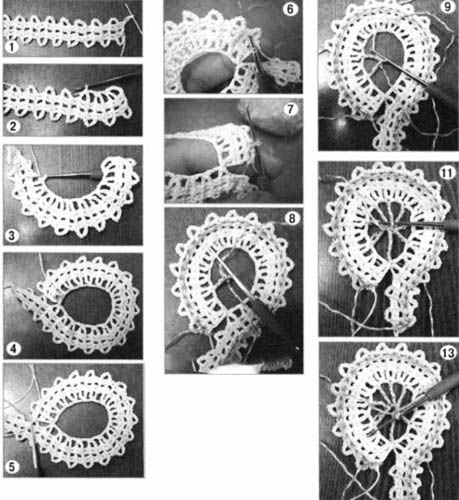
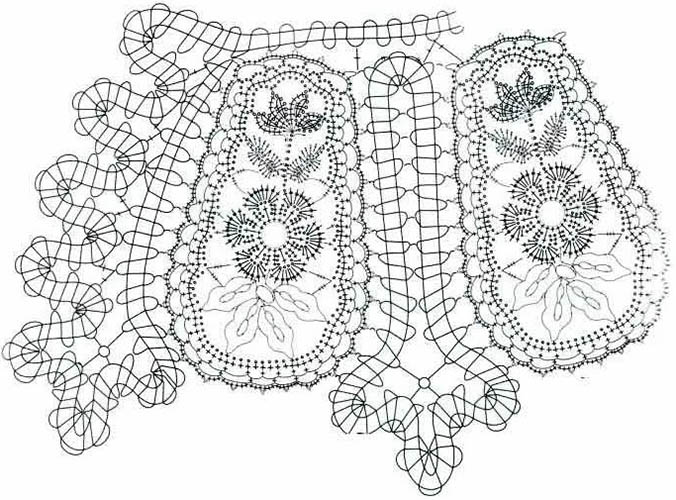
Knot
For beginning knitters, when learning the technique of Bruges lace, it is advisable to initially make products in the form of a knot.
Step by step instructions:
- Before knitting 5 air loops for the 1st arch, leave 10 cm of thread material free. Then, at the beginning of the yarn, make 5 columns with a yarn over and a similar number of air stitches for lifting.
- Continue working to row 25. At the beginning of rows 26 and 28, replace the arch consisting of 5 air stitches with 2 air elements. Knit 1 connecting column in the arch of the 4th and 2nd rows, which are located opposite each other. Additionally, make 2 air stitches to attach the central area of the ribbon.
- In the same way, design the fabric up to row 47. When creating row 48, join the 1st row. Then trim the thread material.
- To fill 2 motifs, initially make 1 air loop. Then alternately knit columns with 2, 3 and 4 yarn overs. To do this, insert the knitting tool into the inner arches from each side of the tape that remain unknitted.
- After finishing the work, secure the thread material.
Triangle
Bruges lace crochet (patterns will allow you to easily create any pattern) is often presented in the form of triangular motifs, which are within the power of beginner knitters.
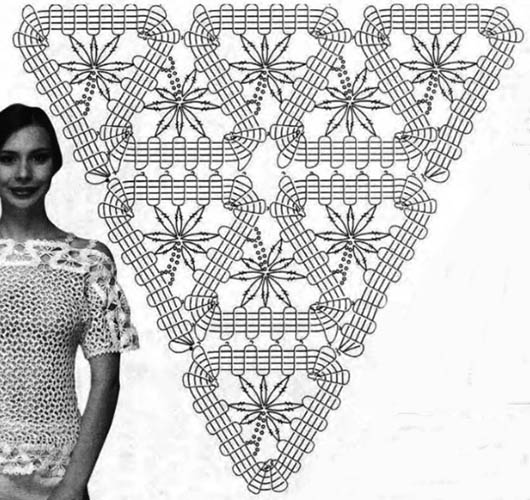
Step-by-step description of the scheme:
- Make a set of 5 chain stitches. Additionally knit 5 chain stitches for the 1st arch.
- Knitting begins with the 6th element from the tool, alternating rows of 5 columns with a yarn over and 2 cells.
- Continue working to row 7. At the end of the row, make 2 air stitches and a single crochet stitch, which was simultaneously connected to 3 previous internal arches. This step is needed for the 1st corner.
- Knit the remaining 2 corners of the geometric figure in the same way.
- After completing row 48, cut the yarn, leaving 10 cm of length for sewing the row to the cast-on chain using a slip stitch.
- To fill the motif, initially make 1 air stitch.
- After knitting a single crochet, 3 air stitches into the initial loop. To finish, make 1 connecting column into the 1st single crochet and make an additional connecting column into the 1st arch. Repeat this step 9 times.
- While knitting the 2nd circular row, connect the inner arches of the ribbon that remain unknitted with a group of 2 columns with 3 yarn overs knitted together.
- To close this circular row, knit 1 connecting column, formed into the 3rd of 3 air stitches, which replace the 1st column with a yarn over. Cut the thread material.
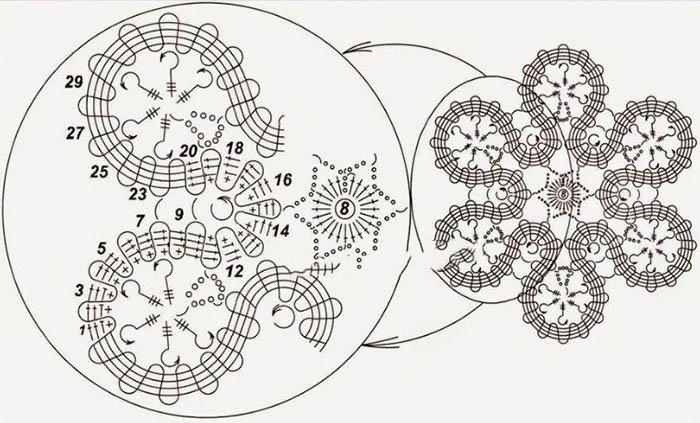
Sun
To create a miniature Bruges style sun motif, you need to connect the arches with braid.
Step-by-step description of knitting technique:
- Make a set of 10 chain stitches. Additionally knit 7 chain stitches to form the 1st arch.
- After in the 8th element from the knitting tool, make 1 column with a yarn over. Make 1 air loop, skip 1 element, knit a lush column of 5 columns with a yarn over in the next air stitch.
- After knitting the air loop, skip 2 elements. Then knit a column with a yarn over in the next air loop. Then knit 2 air stitches, 1 column with a yarn over in each of the 3 outer air loops and 15 air elements.
- Row 2 includes 1 yarn over column into 3 yarn over columns of the previous row, 2 air stitches, a yarn over column into the next yarn over column and a yarn over column under the new air loop. Additionally, knit an air element, a yarn over column under the next air stitch, a yarn over column into the next yarn over column and seven air elements.
- Turn the fabric, continuing straight knitting with alternating 2 rows with external arches of 7 air stitches.
- Additionally, alternate arches of 5 and 15 air loops inside the ribbon.
- After completing row 48, cut the yarn, leaving 15 cm of material for joining this row with the main chain using a slip stitch.
- To make the central motif for filling, secure the yarn to the inner arch, consisting of 15 stitches.
- Then in each arch of 15 loops make 1 column with a yarn over and 1 air stitch. Repeat this step with alternation.
- To finish the row, make a connecting column in the 3rd of the 3 air loops that replace the 1st column.
- In the 2nd circular row make a chain stitch. Then knit a single crochet into the arch of 1 chain stitch, and also make a picot in the form of 3 chain stitches and 1 connecting column in the 1st of 3 elements (do it with alternation until the end of the row).
- To finish knitting in the 1st column without yarn over, knit a slip stitch and trim the yarn.
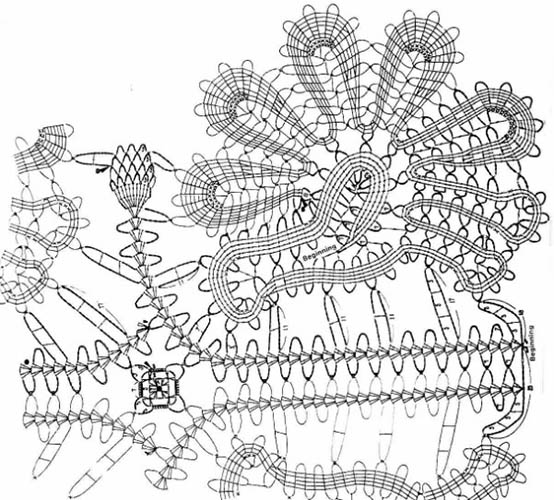
Clubs
This ornament is suitable for decorating various capes, shawls. In this case, it is necessary to follow the sequence of actions and not skip connections in order to obtain the desired pattern.
Step-by-step design of the drawing:
- Keeping the extra 10 cm of yarn, for the 1st outer arch knit 5 air stitches. Then on the remaining thread material knit 5 columns with a yarn over. Additionally make 7 air elements for the inner arch and turn the work.
- Knit straight up to row 4. At the end of the row, make an outer arch of 13 loops instead of 5 stitches.
- Row 5 consists of 5 yarn over columns, 7 lifting chain stitches, 3 chain stitches, 18 connecting yarn over columns into the previous outer arch of 13 loops, 3 chain stitches, a yarn over column into the 2nd chain stitch of the 1st arch, 3 chain stitches and 1 yarn over column.
- Additionally, knit 4 air loops, a connecting column in the 3rd stitch from the tool, an air element and a connecting column with a yarn over through a connecting column with a yarn over. Repeat this step 8 times.
- Then knit 3 air loops, 1 column with a yarn over in each column with a yarn over of the ribbon, and also 7 air stitches.
- Turn the fabric, continuing to knit the tape straight. At the end of the 12th, 20th and 28th rows, make outer arches of 13 stitches to obtain the outer motif.
- In row 32, close the ribbon into a ring and trim the yarn.
- To make the central motif, at the beginning of row 28, secure the thread material to the inner arch. Additionally, knit 1 air stitch.
- Repeat the pattern 4 times, alternating 1 single crochet into the arch, 3 air stitches, 1 single crochet under 3 internal arches and 3 air loops.
- To complete the work, knit a connecting column in the 1st column without yarn over. Then trim the thread material.
Ellipse
Bruges lace consists of the design of the motif, as well as the braid and net for the base. Thanks to such elements of the technique, it is possible to create a variety of patterns.
Step by step instructions:
- Initially, save 10 cm of thread material. To create the 1st arch, knit 5 air stitches. Then, on the saved yarn, make 5 columns with a yarn over and make 5 air loops for lifting.
- Use straight knitting to design the work up to row 35. Join row 36 with row 1 and trim the yarn.
- The central motif consists of a chain stitch, 3 yarn overs, inserting the tool into the inner arch of the ribbon, 1 yarn over and pulling out the loop. Then make paired knitting of all stitches on the knitting tool for the 1st column with 3 yarn overs.
- Make a skip of the 1st arch of the tape to knit a column with 6 yarn overs.
- Perform similar actions, following all steps.
- After finishing the work, secure the end of the thread material.
Secrets for Beginners
Secrets for Beginners:
- This technique requires precise calculations, therefore it is necessary to use a template. This is required so that the size matches, and the symmetry of the ornament is not violated.
- When bending the tape, an angle is formed, the size of which will depend on the number of festoons or connected arches. To create a closed equilateral triangle, it is recommended to combine at least 4-5 arches.
- When creating a braid, each rise column must be formed as an air stitch, which must then be combined with similar rise columns. This process often occurs during knitting. In this regard, it is recommended to pre-depict the base. For example, when designing a dress, it is permissible to use patterns of the clothes that will fit perfectly on the figure, without bulging or pulling. When starting to design the fabric, you need to use the created base.
- The use of various motifs helps to create a beautiful composition. However, before inserting the lace into the frame, the fabric must be washed, starched a little and ironed. After that, the product must be fixed with glue to colored or covered with a paper sheet or fabric cardboard. It is also permissible to design a multi-colored or single-color fabric using one or several types of yarn.
- Bruges lace patterns resemble Irish lace because patterns are needed to form the ornaments. The match is related to the creation of a grid. In this case, it is necessary to collect the braid, which is folded into a pattern, into one whole. It is this process that rarely causes difficulties, but which can be overcome.
- To accurately determine the size of the tape with the angle of rotation, it is necessary to rely on the direction of rotation, the width of the tape and the height of the columns that were chosen to create this detail. To change the slope of the tape in another direction, it is recommended to connect the arches from the opposite side.
Knitting Bruges lace with a hook for beginners may initially seem like a complicated process. However, complex patterns are only a braid that needs to be folded into patterns in a certain way. Having knitted several samples, you can understand the principles of connection with the sequence of work, which will allow you to easily create any patterns.
Video about knitting