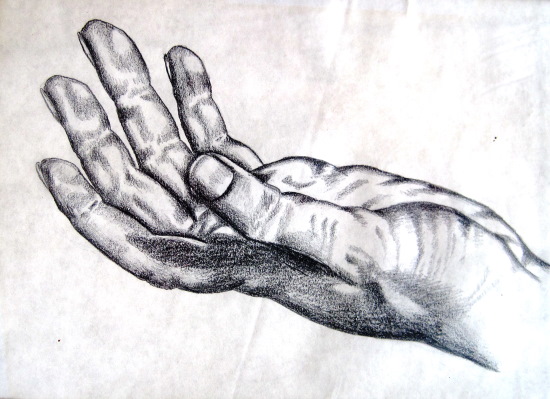
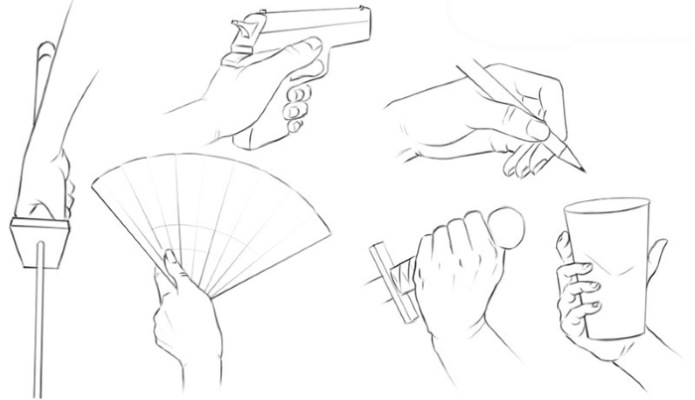
In fine art, hand references are often used for drawing. This is an important technique in creativity, so it is used in work even when creating computer graphics. It is difficult to transfer a dynamic image of hands to paper. People hone this artistic skill for years.
Definition
Hands, drawing references are auxiliary or support images that artists use when creating their sketch. The position of the brush is suitable for a more detailed study of a particular task that needs to be performed by the artist.
Hands references for drawing allow you to see the size and ratio of elements, the work of the muscles of a living organism. Thanks to this, artists do not just copy an object onto paper, but also get inspiration. References help to see and feel every detail of the model.
Almost every artist, in addition to professional skills, has personal experience. They know what an object looks like in life, how it can change, what poses it can take. Therefore, it is not uncommon for painters to use even photographs as a reference. This allows them to work out the dimensions of the hands in detail.
Construction
Hands are difficult to find references for drawing.
There are certain difficulties that are an obstacle in drawing:
- Using photographs, it is not always possible to convey the natural coloring of the model. This is due to the distortion of color rendition. Natural shades are difficult to transfer to canvas, focusing only on photographs.
- Lighting is often unrealistic, which is why it hides the smallest details of the composition.
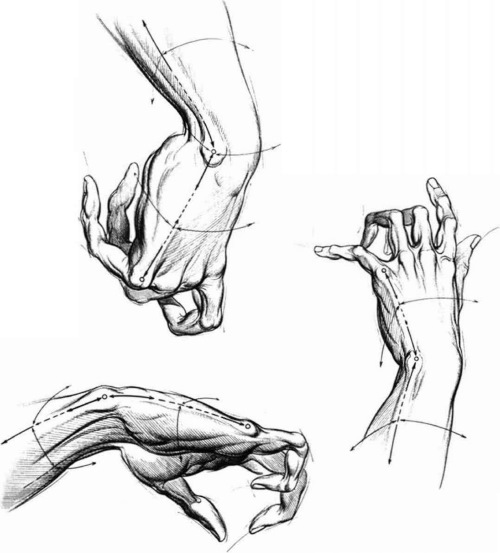
Hands references for drawing include a large number of components that need to be put together to create one complete, high-quality image.
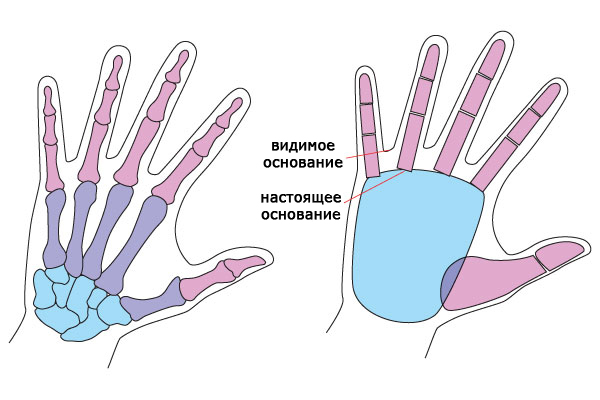
The basic mechanism is understanding what the palm is made of. If you draw from life, you can examine this part of the hand in detail. The palm is the basis of the drawing. From it begins the forearm bone and the thumb, reaching the middle.
When constructing a drawing, it is important to consider the following:
| What to look out for | Why is this so important? |
| General proportions of the hand | Maintaining the proportions helps to depict the hand accurately. Thus, the length of the palm is approximately equal to the height of the index finger. If you look at the thumb, its phalanx reaches the index finger. Also, there are different types of limbs, and this is important to consider. |
| Elbow joint bone | Its rounded tip can be seen at the base of the palm under the little finger. This feature is necessarily preserved in the drawing to convey the realism of the image. |
| Hands of women and men | The difference between men's and women's hands is in their contours. The strong half of humanity has larger joints, square fingertips, and overall, they look angular. Women's hands have thin fingers and a softer palm contour. |
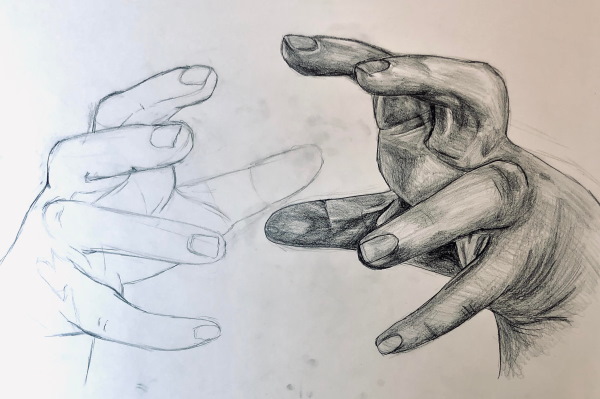
It is also worth using dynamic references of hands for drawing. This will help hone your skills and improve your brush drawing skills. Don't get hung up on one position, because hands can be depicted in a variety of positions.
Some ideas
Drawing hands is especially difficult for beginner artists. This part of the body is very mobile, and therefore they do not have a constant position. Therefore, before starting to create a sketch, it is worth deciding on a reference in advance. This will make the task easier and clearly set a goal.
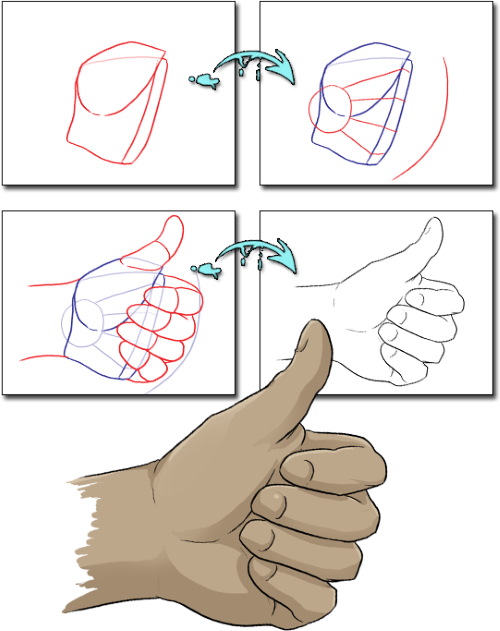
Crossed arms position
To draw beautifully crossed arms, you need to carefully study their anatomy. This will allow you to learn about the physiological characteristics of the hands. Knowing the internal structure of the fingers will allow you to place them at the correct and natural angles.
After this, it is necessary to study the possible positions of the fingers, their proportions. To depict women's hands, the flexibility of the lines is increased, and more angularity is added to the male part of the body.
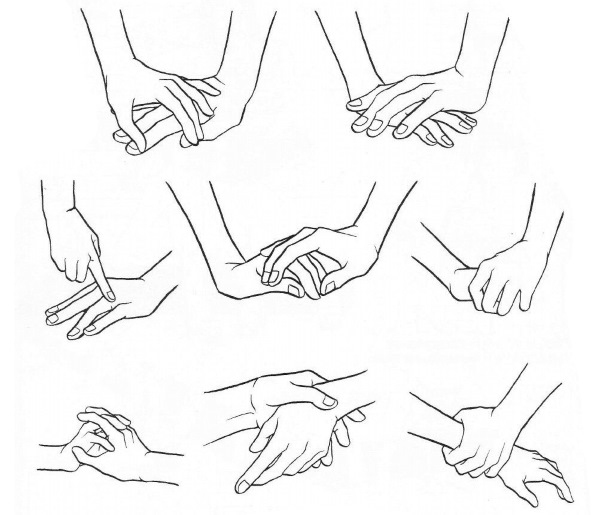
The drawing begins with the depiction of basic shapes and lines, observing the necessary proportions of the joints. To begin, the upper basic features of the end of the forearm in the wrist area are depicted.
Draw the basic position of the index finger, and then the thumb. Thus, the shape of the hand is already drawn. Add a sketch of the middle finger, ring finger to the sketch. The correct position of the joints will allow you to achieve beauty and naturalness of the lines. Finish drawing the little finger and decorate the drawing with small details: nails, wrinkles, shadow.
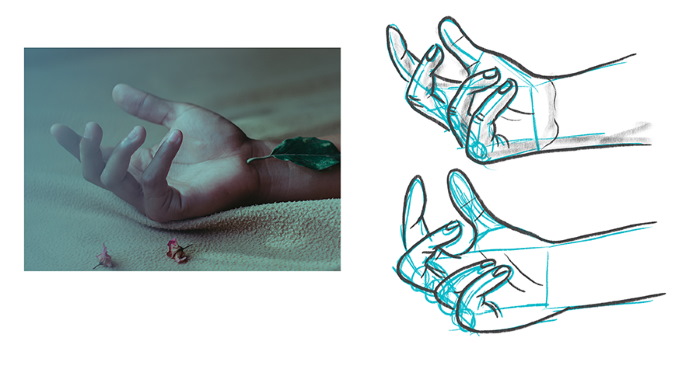
An outstretched hand
This reference is sometimes called the Renaissance gesture. This position got its name from the era of the same name. At that time, many paintings depicted hands in this position.
The reference has a slight resemblance to a relaxed position. It differs only in the position of the fingers: they are more relaxed and straight in shape, and the two middle limbs seem to be connected to each other.
Technique of execution:
- Draw the base of the palm.
- Add a thumb to the sketch, following the relaxed pose pattern.
- Draw lines on the wrist, located slightly behind.
- The index finger is drawn as on a simple hand.
- The 2 middle fingers are drawn connected together.
- Draw the little finger.
- They make an outline and highlight all the details of the drawing.
This pose is very elegant and can be used to create different images. It will be especially relevant in images where gracefulness needs to be emphasized.
Something is holding
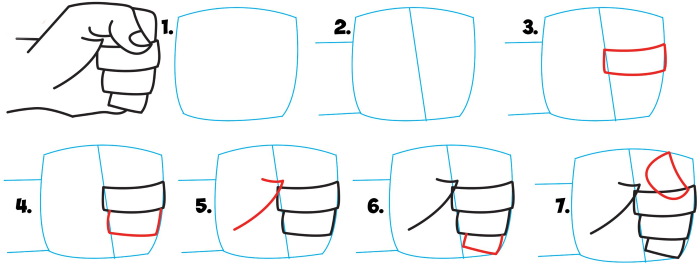
For beginner artists, it is worth starting with drawing simple elements. For example, a hand holding a round object. This is the simplest interaction of the brush and an external element, which is quite easy to depict.
First, draw the object that the hand should hold. Then they begin to sketch the palm. They even apply to the object those lines that remain behind the object. But they should definitely be drawn temporarily in order to orient themselves in the real position of the hand.
Then they begin drawing the finger lines. This is the most difficult part of the work. After all, they have to be depicted around the object, while maintaining the natural position of the phalanges and joints.
After the rough sketches of the fingers are applied, they begin to outline them: they give volume to the limbs, while maintaining the space between them. When the drawing is ready, inaccuracies are corrected.
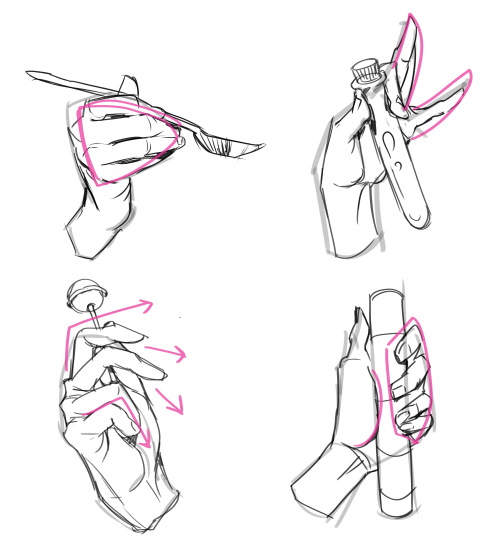
Drawing a hand holding a bowl or cup can be done using the same principle, with the exception of some details. First, draw the object of interaction with the brush, using deliberately rough lines.
Then sketches are made for the base of the brush. It is worth considering that the fingers should be long so that they can easily bend around the object. Therefore, the curve of the cup should correspond to the base of the hand.
At the top of the palm, draw a triangle, next to it - the base for the thumb and index finger, and then sketch out the lines for the remaining limbs. To achieve a natural position of the hand, it is necessary to draw the thumb in the opposite position from it.
At the end, apply the main base, add a few lines on the wrist so that the hand does not appear cut off.
Brushes
When drawing hands, you must adhere to the following rules:
- Preliminary drawing practice is a must. To do this, draw the hands in a variety of positions to understand their dynamism.
- When creating a sketch of children's palms, one fact must be taken into account: their thickness exceeds the size of the fingers.
- In images of the hands of elderly people, it is necessary to emphasize the drawing of wrinkles and knuckles.
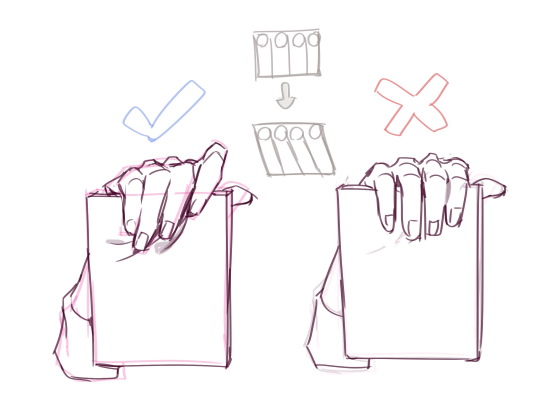
- Your own hands can be a good reference. You can thoroughly study their anatomy, proportions and shapes. Pay attention to the positions of the phalanges: they are not located on one line, and when the fingers are tilted, their angle of bending changes. All fingers have a close connection with each other, with the exception of the thumb (it has a wide range of motion).
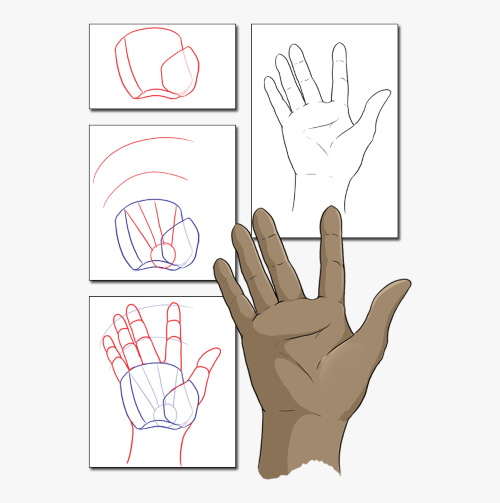
- To make the palm look good on paper, study the outline of the hand. For example, this can be done in a simple way: draw the hand on paper and fill its inner part with details.
- Before starting to create a drawing, make a sketch of its overall size and the points where the fingertips will be applied. Then the sketch is divided into several parts.
When creating a drawing, it is important to observe the basic proportions of the brush:
- The index finger may be slightly longer or equal to the ring finger.
- The length of the index finger multiplied by 2 equals the length of the palm.
- The end point of the little finger is equal to the phalanx of the ring finger.
- The nail occupies an area equal to half of the phalanx.
Beginning artists are advised to start with simple hand positions: extended, relaxed.
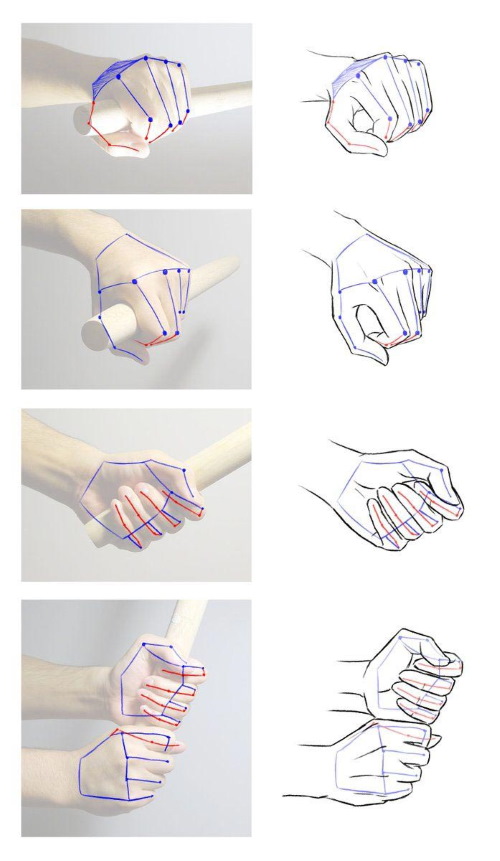
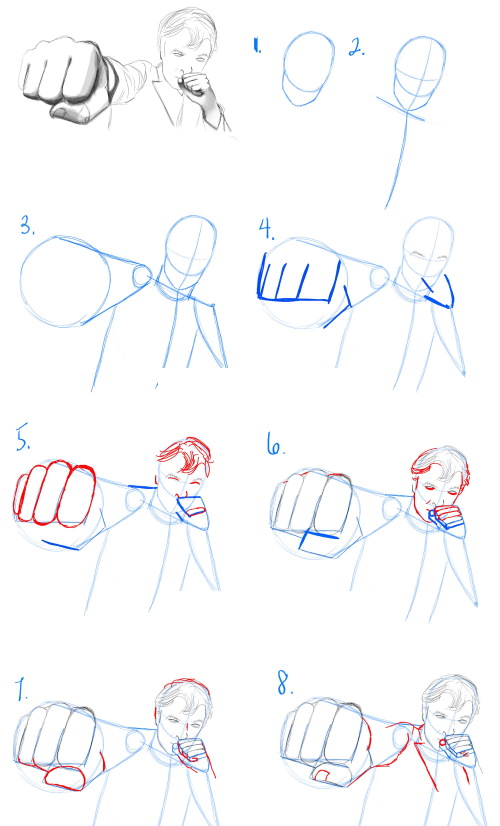
Clenched in a fist
It is worth remembering that a fist is the opposite of an open palm. While an open, unfolded hand has its fingers spread out, a closed hand has its limbs at an angle to the center of the palm.
Unlike the other fingers, the index finger and little finger are at a large angle to the center of the palm. If you look closely, the limbs seem to point to one point. It is important to remember this when drawing an opening palm, when the little finger is not yet raised.
It is also worth noting that the top bones of the joints are at an angle, and the next row of them is at an even greater angle. The reason for this is the angled convex part at the base of the thumb. Its main mass is on top. This allows the index finger to bend to a certain extent.
At the same time, the little finger, bending, falls into the so-called notch. Therefore, when the palm is bent into a fist, such a gradient is obtained. The closer the fingers are to the little finger, the more they can bend. Due to this circumstance, the 2nd row of joints is at a large angle.
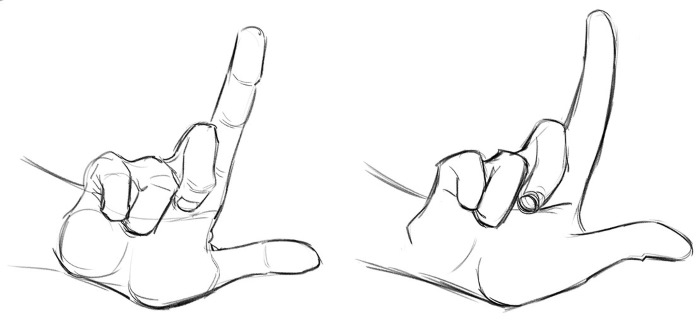
It is worth knowing that the fist is the basis of such positions as:
- Index finger pointing upwards.
- Goat and Peace gestures.
If an artist can learn to draw a fist from different angles, he will be able to easily perform all of these positions.
Gesture images
Hand references with gestures are a difficult type of image, since the fingers are in an unusual position. Conveying the dynamism of the joints without losing their naturalness is not an easy task.
A common gesture is the index finger, with the finger raised upward. If you look at the image of such a hand, you can see its tension. In the picture, this is highlighted by the emphasis on the protruding tendons in the wrist area.
Pay attention to the skin, which gathers into folds due to the position of the fingers. It is very important to convey the darkening of the upper phalanges of the fingers (except the thumb). The smooth gradient allows for a soft transition to avoid creating the effect of a chopped off arm.
The thumb is raised up. Its lines are smooth, softly connecting with the wrist. The index finger extends from it. It is worth paying attention to its phalanx: it seems to be looking down. This is a natural position, but many artists make the mistake of drawing it in an unusually straight position.
This gesture can also be positioned at a more complex angle - towards the viewer. In this position, the thumb should be placed along the index finger or its phalanx should be slightly raised.
Another common gesture is the "Class" position, which expresses approval. It is often depicted on the outside of the hand, hiding the back surface from view. Much attention is paid to the drawing of the knuckles: they should be in a natural position. Depending on the structure of the hand, some of them may protrude more than others.
The position of the thumb should be natural: its upper line is depicted as a curve, which is connected to the wrist at a gentle angle. Do not forget about the features of the joint. They are tense in this gesture and protrude from under the skin. If the hand is thin or the tendons are close to the skin, then the rest are also highlighted.
In a relaxed state
The drawing starts with a simple palm shape. Make a sketch of a three-dimensional block of the base of the hand. When drawing the fingers, make the index finger more open and the little finger closed. This will add dynamism to the pose.
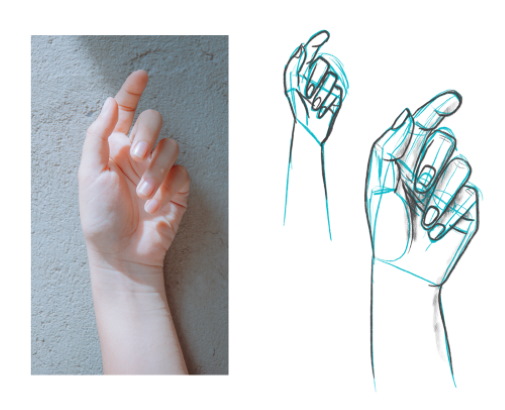
The index finger should not be too straight, and the little finger should be completely bent. And the other limbs gradually open. The thumb is slightly relaxed, and is in the same position each time, at any angle of the hand. It is necessary to achieve the effect of a relaxed hand, and the open index finger and thumb will contribute to this.
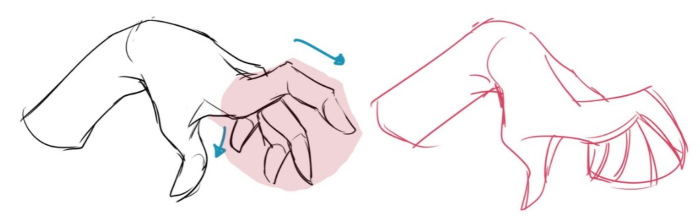
Crooked hand
Dynamic hand reference is a crooked position of the fingers. In this position they are in a curved state, as if tense. First, a sketch of the palm is made. Unlike the other sketches, it is depicted in the form of a crooked triangle.
From it, the lines of the thumb and index finger are derived. They are given great attention because they will be in the foreground. To convey the twisting of the limbs, the phalanges are bent a little.
On the thumb, its upper part will rise upwards and go inwards. To create this position in the drawing, darken the lower area of this limb and highlight the knuckle with dashes. Draw the nail at a slight angle.
The other fingers are easier to draw because their position should simply be drawn with a curved line. The phalanx at the base of the index finger is made straight, then bent at an angle, increasing it at the end. This is emphasized with dashes on the folds.
Draw the middle finger, which is connected to the index finger. An important point is that its angle of inclination can coincide with the second one. The ring finger requires special attention. It is located at a distance, and it is important to draw it correctly to complete the image of the twist.
To do this, its phalanx is brought to the foreground, emphasizing the curvature with a fold on the skin, and the base of the finger is darkened. It remains to finish drawing the little finger, which is located next to the thumb. This part of the hand represents the inner part of the finger for review, and therefore it is important to convey the division of the limb into phalanges. Also, you can simply darken the little finger.
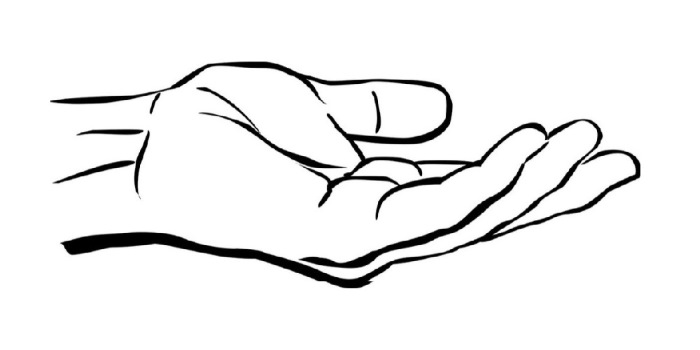
Palm up
The reference of the hand raised up requires only the correct placement of the fingers and lines on them. First, the base of the palm is depicted - a curved rectangle. Then, lines are outlined on it, from where the fingers will be drawn.
Depending on the position of the hand, the fingers are drawn. Almost always, the big one is located as if apart from the others. The index finger is drawn not far from it. But the others are often connected to each other.
To draw the natural position of the fingers, sketch all their lines. For example, draw the middle finger completely. The part that will then be hidden by the ring finger is also drawn on paper. This will help you understand what position the hand is in.
Then, the next finger is drawn on top of this, and the sketch is completed with the little finger. Then, the extra lines are removed, leaving only those that create the main drawing. You can play with the shadow and lines on the palm.
You can use references of hands for drawing as a practical experience. Moreover, it is permissible to take photos of your own hands, from different angles and positions. Such an opportunity is a real treasure for a beginning artist.
Video about drawing
Hands references for drawing: