The book is an important tool for developing imagination, critical thinking and language skills. In art and culture, it often becomes an object of depiction.
Unique images of the book are created, reflecting its appearance and sometimes its internal content. The younger or less experienced the artist, the simpler the drawings should be.
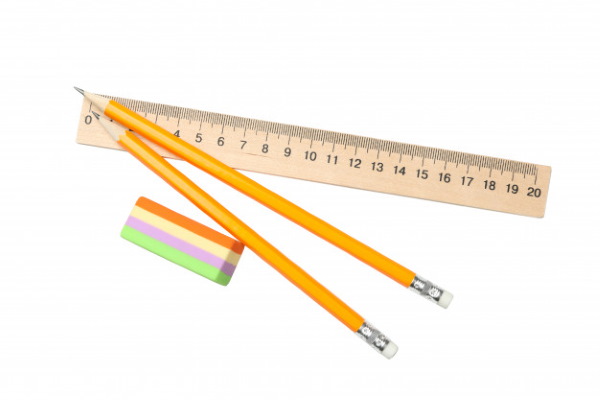
Necessary materials and tools
Pencil art is a unique way of self-expression that requires the right selection of materials and tools. The table below shows the main ones needed to create pencil drawings.
| Tools and materials | Brief description |
| Paper | It can be of different sizes, density and texture. For beginner artists, regular white paper is suitable, which easily absorbs graphite and allows you to draw lines of different thickness. More experienced artists can choose a denser base, which allows you to achieve greater detail and depth of the drawing. |
| Pencils | This is a tool used to create drawings and sketches. They come in different types: from soft ones, which produce darker lines, to hard ones, which allow for thin and light strokes. Pencils are made of graphite or other materials, such as charcoal or sanguine. The choice of pencil depends on the artist's task and preferences. |
| Erasers and pens | Erasers are used to erase lines and correct the drawing. They can be soft, to erase marks without damaging the paper, or hard, for rougher erasing. A kneaded eraser is a type of eraser that is a soft and flexible material that can be used to shade lines and give them volume. These tools help the artist make changes to the drawing and create the necessary effects. |
| Stencils | This is a device that is a sheet with cut-out figures or patterns. Using a stencil, you can quickly and accurately transfer an image onto paper. They can be made of various materials, including plastic, cardboard, and metal. Their use helps artists speed up the work process and get repeating elements in the drawing. |
| Rulers, compasses | A ruler is a tool for drawing straight lines and measuring distances. A compass is a device for constructing circles and arcs. Both tools are used to accurately and accurately draw elements in a drawing, as well as to create geometric shapes and proportions. |
| Sharpeners | Designed for sharpening pencils. There are different types of sharpeners: mechanical, electric and manual. Sharpeners allow you to keep your pencils in working order and ensure smooth and clear lines during the drawing process. |
Master classes
When designing a book, you need to pay attention to the following aspects:
- The peculiarity of drawing a stack of books is that it is necessary to create the illusion of volume and mass. To do this, you can use the technique of chiaroscuro to emphasize the relief of the books and make the image more realistic.
You can also add shadows in the background to create a sense of depth in space. This will make the composition dynamic and interesting.
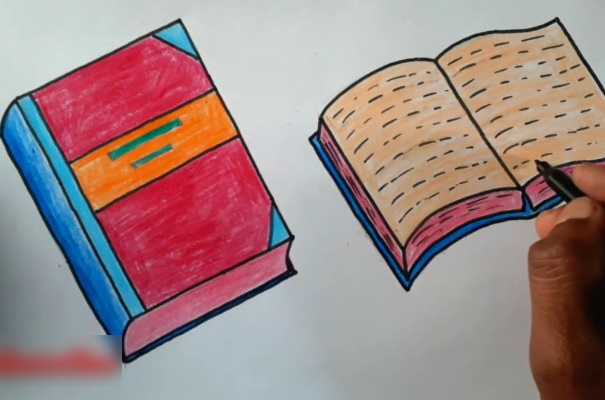
- By drawing an open book, an artist can convey its contents using various visual techniques. For example, you can draw text or symbols on the pages of a book to reflect its theme.
They also use a color scheme. A bright and saturated shade will symbolize joy and optimism, and dark and muted shades will symbolize scientific content.
- The cover of a book plays an important role in its perception. It should be attractive and informative to attract the reader's attention. The cover can contain information about the book title, author, genre and other important characteristics.
The cover art can reflect the book's content and style.
In open form
The book in the picture can be depicted using the steps from the following master class:
- Start by sketching the main elements of the book: the cover, spine, and pages. Use simple shapes and lines to create the sketch.
- Draw the pages of the book. They should be thin. It is important to convey the shape and size of the pages correctly.
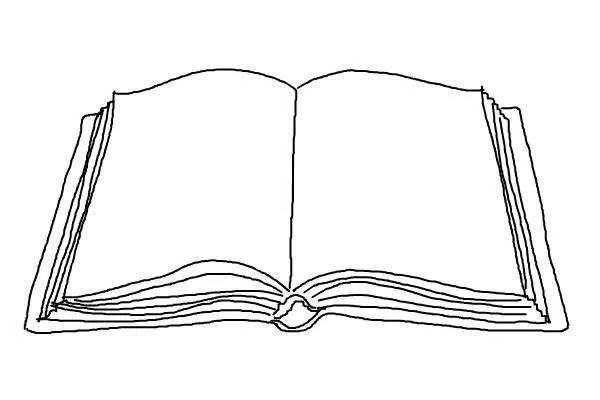
- Create the spine of the book. It should be strong and reliable. To create a realistic effect, you can draw the spine as a strip that connects the pages.
- Remove unnecessary lines and details that are not needed to complete the drawing.
- Trace the outlines of all the elements of the drawing. The outlines should be thick enough so that the drawing is easy to read.
Adviсe:
- Use different drawing tools to create a variety of lines and details.
- Draw in several stages, gradually adding details and refining elements.
2 books (open and closed)
This master class presents the general concept and recommendations for creating 2 books - open and closed.
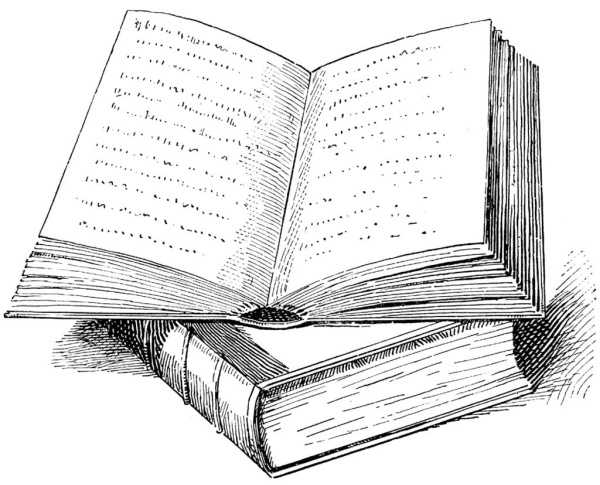
- To create a sketch, you need to follow these steps:
- Draw the outline of each book, leaving space for details. Use a pencil or other tool to create a sketch. This will help determine the proportions and structure of the future drawing.
- Draw the bottom closed book using the following steps:
- Create a basic shape for the bottom book cover, using a rectangle with rounded edges.
- Add details to the spine of the book to make it three-dimensional and interesting.
- Draw the pages of the book with thin lines inside the cover. Consider the proportions between the pages and the cover to create a realistic effect.
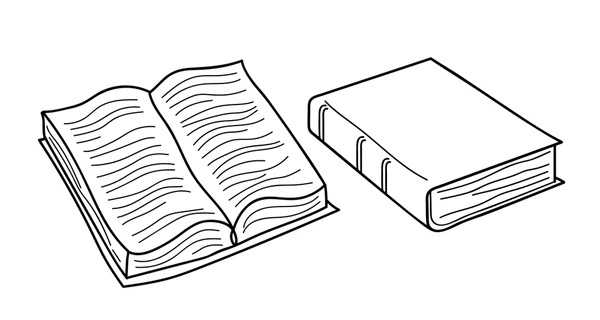
- The top open book can be drawn by following these steps:
- For the top book, create a sketch, leaving the cover and a few pages open.
- Draw the spine in more detail, adding characteristic curves.
- Add lines of text to the opening pages. They can be represented as dots and dashes of different lengths.
- Before erasing unnecessary lines, it is recommended to:
- Look closely at the drawing and find extra lines that may make it difficult to perceive the volume and structure of the books.
- Pay attention to the clean lines and quality of detail.
- To outline the contours, you need to:
- Add finishing touches to the outline of each book. Make sure the lines are crisp and clear.
- Pay attention to details such as spine shape, page corners and other elements to give the books a realistic look.
- You can add volume by doing the following:
- Using a pencil or other tool, shade each book.
- Start with general areas of shadow, gradually moving to smaller details. Keep in mind that the shadows should emphasize the shape and volume of the books.
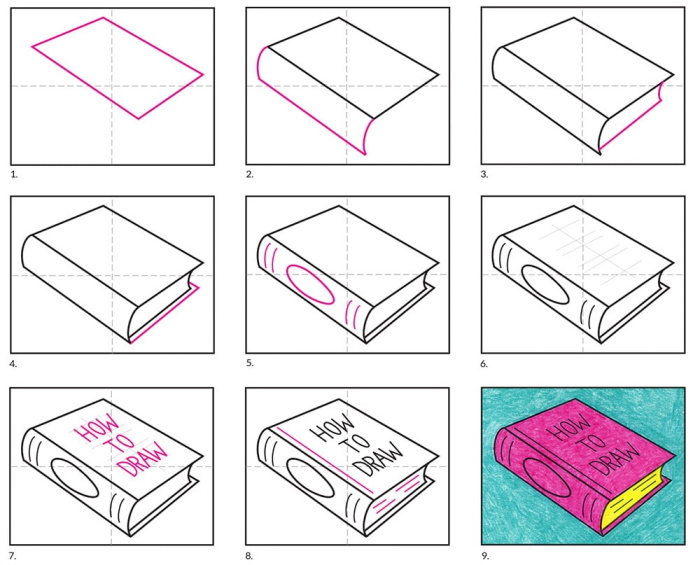
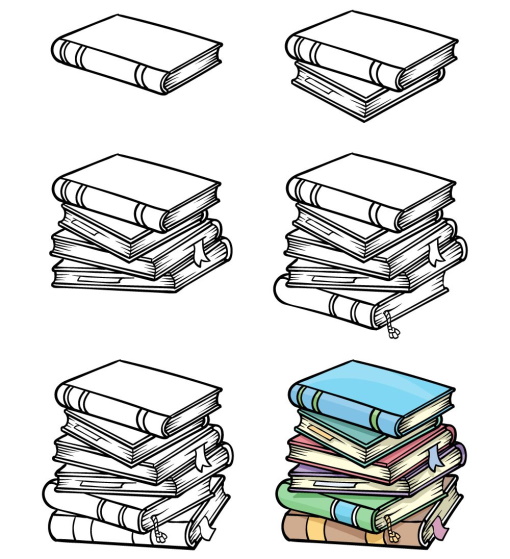
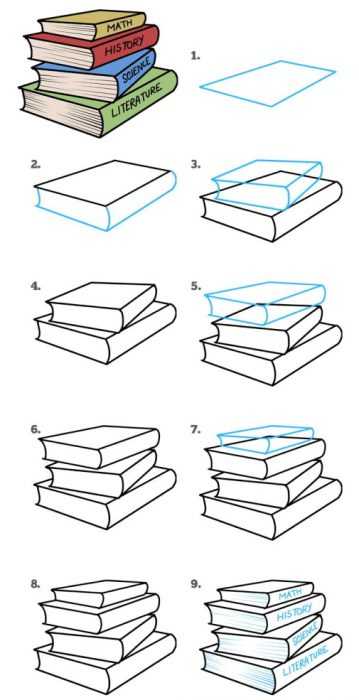
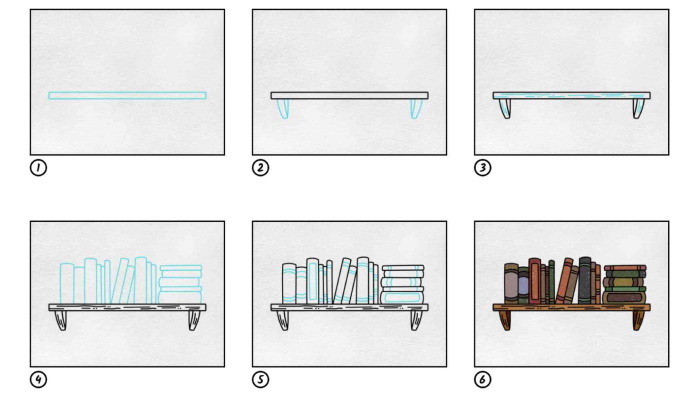
Stack of 4 books
There may be more than one book in the picture.
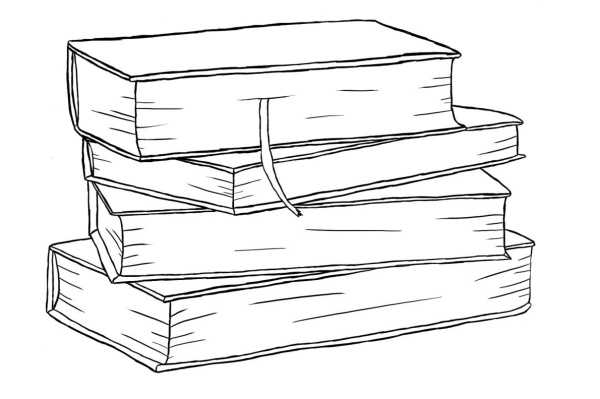
A stack is drawn based on instructions, at the end of which it is necessary to make sure that all the elements are balanced, harmoniously combined with each other and create the impression of a real stack:
- Make a sketch of a stack of books. It is important to keep the proportions and consider the location of the books relative to each other.
- Draw the cover of the book that is at the bottom of the stack. It can be a simple rectangular shape. Draw the spine of the book, it can be straight or curved, depending on the style of the book. Draw the pages of the book.
To create a more realistic effect, you can add shadows and highlights on the pages of the book.
- To create the 2nd closed book, repeat the steps as for the bottom book: draw the cover, spine and pages. The 2nd book should be placed slightly above the first book, forming a stack.
- Also draw the 3rd book, which should be located even higher than the second book. It should not overlap the 2nd, but be located slightly at an angle on it.
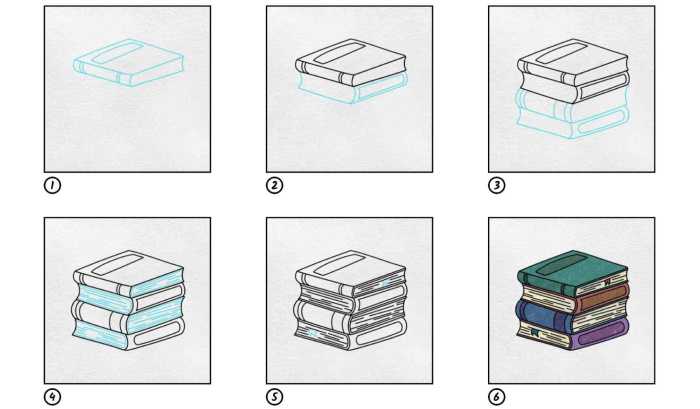
- Finish the stack with the top book, which should also be closed and positioned at an angle to the previous books. Draw a bookmark inside the pages, thus emphasizing that the reader has not finished reading.
- Erase unnecessary lines and make them smoother. Pay attention to details, especially where the pages connect.
- Choose a hard pencil or marker to outline the book outlines and spines. Slightly strengthen the lines so that they stand out against the paper background. The clarity of the outlines plays a key role in creating a three-dimensional image.
- Use different types of shading or shadows to add volume to the books and spines. Consider different shading options to see which works best for the composition.
A stack of 7 closed books
You can draw a stack of books during this master class, experimenting with different styles and drawing techniques to find the most suitable approach.
It is recommended to add your own unique elements.
- Start by sketching a stack of books. Determine their location and size relative to each other. This will help you understand the composition of the drawing and determine the place of each book.
- Draw the bottom book. It should be located at the bottom of the sketch and turned with the spine towards the viewer. For the cover, you can draw a frame that will symbolize the cover of the book.
Draw lines on the front and back of the book to indicate the pages. Add a bookmark line in the center of the pages.
- Add a 2nd book on top of the first one. It should be closed with its pages facing the viewer. Repeat the same steps as for the first book: draw the cover, page lines and bookmark. Make sure that the 2nd book completely covers the first one, creating the appearance that it is lying on top.
- Draw a 3rd book with its spine facing the viewer. Depict part of its cover, including design elements. Add the spine of the book and detail the pages inside the book. Include a bookmark in the image as an additional element.

- Go to the 4th book, which is drawn with its pages closed towards the viewer. Work on the book cover, its spine and pages.
- Add a 5th closed book following the steps above. It is important to create the impression of depth and volume. Each book should be seen in perspective, but retain its individuality.
- Book 6 continues the series, adding depth and variety. Draw it by repeating the previous steps.
- Add the top book to complete the composition. It should fit harmoniously into the overall look of the stack and create completeness. Add a bookmark to it.
- Examine the resulting drawing and remove unnecessary lines and strokes that may distract from the overall appearance of the stack. Leave only the necessary elements.
- Trace the outlines of all the books to create clean lines and borders.
- To give volume to the stack of books, add shadows and light. Shadows will help emphasize the contours of the books and create a sense of depth. Light will highlight the main elements and add brightness to the drawing.
Use different levels of lighting to create different effects and highlight details.
Old closed
The book in the picture can be created using basic steps that will help you depict it in a closed state.
You can make changes to the drawing process.
- Make a sketch of the future book. Use a pencil and an eraser for this. Draw a rectangle that will represent the front part of the book cover. Add a small triangle at the bottom for the spine. This will become the basis for the book.
- Give the cover volume and texture. Draw some curved lines on the front of the cover. Use these lines to create patterns that add realism to the drawing.
- To create the effect of pages, draw horizontal lines inside the main rectangle. These lines can be thin or thick, depending on the idea. Keep in mind that these lines should imitate the folds of paper.

- Draw the spine of the book as a triangle that connects to the cover and pages. Indicate the shape and thickness of the spine, this will help give the book a finished look.
- Create the appearance of a lock or clasp on a book. The lock can be depicted as a small symbol on the cover.
- Use an eraser to remove extra and unnecessary lines from the drawing.
- Emphasize the main contours of the book using thicker lines. This will make the drawing clearer and more expressive.
- To add volume to the book and realism to the drawing, you can shade the cover and pages using different shades. Add shadows from the light source to give the drawing depth and volume. Pay attention to the play of light and shadow, which emphasizes the curves and textures of the drawing. Depending on the style, you can choose a shading technique, for example, light smooth lines or more rigid contours.
Bookcase
The book in the picture may be on the shelves of a bookcase next to others.
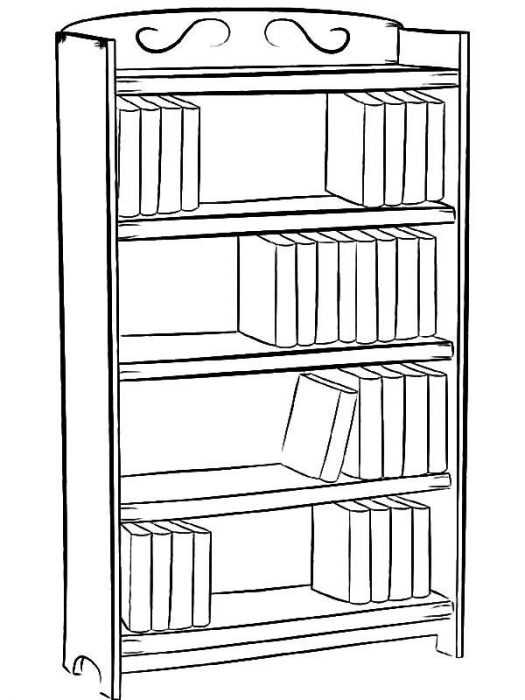
To depict such a picture, it is recommended to follow the master class:
- Create a basis for the future drawing. Draw a schematic outline of a rectangular cabinet with clearly defined proportions and lines.
It is important to determine the location of the shelves and think through the composition of the drawing. Consider the perspective. The shelves should become smaller in size as they move away from the viewer. This will make the drawing more believable.
- Go to the image of the cabinet. Draw horizontal lines that will indicate the position of the shelves in the cabinet. They should be parallel to each other and evenly distributed along the height of the cabinet.
Add cabinet details: legs, handles. Pay attention to the angle of inclination so that they look realistic.
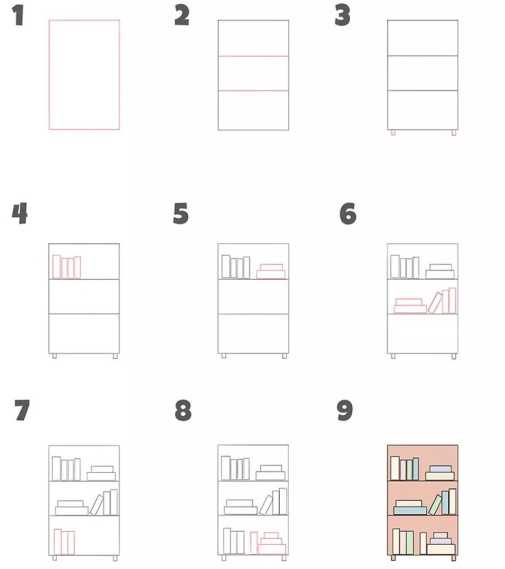
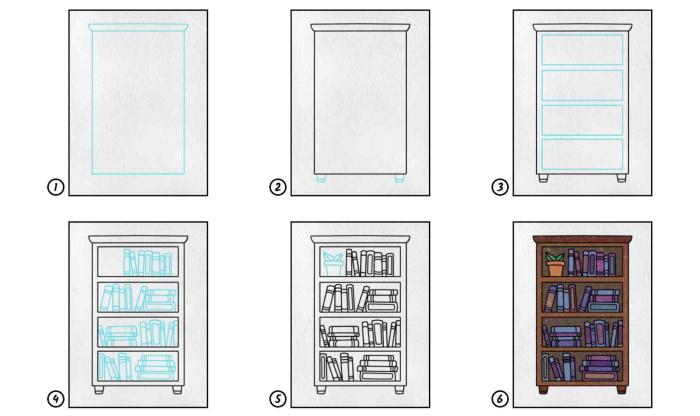
- Place the books on the bottom shelf. Align the spines of the books so that they face the viewer. Give them the desired shape and size. Place the books evenly on the left and right sides. This will help create the impression of order and symmetry.
- On the 2nd shelf, arrange the books similarly to the bottom one, but add one book at an angle. It will create an interesting accent in the composition and add dynamics to the picture. Place it so that it fits harmoniously into the overall picture.
- On the 3rd shelf, draw books placed only on one side - on the right. Their number will increase to 8, creating a dense and filled group. Arrange the books so that there is no space between them, creating a sense of volume and depth.
- On the 4th shelf, draw books placed on 2 sides from the center so that the spines are facing forward. Let there be 4 of them on each side, which will give the drawing a finished look.
- The 5th shelf will remain empty to create the illusion of space. You can draw a pattern or design on it that will harmonize with the overall style.
- Look at the drawing carefully and evaluate the impression it makes. Remove all unnecessary and interfering lines that do not carry any semantic load.
- Trace all the main contours. Use firm and confident lines to give the drawing a finished look. You can add shadows or shades to give volume. This will make the bookcase more realistic and expressive.
Tips for Beginners
General recommendations can be adapted to individual needs and preferences:
| Stages | Comments and recommendations |
| Sketch | Identify the main elements of the book: spine, cover, pages. This will help you better understand the composition and proportions of the future work. |
| Composition | Place the book (or a stack of books) in the center of the sheet. Think about the ratio of the book's size and the space around it. It is better to use a vertical format for a book, and a horizontal format for a stack. |
| Drawing details | Start with the general outline of the book (spine, cover). Move on to drawing the pages using light lines. Draw individual letters and words on the pages. Consider the slope of the letters and their location. |
| Detailing | Finish details such as page spines, page edges, and covers. This will give the work a finished look. |
| Light and shadow | Consider how the light falls on the book. Pay attention to the shadows cast by the pages or covers. This can help make the image more realistic. Add shadows and volume to the book. Use different shades of pencil to create shadows and textures. For example, you can use darker shades for the cover to make it stand out. |
| Completion | Evaluate the work and make any necessary changes. Make sure that all elements fit together harmoniously. |
The book is a multifaceted object of art that can be depicted in various styles and techniques. Drawings dedicated to this topic allow us to convey not only their appearance, but also their content and atmosphere, creating unique works of art.
Video about drawing
Book - picture: