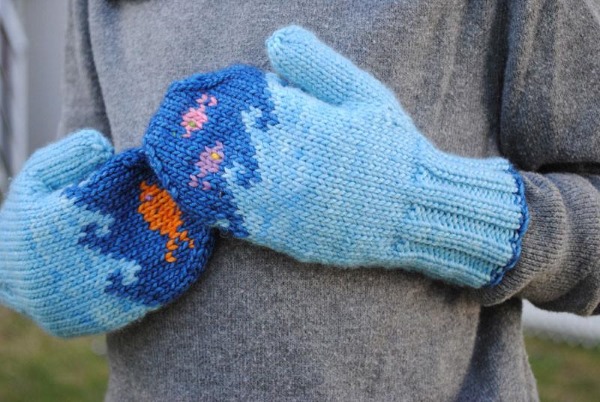
Knitted items always remain relevant in the cool season. A master class for beginners on how to knit patterned mittens with knitting needles step by step gives any girl the opportunity to make a practical accessory for severe cold weather. If desired, you can create a real warm accessory yourself, just follow the step-by-step instructions.
Rules for knitting mittens
Mittens can be made in the following ways:
- using a strong hook;
- the traditional option is a set of knitting needles;
- using a knitting kit.
As a result, they are completely seamless or from equivalent parts that are sewn together using threads. With 5 identical knitting needles, a whole product is obtained.
At the beginning of the work, the collected loops are divided into 4 equal parts, distributing them on the knitting needles. The remaining tool is considered the working one. The upper zone and the palm are divided into 2 equal parts of the product. When knitting this accessory, patterns suitable for 2 knitting tools are used.
Selecting yarn
Raw materials for knitting are selected taking into account regional weather conditions.
The following types of yarn suitable for knitting mittens are available for sale:
- thick wool – for severe frosts with gusty winds;
- semi-wool – optimal for variable temperatures;
- soft acrylic – for small children.
Babies under one year old feel uncomfortable in mittens made of natural wool or semi-wool, as it tends to itch. Acrylic is a product of synthetic origin, but despite this, it has an excellent ability to retain heat.
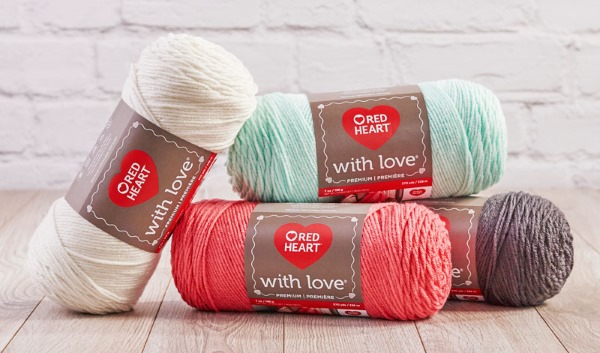
Knitting threads can be made in one or several tones. Also suitable for this purpose is fancy yarn with pile and small irregularities.
Selecting spokes
Knitting needles are the main tool of a knitter. They are classified by their main purpose, raw material, and original thickness. Outerwear is made with paired tools connected to each other with a strong fishing line.
When choosing tools, you need to pay attention to the following criteria:
- Their weight should be minimal, since heavy knitting needles quickly tire the hand.
- The ease with which the thread slides is an indication of the quality of the needles, as a good tool should not catch on anything.
- The ends - the tools should not be too sharp, so as not to injure the delicate skin on the phalanges of the fingers, and the thread will fly off from the blunt ends, so the ends should be moderately sharp.
- Size – specified by the diameter of the knitting needle and calculated in millimeters. This indicator is selected based on the current thickness of the yarn. Knitting density is achieved by the ratio of the thread thickness and similar parameters of the knitting needles. The manufacturer indicates the optimal number of knitting needles on the skein of threads.
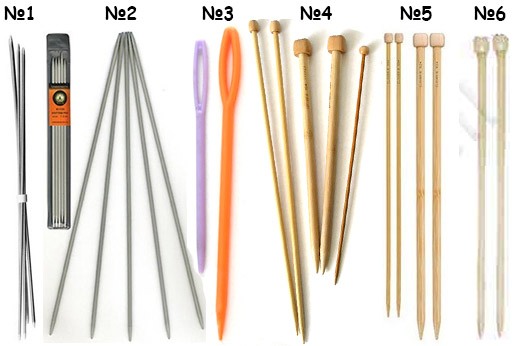
Steel needles are suitable for thin yarn, their length is medium, they have a slippery surface, the hand does not get tired from the knitting process. Aluminum tools are suitable for dark-colored yarn, because they leave a mark on the thread.
For models with voluminous patterns, tools with different thickness indicators are selected. Thicker tools are suitable for knitting lush braids or cords, while an openwork pattern requires the use of thin knitting needles.
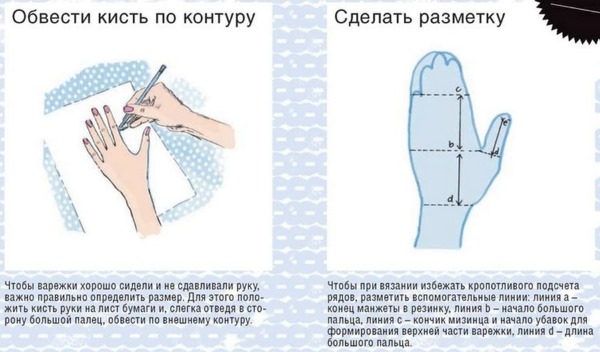
Necessary measurements
To ensure that the accessory fits snugly on the hand, the knitter must follow these step-by-step steps:
- Determine the length of the palm from the starting point to the end of the longest finger.
- Find out the exact distance from the base of the palm to the thumb.
- Measure the exact distance from the beginning of the palm directly to the tip of the little finger.
- Find out the exact length of the thumb.
- Wrist circumference.
To knit a hand accessory correctly, you need to familiarize yourself with the size chart for mittens.
| Mittens made of 4-ply yarn, 210 m in 50 g | Children | Men | Women | |||||||||
| Size | 0 | 1 | 2 | 3 | 4 | 5 | 6 | 8 | 9 | 6 1/2 | 7 | 7 1/2 |
| Palm circumference, cm | 11 | 12 | 13 | 14 | 15 | 16 | 17 | 21.5 | 24 | 18 | 19 | 20 |
| The set number of units on the needles | 34 | 36 | 38 | 40 | 44 | 46 | 50 | 60 | 68 | 52 | 54 | 56 |
| For the thumb wedge, increase 1 stitch after (…) stitch on needle 2 | 7th | 7th | 8th | 8th | 9th | 10th | 11th | 13th | 15th | 11th | 12th | 12th |
| Number of loops for the thumb wedge | 11 | 11 | 11 | 13 | 13 | 15 | 15 | 17 | 9 | 15 | 17 | 17 |
| Addition after the wedge of the thumb | 0 | 0 | 2 | 2 | 2 | 2 | 2 | 4 | 4 | 2 | 2 | 4 |
| Number of loops for palm | 34 | 36 | 40 | 42 | 46 | 48 | 52 | 64 | 17 | 54 | 56 | 60 |
| Length from wrist to index finger | 7.5 | 9 | 10.5 | 12 | 13 | 14 | 15 | 16 | 16.5 | 15.5 | 15.5 | 16 |
| Number of loops for thumb | 11 | 11 | 13 | 15 | 15 | 17 | 17 | 21 | 23 | 17 | 19 | 21 |
| Length of thumb to cape | 2 | 2.5 | 2.5 | 3 | 3.5 | 4 | 4.5 | 5.5 | 6 | 5 | 5 | 5 |
Circular knitting on 4 needles
After completing all the required measurements, you should begin knitting the sample. When the control fabric is ready, a thick ruler is applied to it, calculating the exact number of loop units contained in 1 cm.
Next, it is multiplied by the measured length of the movable hand to the wrist itself. The resulting digital unit must be divided by a number multiple of 4. For example, if the calculation yielded the number 45, then 44 will be suitable for the product. The required number of loops is calculated in a similar way.
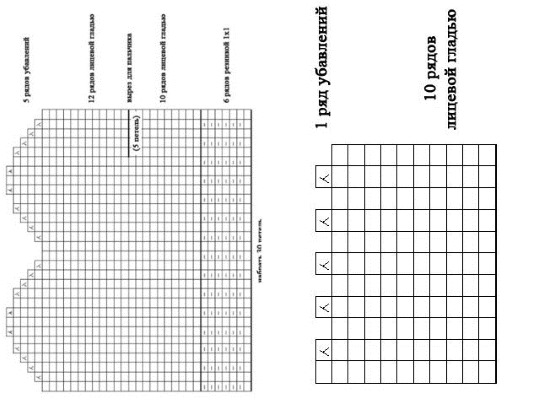
Next, a diagram is built based on the measurements taken. After the basic foundation is ready, the raw materials and tools are selected, then you can proceed to the practical part.
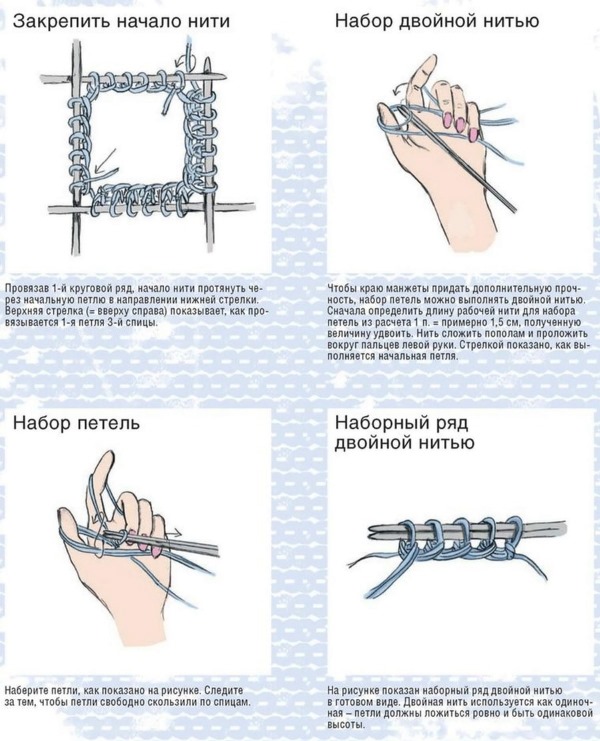
Casting on stitches and knitting elastic
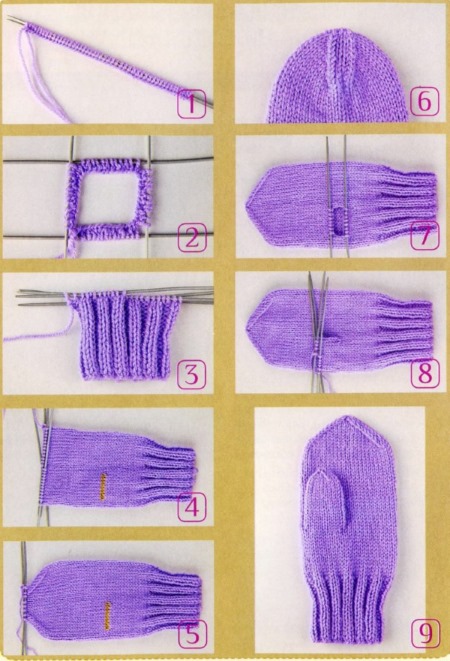
Now we begin the practical process of how to knit mittens with knitting needles for beginners step by step using a standard set of 5 knitting needles, where all the collected loops are connected into a single ring.
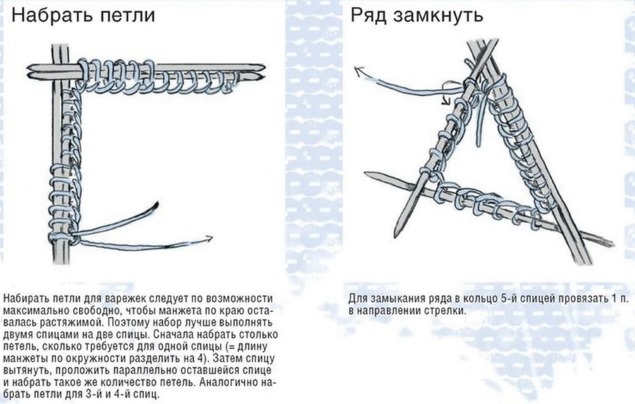
The basis of such knitting is a circle, where a soft frame is fixed on 4 tools. The initial stage is knitting a cuff using a traditional elastic band - 1 front and back.
The step-by-step creation of a mitten in a circle looks like this:
- First, the cuff is created; the rules for calculating loop units for it are similar.
- The required number of loop units is cast on using 2 tools.
- Next, the resulting number is divided into 4 equal parts, and loops are thrown onto each knitting tool.
- The next step is to close the collected loops into a circle, connecting the threads together.
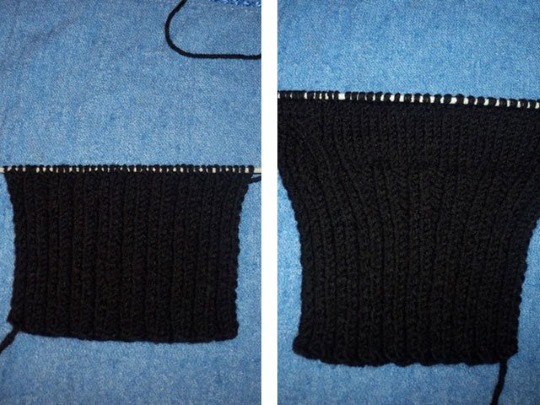
- The optimal height for knitting cuffs is from 5 to 7 cm; knit to the desired height.
- After finishing the height of the cuff, we begin to create the main part, then an increase of 1 st is made to each knitting needle.
- At a similar pace, knit the required height indicated in the calculations.
The knitting stage of the cuff is complete.
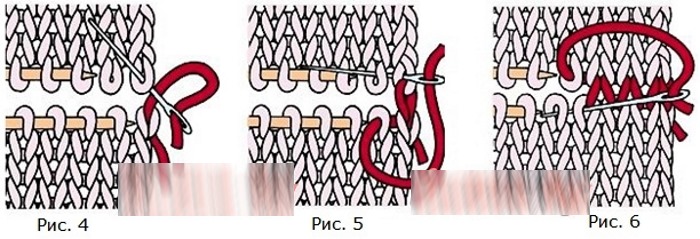
Knitting the Thumb Hole
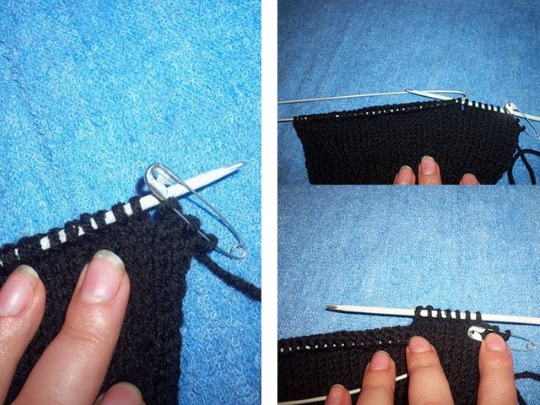
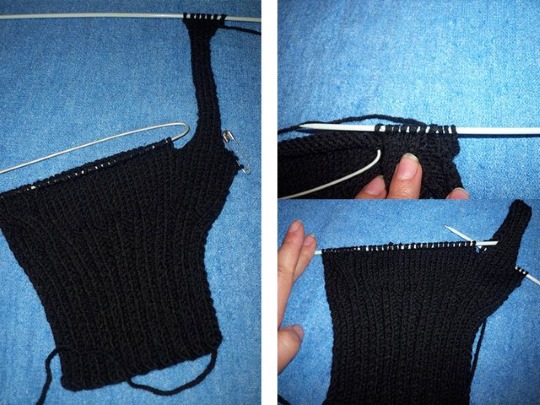
Next, proceed to forming the thumb. The notch for it will be placed on the 3rd tool for the right hand, on the 4th - for the left mitten. The required number of loop units are pinned with a small metal pin.
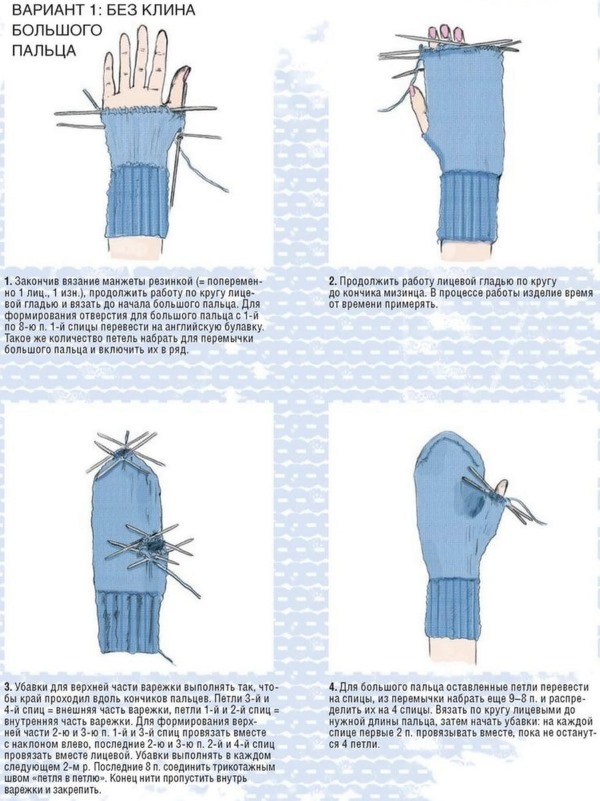
The continuation of the creation of the mitten looks like this:
- The finger hole is being formed. Each tool has an equal number of loops, for example 11. In this case, 1 st is knitted, the others are pinned with a pin.
- A yarn over of 10 units is made onto the right knitting needle, the final 12 units are knitted.
- Thus, the clearance for the thumb is ready.
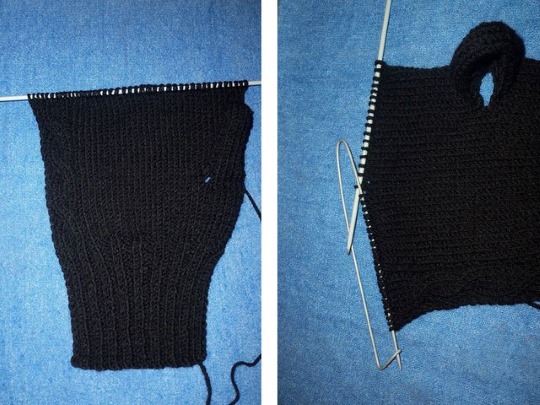
Making a toe
Once the space for the finger has been drawn out, they begin to create the toe.
Step by step, this process looks like this:
- Knitting goes in a circle up to the height of the little finger.
- Next comes the reduction of the links: on the 1st and 3rd tools, knit with a slight throw-over 2 units each, and at the end, on the 2nd and 4th needles, knit 2 loops for the upper backs.
- The reduction in the number of links goes on for each tool until there are half of the units of the initially cast-on row left on them. Now the reduction of loop units goes on in each row.
During these actions, the toe of the future mitten is formed.
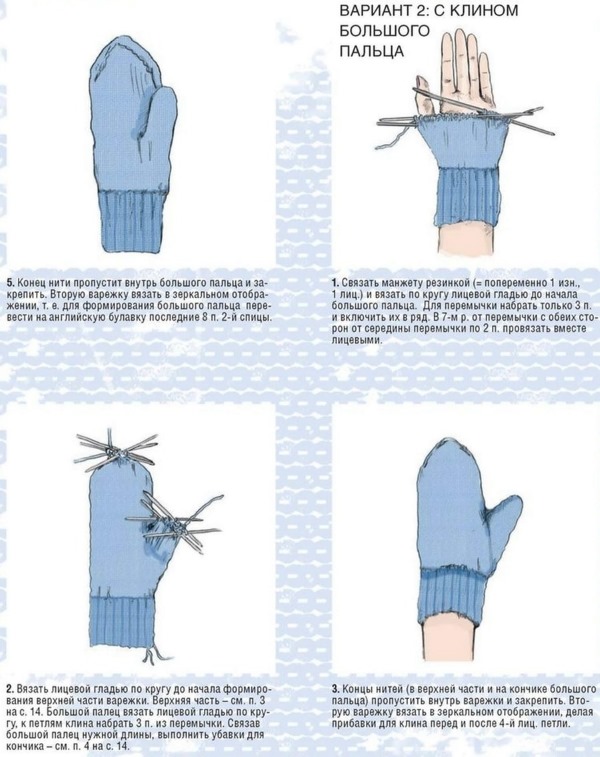
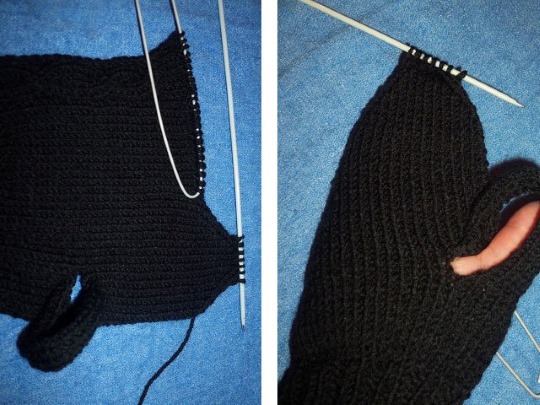
Thumb ligature
To knit a finger, all the loops collected on the hole are collected on the tool, on the deficiency they are collected from the fabric of the product, all the loops are divided into 3 parts, 4 are used to make a finger. They are knitted with the front loops to the middle of the nail plate, then the decrease begins on each tool until only 2 sts remain, they are carefully tightened with a thread, hiding the end from the inside.
Completion of work
There are several easy to understand ways to finish knitting a mitten, namely:
- To create a rounded toe, decreases are made at the end and middle of each knitting tool, and the remaining units at the end are tightened;
- On the first and third instruments, every 2 loop units are knitted using a throw-over, pulling one through the other. And on the even instruments, only the last 2 loops are knitted in the usual way.
Close the product at the top of the toe. Close by pulling the thread through the remaining loops from the back side, then close. When tightening the thread from the front side, an unsightly rough seam may appear, where the thread will stick out. This is why the warm accessory for hands is tightened from the back side.
Mittens on 3 needles
The method of how to knit mittens with knitting needles for beginners step by step on 3 knitting needles is the most suitable for making children's mittens.
The diagram looks like this:
- The required number of loops is cast on using 2 tools.
- The next step is to divide them into 3 equal parts.
- The elastic band is knitted on the basis of 1 front and back stitches.
- If necessary, new thread tones are introduced without breaking the running thread.
- Add the number of units according to the dimensions made.
- If a design is supposed to be in the product, then its formation begins here; a hole for the thumb is also made at this step.
- At the end of the openwork, the product is knitted to the height of the tip of the little finger, after which the number of loops is reduced.
- At the end of the product, the thumb is knitted in the traditional way, and the end is secured on the inside.
This technique is usually used to create children's accessories.This choice of technique is due to the fact that a child's wrist is much narrower than an adult's, so there is no need to use a 4th knitting needle.
Mittens on 2 knitting needles
There are two ways to create a winter accessory using 2 tools. In option 1, the upper and inner parts are knitted separately and connected with a beautiful invisible track using a hook. It is also possible to knit both parts with one piece. In this option, the seam will be on one side.
How to knit mittens with knitting needles for beginners step by step on 2 knitting needles is schematically described in the following master class:
- Collect the required number of units and knit a 2*2 elastic band of the required height.
- They begin to knit the accessory to the desired height, up to the thumb.
- In the purl row, remove the required number of loops and place them on a pin.
- In the front row, knit the set aside loops once.
- Knit the product to the desired height.


- Close the loops, connecting them in the process of knitting 2 loops through every 3 loops, then decrease through 2, then through 1 loop, pull together the remaining loops.
- To knit a finger, remove the loops from the pins and cast on another equal number of loops.
- To avoid holes in the corners, loops are pulled out not from the current row, but from the previous one.
- Knit the finger to the desired height, then close the product completely.
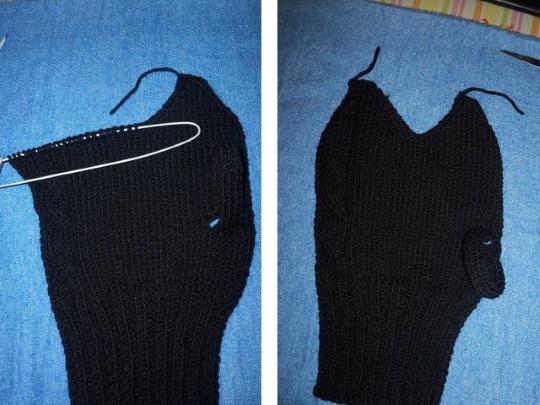
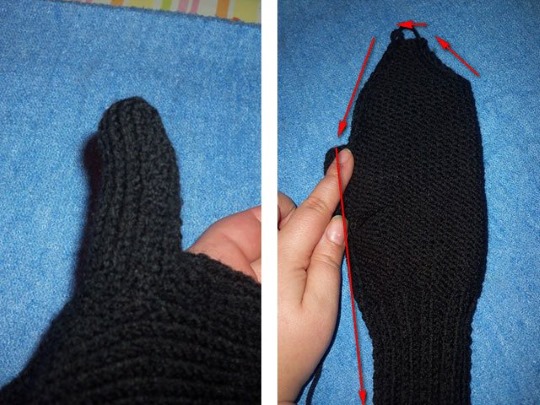
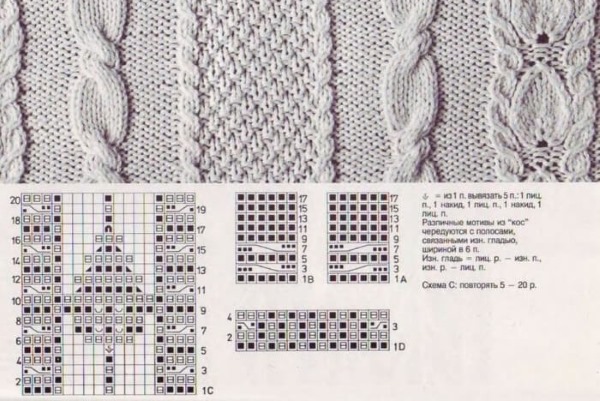
Knitting mittens with braids
To knit mittens with braids using knitting needles, first take the necessary measurements, select the appropriate yarn, and draw a diagram of the future product. Next, knit a sample of the future pattern and a standard elastic band for the cuff, on the basis of which the density of the product will be determined.
The step-by-step system for knitting a mitten looks like this:
- After making the necessary calculations of the loops, dial the required number of units and distribute them evenly across the tools.
- After finishing knitting the elastic on 2 knitting needles, start knitting the front surface, and on the rest - the voluminous braids themselves.

- After forming the hole for the finger, the braids continue.
- From the knitted height to the tip of the little finger, the decrease of loops in the rows begins.
- The end loops are secured with the working thread from the back side.
- The second mitten is knitted in the same way, only they should mirror each other.
Mittens with cords
Mittens with cords are suitable for girls who value beauty, originality, elegance, and warmth of hand-knitted products.
The order of actions during the creation of a warm accessory is similar to the classic method, it looks like this:
- Cast on the required number of stitches, then distribute them across 4 working needles.
- Knit the cuff to the desired height.
- Next comes knitting according to the basic pattern, highlighting the outer side, on which the main cords will be located, and the inner part of the mitten.
- The design will be placed on the outside of the handicraft, and do not forget about forming a hole for the thumb, leaving loops on the pin.
- After knitting the required height, decreases are made in each subsequent row, 4 loops are connected at a time, then after 5 rows the product is closed.
When knitting 2 equal accessories, it is necessary to remember about the mirror-image arrangement of the finger holes.
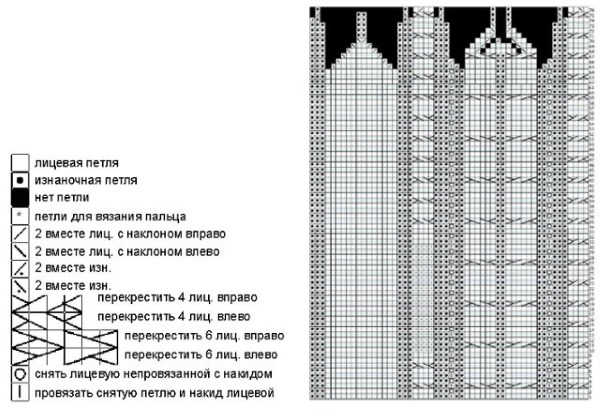
Openwork mittens
To make the product jacquard, take threads of contrasting colors. As a result, you get striped mittens. Using stripes of contrasting colors, you can make elegant accessories for your hands.
The difficulty of openwork patterns is that the process of knitting requires constant calculations of loops. The beauty of the product is created with the help of openwork yarns and joining 2 loops together. Even 1 mistake can lead to a skewed product.
For beginners, instructions are written on how to knit mittens with knitting needles step by step in an openwork style. Before the needlewoman begins to follow the proposed recommendations, she needs to select yarn of the desired tone and thickness.
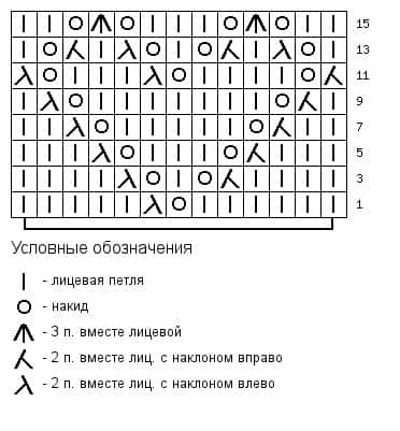
The pattern "Openwork hearts" looks cute on warm mittens, has the following sequence of execution:
- To create 1 heart, 13 units of loops are used.
- The resulting loops are divided equally, an air yarn is made, and the 2 loops are connected together.
- In the next row, the yarn over stitch is knitted purlwise.
- In odd rows, 2 yarn over loops are made, next to 2 units together.
- Between yarn overs, increase the number of loops to 5.
- Similar actions are performed in 3, 5, 7, as a result in the 9th row there will already be 3 yarn overs and 3 pairs of loops 2 together.
- In the 11th row there are already 4 yarn overs, between them 2 times 3 together, then the pattern is repeated again.
Warm mittens with English elastic
A simple pattern "English elastic" gives the accessory warmth and volume. The technique is easy to perform, while knitting it, the craftswoman must be extremely careful. In order for the accessories to keep their shape and remain beautiful, they must be made on 2 tools with further connection along the edge of the palm.
Main stages of work:
- Taking measurements, knitting control samples, drawing a pattern for the mittens.
- When creating loose knitting using the English elastic technique, use knitting needles that are slightly thinner than the yarn.
- To ensure that the fabric retains its natural softness, the product is made without edge loops.
- The thumb is knitted with the front surface, the toe of the mitten is done in the same way.
- The product is carefully sewn with a crochet hook without excessive tightening of the loops. In this way, the seam remains soft and does not create obstacles during wearing.
With jacquard patterns
Both an experienced craftswoman and a beginner can create such an accessory.
Conventionally, jacquard is divided into:
- Lazy – includes chaotic and ordered drawings.
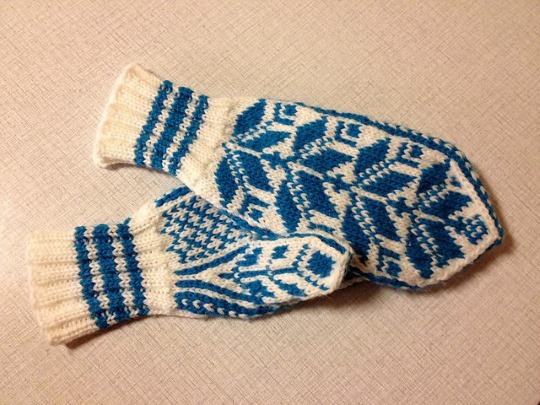
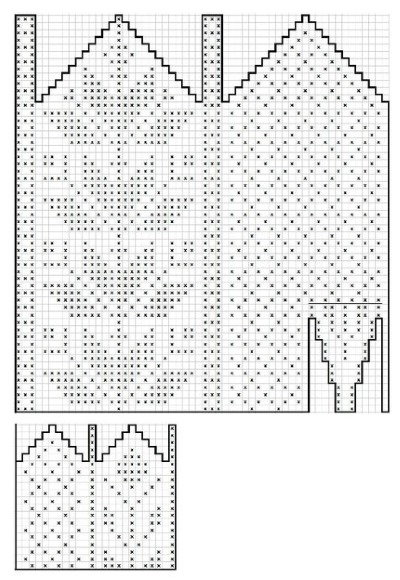
- Norwegian – motifs with stars, deer, snowflakes.
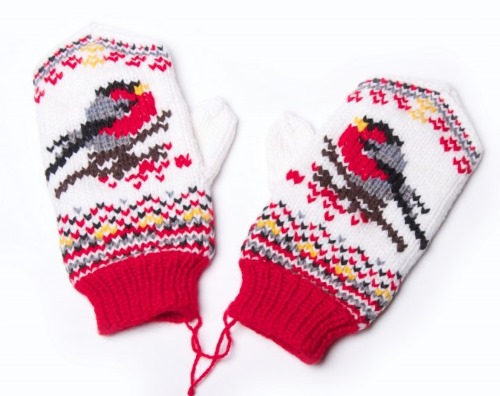
The drawing itself may show floral elements, parts of plants, birds and animals. The procedure for creating a hand accessory is similar, only here the jacquard pattern is taken as a basis, during knitting several shades of yarn are used, harmoniously combined with each other.
Simple patterns for knitting mittens for beginners
How to knit mittens with knitting needles for beginners step by step with various patterns, is described in the recommendations simply and easily understandable. There are many ideas on this topic, where each craftswoman can choose a suitable pattern.
Among the easiest patterns to make are braids, openwork patterns, large arans and cords, for children various patterns with deer, patterns with deer.
Two-colored minion mittens for boys will look very original. For girls, mouse or white hedgehog mittens, items with flashy deer in colorful national ornaments will suit.
Drawings
How to knit mittens with knitting needles, for beginners step by step, is discussed above. If you want to make a product with a pattern, whole images are taken as the basis for its creation, for example, Norwegian stars are most often used for mittens, a light openwork pattern is suitable for winters with a moderate climate.
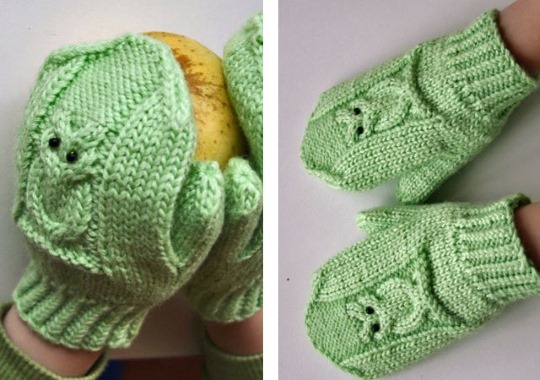
Mittens with owls, simple mittens with external embroidery in the form of bullfinches are suitable for children. Children's mittens with applique funny sheep look cute. Any pattern you like can be implemented on the canvas for creating mittens.
The main thing is to choose the right tone and thickness of the thread, and master the proposed technique for creating an ornament., and the result will be a product that not only warms hands in the cold, but also brings aesthetic pleasure to its owner.
Such a warm accessory as mittens is a worthy gift for yourself and your loved ones, which even a novice needlewoman can knit with knitting needles, using a step-by-step description. Having devoted a little time to this interesting activity, you will get a result that will exceed all expectations.
Article formatting:Natalie Podolskaya
Video about knitting mittens with knitting needles
Video instructions on how to knit mittens with knitting needles: