Since ancient times, needlewomen have created various original household items and accessories from beads: necklaces, earrings, hairpins, figurines.
Beaded embroidery and decorative household items were also popular, with which people decorated their homes. Recently, original beaded trees created by hand have become fashionable. This entertaining hobby requires diligence, perseverance and the ability to concentrate on details. But the results can be truly impressive!
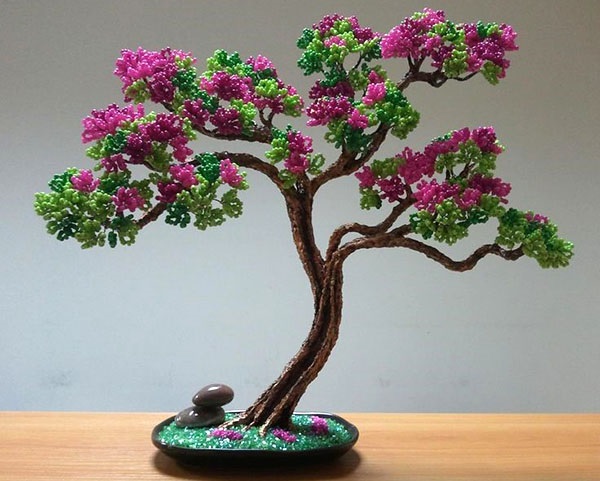
Trees made of beads
The main advantage of beadwork is that you don't need to buy expensive equipment and materials for this craft. Threads, a needle, scissors and multi-colored beads are all you need to create beadwork masterpieces. The complexity of beadwork is mainly due to the fact that the work involves small parts that need to be put on a thread.
Trees that look like real ones have become especially relevant. They have every chance of becoming a decoration of any home or becoming an excellent gift for various celebrations. This is a very common type of handicraft.
Crafts fit perfectly into the diverse interior decoration of a home or study. For those who want to learn this skill, it is necessary to first try to make small trees or flowers.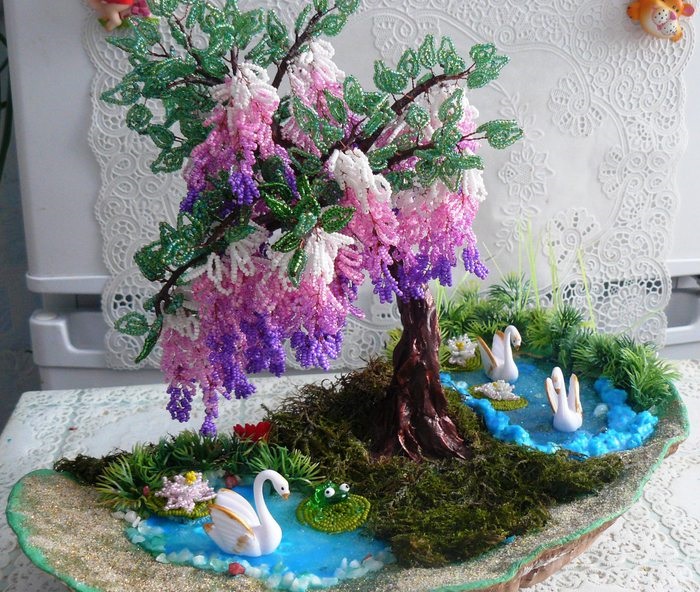
Before you study the detailed lesson on making beaded trees, you need to focus on the features of working with beads and wire.
How to change the wire
Trees made from wire and beads require a lot of wire.
If the wire runs out and the work is not yet completed, it is necessary to introduce new wire:
- We thread the newly cut section of wire into the previously knitted row of beads.
- Then a new row is woven on the basis of two wires.
- After doing this, the old wire must be carefully cut off.
How to secure the wire
At the end of the work, you need to skillfully hide the ends of the wire:
- Pull the ends of the wire through a row of beads located next to each other.
- Cut them off close to the bead hole.
- For the final row, you need to take beads with wider holes so that the wire can pass through them without hindrance many times.
- The ends of the wire need to be cut very short so that they do not prick.
- If the wire is difficult to pull through the bead, there is no need to pull it too hard.
- There is a risk of damaging the bead. It is better to make sure in advance that the opening in it is sufficient.
What you need for beading
- Beads of the required color and size.
- Copper wire of varying length and thickness.
- Scissors.
- Velvet napkin (to prevent beads from scattering across the table).
- Containers for beads of different colors.
- Masking tape or yarn (for branches and trunk).
- Flower pot.
- Soil, sand or gypsum mortar.
Beaded tree for beginners - sakura
If there is a need to decorate the interior of your home, then beaded trees with your own hands are the best option for this. Such beauty will bring a lot of aesthetic pleasure.
Material:
- wire thick and thin;
- 250 g of pink beads (with shades is possible);
- 60 g of green beads (for the pot);
- plastic bag;
- glue - Moment "Carpenter";
- paper towels, foil;
- gouache or acrylic paint for painting the trunk;
- 2 cups of plaster of Paris (for the base);
- stand or pot for sakura.
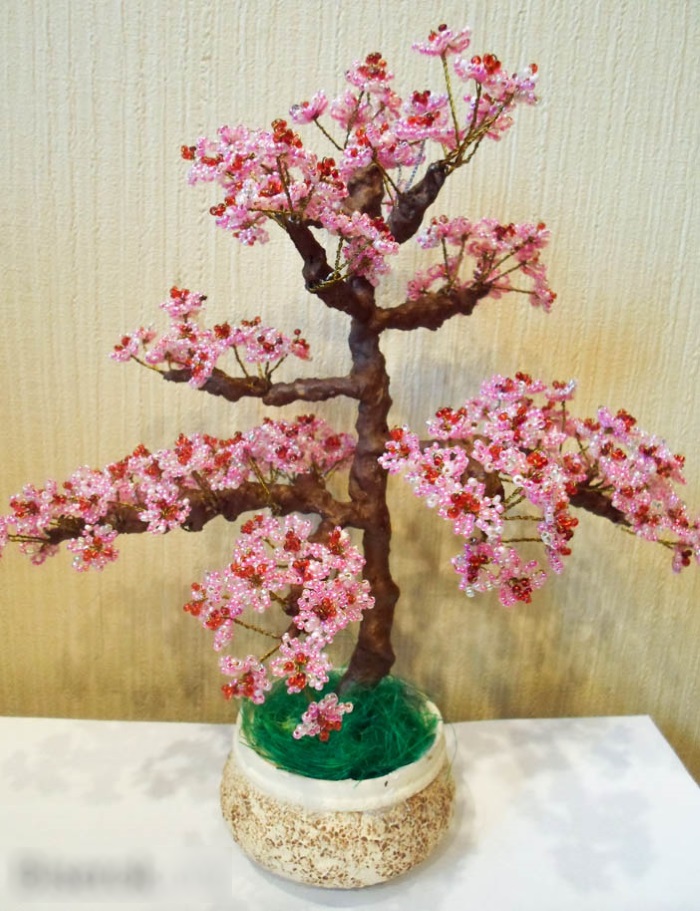
Manufacturing process:
- Make a base for the trunk from thick wire.
- Choose a stand for the tree. Cover the bottom with foil.
- Pour the gypsum solution into the stand or pot. Dip the wire roots of the sakura into it. Hold the tree in this position for 2 minutes so that the solution hardens. Form a relief trunk with the remaining liquid gypsum.
- Paint the tree trunk.
- Glue green beads to the trunk area.
- String pink beads onto a thin wire. Leave a free end of the wire 10 cm long. Twist a loop of 10 beads, making several turns. You will get a kind of leaf.
- After 2 cm, make the next leaf, counting 10 beads.
- Continue making loops until you have 5.
- Turn the work and start forming loops on the other side.
- Twist the wire between the loops to make a branch. Make leaves until there are 8 leaves on the branch.
- Twist the remaining ends of the wire, 10 cm long, together.
- Make at least 70 of these branches.
- Next, form one lush branch from the five branches.
- Attach it to the top of the tree with wire.
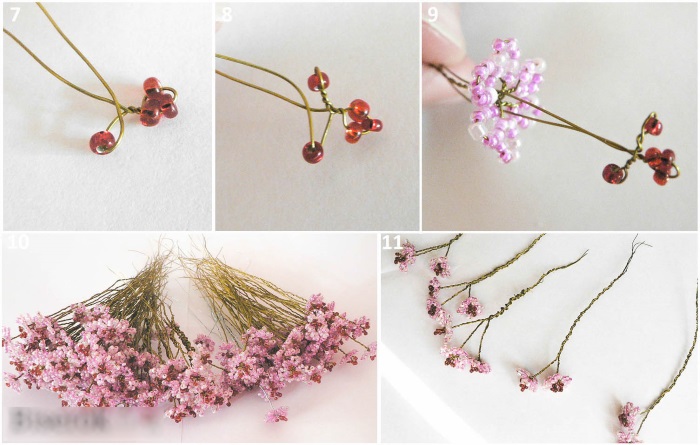
- Take 3 branches from 8 loops and make one fluffy one out of them.
- Make 3 more lush branches in the same way.
- Attach a lush branch, stepping back 2 cm from the previous one. Then, also stepping back 2 cm, attach the remaining lush branches. The top of the sakura is ready.
- Take 3 regular twigs again. Make one fluffy one out of them.
- Fix it to the end of the top branch. Make such tops on all subsequent branches.
- Start making branches from 13 loops. For further decoration of the tree you will need 90 such branches.
- Twist the ends of three long branches together to form one lush one.
- In this way make 4 lush branches.
- Attach 2 long, lush branches 2 cm from the top attached to the branch. Attach 2 more branches 2 cm further.
The branch is ready. - Decorate the remaining branches in this row in a similar manner.
- Now you need to decorate the branches from the wire of the bottom row.
- Make the top in the same way, and then attach a bunch of long branches every 2 cm to the end of the row. Decorate all the branches of the last row in this way.
- The next step is to wrap the branches and trunk with strips of paper towel. First, you need to wrap the branches from the side, starting from the end of the branch. Then, also design the trunk.
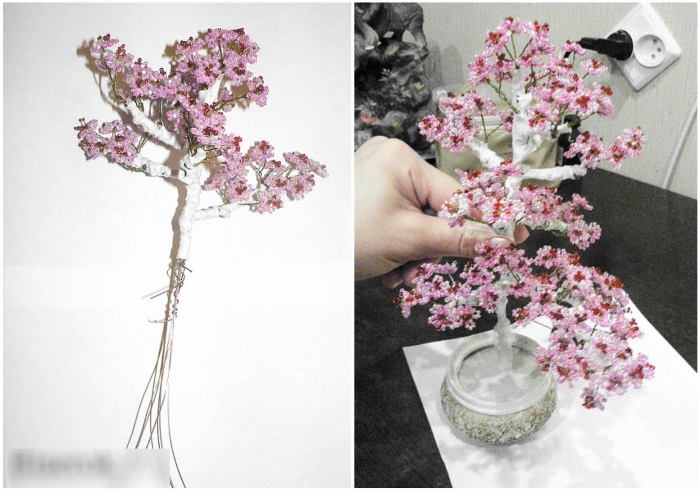
- Paint all the wrapped branches and trunk with gouache mixed with water and glue. The color shade should match the color of the previously painted section of the trunk.
The Sakura bead tree is ready. All that's left is to straighten the branches so that the tree becomes lush.
Master class: Birch from beads
To make a birch tree you need:
- 3 different shades of beads;
- wire of various thicknesses;
- for wrapping branches and trunk - masking tape;
- acrylic varnish and paint;
- PVA;
- building plaster.
Manufacturing:
- Initially, you need to make about 150 small branches. Put beads on a thin wire. After 1 cm, make small loops in any quantity. It all depends on how long the branches need to be. Fold the wire in half and twist
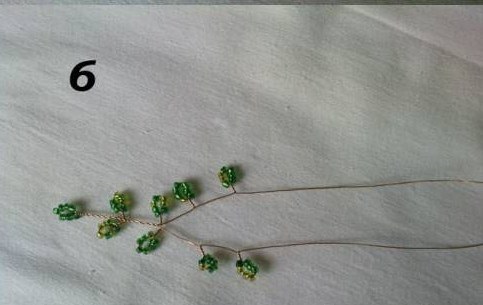
- Make short branches for the tops.
- When you have twisted enough twigs, you need to make lush twigs out of them by connecting 2-3 pieces into one.
- Take a thicker wire and attach the branches to it using thread.
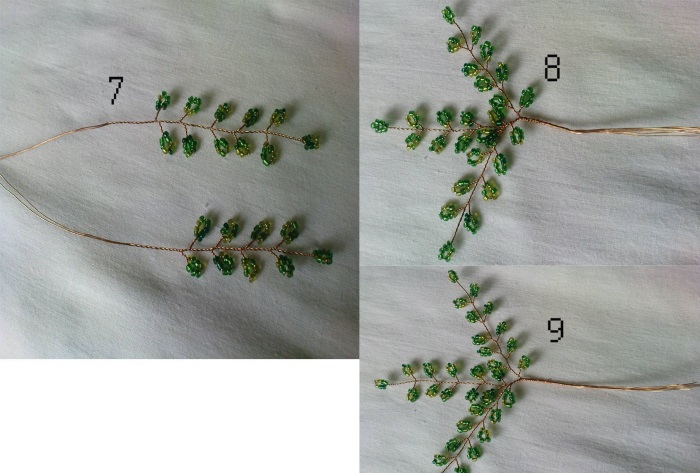
Wrap all the lush branches you have made in this way. - Next, you need to make the branches bigger. You need to use 1.5 mm wire for this. Take a branch, tie another one to it.
- Step back about 2 cm and tie another one. You should get a large fluffy branch. Do the rest in the same way.
- From these twigs, assemble the top of the birch. Then add another 2 to 4 twigs in a circle.
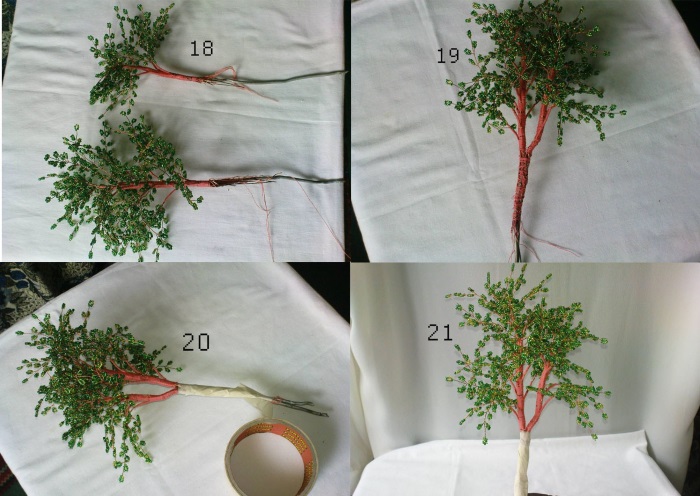
- Now you need to increase the thickness of the barrel using a piece of thicker (5 mm) wire. Wrap it with threads ("iris") or masking tape.
- We gradually create the tree itself, attaching branches to the trunk one by one every 5 cm.
- The remaining ends of the wire at the bottom are the roots of the tree. They need to be secured in the container using plaster. Be sure to wait until the plaster hardens.
- Make a mixture of plaster and glue until it reaches the consistency of sour cream. Cover all the branches with it in two layers. Let each layer dry.
- After the first layer of coating has dried, apply the second one and form peculiar furrows. This creates the effect of tree bark.
- You can leave it overnight so that everything dries well and bonds.
- Then cover all the branches and the trunk with white paint. And when the paint dries, create a pattern with black paint that resembles birch bark.
The beaded tree Birch, created with your own hands, is ready.
How to weave rowan
Material:
- green and orange beads (No. 9 or 10);
- wire (No. 3) and thicker;
- metal or wooden stick for the barrel;
- brown iris threads;
- building plaster;
- container for fixing wood, foil;
- acrylic paint, varnish, gloss.
Process:
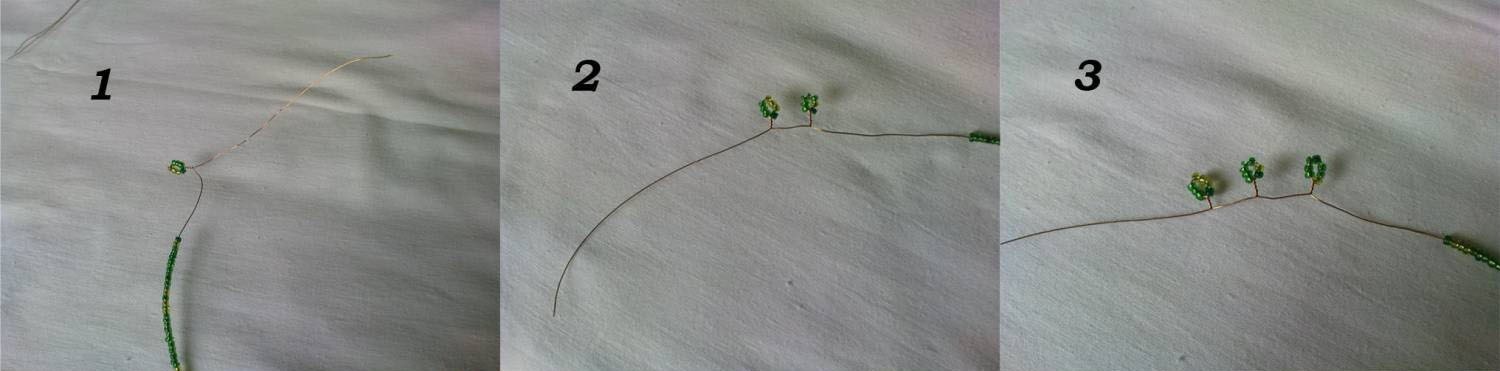
- Prepare 27 pieces of thin wire about 40 cm long.
- Take one prepared wire, step back 10 cm from the edge and form a loop of 7 beads. Twist it around several times.
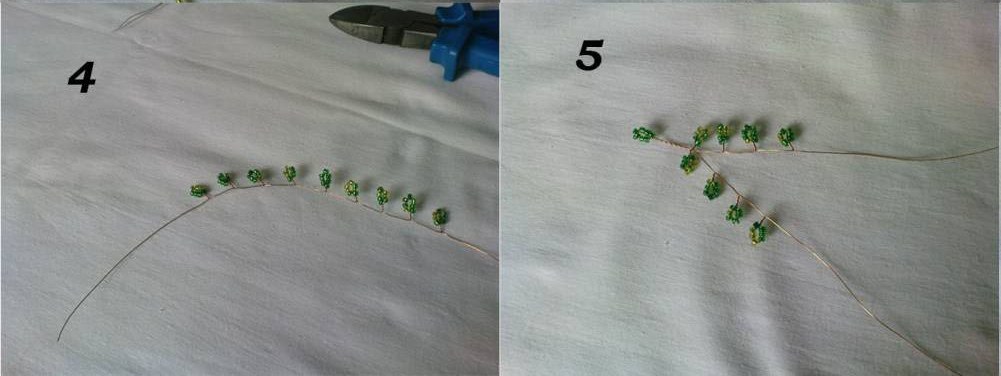
- Skip 1.5 cm from the first loop, string 7 more beads on the wire and make another loop, twist. Also make 7 more loops.
- Fold the wire with loops in half and twist the free sections together. You get a branch.
- Make 18 branches in a similar manner.
- The next step is larger branches. Cut wire pieces 50 cm long.
- Step back 10 cm from the edge. Make 9 loops from 7 beads. Fold in half, twist. You will get a larger branch.
- You need to make 27 of these branches.
- Now we need to make rowan berry clusters.
- Cut a 20 cm long wire. Step back 10 cm from the edge, string an orange bead and twist it a little. Then string another bead and twist it. 2 berries on stems appeared. Make 4 more berries and twist the free sections of the wire. The bunch is ready. You need to make 18 bunches.
- Now all the elements for creating the rowan tree are ready. Distribute them into 9 parts. Let's start making the tree.
- First tie the bunch and then the branches onto a piece of thick wire with thread. First screw on the short branches, then the long ones.
- There should be 9 branches with bunches. In the same way, from these 9 branches it is necessary to make 3 lush ones.

- Take a wooden or metal stick and firmly attach the resulting branches with clusters to it with threads or wire.
- Bend or twist the wire at the end of the trunk so that the rowan tree holds firmly when fixed in plaster.
- Line the bottom of the container with foil. Pour in a gypsum solution of the desired thickness. Let it harden. Coat the trunk of the rowan tree with the same solution.
- Paint the trunk brown and the plaster area around it green. Cover with varnish. You can sprinkle green beads along the bottom for decoration.
The rowan is ready.
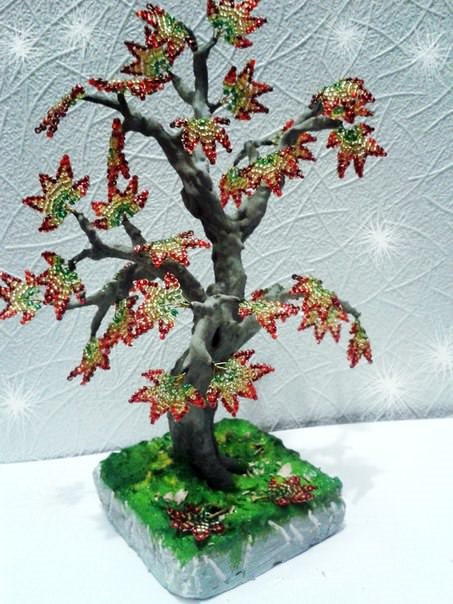
Autumn tree weaving pattern - maple
Materials:
- Beads of orange, red, green and yellow colors.
- Thin wire 0.3 cm.
- "Iris" is brown.
- Thick wire for branches and trunk.
- Construction plaster.
- Flower pot.
- Scissors, black tea.
Manufacturing:
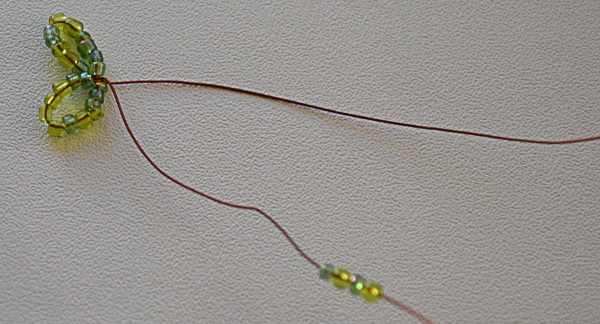
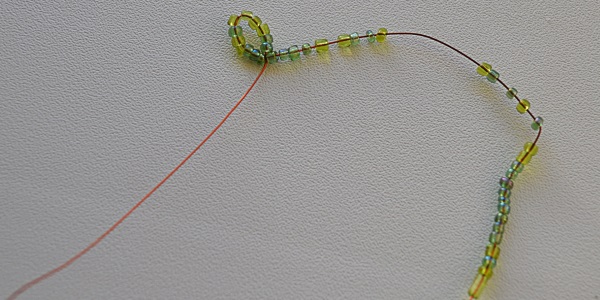
- First, you need to create an orange leaf. Take a 30 cm long wire. String 3 orange beads onto it. Pass the wire back through two beads and tighten. String 3 beads again and repeat the steps. Next, string 4 beads onto the wire, return to 2 beads, tighten. Then string 5-6 beads.
- Repeat the steps. Then we start decreasing the beads: string 5 beads, go back, tighten. And so on, 4, 3, 2, 1. Twist the wire in 2 turns. You should get a rhombus - the center of the sheet.
- Start making the side parts of the leaf. To do this, take 2 pieces of wire 25 cm long. String 1 bead on one of them. Then 2, 3, 4, 5 beads.
- Next, string 4 beads on the second wire, and pass the other end of the wire between the 5th and 4th row of beads on the first wire. Pass the same end of the wire back through the beads and tighten. Pass it back between the 4th and 3rd row of beads on the first wire.
- Thread 3 beads onto the wire and tighten with the other end. Now pull the end of the wire between the 3rd and 2nd row of the first wire.
- String 2 beads and pass the wire between the 2nd and 3rd row of the first wire. Put on another 1 bead, tighten. Twist the free ends of the wire.
- Make another such detail for the other side.
- Now you need to make the smallest elements of the maple leaf. The process is similar. The only difference is that the maximum number of beads in this detail is 4 pieces. That is, after 4 beads, you need to dial 3 beads to decrease. Then pull the end of the wire between the 4th and 3rd row. Pass the wire back through 3 beads and tighten. And so on until the final bead.
- Make the second identical part in the same way.
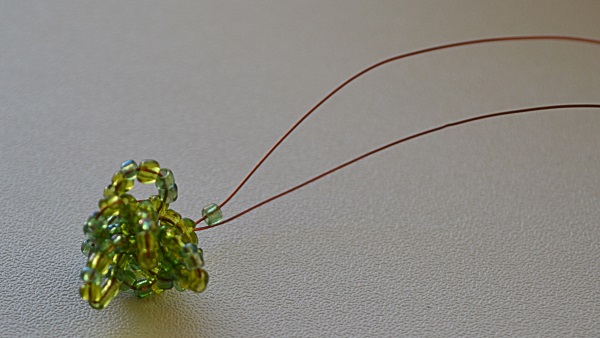
- Got 5 elements. Twist the ends of the wire of these parts together. The maple leaf is ready.
- Also make other leaves. You can take beads of different colors and make multi-colored leaves, creating an autumn effect.
- When you have made enough leaves, you need to wrap the ends of the wire with thread, but not all the way around.
- Next, you need to make branches without foliage. To do this, wrap pieces of wire with threads.
- 2 or 3 leaves are connected together using wire or thread. Tie the resulting bouquet to branches without leaves. You will get a large branch with and without leaves.
- Make more branches like this. Then tie them together to form a tree trunk.
- It is necessary to fix the resulting maple in a container filled with gypsum solution. Dry it. Cover the base with black tea leaves, fixing them with varnish. The beaded maple is ready.
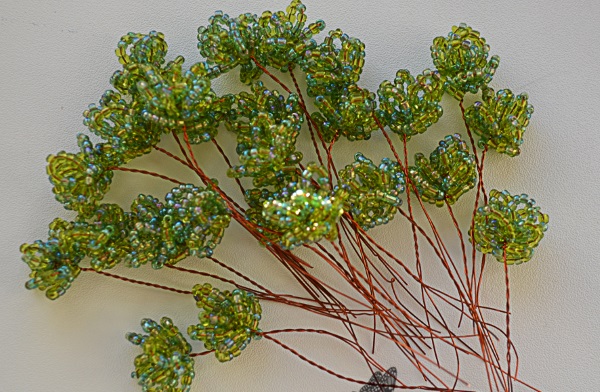
DIY Beaded Money Tree
What you will need:
- thin wire on a spool for branches;
- thick aluminum wire for the base of the barrel;
- coins of the same size;
- 80 g of beads in different shades of green;
- insulation tape;
- gypsum;
- small and large brushes;
- acrylic paint, glitter;
- double-sided adhesive tape;
- glue gun.
Manufacturing process:
- String beads of different shades onto a 20 cm long wire.
- Make a loop of 12 beads, twist around twice.
- Make 8 more of these loops, spaced tightly.
- Fold the wire with loops in half and twist the free ends.
- Make 60 similar branches.
- Next, prepare a wire frame. Cut the wire and make a loop at the end. Glue a coin inside this loop. You need 15 of these branches.
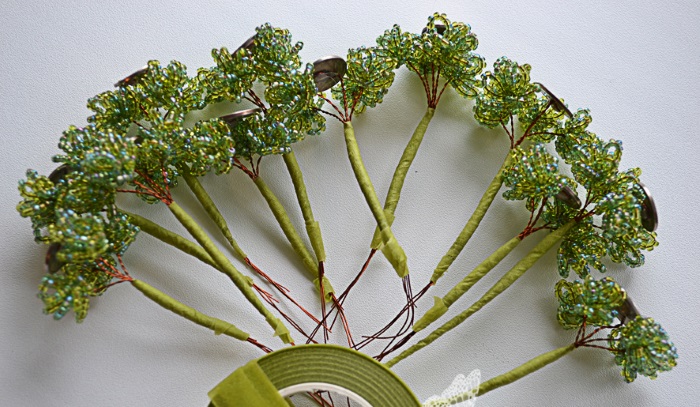
- Form branches: twist 4 branches with loops and one branch with coins together. Secure with tape. You should get 15 large branches.
- Using thick wire, make the main branches for the crown: attach 3 branches to this wire and wrap with insulating tape. Paint them with golden acrylic paint.

- Take 3 pieces of thick wire and twist them together to form a tree trunk with branches. Screw the finished branches onto them. Secure everything with electrical tape.
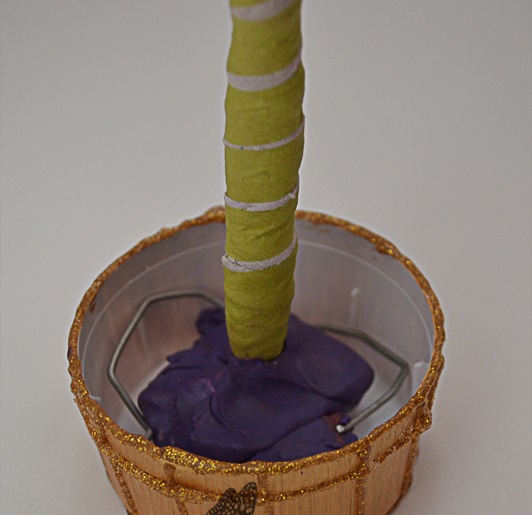
- Pour a gypsum solution into a container, place the tree roots there. Let dry. Form the trunk with the same solution. Dry.
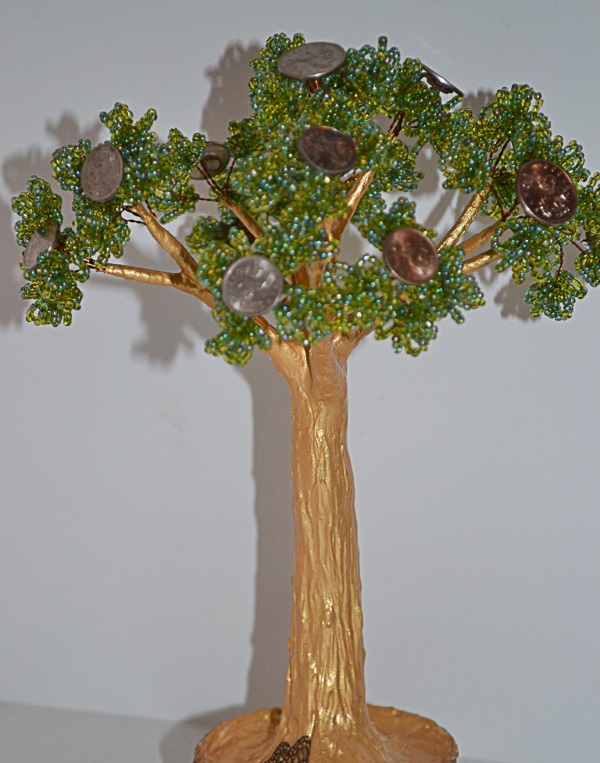
- Paint the trunk with acrylic paint. Sprinkle with glitter.
- Fluff up the tree crown. Your DIY beadwork is ready.
How to make a Christmas tree from beads
Material:
- green beads (80 g);
- white beads (20 g);
- 3 spools of wire (0.3);
- insulating tape;
- gypsum solution;
- capacity for installation.
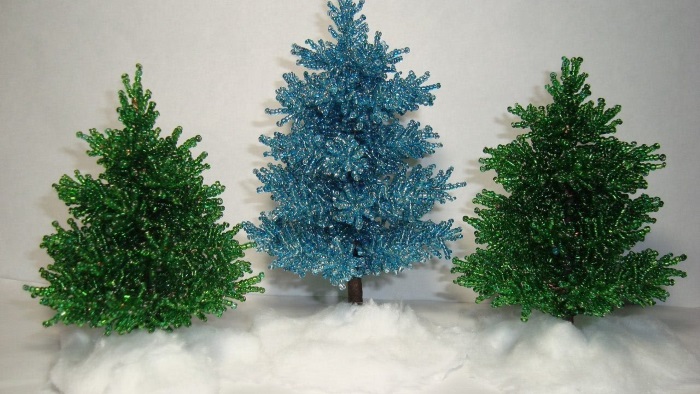
Description of the process:
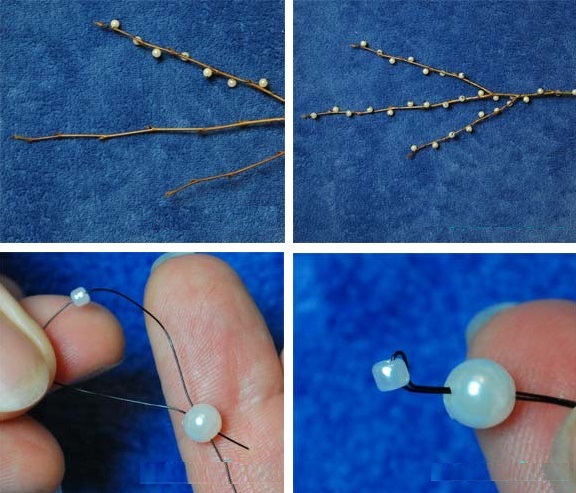
- String 2 white beads and 7 green beads onto the wire.
- Pass the end of the wire through the second white and all green beads.
- The top part acts as a kind of “lock”.
- Again string 2 white beads and 9 green beads and repeat step 2.
- Repeat all 7 times.
- Wrap the resulting Christmas tree branch with electrical tape at the bottom to make it stronger.
- Make the required number of branches in the same way.
- Connect the branches together and twist.
- Strengthen them in a container with a gypsum solution and dry.
Heart Shaped Beaded Tree
What you will need:
- beads of 2 contrasting colors;
- wire to match the color of the beads;
- thick wire for the heart;
- masking tape;
- iris or floss threads of the same color as the beads;
- small flower pot.
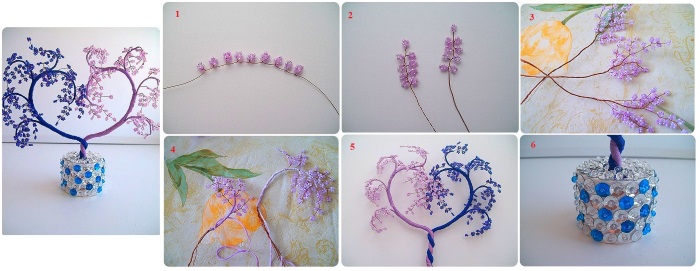
Description of production:
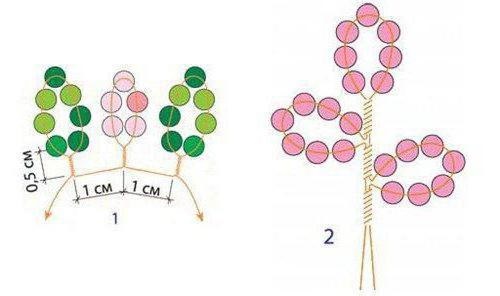
- String beads of one color onto the wire without separating it from the spool.
- Make 5 cm long branches with 7 loops from five beads. You need 3 of these branches.
- Create one branch from three small ones.
- It is necessary to make 19 blue triple branches and the same number of red ones (colors at the discretion of the master).
- Next, you need to make a heart-shaped base. If the heart is not very strong, you need to strengthen it. To do this, you need to wrap the base with tape.
- Separate the threads by color. Wrap them tightly around the base over the tape. Secure the ends with tape.
- Then you need to tie it to the base of the branch every centimeter.
Each half has its own color scheme. - "Plant" the heart-shaped tree in a flower pot filled with plaster solution. Let it dry. Done.
Wisteria beading master class
Materials:
- beads of various colors: green, white, several shades of pink;
- sheet of foil;
- PVA;
- gypsum mortar;
- wire of different thickness;
- plastic bottle;
- "iris";
- brown gouache.
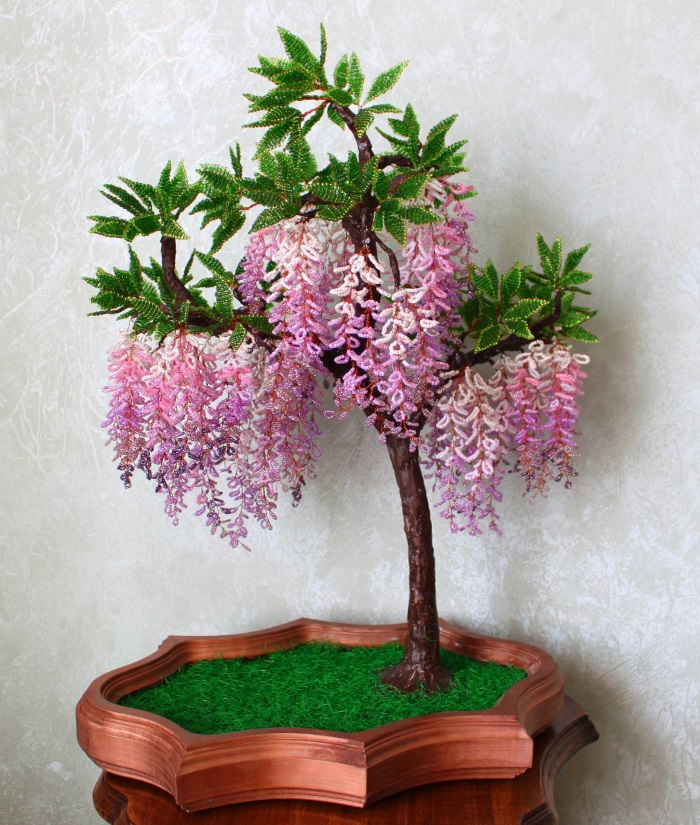
Manufacturing:
- Take a meter-long piece of 0.3 mm wire. Put six light purple beads on it and place them in the center of the wire.
- Make a loop, twist 2 times.
- On one side of the wire, make 2 loops of each color (except green), gradually increasing the number of beads for the loops. The last 2 loops should consist of 13 beads.
- Also make loops on the other side of the wire. Twist the remaining ends of the wire together.
- You need to make 32 similar branches.
- On a 0.4 mm wire, make a branch with 11 loops from ten beads, as described above.
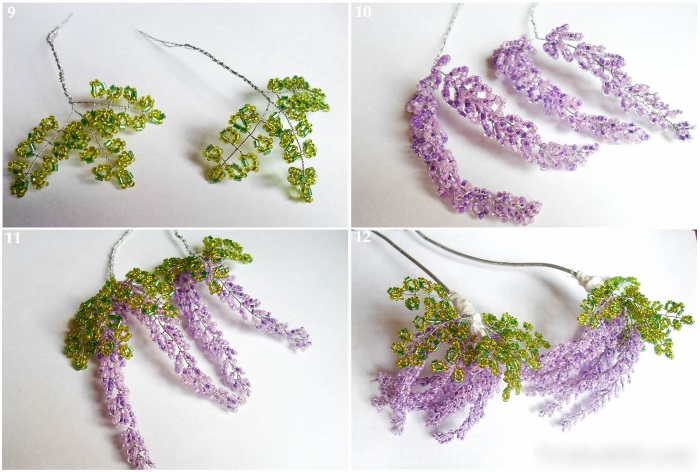
- You need to make 32 of these branches.
- Next, connect the branches with pink loops and the branches with green loops in pairs.
- Attach these branches to a 1 mm wire with threads, keeping a distance of 1 cm between them.
- If there is wire visible somewhere, you need to hide it by wrapping it with thread.
- Fill the container with a gypsum solution mixed with glue. Place the tree roots there. Let it dry.
- Paint all the branches and the trunk with brown gouache.
- Wisteria is ready.
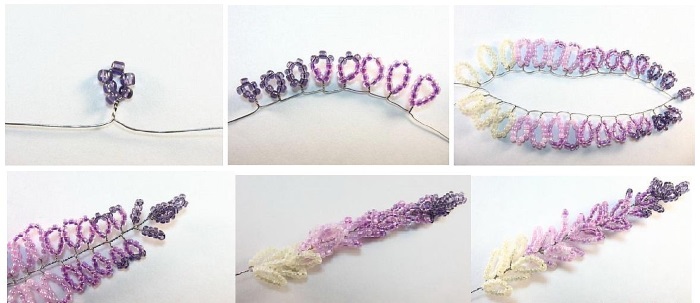
Lilac from beads
Materials needed:
- beads of lilac, white and green colors of different shades;
- thin wire of two colors: regular and green;
- brown scotch tape;
- pot;
- gypsum.
Manufacturing:
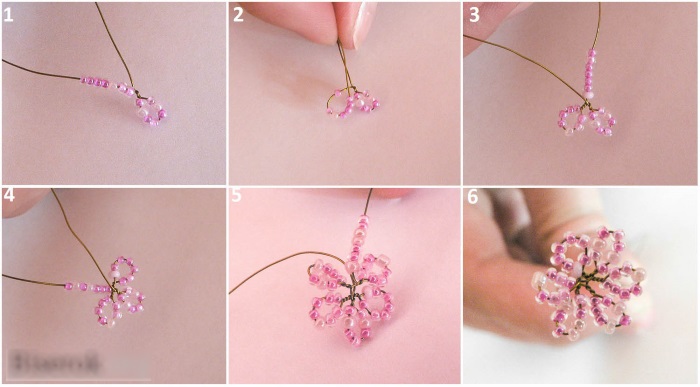
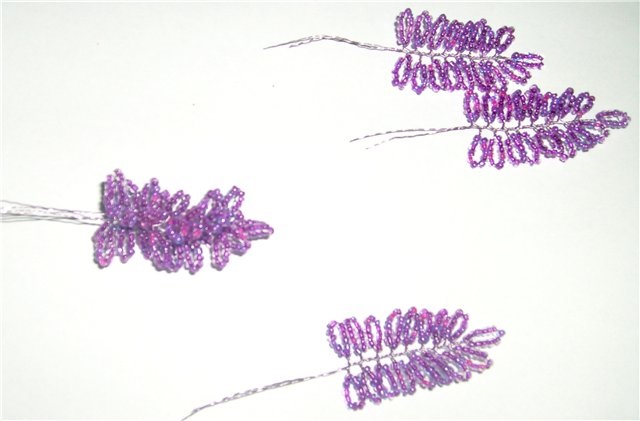
- String 6 beads of different shades of lilac and white onto a regular wire. Make a petal, twist 1 cm.
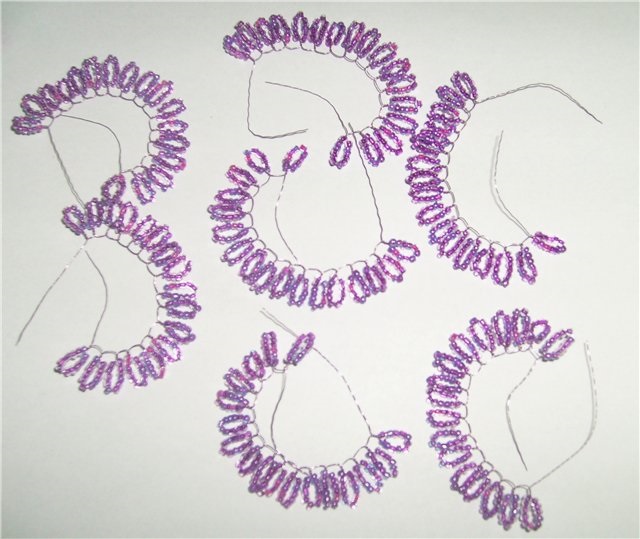
- Make similar petals on one side and on the other, changing the number of loops from 5 to 7. Twist the free ends.
- Bend all the loops so that a lilac inflorescence is formed.
- To get one branch of lilac, you need to make 15 inflorescences.
- When forming lilac inflorescences, wrap the stems with brown tape or green wire.
- Using circular weaving, make 9 lilac leaves.
- The stems are designed in the same way.
- Connect the inflorescences with the leaves. Wrap the stems with tape or wire. The lilac branch is ready.
How to make illumination of beaded products
To make illuminated bead trees, you need to prepare:
- LEDs, resistors;
- batteries and a box to insert them into;
- wires;
- soldering iron.
Assembling the backlight system:
- Solder the positive and negative wires to the battery box.
- Wrap exposed LED wires with electrical tape.
- Solder the wires to the ends of these wires. Their length must be calculated independently, depending on how high the backlight will be extended.
- Solder the other ends of the wires to the battery box.
- Check the operation of the LED by applying a resistor to the positive wire.
- Connect the LED wires and the box wires: plus to plus, minus to minus.
- Do this for all LEDs.
- Solder resistors for resistance to the "positive" wires. Gather them together and solder them to the wire coming from the battery box.
- Do the same with the negative wires.
- Solder the switch between the positive and negative wires of the box, in the gap.
- Insulate all exposed wires.
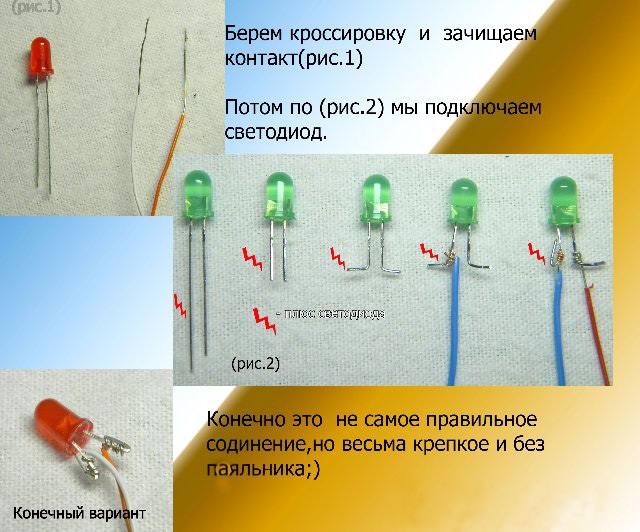
To make the beaded tree more beautiful, it is recommended to make the backlight yourself or buy a ready-made one in the store
The process of attaching to branches:
- Secure all the wires along the trunk with threads.
- Place the LEDs between the skeletal branches and secure them in the same way.
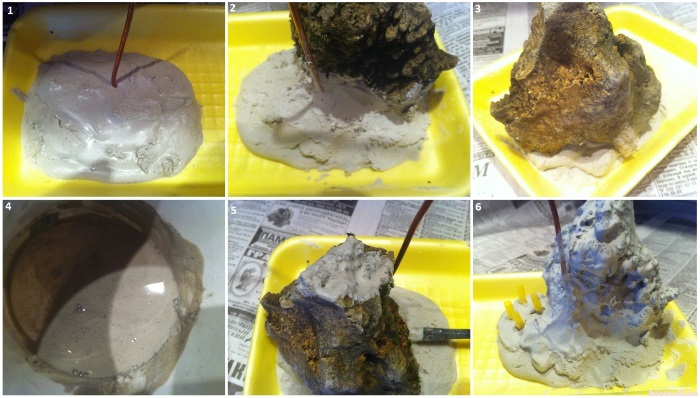
How to Make Bonsai Compositions
- Mix different shades of green beads.
- String 8 beads onto a 50 cm long piece of thin wire.
Move them to the center and form a loop, twist. - Step back a little and pick up 8 more beads. Make another loop.
- It is necessary to make 9 such loops on one section of wire.
- Twist the wire to form a tight cluster.
- The ends of the wire must be left at least 10 cm long.
- More than 150 such clusters need to be made.
- Make unique bouquets of 3 bunches by twisting the ends of their wires together. You will get 50 elements.
- Now you need to form a tree branch. To do this, connect 3 triple bouquets together, wrapping their ends with brown threads for 2 cm. You have a branch.
- Make 2 more branches like this.
- Tie these branches together to create a larger branch.
- Take a thick wire for the trunk and large branches. Twist it at the end for further fixation in the plaster solution.
- Attach the branches to the trunk and awn branches using tape.
- Mix plaster, water and glue until it reaches the consistency of sour cream.
- Cover the bowl with foil. Place the twisted end of the tree in there. Fill with the plaster mixture.
- Cover the trunk and branches with the remaining solution, wrapped in tape.
- Use a sharp object to make grooves on the trunk, creating the effect of bark.
- Dry everything thoroughly.
- Paint with brown acrylic paint.
- Decorate the bowl as you wish.
How to Make Tree Stands
Option #1
- Make a mixture of alabaster and water in a 1:1 ratio.
- Prepare the mold in advance (yogurt or sour cream jars) by greasing the inside with vegetable oil.
- Fill the mold with alabaster mixture.
- Now you need to make a recess inside by placing the bottom of a bottle filled with water into the mixture.
- After drying for about 5 minutes, carefully remove everything from the mold. You can draw the effect of bark or something else while the mixture has not completely hardened.
- Cover with paint as desired.
Option #2
- For stands for beaded trees, you can use special bonsai pots, ceramic saucers, flower pots, a serving dish and ashtrays.
Interior ideas
A beaded tree will look very beautiful on a glass shelf in the wall of the hall, chests of drawers, trellis. If the beaded composition is backlit, then its place is a bedside table in the bedroom. The elegance of such a lamp will have a positive effect on the mood before sleep.
To add originality and individuality to your living space, you can decorate the interior with beaded trees of any taste, made with your own hands, because the furnishings of any home look dull without decorative elements.
Article formatting: Vladimir the Great
Video on the topic: Trees from beads
DIY beaded apple tree:
DIY beaded bonsai:
Very painstaking work. It takes about two days for one tree(. And this is the easiest