Making kirigami requires perseverance, and cutting out cards and figures from paper requires templates that can be found in specialized stores for handicrafts. The Japanese turn everything they do into art. They love beauty and perfection so much that they find a creative approach to any task, giving their soul and talent to achieve the ideal result.
This is what happened with kirigami, which became fashionable thanks to the skill and dexterity of Japanese architect Masahiro Chatani. Using scissors, he first made a three-dimensional picture from a single sheet of paper in 1980. Kirigami in Japanese means cut paper.
How Kirigami appeared, its types
The author of "origami architecture" is a doctor of engineering, professor of Tokyo Institute of Technology. Mr. Chatani is the author of 30 books on paper architecture - "Origami Architecture".
In the early 80s of the last century, using paper in his work to present projects for buildings, the doctor became the founder of kirigami - the art of creating three-dimensional paper figures. Chatani's books contain more than 2 thousand schemes for making models, developed and made by the professor.
He became the founder of pop-up greeting cards, which are now successful all over the world. Master classes and lessons of Masahiro Chatani gather followers of his work and talent. Keiko Nakazawa, who wrote books on making greeting cards, became a co-author of some of his books.
The art of cutting and folding paper into a three-dimensional picture depicting one object or an entire plot scene, patterns, flowers, architectural models, is called kirigami.
The details of a three-dimensional picture or figure are cut out from one sheet of paper. For the product, the working canvas is folded in half. When the sheet is unfolded, a three-dimensional figure is obtained between the two base halves.
Fantasy and the ability to see a future three-dimensional picture on a two-dimensional sheet of paper are very important in this craft. Scissors and a sharp stationery knife of different sizes are used to create kirigami-style cards.
Kirigami resembles panoramic pop-up books for children, where episodes from fairy tales are recreated on each page. Cardboard, scissors and glue are used to create them. Some parts are glued or woven into others to create the effect of dynamics and movement. The book comes out bright and colorful.
Pop-up cards have a great resemblance to kirigami, where figures are assembled separately in the style of jenigami, and then inserted into a beautiful card. When opening the card, the figure, from the folded state, unfolds into a three-dimensional image, model or figure.
Genigami is a branch of kirigami: creating 3D figures from many cardboard and paper parts that are stored folded. No glue is used here.
A very popular and beloved art of origami. Paper folded in a special way turns into a beautiful statue or figurine. No scissors or stationery knife are used here.
Kusudama is a type of handicraft derived from origami. Modules are assembled from parts folded using the origami method. Usually flowers or balls. They are used to assemble the basis of a paper bouquet and mobiles that are suspended on a thread. The modules are connected by stitching or gluing.
Scrapbooking is a type of handicraft where albums, photo albums, and diaries are designed using appliques made from colored paper, newspaper, and magazine clippings.
Kirigami is a complex art, but beautiful and original. It requires attentiveness, perseverance, the ability to draw and skills of architectural vision of the future postcard or figure. To begin with, ready-made schemes are used to get the hang of it and learn the techniques and secrets of craftsmanship.
Kirigami (cutting templates) for beginners contain schematic tips to make the work easier:
- solid lines indicate a cut;
- dotted lines – fold inward;
- dotted lines - fold outward.
Kirigami can be made three-dimensional or flat:
- flat - these are ordinary cut-out paper silhouettes. For example, snowflakes. Or other cut-out figures, patterns, plots, pictures. Silhouettes, forms, openwork, cut in this manner, are glued or attached to a suitable background;
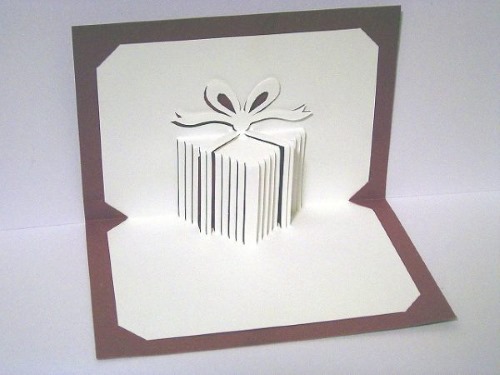
- volumetric – cut out of a single sheet of cardboard or paper without tearing it away from the base. To add volume, notches-stands are made in different places, which bring the flat figure to the foreground, making it tangible not only visually but also tactilely. The figure can then be glued to another base, which further emphasizes the volume of the cut-out image or pattern.
Kirigami can be mastered to a high level through constant practice.
Starting with simple figures, after a while you can complicate the images, simultaneously finding out all the subtleties of performing fine and filigree work. The art of cutting has no age restrictions. The main thing is to have patience and the desire to get a beautiful postcard or figure that will speak of the comprehension of delicate art.
Fragile paper and steel scissors can, with the help of artistic vision and skill in using them, bring benefit not only in the aesthetic sense, but also in the embodiment of the talent of the artist-master. The technique requires attention, a lot of time and patience.
Kirigami tools
To cut kirigami using templates, the artist needs the following tools:
- For the craft, you need to choose thin cardboard or colored paper. Density from 80-120 g / sq. m. (regular office), according to the sizes required by the scheme. Fold in half, draw the scheme according to the template.
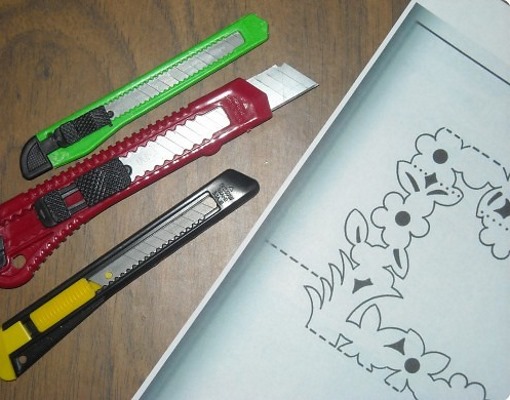
- Small scissors. Special scissors with a sharp tip and blade are sold in craft stores. You can choose embroidery scissors.
If the pattern is solid and you need to cut through the internal parts, then pierce the canvas with the tip of the scissors and make a cut with only the tip. To avoid unnecessary notches along the edges, do not connect the tips of the scissors, and cut without stopping, constantly turning the workpiece.
- Stationery knife: large and small.
- A special knife for cutting out small parts.
- A rubberized mat or a model mat is needed to prevent the craft from shifting while cutting small parts.
- Clamp for securing paper with a template to the mat.
- A thin spatula or a putty knife for smoothing out folds will save your fingers. It will also help to separate some small parts, lift corners.
- Metal ruler.
- Pencil.
- Glue stick that leaves no marks.
Schemes for kirigami
Kirigami cutting templates for beginners can be simple and clear.
There are different schemes: simple, complex and author's. Complex ones can be tried only when you have confidence in using the tools and understand the principle of doing the work.
Template legend:
- solid line - cut, incision;
- dotted line in the form of dashes - fold inward;
- dotted line in the form of dots - fold outward.
The diagrams and templates provided are the easiest to implement.
Valentine
An original gift for Valentine's Day is a kirigami card with a heart, transformed by decorative elements into an original work of art:
- For work, take thick colored paper or cardboard.
- Prepare the necessary tools for handicrafts.
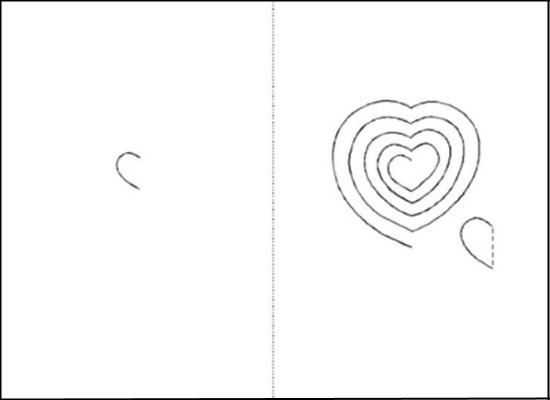
- Print the template on a printer with a spread size of A4 or A5, depending on what size the postcard will be. The template can be redrawn.
- Using a utility knife, carefully begin cutting the card along the design you've applied. Or you can make a cut with a utility knife and then use scissors to make the rounded areas smooth and without nicks.
- Cut the remaining pieces.
- Decorate the card cover with sequins, glitter, self-adhesive rhinestones and other decorative elements to make it more elegant and festive.
- Write your wishes and the recipient's name inside.
- When everything is ready, stretch the resulting spiral from the heart and secure the middle part to the half of the heart on the left side of the card.
- Bend the heart on the right half along the dotted line outward. You can color it or leave it as is.
- Valentine's card is ready.
Lock
Kirigami templates, which require sharp scissors and thin tools to cut, are convenient for making architectural structures of any complexity. Making a castle will be a great test for tools and an experience to start a hobby of a paper architect.
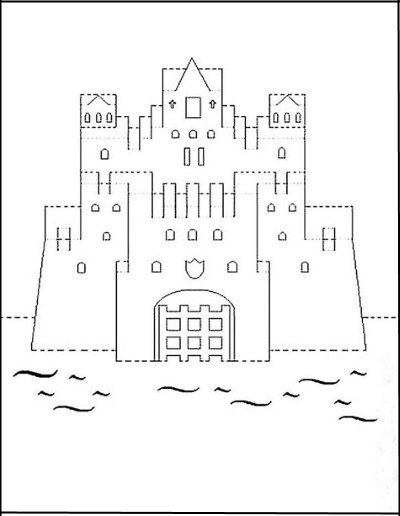
Step by step:
- Prepare a sharp stationery knife or scalpel. Do not forget about safety precautions - protect your fingers.
- Prepare a sheet of thick paper or thin cardboard so that the structure does not fall apart later.
- Redraw the template outline onto the blank.
- Carefully cut out curved and vertical solid contours. Start from the very top point of the drawing.
- Leave horizontal lines for folds.
- Moving down, cut out the side contours of the lock.
- The openings of the castle gates, in the lower part, are cut along the contour.
- The window openings also need to be cut out.
- Start assembling the blank into a three-dimensional picture from the top and from the middle, bending all horizontal lines along the contour.
- Choose a good background to demonstrate the volume of the castle.
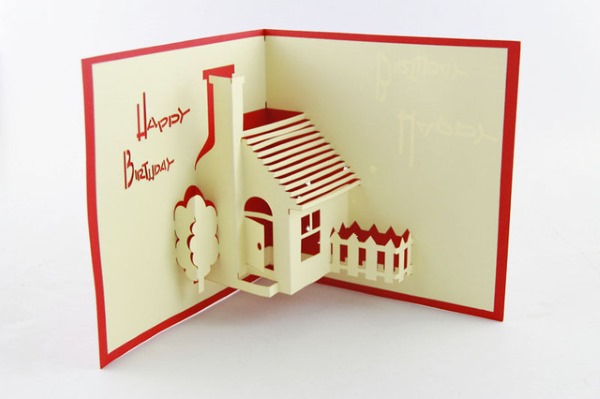
Hut
Making a hut or a house to reinforce the first skills will be a good example.
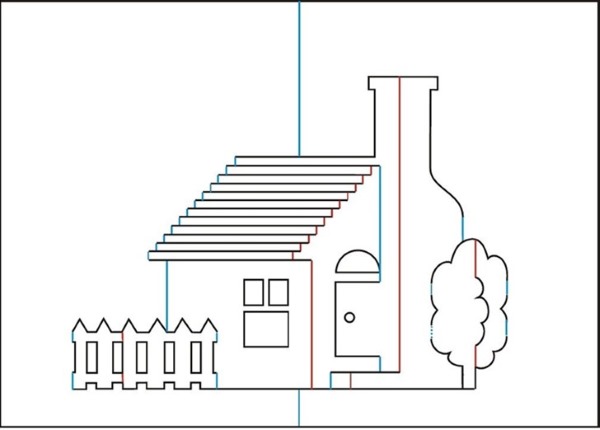
The schematic color codes on the template indicate the following:
- blue - fold the paper along this line outward;
- red - fold the paper along the line inward;
- solid black - the place where the workpiece needs to be cut.
Work order:
- Prepare a paper base, tools - scissors and a stationery knife.
- Never forget to put a backing under the workpiece to avoid damaging the furniture.
- Start cutting from the topmost point. Then cut the inner outlines, gradually moving towards the edge of the product.
- Pay attention to the “ladder” of the roof – this will require attention and fine work.
- To cut the wood, you will need sharp curved scissors so that there are no knife marks left along the edges of the cuts - cut a line with the knife to carefully insert the tip of the scissors there. Start the cut with short movements, smoothly moving to the wide part of the blade of the scissors, and without closing the tips.
- After cutting the solid lines, start bending. Pay attention to the internal and external ones. You should start from the middle of the craft.
- To fold the roof "ladder", you can use thin spatulas or putty knives designed for modeling from plasticine.
Ladder
A simple staircase template requires attention and concentration when folding the cut pieces. You will need thin spatulas and trowels, a metal ruler, and a sharp stationery knife.
Manufacturing:
- Cut vertically all solid lines with a utility knife. You can use a metal ruler to make sure the cut is straight.
- Place the ruler on the drawing and make a cut with a knife exactly along the edge of the ruler.
- Using a spatula and a trowel, alternately make internal and external folds, starting from the middle.
Frog
To develop fine motor skills, eye and imagination in children, you can make a frog together with them. This will be kirigami with applique elements. Only the mouth of the frog will be voluminous. You will need: green, red and blue paper, ready-made “frog eyes”, scissors, glue, pencil, template.
Procedure:
- Fold the green paper in half with the right side facing inward.
- Redraw the frog template. You will get one half of the frog.
- Cut out the frog along half of the outline, but on two halves.
- Make a horizontal cut for the mouth.
- Bend the corners of your mouth in different directions.
- Unfold the frog.
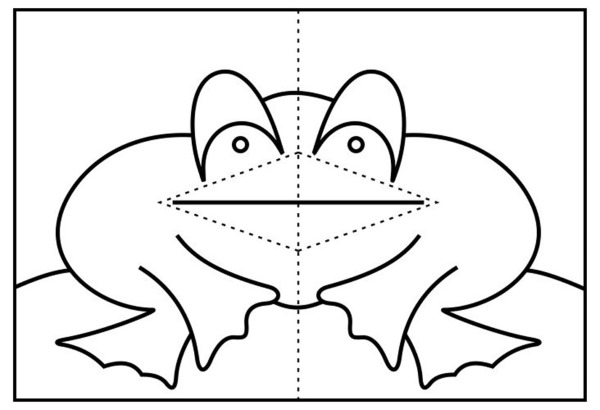
- Turn out the folded corners of the mouth to give them volume.
- Glue on the eyes or draw them with a black marker, after gluing on white paper circles.
- Cut out the frog's "tongue" from red paper, round one end. Choose the width proportionally to the template.
- Make a blue base-background by folding a sheet of paper in half from the “landscape” type.
- Glue the rounded part to the top, vertically “tongue” with one side to the fold, so that when closed it does not wrinkle.
- Glue the frog to the base, put the tongue in the mouth. Make sure that the middle lines of the base and the frog coincide into one.
Birthday card
A homemade birthday card will be a great gift for the birthday boy. A little effort will give an excellent result, in the form of a paper cake. You will need double-sided colored paper of any color - one side colored, the other white, then the result will look more impressive. You will also need tools for kirigami, sequins, ready-made themed stickers.
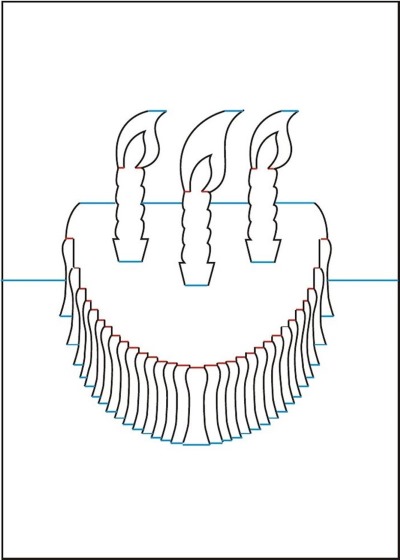
How to do:
- Mark the contours of the future cake on the blank.
- Use a knife to cut along the black outlines.
- Draw folds outward along the blue ones. You need to start from the middle of the image.
- Along the red ones - inside.
- You can write congratulations on the empty spaces around the cake.
- The front side of the card can be decorated with colored stickers.
Birdie
Kirigami, a template for cutting out a flat figure - a bird, is not as difficult as it seems. To make the figure beautiful and even at the edges, you need to try and use all the cutting tools - a knife, a scalpel, scissors. You will need: a white sheet, maybe a thinner one, any colored paper will do for the background, kirigami tools, glue.
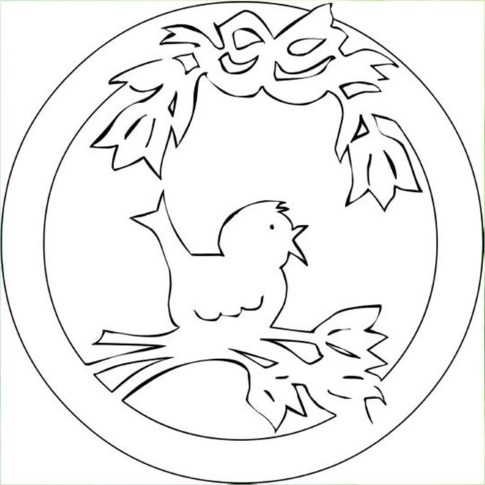
Manufacturing:
- Transfer the template onto the cardboard base.
- Cut out only those parts that are not needed - do not touch the main drawing. Cut out the space around the bird, cutout details on the flowers. Start from the middle of the picture.
- Carefully glue the figure to the background. Bend back some parts: flowers, leaves.
Fish
The kirigami fish consists of two parts. You should get an unusual and beautiful craft with a contrast between the background and the main image. You will need: two-color A4 paper, double-sided - it is better to choose contrasting colors, kirigami tools, glue.
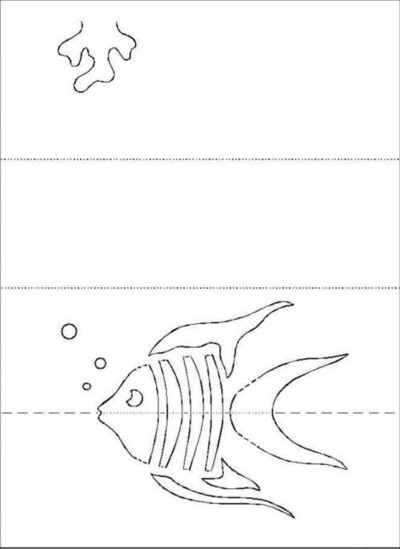
Technique of execution:
- Reprint the template onto colored paper.
- Cut all solid lines. Pay special attention to the stripes on the side of the fish - they must be preserved.
- Fold along the dotted lines with the fold facing outwards. Start from the middle.
- Along the dotted line of dashes - inward.
- Secure the joints at the corners with glue so that the figure does not fall apart.
With a Christmas tree
For the New Year holidays, kirigami trees made of foil or matte paper will look especially elegant. Such a card can become a decoration of the festive table, placed in several places. You can even make a fir forest, making trees of different sizes and shades.
Materials: double-sided cardboard size A4, desired color, kirigami tools, self-adhesive colored rhinestones.
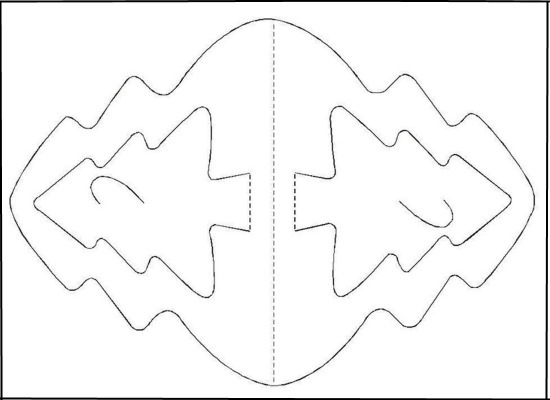
Work order:
- Transfer the diagram onto cardboard.
- Using a utility knife, cut the inner shape of the template along the solid lines.
- Cut out the figure along the outer contour.
- Make folds along the dotted lines.
- The outer part of the figure serves as the base for the tree.
- The trees are connected to each other using tongues that are cut into them.
- Decorate with small colored rhinestones.
Snowman
The snowman is cut out very simply. Cut out small details with a knife, scissors will do the job in other places. You will need white paper or cardboard, kirigami tools.
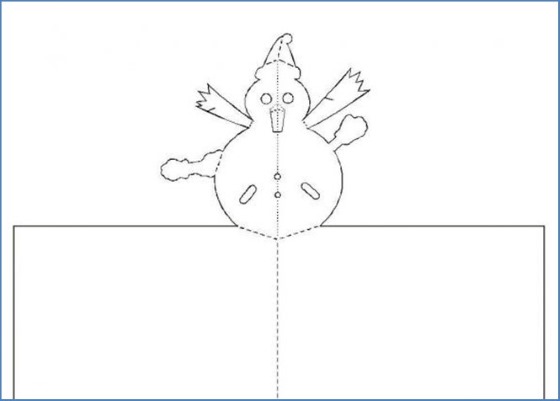
Step by step:
- Carefully cut and cut out small parts with a scalpel, starting from the middle.
- Using the template, cut out a snowman figure with a rectangular base.
- Bend the dotted lines according to the diagram and the snowman is ready.
- You can make a background from cardboard of a different color by folding it in half.
- Attach the snowman to the fold of the background.
Snowflake
Snowflakes are the most famous and favorite kirigami that everyone can make. If you fold a sheet of thin white paper 4 times, you will get a very beautiful and real snowflake. Because in nature, snowflakes have an even number of edges, which give them such a beautiful look. To make a snowflake, you will need a sheet of white paper, scissors with a sharp tip, and a pencil.
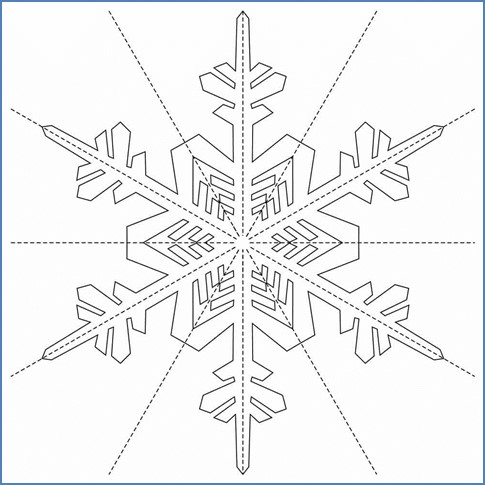
How to cut out a snowflake:
| 6th ending snowflake | 8 point snowflake |
| 1. Fold a square from A4 paper. Align the corners of the sheet diagonally, joining the sides to form a triangle. Cut off the excess rectangle. | |
| 2. Without straightening the triangle, fold it into another, smaller triangle, connecting the sharp ends. | |
| 3. Fold the triangle a third time, connecting the sharp corners. | Fold the triangle 2 more times, connecting the sharp corners. |
| 4. Align and smooth the resulting base along the folds to make it easier to cut. | |
| 5. Draw the outline of the snowflake with a pencil. The long angles of the triangle are the rays of the snowflake. You can draw the outline of the snowflake according to your imagination. | |
| 6. Cut out along the outline of the drawing with scissors. | |
| 7. Unfold the snowflake. | |
| 8. You can stick it on a dark base or use it by hanging it on a thread from the ceiling. | |
Tips for Beginners
Some tips for cutting kirigami:
- patterns with small details, openwork patterns should be cut out first from the middle of the sheet;
- finish the work by cutting out details and patterns from the edge of the product;
- You can copy the kirigami template by placing a sheet of paper on the monitor screen;
- the blank with the template can be attached to the mounting mat with stationery tips or masking tape to prevent it from slipping;
- A set of special knives for working with paper prevents your fingers from slipping.
Kirigami is an art accessible to everyone. Starting with snowflakes in kindergarten, ending with complex models of architectural buildings, fantasy patterns, you can develop your skill to unprecedented heights.
Some turn the art of kirigami into a profession, finding patterns for cutting in everyday life, in the world around them. They create cartoons using paper figures, make paper paintings and masterpieces. Kirigami is a hobby, an exciting pastime and a manifestation of talent.
Author: Lilia Ivanova
Article formatting:Natalie Podolskaya
Video about kirigami
Kirigami - cutting templates in this video: