Hats are one of the most popular knitted items.. They are quickly knitted and not very difficult to make. However, in order for the accessory to be neat and sit well on the head, it is very important to close the crown correctly.
The closure method will depend on the style (round hat, beanie) and knitting technique (1x1 elastic, jacquard, stocking stitch) of the hat.
Calculating the crown of a hat
To calculate the crown of the hat, you need the following data:
- the total number of stitches cast on for the headdress;
- pattern density, namely, the number of rows in 1 centimeter;
- desired length of the hat;
- the number of loops to decrease in 1 row (depending on the shape of the crown);
- multiplicity of decreases;
- the number of loops in the last row of the crown (depends on the desired shape of the hat and the thickness of the yarn - the thicker the thread, the fewer loops there should be at the end).
The calculation procedure is best illustrated with an example.
For the hat, 90 loops were cast on, and as a result, you need to get 18 loops:
- First, you need to determine the method of forming the crown. The most common option is 4 wedges. That is, the decreases will go along four "paths" of loops.
- The central loops, along which the decreases will be, are not taken into account in the calculations. Therefore, in this example, it should be assumed that 14 loops should be obtained from 86. If the design of the product assumes more central loops, the calculations are adjusted accordingly.
- For a neat crown, it is important to distribute the loops evenly. The best option is when the number of loops is divided by the number of wedges without a remainder. In the example, 10 is not divisible exactly by 4, there are 2 extra loops. These loops need to be divided between the opposite wedges. That is, if you imagine that the wedges of the crown are numbered in a circle from 1 to 4, the loops will be distributed like this: 2, 3, 2, 3. As a result, the hat will be symmetrical.
- If there is only 1 extra loop, it is better to leave it in the central wedge on the back side. Accordingly, 86 loops are divided into 4 parts: 2 parts with 21 loops and 2 parts with 22 loops.
- To make calculations and distribution of loops on the crown less complicated, it is better to initially calculate how many loops you need to cast on, taking into account the final crown. And if the pattern allows it, immediately cast on 1-2 loops more or less.
- Next, you need to figure out how many loops are decreased in 1 row. In the example, this is 8 loops - 2 in each wedge. Decreases in this method are performed in every second row. In total, you need to decrease 86 - 14 = 72 loops. This number is divided by the loops decreased in one row. 72: 8 = 9 rows.
- The obtained result must be multiplied by the decrease multiple. 9x2=18 rows. The height of the crown will be 18 rows. Based on the knitting density, the rows are converted into centimeters. That is, 18 rows are divided by the number of rows in 1 centimeter and the height of the crown is obtained in centimeters.
- The calculated height of the crown should be subtracted from the total height of the hat. The result is the height of the work, after which you need to start shaping the crown.
The crown of the hat can be closed in a different rhythm, unevenly. In this case, in order not to make a mistake, it is better to describe the entire process of forming the crown in advance. For example: Row 1 - 20 loops are decreased; Rows 2 through 5 - according to the pattern; Row 6 - 10 loops are decreased. And then by analogy until the last row.
The height in centimeters is calculated in the same way as in the example above. Finally, the rows are converted into centimeters using the knitting density data.
Ways to decrease stitches on a hat
Closing the crown of a hat with a 1x1 elastic band or another method is not so difficult to calculate, the main thing is to understand the principle of these calculations and practice a little. But to get a beautiful hat with a neat crown, it is important not only to accurately calculate its height and the number of loops, but also to correctly perform the decreases themselves. There are different technologies for reducing the number of loops.
On the edges
This type of decreases is used in rotary knitting, for items with one or more seams. Decreases are performed in the front rows. They can be performed with different inclinations - to the right or to the left.
To decrease to the right, knit 2 loops together. To make a tilt to the left, slip the first loop on the right as a knit, leaving the working thread behind the work. Then knit the second loop as a knit and pull the loop slipped before through it. This is the method for stockinette stitch.
Purl stitches can also be decreased with a tilt in different directions. For a tilt to the left, a pair of stitches are knitted purlwise. For a decrease to the right, you need to knit 2 stitches at once purlwise crossed.
It should be remembered that this description is suitable for the classic knitting method. If the "granny" method is used, before performing the decrease, the loops must be arranged in the classic way.
Decreases along the edges of the fabric are performed immediately after/before the edge loops, or 1-2 loops away from the edge loops.
When closing the crown, you need to pay attention to the fact that the decreases that will be located on both sides of the hat seam are mirrored. That is, if the loops on the left side of the seam are tilted to the right, then the decreases on the opposite side should look to the left.
In the middle of the hat
Loops can be decreased not only along the edges of the knitted fabric, but also in its middle. This method is especially relevant for knitting in a circle, when there are no seams. In this way, loops are decreased on the front part of the knitting.
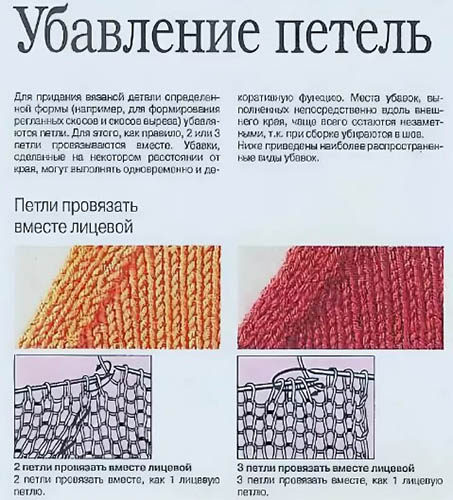
To decrease 1 stitch, knit 2 stitches together. To decrease 2 stitches, knit 3 stitches together at once. With this method, you do not need to decrease more than two stitches at a time, so that the finished product does not shrink.
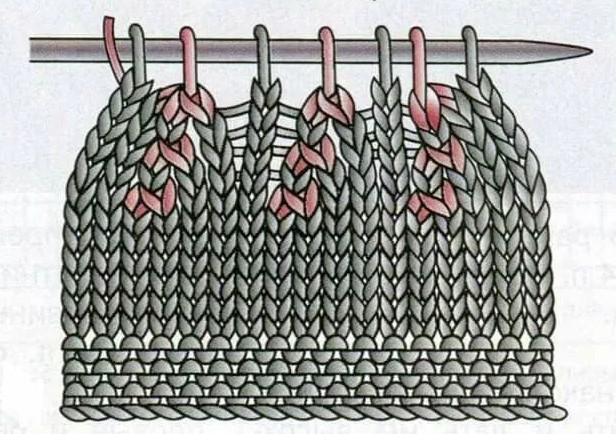
How to decrease more than two stitches at once
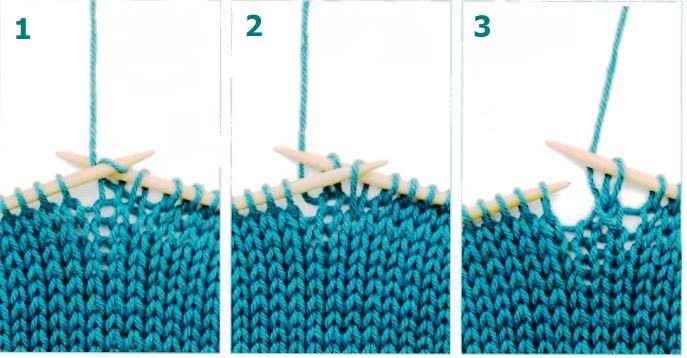
If you need to knit 3 loops together at once, they are swapped in this way:
- Move all 3 loops to the right knitting needle.
- Place the leftmost loop of the three slipped stitches back onto the left needle, then the rightmost loop. The middle loop remains at the front.
- Place the second loop on the left knitting needle. As a result, the first 2 loops will swap places with each other. Knit 3 loops as one front loop.
In 6 places
First, you need to divide the cap loops into 6 equal parts, mark the borders with markers. If you can't divide them completely, the extra loops are distributed as evenly as possible between the wedges. The main thing is that the result is as symmetrical as possible. Then there are 2 options for forming the wedges.
Most often, loops are decreased both at the beginning and at the end of the wedges. In this case, you can leave 1-2 loops between the wedges and perform decreases along them. It should be remembered that the slope of the decreases at the beginning of the wedge should be a mirror image of the decreases at the end of the wedge.
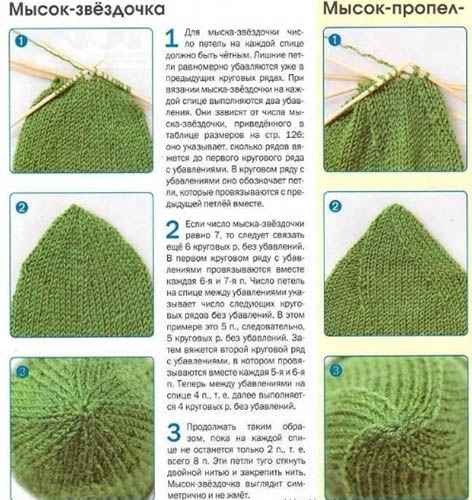
Usually in this case the loops are reduced in every second row, but if you need a longer crown, you can change the rhythm. For example, decrease in every fourth row.
In another method, decreases are not performed on both sides, but only at the end of each wedge. The first 1-2 decreases are performed 4 rows apart. Then decreases continue through the row until there are enough loops left to close the crown.
The result will be an original spiral-shaped crown. If this method is chosen, the slope of the decreases should be the same in all wedges.
In 8 places
The crown closure can be done with a larger number of wedges. The decreases for eight wedges are done in the same way as for six, only the number of loops will need to be divided by 8. Both methods described above are suitable in this case. That is, you can form both symmetrical wedges and spiral ones.
Simple decreases
The easiest way to reduce the number of loops is to knit 2 loops at once as one. These can be 2 purl or 2 knit, depending on the hat pattern. Beginners who are afraid of getting confused with the slope of the loops can simply do all the decreases the same way. This is quite enough to neatly close the crown of the hat.
You can not just knit the loops together, but pull one through the other. Externally, such decreases differ from the usual ones. Therefore, before starting work, it is advisable to practice on samples and choose the most suitable method.
How to properly close the loops on a hat depending on the model
The crown closure depends not only on the desired shape of the hat, but also on the knitting technique. A method suitable for a hat with a simple satin stitch may not work for a 1x1 rib or an openwork pattern.
| Knitting technique | Methods of closing the crown |
| Front or back stitch | Any way |
| Rubber | Transition from elastic to front surface and its closure or formation of wedges taking into account the elastic pattern. |
| Complex patterns, jacquard | Individual change of the pattern scheme. |
Round hat
A round hat is a hat with a low, fairly flat crown. To get such a crown, you need to quickly but evenly decrease a large number of loops in a small number of rows. You can decrease every tenth or every sixth loop - the number of decreases depends on the original number of loops and the desired height of the crown.
Decreases should be done in every second row. When the number of loops decreases to 8-12, they should be connected with a thread using a needle or hook and the end secured.
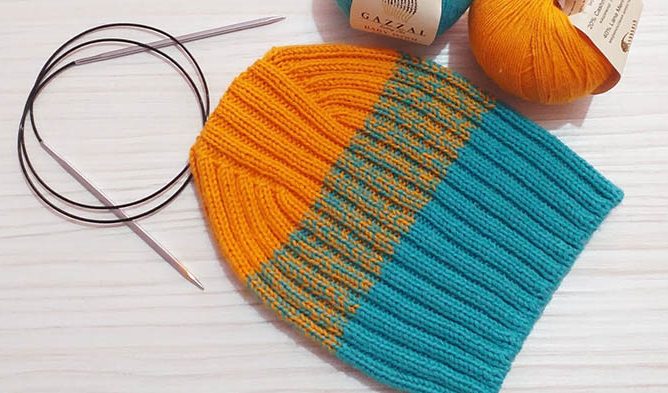
Stocking cap
A stocking hat is an elongated hat model, otherwise called a beanie hat. In such a product, you can use different methods of closing. The simplest method of forming the crown will do. To do this, having knitted a hat of the desired length, you need to pass the working thread through the loops and tighten them. Fasten the thread and hide the end.
The result will be a pumpkin-shaped crown. This method may not work for items made from thick yarn - the crown may look too massive. In addition, a voluminous fabric is more difficult to securely fasten with thread.
The stocking cap can also be closed with a round crown or wedges.
Scallop hat
A comb hat is a headdress with a flat, slightly elongated crown. Unlike hats with a standard round crown, this product has side parts that are different from the front and back. And the top of the hat is a straight line.
The crown of a hat of this shape is closed as follows:
- Determine how long the top of the crown should be. Convert the value into stitches based on the knitting density. Put this number of stitches in the center of the front and back of the future hat. Separate these areas with markers. All other stitches of the work should be decreased.
- Make decreases on each side of the marked sections until only the parts marked with markers remain on the needles. If you want a shorter crown, all the stitches are decreased in each row. To get a longer crown, first decrease the stitches every other row. When about 60% of the decreases are done, the rest are made in each row.
- The loops set aside on the central parts of the front and back of the hat are combined without closing and joined with a knitted seam.
Wedge hat
Forming the crown of a hat from identical wedges is very popular because it does not require complex calculations. To do this, you only need to distribute the loops of the process into equal parts according to the number of wedges and perform decreases at the beginning and end of each wedge.
The rhythm of decreases is every other row. Between the wedges there may remain 1-3 loops, the so-called axis of decreases. The number of wedges is usually 4, 6 or 8.
Hat with elastic band (1x1, 2x2, English elastic band)
The elastic band is a very simple and at the same time effective pattern for knitted hats. It not only decorates the product, but also gives it elasticity, which is important for hats. The closure of each type of elastic band has certain features.
Closing the crown of the hat with a 1x1 elastic band is very simple.
- To do this, in the first row of decreases, the loops should be knitted 2 together with the front loop. The first loop in the pair should be a back loop. As a result, there will be only front loops in the work.
- Knit the next row without decreasing.
- Continue knitting as follows: 2 knit, 2 together, repeat to the end of the row.
- Then a row without decreases.
- In the next row, alternate 1 knit, 2 together.
- Then all the loops of the row are knitted 2 together as front loops.
- Such decreases continue until there are 6-8 loops left on the needles. They are tightly pulled into a ring, covering the crown.
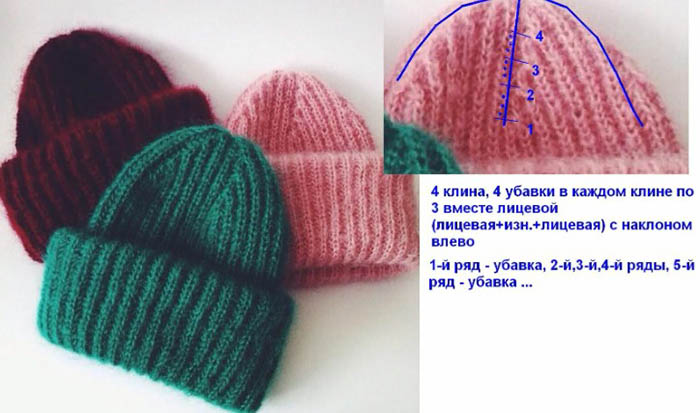
There is a more interesting option for shaping the crown of a hat with an elastic band. The result will be a hat similar to the "comb" model, but with a slightly pointed crown.
For such a hat, the number of loops cast on must be a multiple of eight.
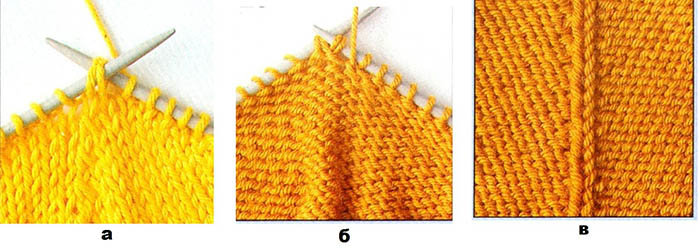
- At the beginning of the crown formation, the fabric is divided into 4 parts, markers are placed on the borders. The loops in the marked places are knitted 3 together so that the front loop is in the center. Only 4 decreases per row.
- The next row is knitted according to the pattern.
- Next, the first and second rows are alternated, making sure that the decreases are located exactly one above the other.
- Knitting continues until there are about 12 loops left in the work. They are pulled together, finishing the knitting. The resulting hat looks equally good from both the front and back sides.
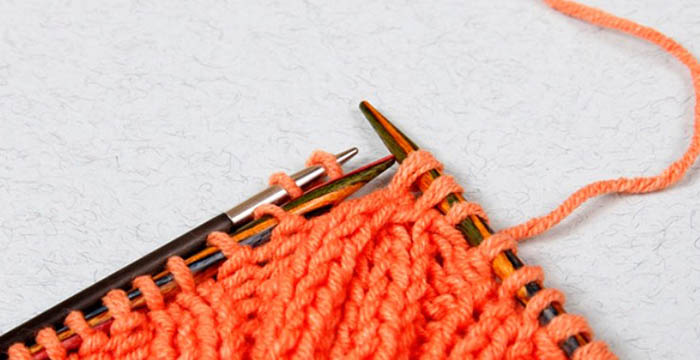
The crown of the hat is formed with a 2x2 elastic band in the following order:
- Knitting begins with a purl stitch. 1 purl and 1 front stitch are knitted together purlwise. The next front and back stitches are knitted together purlwise. The steps are repeated until the end of the row. The result is a 1x1 elastic band.
- The next row is knitted according to the pattern.
- All loops are knitted 3 together in such a way that the front loop ends up in the center of each triple. That is, when decreasing, in every three loops the far right one should be the front one. To do this, the 2 right loops will have to be periodically swapped.
- Next, row 1 is knitted without decreasing with face loops. The crown is pulled together with the working thread.
English elastic (another name is patent) is formed using yarn overs. Closing the crown of a hat with such a pattern comes down to the fact that the patent elastic smoothly turns into a 1x1 elastic, and then into a front surface.
This is done in the following sequence:
- In the initial row of the crown, the purl stitch with a yarn over is knitted as a purl stitch, the front stitch is removed. All actions are repeated until the end of the row.
- The second row is knitted according to the pattern: 1 purl, 1 front.
- In the next row, 1 loop is knitted purlwise, 1 is removed.
- The fourth row is knitted like the second, the fifth like the third.
- In the sixth row, all loops are knitted 2 together.
- Another 2 rows are knitted without decreasing using only face stitches.
- In the ninth row, the loops are again decreased by 2 together using the front loop.
- Then another row is knitted with face loops without decreasing and the loops are pulled together on a thread, closing the crown.
Hat with stockinette stitch
Closing the crown of a hat with a 1x1 elastic band comes down to transferring the pattern of the product to the front surface. If the entire product is knitted in this way, closing the crown will be much easier. Any method of closing the crown will work for a hat knitted with the front surface. Most often, beanie hats are knitted with the front surface, both double and single.
Their crowns are usually formed by wedges, less often with a "comb" or using a "pumpkin" assembly. It is important to remember that when knitting a double hat, the inner crown should be round. Thanks to this, the product will sit better on the head.
Hat with openwork pattern
Closing the crown of a hat with a 1x1 rib or a comb hat may seem difficult, especially for beginners in knitting. However, to master these knitting methods, it is enough to follow the algorithm and practice several times. For complex patterns, such as lace or aran, there is no single algorithm.
Openwork items are very effective, but it is quite difficult to fit them into the decreases for the hat. Of course, you can gather them on a thread and pull them together without decreasing the loops, but the result will not be very neat.
You can finish the lace at the beginning of the crown formation and continue knitting with a rib or stockinette stitch. This method is sometimes used, but it greatly simplifies the appearance of the product.
The best option for openwork knitting is to change or simplify the pattern in accordance with the rhythm of decreases. There are no universal solutions here; to make a pattern of decreases for a certain pattern yourself, you will have to work hard.
Perhaps, for beginners in knitting, the best choice will be ready-made master classes from experienced designers. However, having mastered such calculations, you can create truly unique products.
Jacquard pattern hat
When knitting jacquard, as well as in the case of openwork patterns, the usual methods of decreases are ineffective. And the best option would be to work according to a special pattern, compiled taking into account the decreases on the crown. You can use ready-made patterns or try to compose them yourself.
If there is no suitable pattern, you can finish the jacquard pattern before starting the decreases and switch to single-color knitting, or, alternatively, to transverse stripes. This way, the decreases will not spoil the pattern. It is important to consider how such changes will fit into the overall pattern.
Useful tips
There are a number of tricks that will allow you to complete the work on the crown much faster and better:
- You need to determine what the top of the hat will be before you start knitting. It is better to do all the calculations right away and, if necessary, adjust the number of loops or the pattern so that the loops are distributed correctly at the end of the work.
- To knit the crown, you can use knitting needles 0.5 - 1 size smaller. This will make the top of the hat denser and neater.
- For decreasing, needles with a pointed tip are best - they make it easier to pick up several stitches at once without damaging them.
- When decreasing, all stitches that are knitted together must be turned in one direction.
- When calculating the length of the main part of the hat, you need to consider what pattern the product is knitted with. If it is elastic knitting, for example, elastic, you need to consider that when it stretches, the height of the fabric will decrease. Therefore, it is better to knit the hat 1 - 2 cm longer than calculated or initially calculate the knitting density on a stretched sample.
It is the details and the right finishing that give knitted items a finished look. Therefore, knitters who want their hats to look perfect must master the correct crown closure.
Having mastered the simple principles of calculations and techniques of decreases, you can beautifully finish any product, from simple models with 1x1 elastic to complex openwork accessories.
Author: Nina Tereshchenko
Video about knitting