Making a postcard with your own hands is a fun and useful activity. You can create many items from paper for almost any holiday, celebration, or event.
What techniques are used?
Scrapbooking
Scrapbooking is a type of handicraft that is used to create colorful, unusual photo albums or books. Nowadays, various scrapbooking techniques have also begun to be used to make postcards. Any decorative elements can be used for scrapbooking. Small details are welcome in scrapbooking: beads, buttons, ribbons, stamps, etc.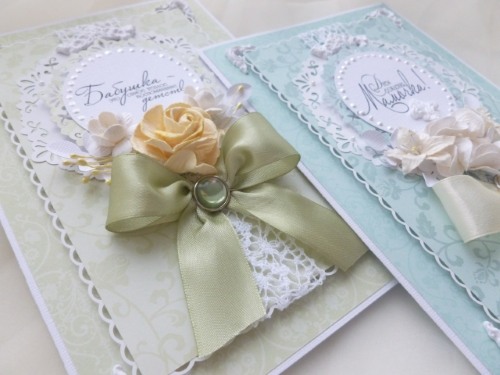
Now the concept of "digital scrapbooking" has appeared. In this case, some of the decorative elements, most often artistic fonts, monograms or figures, are not attached manually, but are applied to paper using computer graphic editors.
Quilling
Quilling is the art of paper rolling, which is used to create flat and three-dimensional cards, decorative elements and paintings.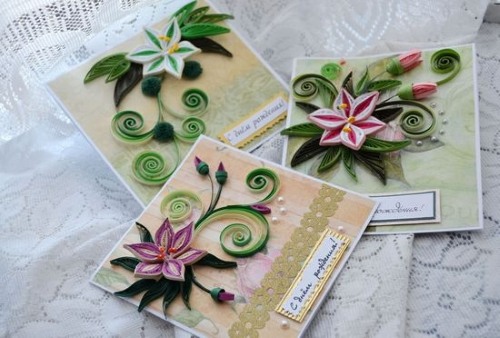
To create the works, thin strips of white or colored paper are used, which are twisted into various figures. The main tool of quilling is a needle. It is easy to twist the tip of the paper strip onto its thin base. Then the master can form almost any figures from the resulting spiral with his fingers, changing the intensity of the twisting.
For quilling, you can make a winding tool with your own hands.
For this you will need a needle with a long eye. The top of the eye is broken off with pliers and the tip of the paper strip is easily inserted into it. Most often, ordinary paper is used, but special strips for quilling can also be found on sale. They are multi-colored, can be with glitter, patterns, mother-of-pearl, painted along the cut to match the main color.
Kirigami
Kirigami is an opportunity to make an unusual postcard without using scissors, glue and decorative elements. This art emerged in the second half of the last century and is very close in its technology to paper folding - origami. Kirigami allows you to create three-dimensional models of figures, buildings, geometric elements by folding paper and cutting it in certain places.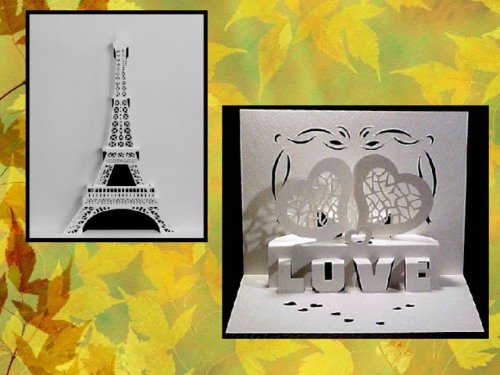
It is quite easy to create a card using this technique even for beginners - you can find many schemes with detailed instructions on the Internet. It is recommended to cut not with scissors, but with a stationery knife, so that all the cuts will be even and less noticeable.
Iris folding
Iris folding is one of the types of applique. It uses multi-colored strips of paper that are folded one on top of the other in the form of a spiral. Both rainbow colors and one color, but in different shades, can be used.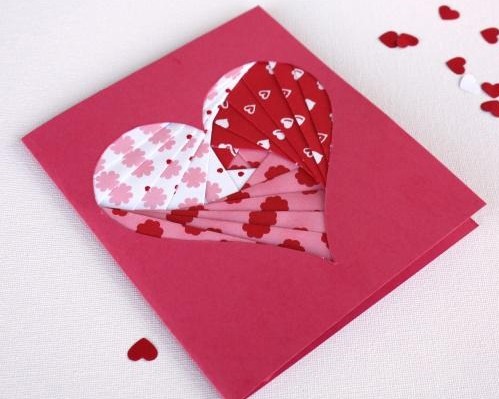
To create paper cards using the iris folding technique with your own hands, you will only need the main material, a pencil, a ruler and scissors. Paper can be replaced with fabrics with different patterns and textures. Satin and silk scraps look especially beautiful.
Tools and materials: what will you need?
The main material for creating handmade cards is paper or cardboard. These can be colored sheets with a golden or silver sheen. Special paper with various patterns and colors can be used for scrapbooking. Many needlewomen use wrapping paper, pages from magazines, books, and parts of yellowed newspapers.
A special rug-ruler can become a workplace. It is very convenient to measure out pieces of paper or decorative elements of the required size on it.
Tools you may need to create cards:
- Scissors or a utility knife.
- Punches for cutting out shaped elements.
- Rulers and protractors.
- Sponges and spatulas of different shapes and sizes.
- Tweezers and needles.
- Single and double sided tape.
- Pencils, markers.
Almost any decor can be used as materials for postcards. Most often these are beads, ribbons and artificial flowers. There are also blanks of inscriptions and stencils for congratulations. It is quite difficult to find them on sale, so they can be replaced with ready-made printed templates from the Internet on cardboard or photo paper.
Master class on creating a postcard with your own hands
Shirt postcard
To create a handmade postcard for a man out of paper, you will need a thin colored A4 base and a ribbon that will imitate a tie.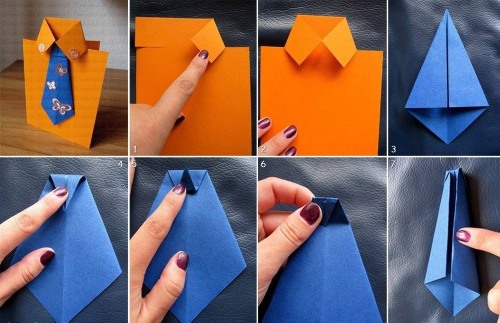
Execution:
- The paper must be placed with the short edge down and divided into 4 parts. The two side parts are folded towards the middle of the sheet.
- At the top of the side parts, the corners are folded and then folded in half again.
- The paper is folded downwards at the corners to form a collar.
- The product is turned over to the other side. The lower part of the product is folded so that sleeves are formed.
The final touch is to create an imitation tie on the collar using a ribbon. The card should be ironed with a cold iron.
Dress-postcard
To create a dress-postcard you will need a base of thick white cardboard, colored paper (you can use pages of a newspaper or a book with printed text), glue and scissors.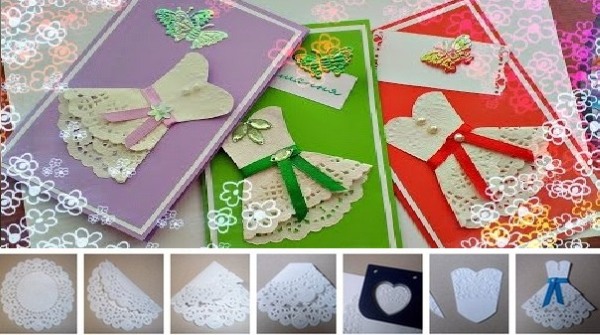
Execution:
- Using a simple pencil on paper, you need to draw a corset and a sun skirt for the dress (you can use a stencil).
- Elements are cut out.
- On the skirt, you need to place identical sectors and fold the paper along these lines. This allows you to create an imitation of folds.
- The top of the skirt is glued to the base of the card, the folds themselves are left free.
- A corset is attached to the top of the skirt. The waist line can be closed with a ribbon or a bow with rhinestones.
You can decorate the dress with imitation paper lace.
8-bit heart
To make a postcard you will need thick cardboard, preferably colored, and a sharp paper knife.
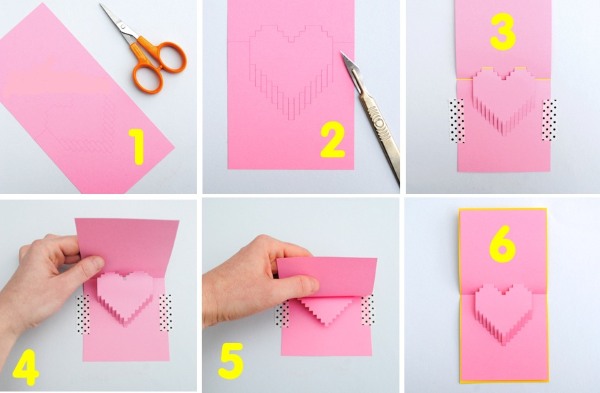
Execution:
- Using a pencil, mark the middle of the cardboard sheet. This is where the bend will be.
- Then the drawing is applied to the paper. Most often, a stencil is used for this, but you can also draw the base yourself. The eight-bit heart can be "transferred" to cardboard using paper lined "in a cage".
- Neat straight cuts are made in the direction of the lines. It is better to use a ruler for this.
- The cut paper must be lifted along the cut lines and bent. To fix the lines, it is necessary to close the card after bending and put a weight on top for several hours.
- At the end, the back of the card can be decorated with inscriptions, appliques or scrapbooking elements.
8-bit weirdos
This handmade paper card is made using the same technology as the "Eight-bit Heart". For convenience, the cutting and folding lines can be marked with multi-colored markers or different pencil strokes.
For the "weirdos" you can use stencils of a skull, an alien, an exotic animal. You can draw the image yourself on checkered paper. To make it easier to bend the "weirdo", the cardboard is attached to the table with tape.
Heart card
An unusual heart-shaped card for a Valentine's Day gift can be made using the iris folding technique. To do this, you will need paper of three colors (red, dark and light pink), a thick sheet of cardboard, glue or double-sided tape, scissors and paper.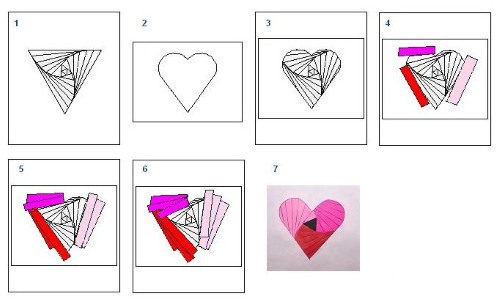
Execution:
- A large heart is drawn on cardboard and cut out.
- The multi-colored paper is cut into strips approximately 4 cm long. Then each strip is folded in half.
- Then the strips need to be laid out, alternating different shades (a diagram of a heart for iris folding can be found on the Internet). You can fix the paper in place with glue or double-sided tape.
- At the very end, you need to make the middle. It can be different in color or be in tone with the rest of the pieces of paper.
Rainbow postcard
To create it you will need 7 colors of colored paper: red, orange, yellow, green, blue, blue and purple, and colored cardboard.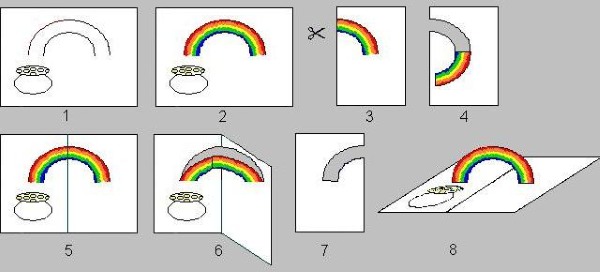
Execution:
- You need to make a small envelope out of cardboard.
- A small strip is cut from each color of paper. Then all 7 are glued together into a long strip that imitates a rainbow.
- You can write a greeting by hand on the rainbow ribbon or attach a ready-made one.
- The ribbon is folded like an accordion. One end is secured to the bottom of the envelope, and the other is tucked inside.
When a person opens the envelope-card, he should pull one end of the rainbow and see a congratulation.
Volumetric postcard "Volcano of Hearts"
To create a postcard "Volcano of Hearts" with your own hands, you will need thick white and red cardboard, glue and a stationery knife. It is problematic to create it from thin paper. It is best to use a template for production.
It is important to ensure that the hearts on both sides are strictly symmetrical to each other.
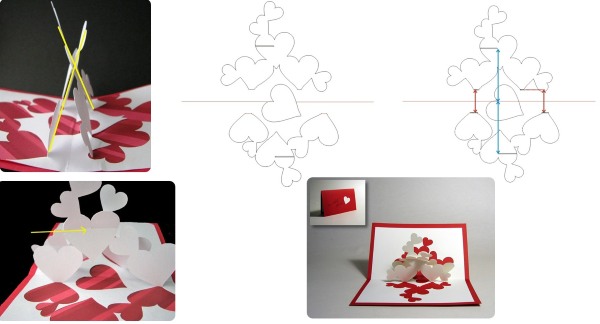
Execution:
- The template is transferred onto thick white paper (cardboard) and cut out with a stationery knife along the entire line, except for the folds.
- On opposite sections of the cut out hearts, symmetrical cuts of the same length are made.
- At the cut points, the cut-out hearts are “linked” together crosswise.
- The white base with cut out hearts is attached to the red cardboard with glue.
Volumetric postcard "Funny crab"
The postcard "Crab" is created using the applique technique. The volume effect is achieved by using polystyrene foam.
To create a postcard you will need:
- a blank for a postcard made of thick paper of any color;
- plain colored paper or patterned paper;
- several pieces of foam;
- glue or double-sided tape.
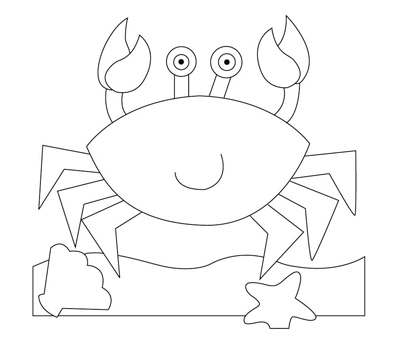
It is recommended to use a stencil when creating. You can download it and print it on plain paper or directly on color paper. It is better to use different colors or patterns for each figure.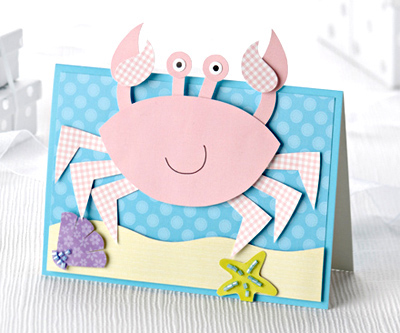
Execution:
- The base for the card is made from thick paper. It can be rectangular or square.
- Then, sections of the crab's body are cut out from the stencil.
- You need to cut one thick piece and several thin pieces from the foam.
- Thin pieces are attached to the crab's claws and legs on one side and to the body on the other. The eyes are glued on without foam.
- Using a black pen or felt-tip pen, draw eyes and a smile on the crab.
- The finished body is glued to a thicker piece of foam and then to a card.
After this, the card can be decorated with beads, beads in the shape of shells.
Volumetric postcard "Chicken"
The technology for creating this card is the same as for "Funny Crab". You will need white cardboard base, several types of colored paper, voluminous tape and glue.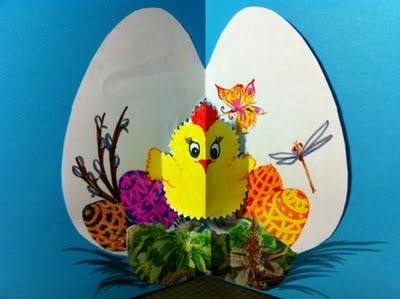
Execution:
- The base cardboard needs to be folded in half and an oval resembling a chicken egg needs to be drawn on one side. The oval is cut out in a circle, avoiding the fold.
- A similar oval, slightly smaller in size, is cut out of yellow paper. It will be the chicken.
- Cut out a beak from red paper and glue it to the chick. Eyes can be drawn with a marker or felt-tip pen.
- Separately, an oval is cut out of white paper to the size of the chicken. Its upper half is cut off. At the cut point, uneven triangles are cut out with scissors to imitate a broken shell. The paper is glued to the lower half of the chicken.
- Double-sided voluminous tape is attached to the back of the resulting applique. The second half of the tape is glued to the egg base.
Volumetric postcard "Gifts"
To create such a card you will need thick base paper of a bright color, white paper and multi-colored pieces of paper.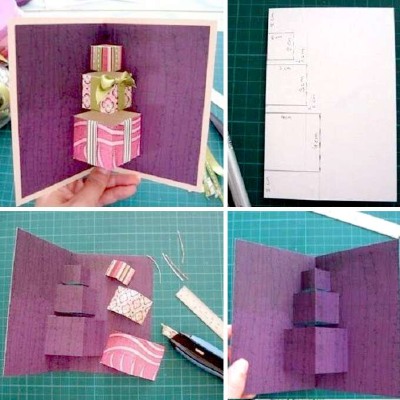
Execution:
- A stencil is applied to white paper: several rectangles (the bottom one should be larger than the top one), and the middle of the rectangle should be located on the fold of the postcard.
- Each rectangle is covered with paper with a pattern or glitter.
- The long side of the rectangles is cut with a stationery knife and they are "pressed" towards the pasted paper. The base and the paper "with gifts" are glued together.
- The postcard is folded and ironed.
Volumetric postcard "Cake"
A very unusual card with a cake can be made for the birthday of relatives or friends. For it you will need colorful and thick paper as a base, several strips of colored paper and glue.
Execution:
- It is necessary to create a base for the postcard from thick paper or cardboard. To do this
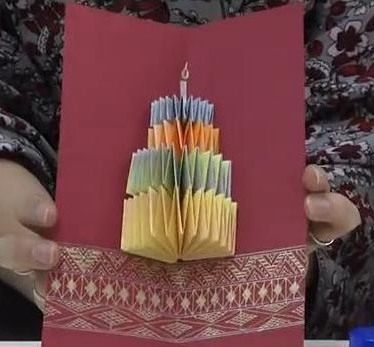 The postcard is folded in the middle. The upper part can be decorated with a drawn or printed inscription.
 - For the cake you will need three strips of paper of different colors. Each of them should be twice as long as the previous one (for example, 3:6:12 cm).
- Each strip is folded like an accordion with the same interval between the folds of the paper.
- The ends of the strips are glued inside the card as follows. The same distance is measured from the fold line (for the first strip - 1 cm, for the second - 2.5 cm, for the third - 4-4.5 cm).
If the strips are attached correctly, when the card is opened 180 degrees, the folded strips form the tiers of a festive cake. Candles and congratulations can be added with colored markers or pencils.
Volumetric postcard "Balloons"
To create the “Balls” card, you will need a lot of multi-colored cardboard or thick paper, knitting threads, voluminous tape and thick A3 cardboard of a light color.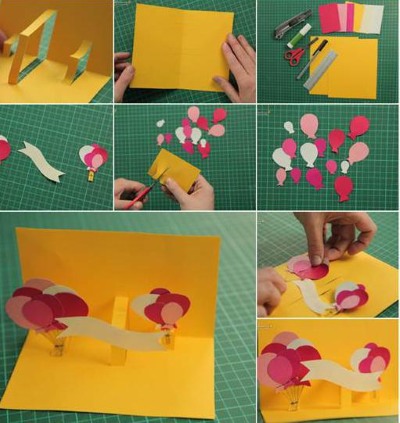
Execution:
- The base is formed from cardboard. It can be not only A3 format, but also larger sizes. It is better to choose cardboard in turquoise or light blue shades for the illusion of balls flying in the sky.
- About 30 circles of different diameters need to be cut out of colored cardboard. The same number of triangles of the same color are cut out for them.
- The lower edge of the circle and the top of the triangle are coated with glue, the end of the thread is placed in the middle and all the elements are glued together. The result is a figure similar to a balloon.
- The largest balls are glued inside the card using glue. The smaller balls are glued on top using voluminous tape.
- The threads of the balls are intertwined with each other, and all excess is cut off.
The postcard can be supplemented with a glued-in volumetric banner with congratulations.
Postcard with volumetric flowers
To create a postcard you will need colored paper, cardboard base, scissors and glue.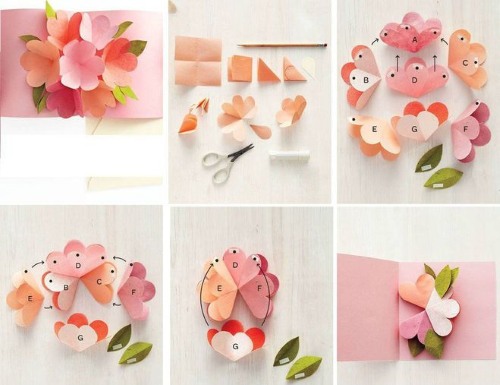
Execution:
- The basis for the future postcard is formed from cardboard.
- From colored paper in pastel shades, you need to cut out 7 squares of the same size (each square can have its own color).
- The square is folded in half twice, then at the corner to form a right triangle. From the right corner it is cut to form a pointed petal.
- When opened, a flower with 8 petals is obtained. One of them is cut off, and the neighboring petals are glued together.
- 6 flowers are laid out in a circle, and the seventh is placed in the middle. Their petals are glued to the petals of the neighboring flowers and the central one. As a result, the central flower has no free petals, and those in the circle have free outer petals. They are glued to the base so that the central petal falls in the middle of the fold (it is not glued).
If you unfold the card, a bouquet of paper flowers appears in front of the person. They can be decorated with green petals, and stamens can be drawn with a black felt-tip pen.
Volumetric New Year's card
A three-dimensional New Year's card can be created in several ways. One of the simplest ways is to cut paper. The technology of creation is the same as for the "Gifts" card.
Execution:
- Imitation fir branches are cut into green paper (the paper is not cut on the sides).
- The base and green paper with the tree are glued together and bent forward (the tree branches are not glued).
- You can use multi-colored markers to add balls and tinsel.
Postcard to the teacher
A postcard for Teacher's Day can be created in an autumn style using applique. To do this, you will need a base of thick paper, colored cardboard in the tone of autumn leaves, glue and decorations.
Execution:
- Using stencils from colored paper, cut out autumn leaves (you will need about 20-30 leaves, depending on the size of the postcard).
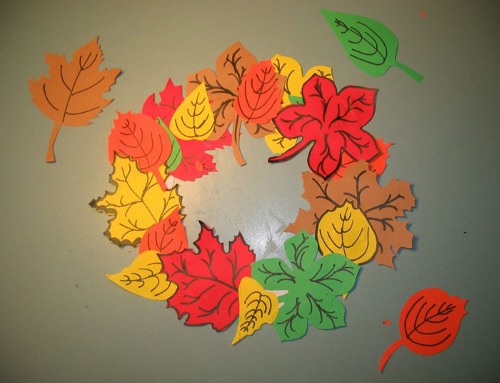
- The leaves form a wreath on the first page. To create a three-dimensional postcard, some of the leaves can be glued on using three-dimensional tape.
- The wreath can be decorated with red and green ribbons, imitation autumn flowers and berries.
Postcard for mom
A simple card for mom can be created using the quilling technique. To do this, you will need a base, strips of colored paper and glue.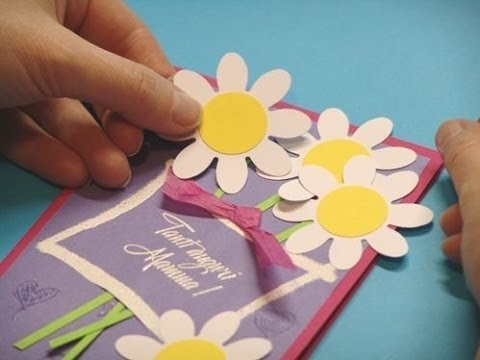
Execution:
- Several green strips are glued to the base of the card – they will be the stems. Several more strips are glued into circles and folded on opposite sides – these will be the leaves.
- Spirals are created from multi-colored paper using a needle. They are glued to the ends of the stems and imitate buds.
- An improvised ribbon made from a strip of red or gold paper can decorate the bouquet.
Wedding card
The most popular gift for newlyweds is money. Therefore, a greeting card can be created using scrapbooking technique. To do this, the base of thick A4 cardboard is divided into three even rectangles and folded along the edges, the two lower parts are glued together along the edge. The upper third should cover them.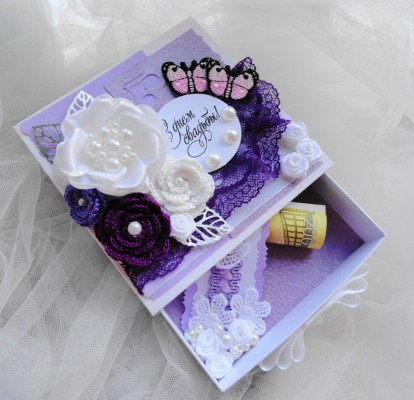
You can decorate it with lace, ribbons and beads, and other paper items in a handmade postcard. A greeting made with curly scissors is necessarily placed on the top of the postcard-envelope. It can be printed on a computer or written by hand.
When creating a postcard for the first time, it is better to use easy techniques and stencils. Later, you can complicate them, add new elements and use your own design developments.
Video on how to make a postcard with your own hands from paper
3D postcard made by yourself, watch the video:
Let's make a greeting card with our own hands: