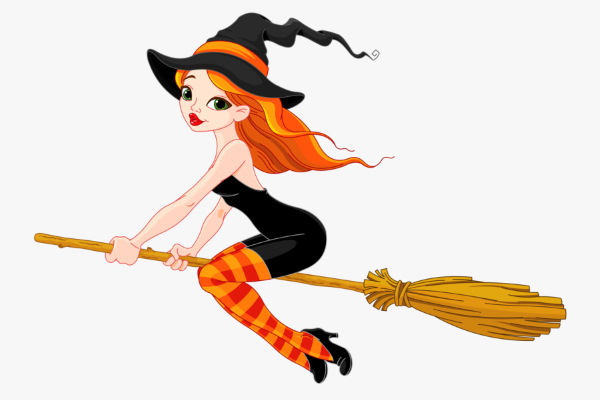
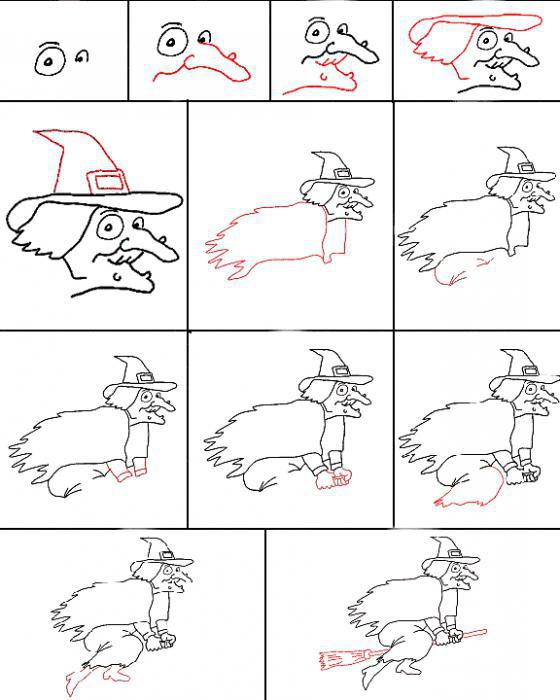
A drawing of a witch on a broom (the photo below shows examples of drawings of varying levels of complexity) can be offered as a creative task for children closer to Halloween or as an illustration for a fairy tale.
In the folklore of different countries there is such a character as a witch or sorceress and in most of them this character is depicted as an evil old woman. To give a frightening appearance, her skin is painted yellow or green, warts are added to her face and she is depicted in dark long clothes.
This character can also be depicted as a young woman or a girl sorceress with the invariable attributes - a broom, a cauldron and a pointed hat. The plot of the illustration can be supplemented with animals - a cat, a raven, spiders, etc.
Regardless of the step-by-step lesson chosen, the following list of tools is used in the process:
| What is needed | For what |
| Paper | The thickness of the paper is chosen based on the coloring method - for paints, it is recommended to take thicker sheets. |
| Pencil | Beginners are recommended to use hard or hard-soft pencils. Soft pencils are more easily soiled and are used for shading and hatching shadows. |
| Eraser | Remove unnecessary details from the schematic drawing. |
| Ruler | Draw straight auxiliary lines. |
| Pen, black marker or liner | Trace the general outline of the drawing. |
| Colored pencils, crayons or paints | Color the finished drawing. |
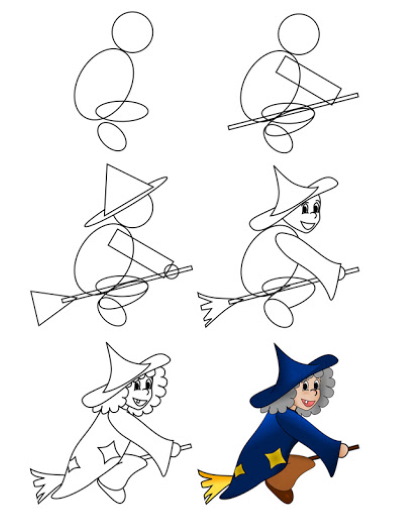
Simple pencil drawing
A witch on a broom (the photo shows a simple drawing for beginners) can be drawn step by step in a cartoon style.
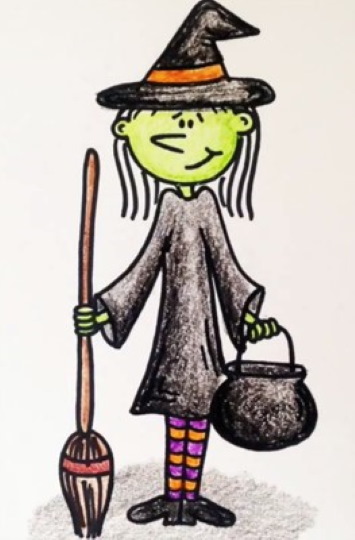
The character will be life-size with a broom and a potion pot in his hands:
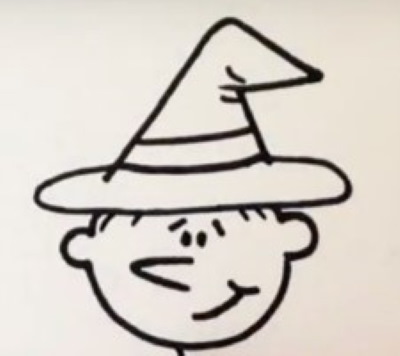
- The sheet is placed vertically and begins with the head, which is depicted as a circle. Small round ears are drawn on both sides. In the center of the face, the eyes are indicated by dots and the eyebrows in the form of raised short sticks. The nose is drawn as a triangle with an indentation downwards. The mouth is even lower. To make it look like a grin, a curved line is made on one side.
A hat with round brim is drawn on the head, its tip is bent to one side and a ribbon is shown with horizontal lines. Hair is visible from under the hat, it is shown with several short lines directed in different directions.
- Under the head, make 2 short parallel lines to show the neck.
A long dress with sleeves and raised shoulders is depicted in full length. The sleeves of the dress and the hem widen and end in a wavy line.
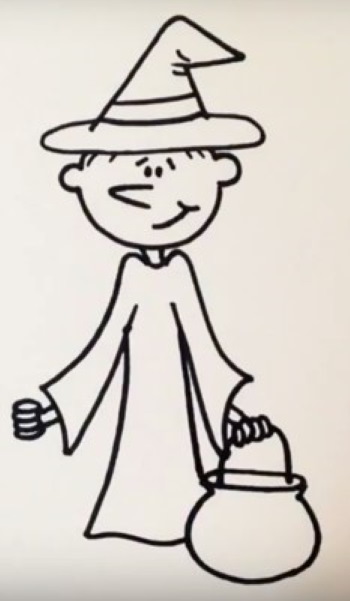
- Thin hands, clenched into fists, peek out from the sleeves – in them the witch will hold a cauldron and a broom.
- In the right hand, draw a curved handle and a round pot. The top of the pot is repeated with a parallel line so that the contents are visible.
- In her left hand, the witch holds a long broom. The base is drawn with thin straight lines. For convenience, you can use a ruler. The rods are drawn in the form of a drop, pointed downwards. Two horizontal lines are made across the rods - this is a rope. The rods are drawn with many vertical lines, they can be directed in different directions and are not necessarily straight.
- At the bottom of the dress, thin legs in stockings are drawn, filled with frequent stripes. Shoes are worn on the legs.
- Add details. Use wavy lines to draw the shoulder-length hair. Use curved lines to show shadows on the brim of the hat, the hem of the dress, and the bowler hat.
- The finished drawing is colored with colored pencils. The face and hands are colored light green. The dress, bowler hat, cap, and shoes are colored black. The stripe on the hat, broom, and stockings is colored orange. The remaining stripes on the stockings are purple.
- The broomstick is painted brown. The dress, cap and bowler hat are painted with more pressure along the contour to create the appearance of a shadow.
Step by step drawing for Halloween
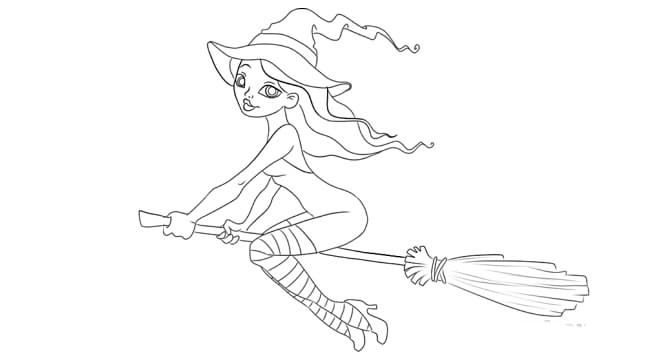
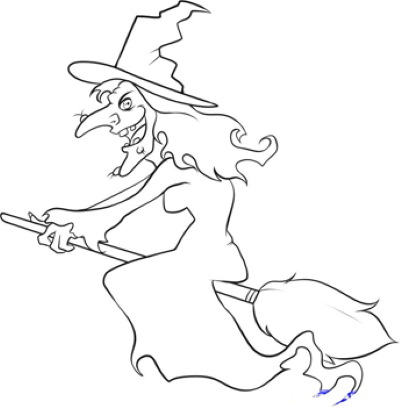
Witch on a broom (the photo tutorial shows how to depict a young cartoon witch in simple steps) - you can depict this character on Halloween cards or as a creative task.
Step by step:
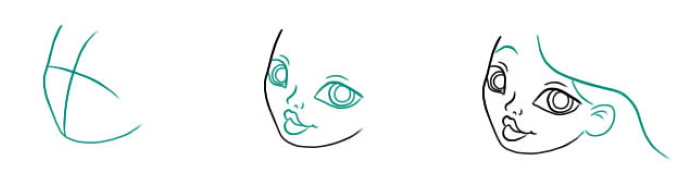
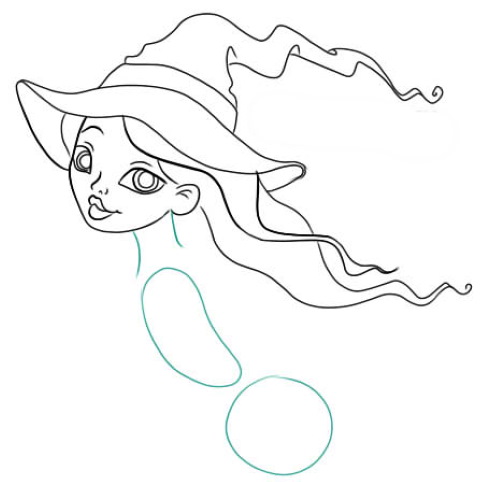
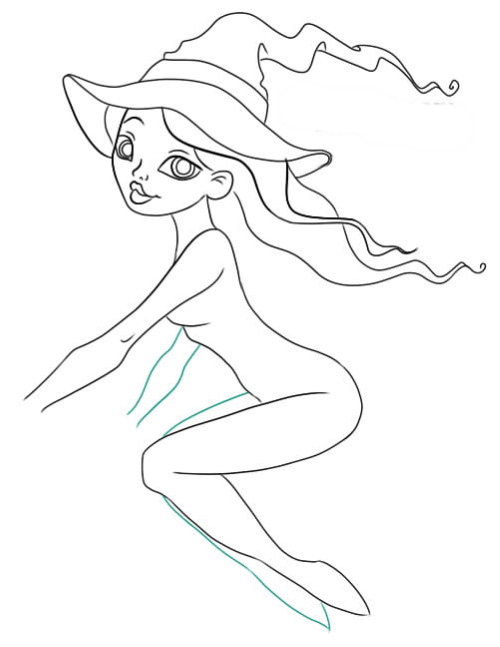
- The sheet is placed horizontally. In the upper left part, they begin to draw the witch's face. It is schematically depicted as a semi-oval. In the center, they draw crosswise lines to further symmetrically depict the facial features.
- On both sides of the schematic lines, draw the eyes as pointed ovals, in the center, circles show the iris and pupils. Above the eyes, short curved lines show the eyelid. In the center of the face, show the nose. A little lower, the lips.
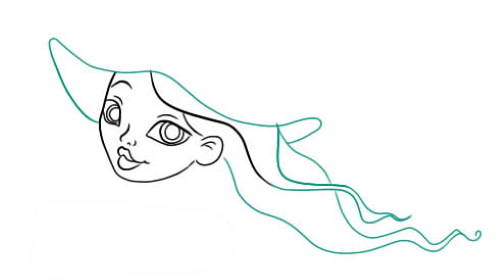
- Above the eyes, a curved line shows the eyebrows. The witch's face is half turned, so only one round ear is visible. From the forehead to the right side, a wavy line is drawn, indicating hair.
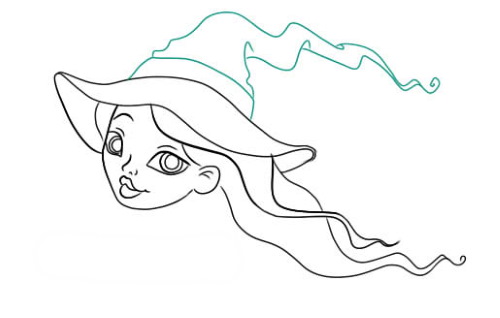
- Draw the brims of the hat from the left side of the face. Finish them on the right side with an indent from the hairline. Draw strands of hair under the brims of the hat, which flutter in the wind.
- Above the brim of the hat, the ribbon and the tip of the hat are drawn with horizontal lines. It also flutters in the wind, so the narrow end is drawn to the right with wavy lines.
- The line of the neck, shoulder and base of the body are schematically indicated.

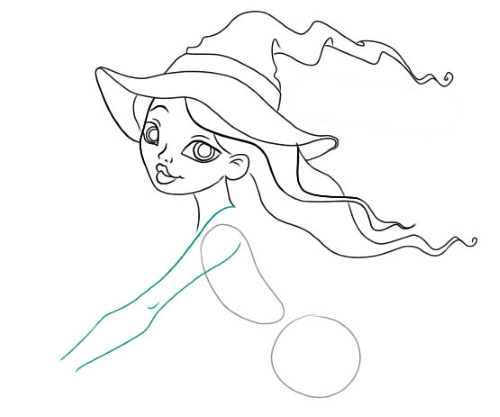
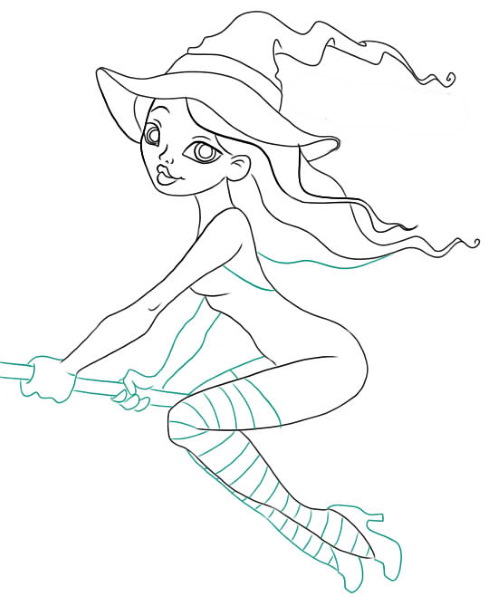
- From the point indicating the shoulder, draw the witch's thin arm, directed to the left. At the elbow, the arm widens slightly, then narrows again. The elbow is indicated by a short curved line.
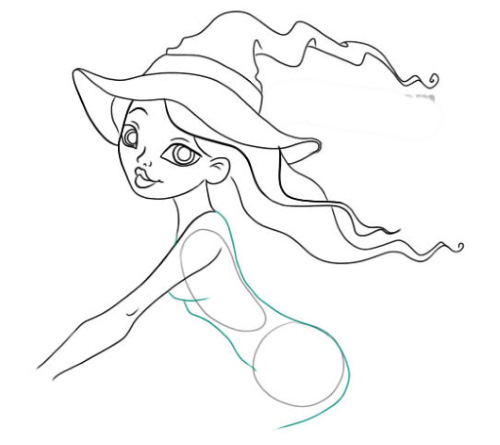
- From the shoulder, draw a curved back and a round hip. From below, draw the waist and stomach.
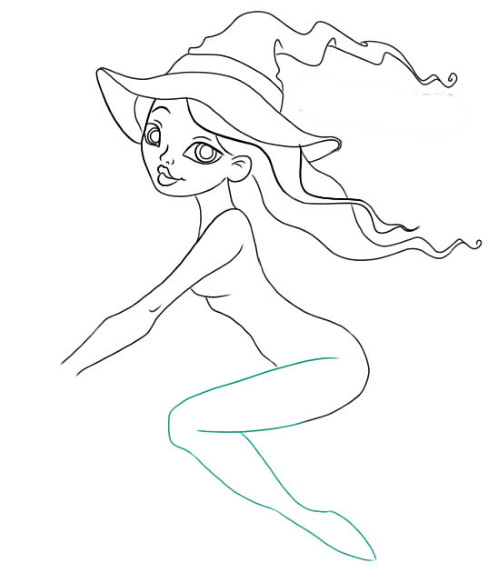
- The leg is drawn with oval shapes up to the knee and below. The leg is bent, as the witch is sitting on a broom. The outline of the leg is outlined with a smooth line. The leg narrows closer to the ankle and widens at the foot.
- From the ribs to the left, draw the far arm, it is less visible, so the arm is smaller in size. Repeat the line of the leg with a small indentation to show the far leg.
- Draw clenched hands and the base of the broom in them. Paint the stockings with frequent stripes. Depict the line of the dress on the back. Draw shoes with a small heel on the feet.
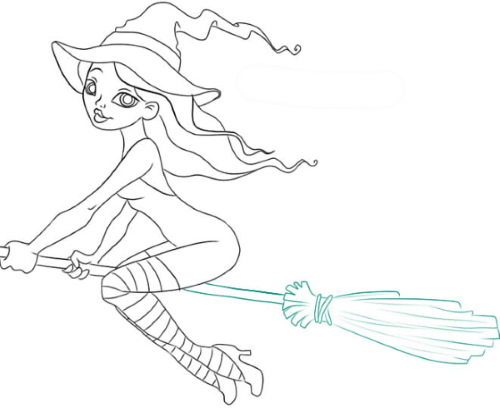
- Draw the broom handle on the right side with a slight downward slope. The broom ends with frequent rods in the form of many lines. The rods narrow at the place of interlacing.
- Erase the auxiliary lines. Trace the general outline with a pen and color the finished drawing.
Cute Witch - Step by Step Pencil Drawing
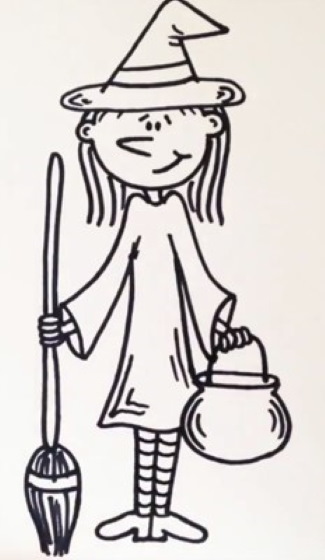
A witch on a broom (the photo shows how to draw a young witch with a cat step by step) can be depicted not only as a scary old woman, but also as a little cheerful girl. This drawing method is suitable for children from 7-8 years old, since in the process they depict asymmetrical figures and small elements.
Step by step:
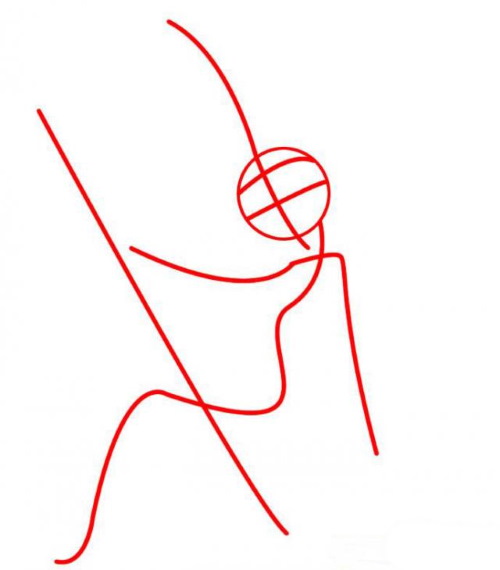
- The sheet is placed vertically and in the upper central part, a head is schematically depicted in the form of a circle. The body and the position of the legs and arms are schematically shown with straight lines.
- The face is slightly extended at the bottom. In order to draw the face symmetrically in the following steps, a cross-shaped marking is made on the face. These are temporary lines, so they are made with a light press of the pencil.
- They begin to draw the face. On the sides of the head, in the center, they draw small round ears.
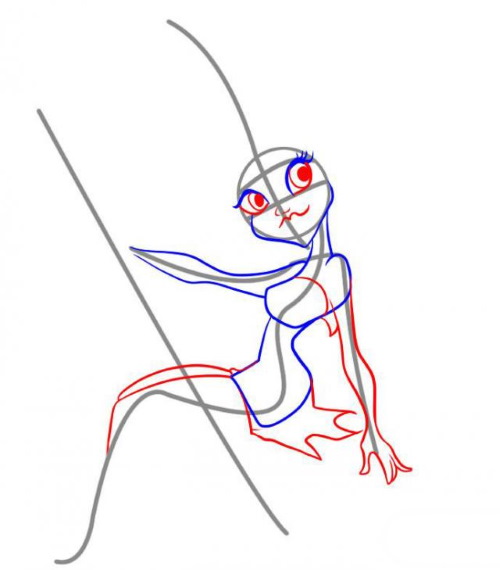
At the same level, the eyes are depicted as semicircles. The eyes are placed at a distance from each other equal to the length of 1 eye. In the center, the pupil is drawn in a circle, and eyelashes are shown on the sides of the eyes. The nose is depicted as a small dot. A smiling mouth is shown as a downward curved arc. The head is framed with wavy lines, schematically depicting the hair.
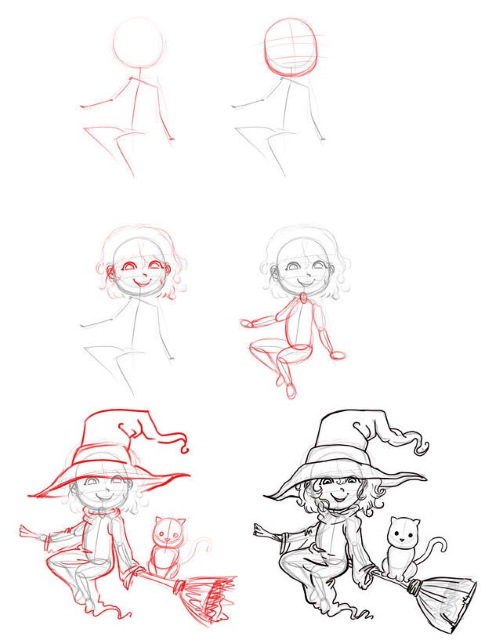
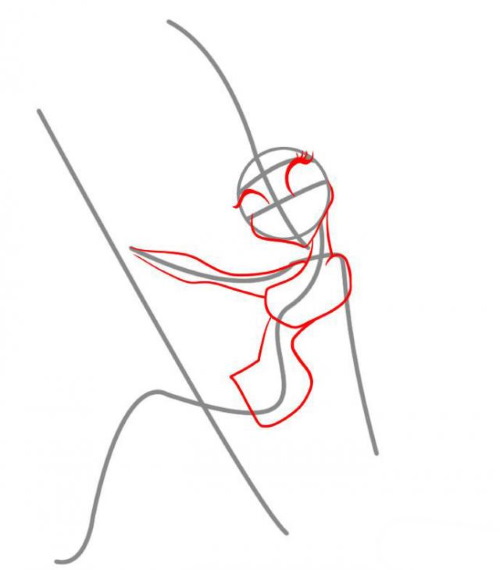
- They outline the body with oval and round shapes.
- The witch's long robe is outlined along the finished smooth lines. Folds are shown at the folds with short curved lines. Around the neck, the folds resemble a circle or hoop to depict a collar. The hem of the robe flutters in the wind to the right.
On the head they draw a wide-brimmed hat with a pointed end tilted in the wind and a wide ribbon. They draw a straight broom and lush twigs on the right side. On the broom, they draw a cat next to the witch with schematic round figures.
- Erase the auxiliary lines. Outline the general outline of the witch, broom and cat with a pen or liner.
- Color the finished drawing.
Scary Witch
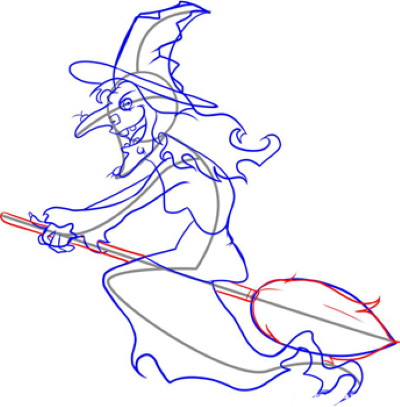
A witch on a broom (the photo below shows what the finished drawing created using this tutorial looks like) in the form of a scary old woman against the background of the night sky can be an illustration for a fairy tale or a themed drawing for Halloween.

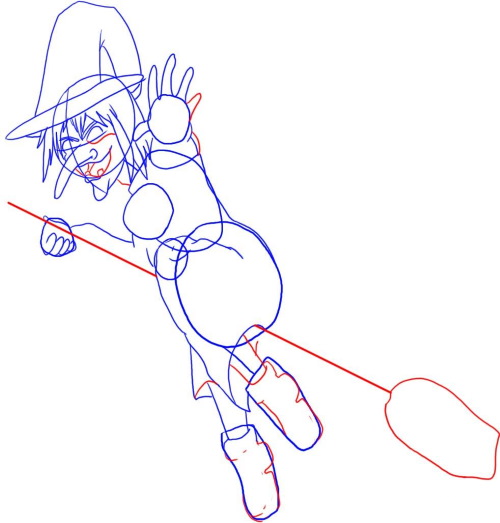
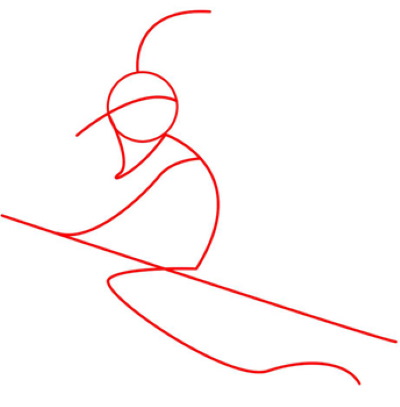
This tutorial is suitable for those who have intermediate drawing skills, since in the process you will have to draw complex curved shapes and lines, and the witch herself appears in a half-turn:
- The sheet is placed vertically and they begin to schematically depict the figure of the witch using circles and ovals. In the upper part of the sheet in the center, the head is shown with a circle, on the face, crosswise lines are drawn and a little higher, a horizontal line of the hat level. From the head down, the neck is shown with a straight line. Large parts of the body, arms and legs are shown with circles.
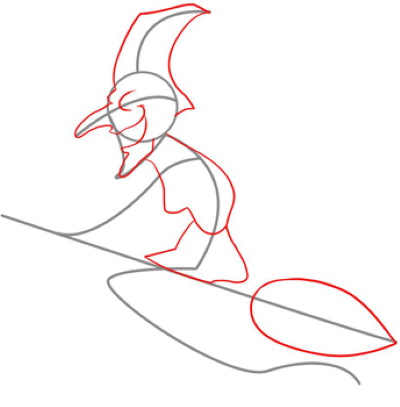
- A curved line is used to draw a hat from the drawn line. On the face, eyes are schematically shown in semicircles, a long nose curved downwards and an elongated sharp chin. Long straight fingers are drawn on the right hand, and on the left – bent into a fist. The body is connected with smooth lines, as shown in the picture.
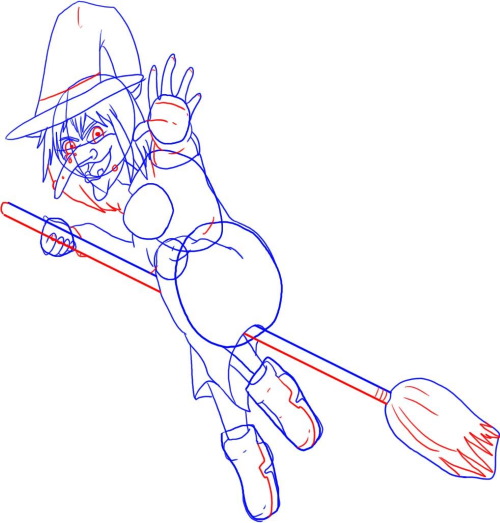
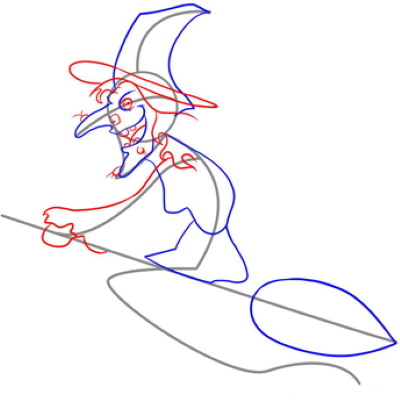
- Draw the curve of the hat back. Draw the shaggy hair sticking out from under the hat with frequent zigzags of varying lengths. Mark the line of the back and hip with a smooth line. Draw the left leg, dressed in a shoe.
- On the face, draw an open mouth with 2 teeth and a line of cheeks. Schematically depict a straight line of the base of the broom and twigs. Draw the right leg sticking out from under the dress. In a circle, draw the outline of shoes with heels on both feet.
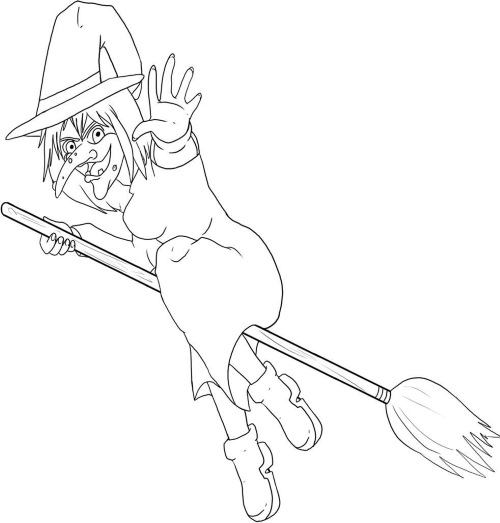
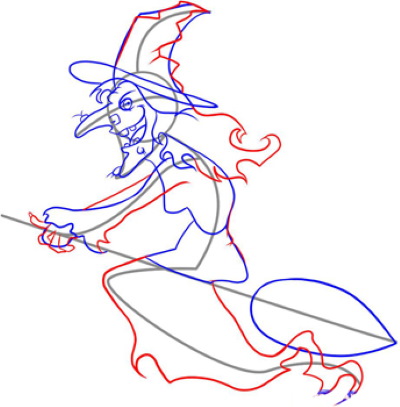
- Add details. Draw a line of ribbon on the hat and use short lines to show folds and bends. Use lines to show the palm of the right hand, extended forward to the viewer. Use a zigzag to draw the hair visible behind the face. Draw pupils in the eyes, warts on the nose and face. Draw the broom and its twigs.
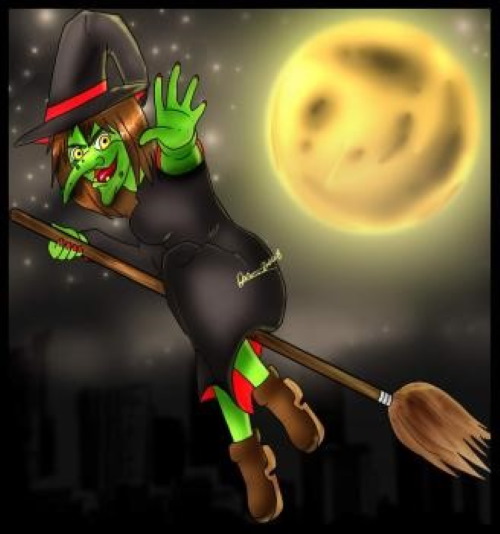
- Outline the general outline with a black pen or liner, erase auxiliary lines and pencil sketches. Color the drawing with colored pencils or paints.
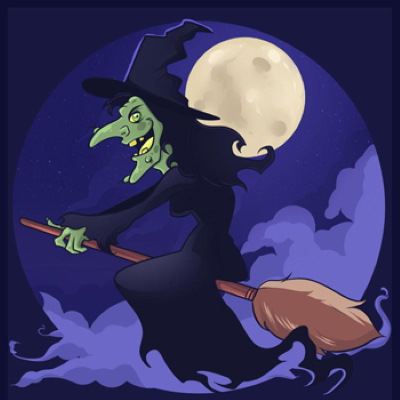
Step by step drawing of a scary witch
The witch on a broom (the photo shows how the drawing looks in color) can be depicted in a simple form, in profile. This method is easier, since you only need to draw the silhouette. Most of the small details will be on the face.
This method is suitable for children aged 7-8 years or those who have a basic level of drawing:
- They start with a schematic image of a broom tilted to the right. It is drawn with a straight line. On it they create a schematic image of a witch. The head is shown in a circle in the upper right part.
- A straight line from the center of the head shows a long nose. From the head, a curved line is drawn up and to the right, showing the direction of the hat. The chin is marked with a triangle bent forward under the head.
- The base of the body is drawn hunched and leads to the center of the broom line. The hand leads from the shoulders to the broom. The legs are shown bent forward and lead this line back to show the fluttering cloak.
- Add details to the head. Draw the end of the hat as a cap pointed to the right. Lead the long nose from the forehead, round it at the tip and take it back to the head. The mouth is open in a smile, the chin leads from the lower lip - its features are slightly rounded. Draw the mouth in a wide smile with a cut to the center of the face. Indicate the eye.
- They outline the line of the body. At the end of the broom on the right side, they show a bunch of twigs as a drop.
- Above the forehead, draw wide and curved hat brim. Under the hat, stick out several tufts of hair, which are shown with wavy lines. The eye is drawn as a circle with a pupil in the center. Warts are drawn as circles on the face. In the mouth, several teeth and tongue are drawn as small circles.
- A smooth line is drawn from the shoulder along the arm, showing the sleeve of the cloak. Its sleeve is drawn torn. The arm is visible underneath – it is schematically shown in a circle.
- The outline of the cap is crumpled, this is depicted with broken lines. Shading is added in places of folds. Curls on the witch's back are drawn with winding lines. Long fingers are drawn on the hand around the base of the broom. Under the broom, the bottom of the skirt is drawn with wavy lines and the end of the cloak fluttering in the wind.
- The general outline of the broom is outlined. The twigs are drawn sticking out from the general bundle.
- Outline the general outline of the drawing and erase all auxiliary lines.
- Clouds and the moon are drawn in the background in the form of a circle.
- The finished drawing is colored with convenient tools - paints, crayons or colored pencils. The witch's face and hands are colored green. The teeth, eyes and tongue are colored yellow.
The broom and twigs are painted brown. The witch's hat, cloak and hair are painted black and blue. The moon is painted yellow and white, the sky is painted purple and blue.
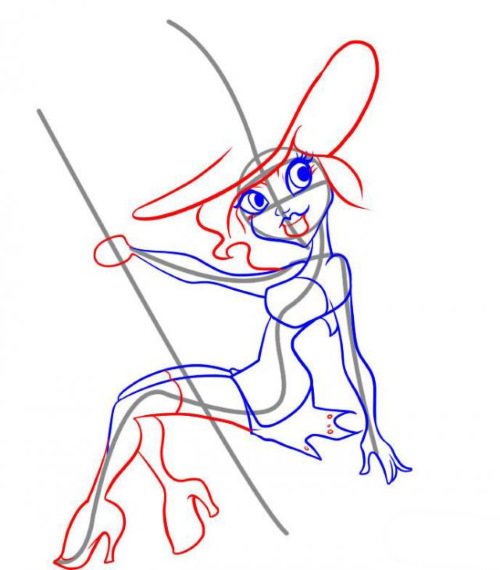
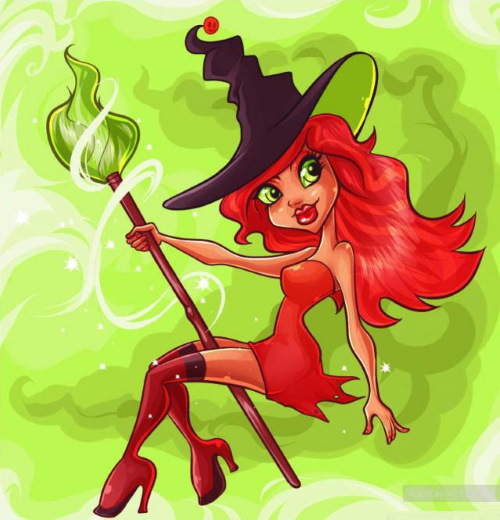
Witch in cartoon style
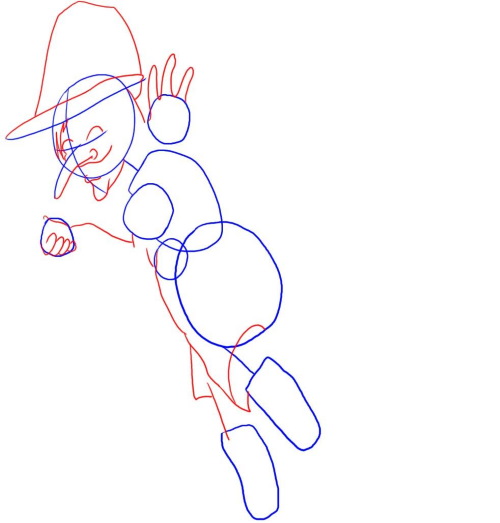
A cartoon-style version of a witch on a broomstick, suitable for children aged 10-12 or for those with an intermediate drawing level. In the process, it is necessary to depict uneven and asymmetrical lines and maintain the proportions of the body.
Step by step:
- Start with a schematic base for the drawing. Draw the head as a circle in the central upper part of the sheet. Make a cross-shaped sketch on the head for a symmetrical depiction of facial features. Draw a slightly curved line upward from the head. Show the neck, shoulders, torso, and the direction of the arms and legs with lines. Show the broom with a long straight line.
- In the center of the face, draw the upper eyelids with eyelashes. The distance between the eyes should be equal to the length of 1 eye. Outline the contour of the face, turning into a thin neck. Outline the contour of the shoulders and right arm. The arm narrows before and after the elbow. From the arms and shoulders, outline the chest, narrow in the waist area and widen toward the hips.
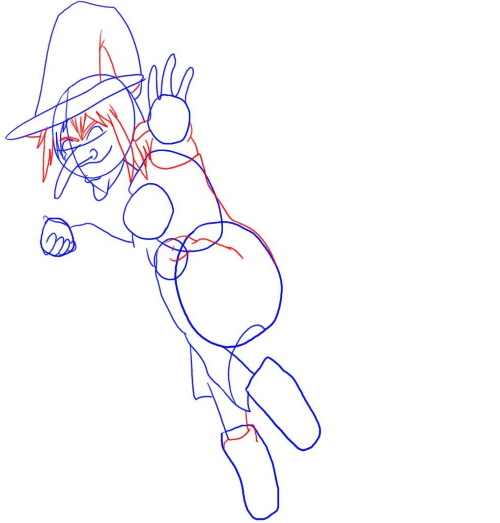
- Draw a curved lower line of the eyes. Draw 2 circles in the center, showing the pupils. They should look in the same direction. Draw the nose as a small semicircle. The upper lip is stretched into a smile.
- From the right shoulder, draw a straight arm lowered downwards with a relaxed palm.
- The hem of the dress flutters in the wind. In front, draw a line of two legs bent at the knees.
- Draw legs in high-heeled shoes. Legs are slightly narrowed at the knee bend and closer to the ankle. All lines are made smooth. The front leg is extended forward towards the viewer, the back leg is bent more strongly and is visible on the right side.
- On the head, draw the wide brim of the hat. Under them, show the hair on both sides of the head with wavy lines. Show the lower lip with a semicircle.
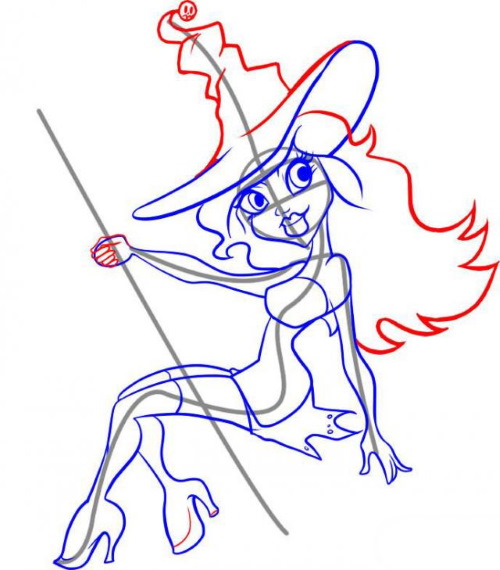
- The cap of the hat is drawn with wavy lines and rounded into a spiral at the end. The shock of hair is drawn behind the witch's back. The left hand is bent into a fist. It is depicted around the broom in a circle. Then each finger is drawn with a separate line and the general outline of the hand is aligned.
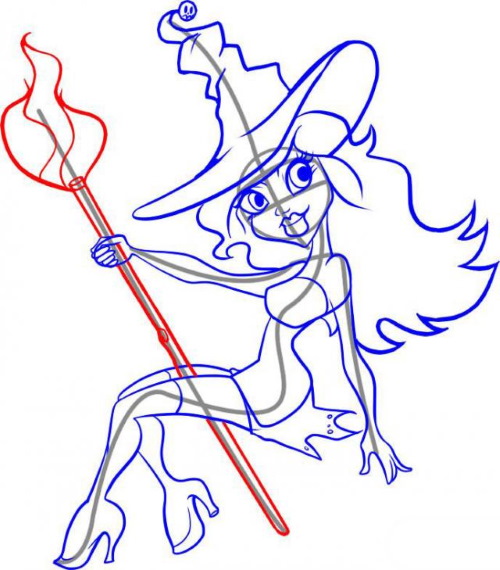
- The base of the broom is drawn with straight lines, adding volume to it. At the top, the rods are depicted with smooth curved lines, tapering upwards.
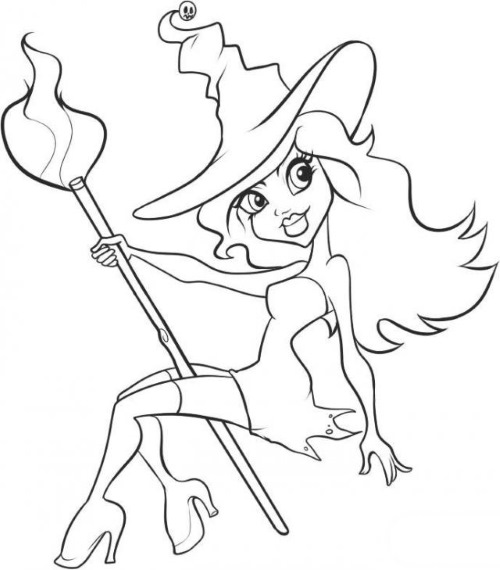
- Outline the general outline of the drawing and erase the pencil sketch. Color the drawing with a convenient tool - paints or pencils. Drawing a witch on a broom (the photos above show drawing options for different skill levels) can be done faster and easier if you follow a few simple recommendations.
- Think about the composition of the drawing and how many characters will be depicted in advance. They are shown schematically with lines or round figures so that all the characters fit on 1 sheet.
- The schematic image and its outline are made with a pencil so that unsuccessful lines can be easily changed with an eraser. Beginners are recommended to use a hard or hard-soft pencil, since it is less easily soiled and leaves a thin mark. A soft simple pencil is used to create shading.
- The finished outline is outlined with a black pen, liner, marker. Sometimes felt-tip pens or crayons are used. The extra details of the schematic drawing are erased only after the main outline has been outlined.
- The drawing is colored when the general outline of the image is ready. They try to use 1 tool, but sometimes they combine colored pencils and paints, it is especially successful to combine watercolor pencils with water colors.
Video about drawing
Witch on a broom. Photo: