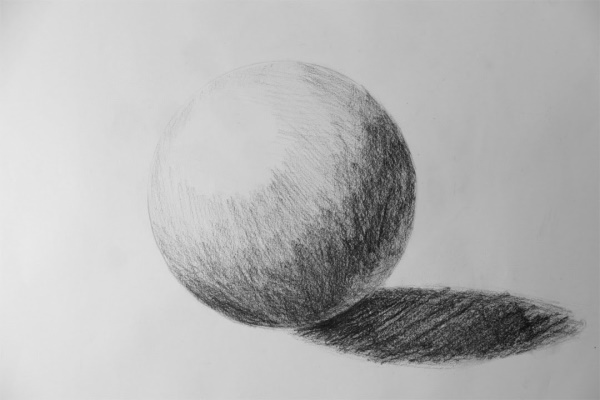
To draw professionally, you need to master the skills of pencil shading. This is an important skill that every beginning artist needs. At the initial stage, working on the image of a ball with a shadow can help with this.
Features of mastering skills
The most difficult shapes to draw are simple ones such as a circle, rectangle or ball.
They are the basis of such paintings as:
- birds;
- snowmen;
- moon;
- Sun.
Having learned to draw simple geometric patterns, a child or an adult can move on to more complex images. Then it will be easier to arrange the details on the sheet, plan them in spatial vision.
Regardless of whether an apple, a ball or a human head is depicted, the ball is drawn first. The required volume and shape can be achieved if you know how to do shading with a pencil. It is the basis for the volumetric perception of the image: dark and light areas make the figure visually heterogeneous.
Selection of tools
Drawing a ball with a pencil and shadow is a simple and complex process at the same time. Here, the skills of drawing with a simple pencil will come in handy. Unlike working with oil paints, this is not difficult and does not require large financial investments.
You can buy a pencil in any store, choosing the required lead hardness. Oil paints are too expensive in this regard and require knowledge of surface application to achieve the desired effect. With a pencil, complex 3-D images of a ball can be easily made.
For work you will need ordinary paper from a school album. It should not be treated with a special composition, because the pencil will slide without leaving marks. Sometimes advanced artists choose paper intended for drawing.
It is sold in packs and is conveniently divided if necessary. In some cases, artists use thick paper for watercolors. You need to buy more pencils and with different hardness: this will allow you to perform different types of shading.
For example:
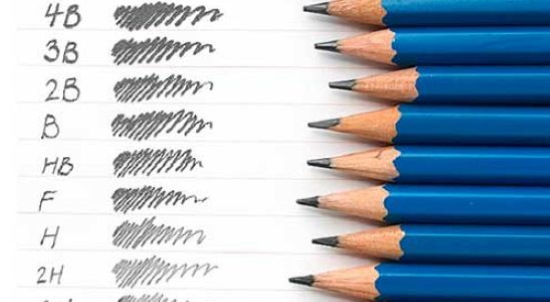
- In order for an artist to be able to highlight a certain segment in a drawing with light, almost weightless strokes, a hard pencil is needed;
- sketches are made with pencils of moderate hardness (marked HB);
- shadows and half-shadows are created using pencils marked 4B, 5B or 6B.
You can find this designation at the bottom of the pencil base. The tools are sold both in sets and individually. When you are just learning the technique, it is better to buy a small number of pencils of different hardness so that during the work you understand what is easier to work with and what you need to buy for further use.
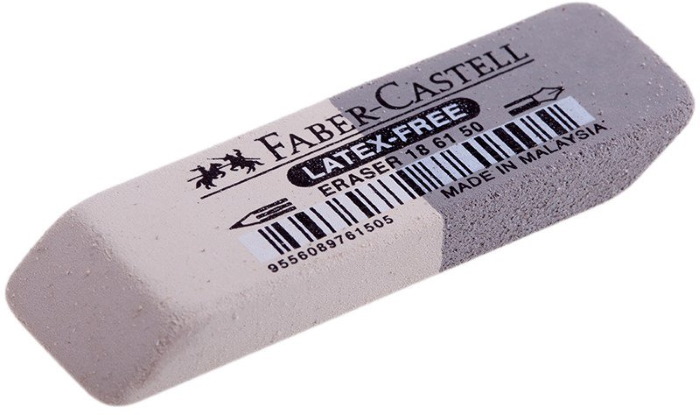
It is also essential to have an eraser in your work. This product is no less important than paper or pencils. It will be necessary to remove incorrectly made strokes so that no traces remain. The requirements for an eraser are as follows.
It should not be:
- too soft so that no particles of the substance remain in your hands;
- too hard.
This will not allow you to completely remove incorrectly applied hatching. After all, you will have to not only remove incorrect pencil lines, but also make defining highlights on the image, especially when you need to draw a ball that gives a shadow.
A stationery knife is needed to sharpen simple pencils, which quickly become dull from work. Sometimes it is necessary to vary the sharpness of the lead, which cannot be done with a regular sharpener.
Stages of constructing a sphere - option one
It is best to start drawing a ball with a pencil and a shadow by spatially defining its position on the selected sheet. It is better to do this with thin, neat lines that barely touch the sheet. This is how the basis of the composition is formed.
Despite the apparent simplicity of the figure, it is not easy to work with.
The stages of drawing a ball are as follows:
| No. | Stage | Description |
| 1 | Draw a circle | This needs to be done as smoothly as possible. To do this:
It is important to remember that it is better to do this without the help of other objects and tools. |
| 2 | To give volume and convexity to the ball | When depicting a ball that stands in front of the artist on a table or a separate pedestal, one must focus on an artificial light source. If this is done by imagining the desired image, then where the light is and how it will fall, everyone must determine for themselves.
With a light source in mind, real or imaginary, the following must be done:
The boundaries of the shadow can be considered as axes drawn directly from the point of light |
Features of image creation
Drawing a ball with a pencil and a shadow in the work requires certain knowledge.
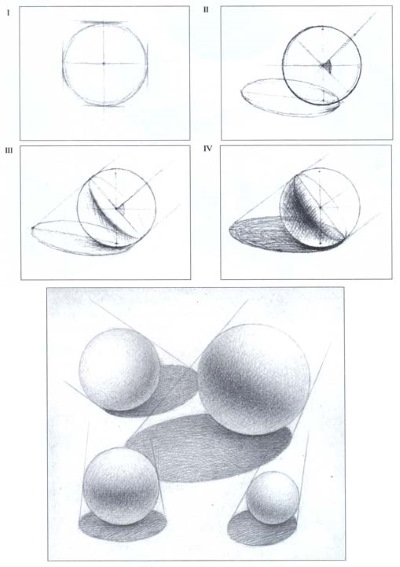
To depict it step by step, you need to follow these steps:
- Make the correct page layout. To make the drawing three-dimensional, you need to take a pencil of medium hardness (HB) and use it to draw an equilateral square.
- Divide the resulting square into sectors by drawing lines horizontally and vertically. Then divide it again diagonally into segments that should be the same size at the top, bottom, and sides.
- Connect the points of the segments with a smooth line - the result is an almost perfect circle.
- Create an ellipse diagonally. Its lower segment is made slightly larger than the upper one.
- Remove excess lines using a quality eraser, carefully moving it along the guide so as not to get an unsightly stain.
- Work on creating a falling shadow. To do this, find a point on the central line of the symmetry axis of the ball image, draw a line slightly deviating from the diagonal. To do this, you need to measure the height of the ball being created and put down exactly the same distance to show where the shadow will fall.
- Draw a drop shadow, which is drawn as an almost round image. However, it is better to make it a little elongated to get a realistic picture. In the presence of diffuse light, the exact contour that the shadow gives should not be.
- Create a picture of the surface of the table on which the ball lies.
- Start working on shading. This is a preliminary stage that allows you to see how to do it correctly on the created image.
- Shade the ball. This is done on its entire surface. Completely covering all the details with smooth rounded movements. When working, it is necessary to take into account that the strokes are placed in the horizontal and vertical plane.
- Make an accent under the base of the ball with tone (the strength of the applied movements, giving a particular shade). This will allow you to show how the ball lies on the surface of the table. When shading the ball and especially its shadow, the lower edge of the ellipse needs to be shaded a little more strongly with the so-called stretch.
In this case, the edge of the figure's own shadow is always made darker, and the reflex is slightly lighter. In this regard, the light part is shaded with neat circular movements that go semicircular.
- Perform the final elaboration of the shadow. To do this, the tone on the ball is intensified. With a pencil, movements in a semicircle are performed on the existing hatching. When performing diagonal hatching, the artist emphasizes the transition from the shadow itself, which is cast by the ball, to its halftone.
This allows the transition to be more expressive and at the same time soft. This effect is achieved by the new hatching.
- Having strengthened the surface of the sphere, do the same with the falling shadow. In this case, the stroke is made in the same direction that was chosen the first time.
- Shade individual details of the image by adding a bit of light background on the side where the light should fall. This will make the ball a few tones lighter than its falling shadow.
These are the main stages of creating a ball in volume.
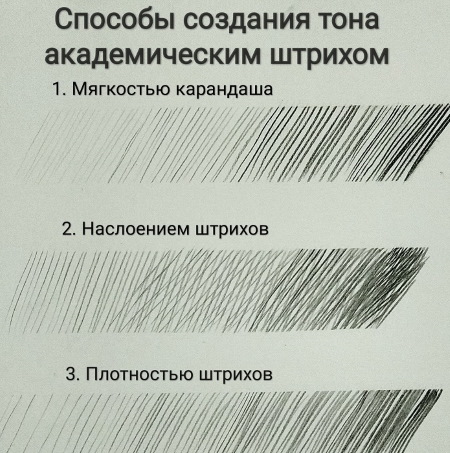
Rules for applying shading
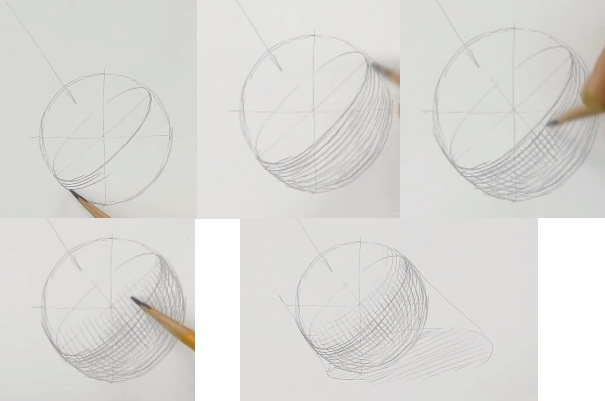
It is best to draw a ball with a pencil and a shadow using an example. Taking 2 balls, you can show 2 types of different shading. After you have mastered the technique of drawing a figure, you need to go further and learn how to correctly create the effect of volume: apply shading.
If this is difficult, it is better to practice a little more. When mastering shading, you will need to create 2 bases of the object. This will help in further training of shading skills. The first ball should be colored with semicircular movements.
Then you need to do the work in the following way:
- Add 1 semicircle stroke, but in a different direction. The strokes will cross, but not create the appearance of crosses and squares. Rather, they should look like small trapezoids.
- All movements should be performed smoothly so that there are no abrupt transitions of large gaps between strokes.
- Proceed to mastering oval hatching. For this, a diagonal hatch along the edge of the shadow cast by the object is used. It is applied in the place where the shadow will be most expressive and dense.
For the work, it will be necessary to make the shading even more varied, and the transitions as smooth and even as possible. This will increase the effect of expressiveness when moving from shadow to halftone and lighter segments.

- If you emphasize the shape of the ball with strokes, you need to make them more correct and rounded. However, you need to observe the measure here. For example, it is better to use straight lines diagonally. They will be even in the center and then begin to round off a little. This will emphasize the volume of the object.
Errors in applying shading
When hatching is applied correctly, the stroke is applied so that the angle is right. If you don't follow this, the shading will be incorrect. This simple lesson will help you master the technique of creating a ball using a pencil even for those who have never done this.
Basics of Drawing and Shading with Pencil. What is Light and Shadow and How to Create It
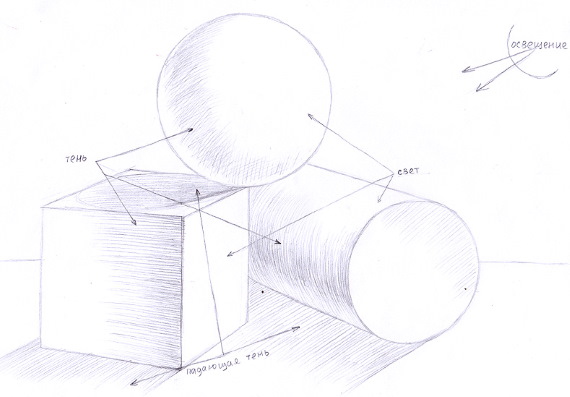
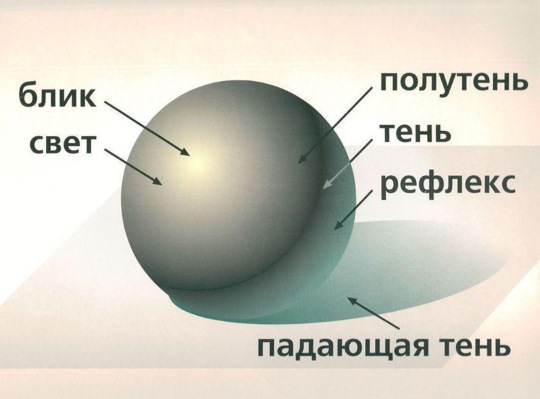
The distribution of falling rays of light and shadow on all objects surrounding in space is commonly called chiaroscuro. It allows one to understand and see in real life and in a painting the volume of objects surrounding a person and almost feel their shape without touching them with one's hands.
The more competently and realistically the play of light and the fall of light on the surrounding space are conveyed, the more voluminous and lively the painted ball looks, which are in the picture. Chiaroscuro is not uniform in its structure, it consists of halftones and shades of different density.
Based on location, the following aspects can be highlighted that need to be taken into account when creating such drawings:
- the darkest place in a painting, which is the object's own shadow;
- from the side where the light rays fall. The shade of the shadow should be a little lighter, because the light also falls on it;
- the transition point from the cast shadow to a more illuminated space. Experts call it a penumbra or artificial shadow. The light that falls here does not pass directly, but rather glides along the surface;
- a strip of reflected light thrown back from the shadow side. It is called a reflex - this is reflected light;
- a shadow that falls from a specific object onto other objects or surfaces. It is usually called a cast shadow.
In the school curriculum, to make it clear what light and shadow is, various geometric bodies are used. The most interesting of them is a sphere with rounded surfaces. However, a rectangle also gives an interesting effect of light and shadow.
Image of other items that can be created based on the ball
A pencil drawing of a ball with a shadow is only the first stage of creating a figure. On its basis, you can create many more complex and interesting details and pictures.
Christmas tree ball
With the help of hatching, you can create an image of a colorful object and it is not always necessary to color it in order to understand the beauty of the composition. For example, a Christmas tree toy on a loop, which is attached to a branch, will look like a bright decoration, even without using paint, but only with the use of hatching and light and shadow.
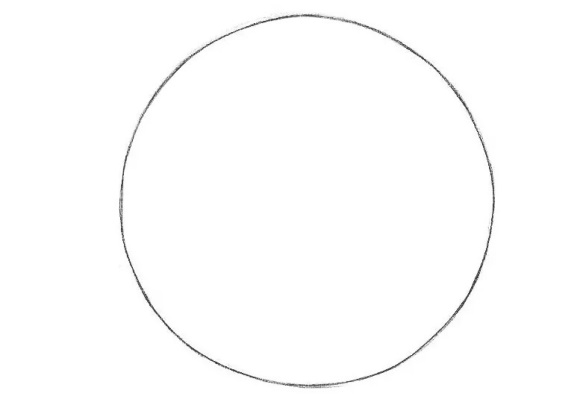
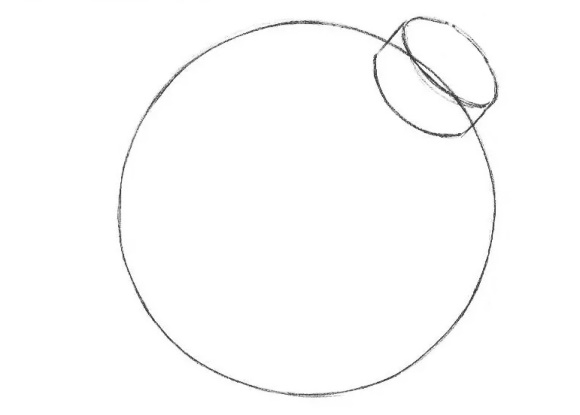
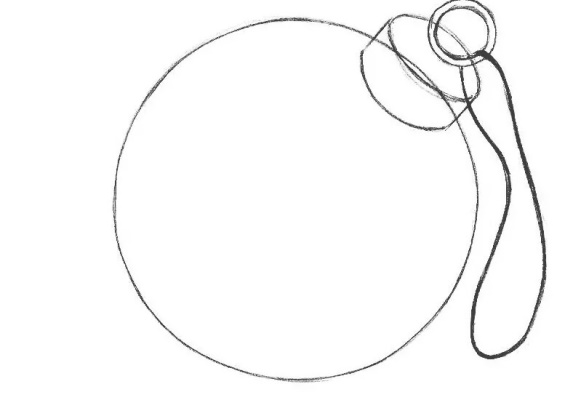
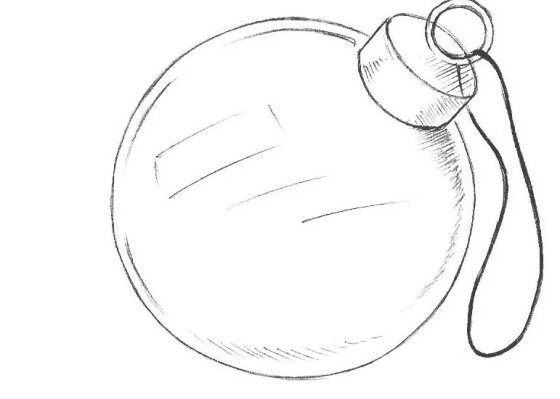
The latter will allow you to show the reflection of the lights falling on the ball and the shimmer of the garlands.The main thing is to understand where you need to make the shading a lighter shade. The darkened side can be made almost black, and smooth transitions and seemingly blurred strokes will show the shape of the product.
A hot air balloon prepared for travel
The ability to correctly draw a sphere and show its shadow makes the artist's paintings more complex and interesting. When looking at such an image, you get the feeling that it was somewhere nearby, in the neighboring apartment or yard.
All objects that surround a person in space consist of separate segments, which in turn are formed from the simplest geometric shapes.
It is not difficult to be convinced of this when you have to draw an ordinary hot air balloon, on which brave pilots traveled in the last century, daring to conquer the ocean of air without a motor and other modern devices.
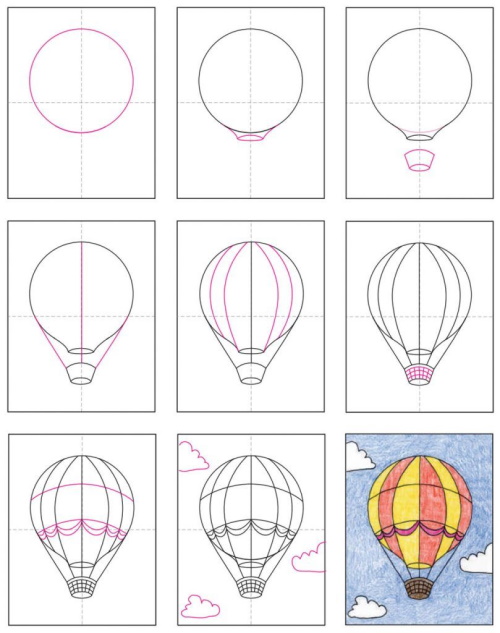
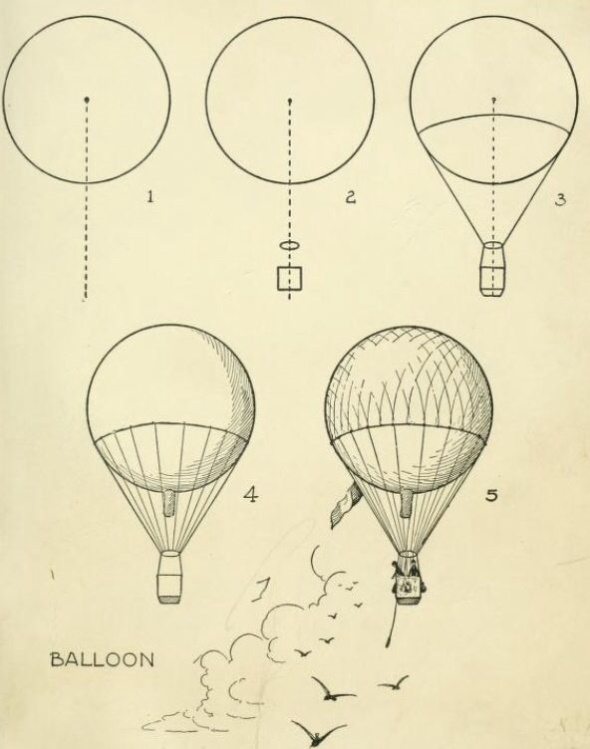

The creation of such a picture will take place in the following stages:
- Draw a sphere. To do this, first draw a square and a rhombus as a starting point.
- Remove extra lines and unnecessary strokes. Only a vertical guideline will remain, passing through the center of the future ball. It needs to be poured down a little.
- Draw a volumetric cube along the guide line, which will later become a basket.
- Pay attention to the outline of the balloon. It should be pear-shaped at the base.
- To get it right, draw the guides from the highest point to the basket.
- Draw a burner suspended on a central cable under the ball.
- Work out all the details with shading and the three-dimensional image of the ball will be ready.
Drawing a ball with a pencil is not difficult. It is much more difficult to show its volumetric form. Here you will need to master the skills of shading and the ability to create light and shadow. Having mastered these subtleties, you can proceed to more complex work.
Video about drawing
Pencil drawing of a ball with shadow:
Detailed description and diagrams of creating a ball. The article is instructive and in practice it is easy to work according to the diagram with step-by-step drawings. 👍👍👍
Thank you. The step-by-step diagrams helped me with my independent studies🙏🏻🙏🏻🙏🏻