Origami is a good way to develop children's creativity. These activities are especially useful for developing fine motor skills, perseverance, and attentiveness. Primary school teachers use this technique for creating beautiful paper crafts in labor lessons.
What is origami
Origami is a type of paper art whose origins are unknown. It is believed that the Chinese and Japanese were the first to master this activity. Figures made of folded paper decorated halls during national holidays, weddings and other special days.
Today, origami has become a popular hobby that both adults and children enjoy. The main difference between origami and other paper techniques is the minimal need for materials. Glue, scissors or other additional tools are rarely used here. The master can create a figure from an ordinary sheet of paper.
This type of paper art has 4 different techniques:
| Name of the technique | Distinctive features |
| Simple | The paper is folded in only 2 ways: mountain and valley. This technique is designed for beginners, as well as for people with disabilities and impaired fine motor skills. |
| Modular | Here the figure is assembled according to the mosaic principle. A certain number of parts are made, which are placed inside each other. The result is a three-dimensional craft. |
| Pattern | The assembly is carried out using photographs as an example, where each fold line is indicated. It is believed that working in this technique is more difficult than folding according to simple patterns. |
| Wet | The paper is moistened to give the works more rounded outlines, smooth curves. Only special material is used, denser than the standard one. |
In origami there are special symbols that allow you to write down the assembly diagram of some craft without using explanatory images.
Origami tools
In origami, additional materials are rarely used, but sometimes you may need:
- glue;
- pencils;
- ruler;
- scissors.
Any beginner can make beautiful paper crafts, the main thing is to choose the right material. Origami paper comes in different forms, and in craft stores you can find sheets already cut into squares. A square is the basic shape from which folding begins. In some cases, circles, octagons, or rectangular sheets become the basis.
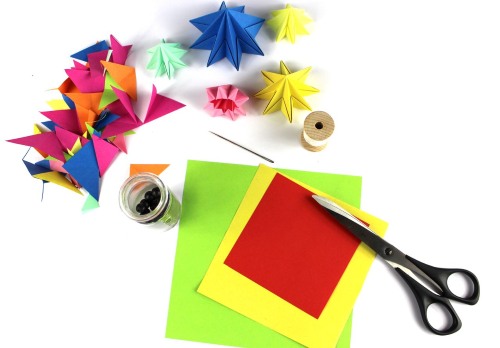
Beginners can use simple office paper, and those who master new techniques use thick sheets for wet folding or, on the contrary, very thin ones, to create small figures. There is special paper with a layer of foil. It holds its shape better and is suitable for making large works.
Origami patterns
Simple figures for children are made using simple patterns. Descriptions are always accompanied by explanatory images to make it easier for the child to understand and repeat the sequence of actions. Below are detailed descriptions of the simplest and most popular patterns for creating beautiful crafts.
Crane
The folding of the crane begins with a double square base.
Procedure:
- The sheet is folded diagonally so that it folds in half. The palm is drawn along the fold line. This line should remain clearly visible. The sheet is unfolded and folded in the same way, but another line is made, from corner to corner.
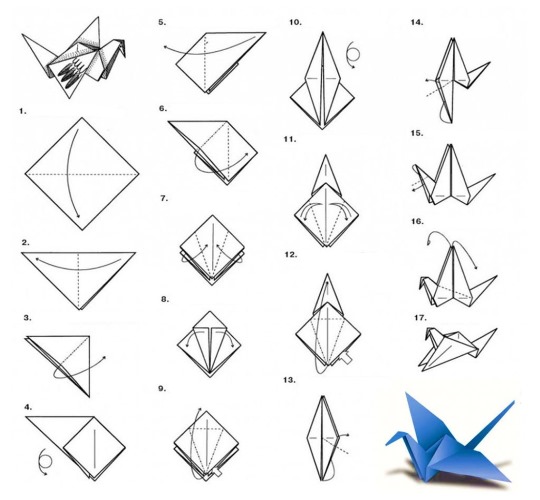
- The paper is completely unfolded and new lines are marked in a similar way, but this time the square is folded in half vertically. Unfold and a horizontal line is marked. Now the square is placed in front of you so that it resembles a rhombus.
- One of the corners should be directed at the master. All corners are bent so as to be attracted to the bottom one. The side corners are folded in half and placed inward, and the top corner is bent under the bottom one. This is how the shape is obtained - a double square.
- The workpiece is turned towards you with the side where the corners are separated. It is necessary to mark the fold lines. Take the first layer of the double square and fold the sides to the central line. Unbend the corners back.
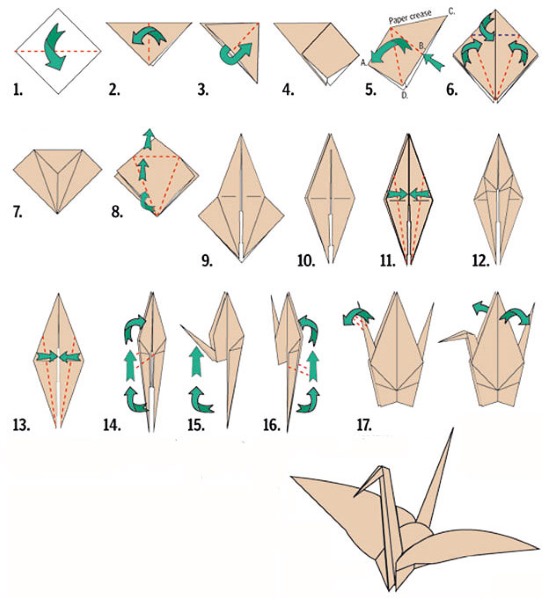
- Now you need to bend the top corner. The fold line is marked where the new vertical stripes from the previous fold end. Unbend the edge again. A triangle of lines should form in the center of the workpiece.
- The top layer is straightened and folded vertically, following the marked lines. There are no difficulties here, since if you pull the slightly opened corner and press the lower part with your other hand, the folding will happen by itself.
- The figure is turned over to the other side. It is necessary to repeat all actions from points 2 and 3. Again mark the lines and lift the corner.
- At one end of the resulting figure, two triangles will be separated from each other. This side of the workpiece should be turned towards the master. Now the triangles are lifted up one by one, along the fold line, which is in the middle of the workpiece.
- You need to turn them inside out and carefully tuck a small corner inside, between the layers of the base. As a result, you should get a figure similar to a triangle from the bottom corners, from which two thin and sharp corners come out.
- Now you need to mark the bird's head or beak. One of the thin protruding corners bends slightly inward.
- To make the wings, the top triangle needs to be folded at the sides.
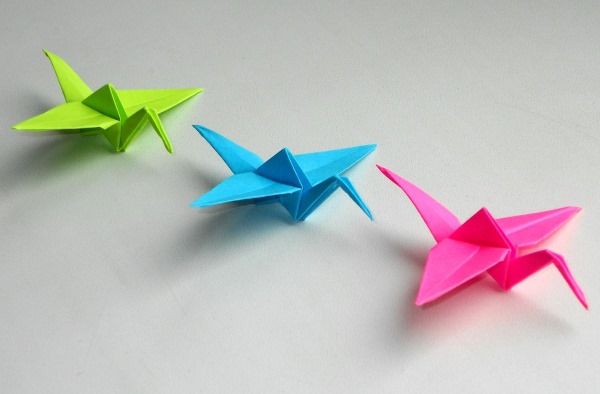
The crane figure is ready. In Japan, it has long been believed that a person who collects 1000 paper cranes receives a chance from higher powers to make his most cherished dream come true.
Snowflake
Origami snowflake is made in different techniques. Below is a description of a simple modular work using glue and additional decorations.
What you will need:
- paper of two colors;
- glue stick;
- ruler;
- simple pencil;
- scissors.
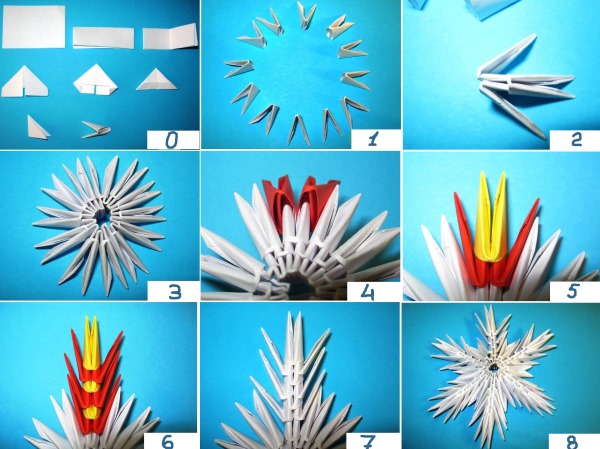
Procedure:
- The snowflake consists of 24 modules, which are divided into three groups by size. To make them, you need to prepare square sheets. Large modules are a square with a side of 10.5 cm. Medium modules are 7 cm, and small ones are 4 cm. Medium parts are made of paper of a different color.
- Each square needs to be folded into a basic shape. The lines on the square are marked using the same principle as when folding a double square. Finally. The sheet is folded in half, and then the side parts are folded inward to form a double triangle.
- Now the edges of the first base layer are folded to the center. The blank is done. It is necessary to prepare 8 modules of each group.
- Each of the parts will resemble an airplane, they need to be fastened together by smearing the lower "wings" with glue. First, a circle of large modules is assembled, then a circle of medium ones is glued separately, and then of small ones.
- The circles are glued to each other in layers, from largest to smallest.
When the work is finished, you can decorate it with rhinestones and beads.
Frog
Beautiful paper crafts can become full-fledged toys, for example, jumping frogs. When you lightly press on the back of the figure, it will bounce forward.
How to make such a frog:
- A base – a double triangle – is assembled from a square sheet.
- The figure is turned so that the upper corner of the triangle looks forward, and its base is directed towards the master. Now you need to bend the upper corners to the middle, focusing on the fold line.
- The bent corners need to be bent in half again, but in the opposite direction. You should get narrow triangles, these are the future paws.
- The base is turned over and the corners are folded upwards towards the fold line. You should get a smooth rhombus.
- The corners of the rum are folded in the same way. The figure needs to be made narrower.
- The free ends that are at the end of the frog's "head" need to be bent back; they will mark the eyes.
- The figure is turned over on its "back" and bent in the middle. The part that lies on top is bent in half, but in the other direction. The line is strongly pressed, the figure can be turned over.
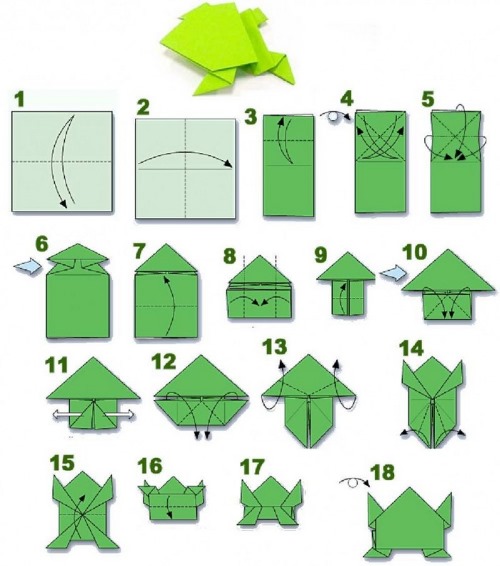
With the help of such jumping frogs you can organize competitions during breaks. Who will jump further, how many jumps each can make or come up with other interesting activities.
Pumpkin
Celebrating Halloween, you can decorate your room or party hall with funny paper pumpkins. In the origami technique, they look voluminous and unusual.
How to make a pumpkin:
- A double square shape is assembled from a square sheet of paper.
- It is necessary to mark the fold lines. The upper corners of the base are bent, hitting in the middle. Now you need to bend them under yourself, following the marked line.
- The following fold lines are marked, on top of the resulting triangle, the corners of the resulting figure are brought to the center, and then folded under it. As a result, a rhombus should be obtained in the middle of the main shape.
- All that remains is to bend all the corners of the figure. The top, bottom and side corners are bent downwards.
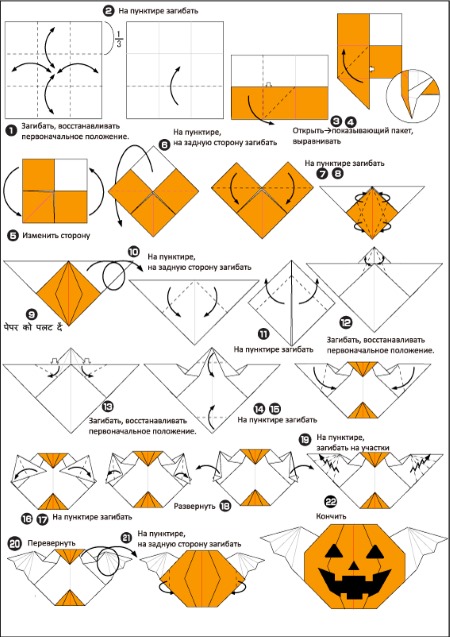
The result is an angular pumpkin figure, but with a voluminous middle. To make the origami craft fit into the interior of the festive room, you need to draw an ominous smiley on it with a black felt-tip pen.
Star
A five-pointed star in origami technique is considered one of the simplest crafts.
How to make it:
- Fold the square in half diagonally.
- The resulting triangle is turned with the upper corner down.
- The right corner is pulled to the bottom one, the fold line is ironed and straightened. The left corner is done in the same way.
- Once the lines are marked, take the left corner and attach it to the right. The triangle is folded in the middle.
- Now the top corner is bent so that the intended fold line coincides with the edge of the triangle. A sharp "tongue" should remain sticking out in the middle.
- The figure is turned over and folded in half from right to left.
- The base is turned over again to the other side, and the masonry that is on the left between the layers is turned over. Then its upper corner is carefully lifted, and the first two ends of the star are obtained.
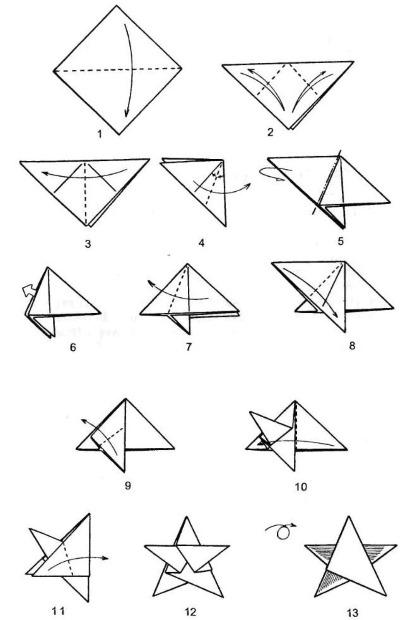
- Now the right corner of the figure is folded along the fold line and aligned with the second line with the edge of the triangle, as in point 5.
- The resulting triangle is folded in the middle so that the upper and lower corners are connected.
- The corner that was just moved is folded back again. But this time it should fold almost halfway, forming the third end of the star.
- The first corner is attached to the bottom left corner, folding the left triangle in half, and then folded back as before in step 10.
The star is ready. Now you can use it to decorate a postcard for Victory Day or February 23. And if you make a craft out of shiny paper, it will become a New Year's decoration.
Cat
Beautiful paper crafts are not always difficult to make.
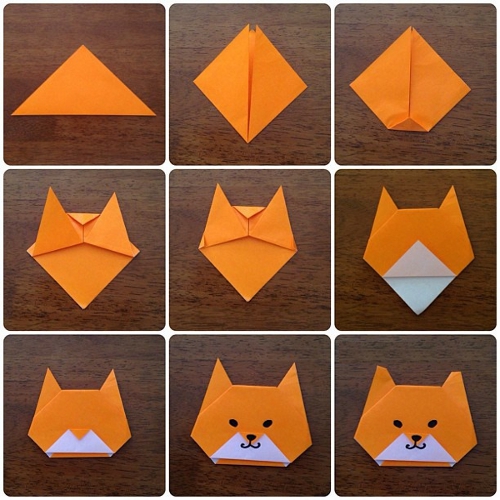
To make an origami cat head, you need to follow a few simple steps:
- The square sheet is positioned so that one of the corners is at the bottom.
- Fold it in half diagonally, from bottom to top.
- Now fold it in half again to mark the center line, and then unfold it.
- The lower corners are folded upward so that the ends stick out from behind the workpiece. There is no need to close the side parts of the corners in the center.
- The top corner is folded down so that a straight line is formed instead.
- The craft is turned over to the other side.
All that remains is to color the cat's face, drawing whiskers, eyes and nose.
Christmas tree
To make this version of an origami Christmas tree, you will need two-color paper in brown and green.
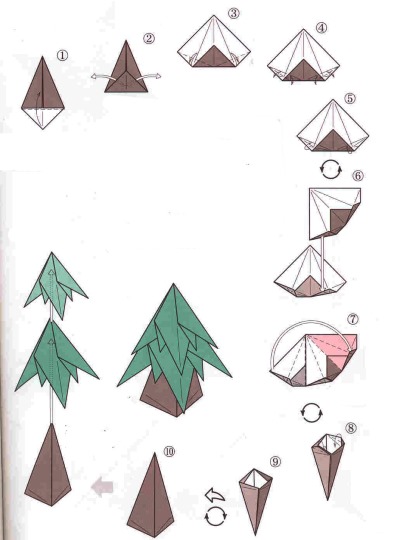
Step by step instructions:
- The square forms a shape - a double triangle.
- The left corner of the top layer is folded to the center line to mark another fold line.
- The corner is unfolded and straightened out like a pocket. The following figure should be obtained: a flat triangle, with another three-dimensional triangle in the middle.
- The workpiece is turned over to the other side and steps 2 and 3 are repeated.
- The remaining corners are folded and opened into a pocket. The result is a 4-gon, the top corner of which is higher than the others.
- The figure is turned over so that the lower corners are at the top, and the corner of the first layer is folded. It is necessary to mark the fold line from one corner to the other.
- Now the bent part is bent. The bent corner should rest against the marked line.
- Then everything is unbent towards the master. The resulting area is folded in half. Afterwards, the corners of this "accordion" are bent downwards.
- The workpiece is turned over and the same actions are repeated on the other side, and then each fold is opened and folds are performed.
- After creating the "accordion", the trunk of the spruce is formed. To do this, bend the extra corners on three sides. This action is carried out with all the folds.
The Christmas tree is ready. All that remains is to carefully straighten the layers. You get a multifaceted figure.
To prevent the tree trunk from spreading in different directions, it is recommended to fix it with a drop of glue.
Fish
A very easy craft to make. It will take 2 minutes to create a paper fish.
Procedure:
- Assemble a double triangle from a square. Turn the figure to the left at the corner.
- Bend the bottom edge upwards so that the tip remains sticking out and is not hidden behind the edge of the workpiece. Do the same with the top corner, bending it downwards.
- Turn the figure over and color it with colored pencils.
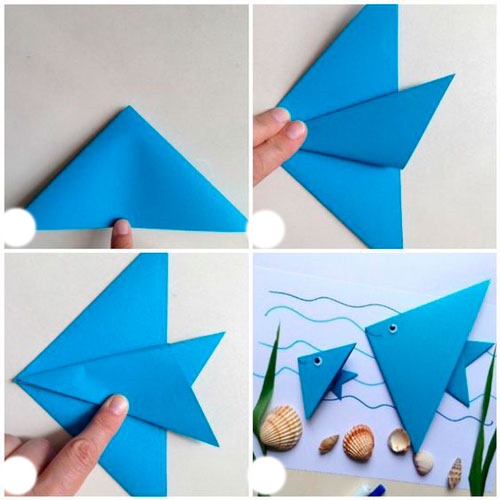
If you make 5-6 similar fish, you can tie them to a fishing line at different heights. Attach the fishing line to the lid. Pour stones into a three-liter jar, put a couple of artificial algae and screw the lid on. You will get a dry aquarium with origami fish.
Penguin
Making an origami penguin will not take more time than the previous figure.
How to make it:
- The square is turned with the corner down and folded in half, from left to right. This is necessary for marking the line.
- The sheet is unfolded and the tip of the bottom corner is folded upward.
- The figure is folded from left to right, along the marked line.
- About 5 mm are retreated from the right angle. The lower right corner is pulled to this point and the fold line is marked.
- The right bottom edge is folded inwards so that a small fold is formed, and the rest of the edge remains visible. This will be the penguin's tail.
- It remains to form the head and beak. The upper corner is slightly opened and bent downwards. 2-3 mm are retreated from it, the tip is bent downwards.
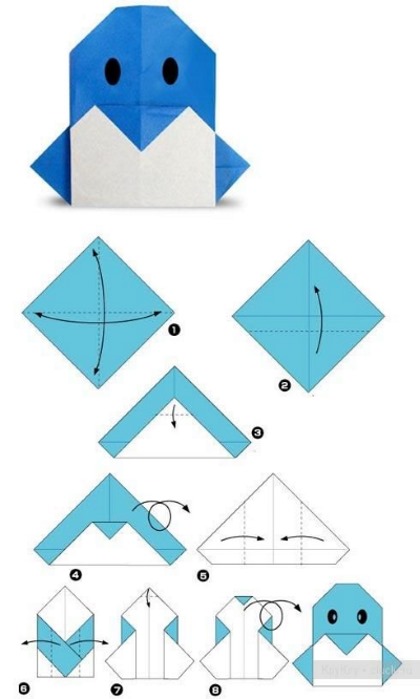
The figure is ready, and to make it more realistic, it is recommended to use one-sided black paper.
Tulip
Beautiful paper crafts are often used to decorate postcards. The simplest version of a tulip in origami technique is invented to create pictures or design greeting cards.
How to make a tulip:
- The square is folded diagonally.
- The edges of the resulting triangle are folded so that their top extends beyond the edges of the workpiece. One corner is folded to the left, the other to the right. The flat model of the flower head is ready, it remains to make the leaves and stem.
- The new square is folded diagonally, straightened and placed with the corner facing down.
- The right and left edges are folded in to meet at the center line.
- The bottom corner is folded upwards, but not straight, but at an angle to the left. It should extend beyond the edges. To imitate a leaf.
The stem and flower are ready, all that remains is to connect them together on a plane.
Tips for Beginners
To easily fold any shape, you need to know a few origami secrets:
- This art loves neatness. Square blanks must be cut evenly, and all folds must form perfect straight lines. When folding, the corners must converge millimeter to millimeter. Even the smallest error can negatively affect the appearance of the finished craft.
- The marking of fold lines is for convenience. To make the paper fold easily during further steps. You need to press the lines well. For this, use a fingernail, and when working with dense material, use a coin.
- The figures should only be placed on a hard and level surface. If you try to fold it overhead, the lines will be crooked.
- If you can't open a small part with your finger, you can use a match or a needle.
Origami is a simple but interesting art. With the help of easy patterns, even the smallest fans of creativity can make beautiful paper crafts. And an adult, having remembered the order of actions for creating any of the listed figures, will be able to entertain a child with the help of an ordinary notebook on the road or in a queue.
Article formatting:Natalie Podolskaya
Video about paper crafts in origami style
Beautiful paper crafts - simple origami ideas: