Drawing a rhinoceros will help a child study the physical characteristics of this animal, and will also contribute to the development of creative thinking. Before classes, adults need to study the list of necessary tools, read several step-by-step instructions on drawing a rhinoceros in different artistic styles, and also choose a picture to copy.
What you need to draw a rhinoceros
List of tools needed for drawing:
- simple hard pencil;
- double-sided eraser;
- sharpener;
- art brushes of different sizes with soft and hard bristles;
- black felt-tip pen or gel pen.
For drawing with pencils, album sheets are suitable, but for paints you need thicker paper that will not deform when exposed to moisture.
You can paint the drawn rhinoceros not only in gray or brown. To draw the animal in different artistic techniques, as well as to decorate the background, you may need pencils, markers and paints of other shades.
Step by step instructions for drawing with a simple pencil
A rhinoceros (a drawing for children over 12 years old should be well detailed), drawn in a picture, can look realistic. To do this, you need to correctly draw the shape of its body, work out small details, and use shading to show the texture of thick skin and a strong horn.
Each stage of the work requires a pencil with a specific marking. The table lists the necessary tools and their purpose.
| Pencil hardness | Marking | Purpose |
| Solid | T or T2 | For sketching and light shading |
| Medium or hard-soft | TM | For drawing small elements |
| Soft | M or M2 | For applying shadows and outlines |
The higher the number after the letter designation of hardness, the coarser or softer the graphite in the pencil.
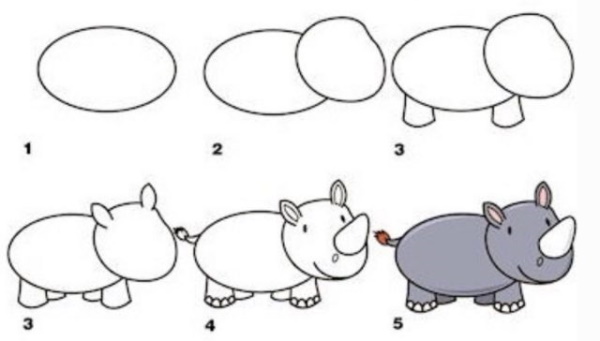
Sketch
A schematic sketch will help you to correctly position all the other elements of the picture at the next stages of work, as well as maintain the proportions of the animal's body.
Algorithm of actions:
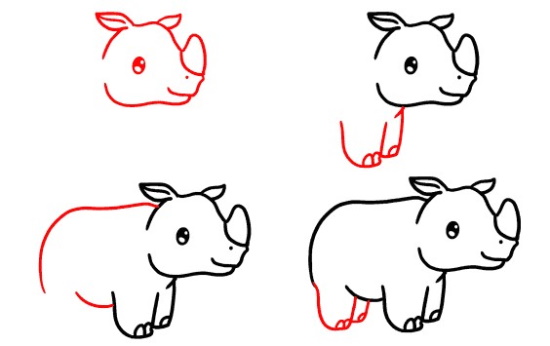
- Draw a medium-sized oval in the center of the sheet.
- Draw a circle on the right so that it covers half of the oval and protrudes slightly beyond its limits at the top. This will be the back of the rhinoceros.
- Draw an oval head on the left side.
- Connect it to the body with a smooth line at the top.
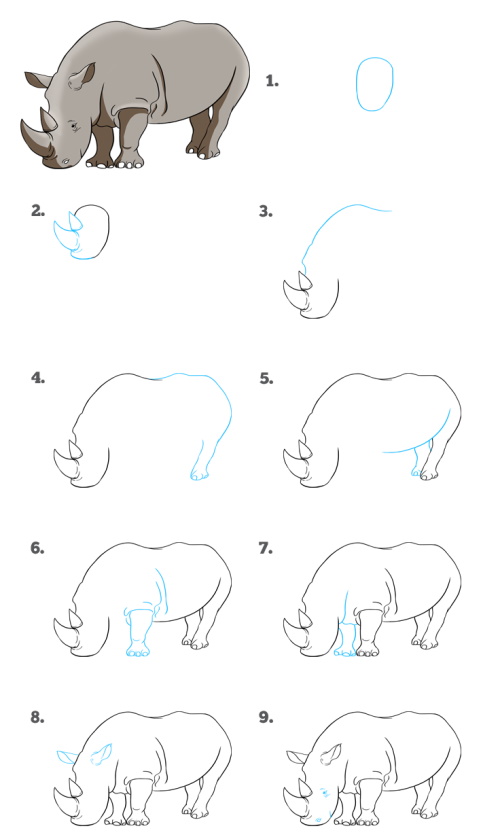
- Erase the large circle and the borders of the oval inside it. Remove the lines where the head and body intersect.
- Draw the rhinoceros's front and back legs. The back legs of this animal are larger and thicker than the front ones.
- Mark the folds of skin in the knee area.
- Give the head the correct shape. Draw a high forehead, a large nose and a massive chin.
- Draw 2 more legs, which will not be fully visible, since the animal in the drawing is standing sideways.
- Mark the location of the large and small horns on the nose with short lines.
Use the eraser to remove all unnecessary lines.
Detailing
Now you need to draw small elements that will make the animal in the picture recognizable.
Procedure:
- Draw the large and small horns.
- Add ears.
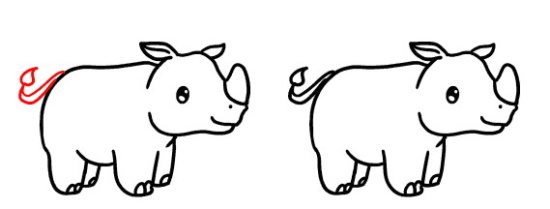
- Draw a thin tail with a tassel.
- Draw semicircular nails on the feet.
- Draw a small eye and draw a line on top that will imitate an overhanging eyelid. It should cover the eye by 1/3.
- Use smooth lines to show the wrinkles and folds of skin on the rhinoceros's face. They should be located on the forehead, under the eye and near the mouth.
- Draw the mouth and nostrils.
Mark the folds of skin at the base of the rhino's legs and knees.
Hatching
Correct shading will help to display the texture of the animal's skin in the drawing.

Algorithm of actions:
- Using a hard pencil, apply diagonal strokes to the lower part of the body.
- Color the legs with horizontal lines.
- Paint the tail completely.
- Shade the ears.
- Darken the lower part of the muzzle.
- Using a soft pencil, without pressing, shade the horn. The lines should follow its shape.

- Paint the lesser horn and toenails.
- Select all the folds of skin.
- Apply strong pressure to place several dots at the base of the large horn.
- Trace the outline of the rhinoceros using moderate pressure on the pencil.
Use an eraser to clean the background and remove any crushed graphite outside the drawing.
Pattern variations
You can draw a rhinoceros using various techniques. The drawing style should be appropriate for the child's age.
Preschoolers find it easier to draw pictures without small elements. To maintain the child's interest in drawing, the animal can be depicted in a cartoon style. For school-age children, it is important to learn to draw more detailed and realistic pictures.
Further in the article you can read several step-by-step instructions on how to draw a rhinoceros using various tools and materials.
Realistic watercolor drawing
This drawing technique is suitable for children over 8 years old.
To work you will need a hard pencil, an eraser, and 4 colors of watercolor:
- black;
- white;
- blue;
- yellow.
You will also need 2 brushes with soft bristles: medium and thin.
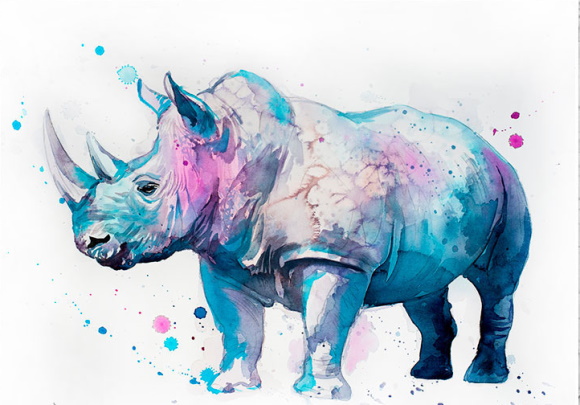
Algorithm of actions:
- Draw the body in the center of the sheet.
- Draw the head in the form of an oval, connect it to the body with 2 smooth lines.
- Draw 4 legs for the rhinoceros.
- Show the folds of skin on the knees.
- Give the head the correct shape.
- Draw the large and small horns, as well as the ears.
- Add a tail with a tassel.
- Draw nails on the feet.
- Draw an eye with a drooping eyelid. It should have a pupil and an iris.
- Use smooth lines to outline the folds of skin on the muzzle.
- Finish drawing the mouth and nostrils.
- Use an eraser to erase all unnecessary lines.
- Mix blue watercolor with a drop of black. Mix the resulting shade with white watercolor in a ratio of 1:5. Completely paint the rhinoceros using a medium-sized brush, without touching the eyes, horns and tail.
- Dry the drawing.
- Mix black paint with white in a ratio of 1:4. Paint the side of the rhinoceros, not reaching the back. Darken the lower part of the muzzle, as well as the near legs up to the knees.
- Dry the drawing.
- Mix blue paint with a drop of black. Mix the resulting shade with white watercolor in a ratio of 1:3.
- Color the lower part of the body, as well as the far legs, the base of the neck and the tail.
- Mix blue with white in equal parts. Use a thin brush to paint the ears and toenails.
- Mix yellow watercolor with white in a ratio of 1:3. Paint the horns and eyeball.
- Add 2 parts yellow to the resulting shade and darken the outer side of the large horn and the top of the small horn.
- Use a thin brush to paint the iris of the eye.
When the picture is dry, you need to take black paint, a thin brush and outline the rhinoceros along the contour, and also highlight all the folds of the skin.
Rhinoceros basking in the sun, gouache painting
This is a cartoon style picture that can be drawn by children over 6 years old.
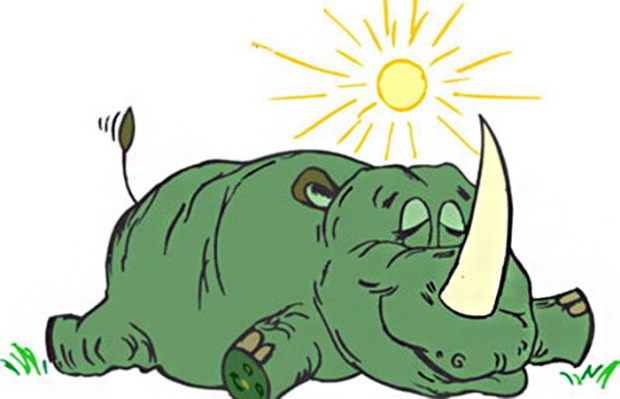
To work you will need a hard pencil, medium and thin brushes with soft bristles, and gouache in 6 colors:
- green;
- white;
- yellow;
- orange;
- brown;
- black.
How to draw:
- In the drawing, the rhinoceros will lie on its belly, spreading its legs in different directions. Using a simple pencil, you need to draw the shape of the body and draw the head.
- The picture will show only 3 legs, 2 front and 1 back. The leg that is closest should be drawn with a round sole. Draw the nails.
- Draw the rhinoceros's closed eyes, 1 large horn, ears and tail with a tassel.
- On the eyes, mark the eyelids.
- Draw large folds of skin on the body and muzzle in the form of smooth lines.
- Draw a sun with rays above the rhinoceros.
- Mix green gouache with a drop of brown. Mix the resulting shade with white paint in a 2:1 ratio. Paint the entire body of the animal, without touching the ears, eyelids and the tip of the tail.
- Wait until the paint dries.
- Using a thin brush, pick up some brown color and paint the tops of the ears and the tassel on the tail.
- Mix brown gouache with white in equal parts. Paint the toenails.
- Mix green paint with white in equal parts, paint the eyelids and the inner parts of the ears.
- Next to the rhinoceros, draw a few green blades of grass using a thin brush.
- Paint the sun yellow.
- Outline the rays with orange paint.
When the drawing is dry, you need to take a thin brush, black gouache and outline the picture along the contour, and also highlight all the folds on the rhinoceros's skin.
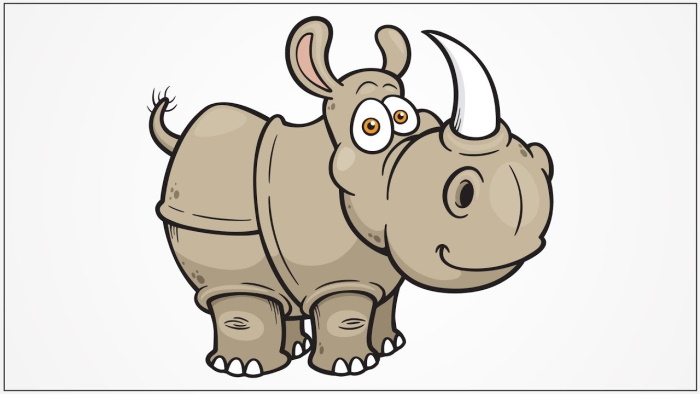
Angry Rhinoceros Drawn with Colored Pencils
This is a simple drawing, without small details. Children from 4 years old can repeat it.
For work you will need pencils of 5 colors:
- brown;
- yellow;
- grey;
- pink;
- red.
You will also need a black gel pen.
How to draw:
- Using a brown pencil, draw the shape of the rhinoceros' body with a hump on its back.
- The head should be depicted as disproportionately small and the nose as large.
- Draw a tall horn with a sharp tip.
- Finish drawing the horn and thick legs.
- Add a tail. The tassel can be replaced with a small circle.
- Using a sharp pencil, draw the ears, slightly pressed to the head.
- Finish drawing large nostrils.
- Add the mouth. It should be slightly open. Outline the upper jaw with a zigzag line.

- Draw a large eye, and above it, mark the overhanging eyelid. Its inner edge should be located lower than the outer one to make the animal's gaze menacing.
- Use a red pencil to color the inside of the mouth and draw a pupil in the eye.
- Paint the ball on the tail, toenails and the inside of the ears in grey.
- Shade the body, head, horn and legs of the rhinoceros with lines in a chaotic order using 3 pencils: brown, gray and yellow. There should be slightly more brown strokes.
- Use a pink pencil to draw veins inside the eye.
Trace the outline of the rhinoceros using a black gel pen.
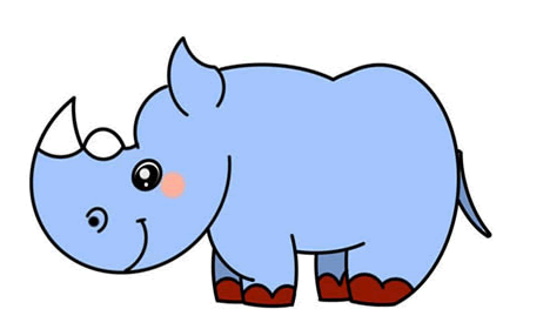
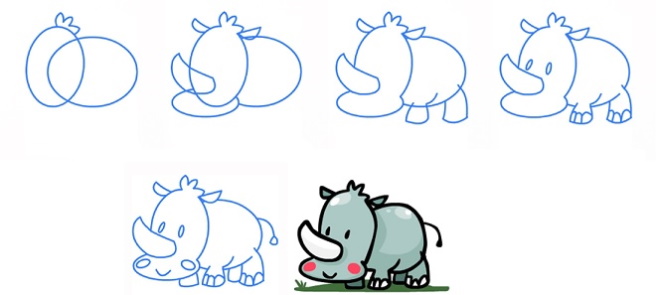
How to draw a little rhinoceros with markers
The rhinoceros (the drawing for younger children should be larger) drawn according to this instruction will turn out cute. This drawing is very easy to do, children from 4 years old can repeat it.
You will need 4 felt-tip pens for this work:
- grey;
- pink;
- orange;
- black.
How to draw:
- Use a black marker to draw a small oval, 4-5 cm long. This will be the body.
- Draw a round head, 2-3 cm in diameter.
- Draw short and thick legs.
- Add a small tail with a tassel.
- Finish drawing the ears and thick horn.
- Color the head, body, legs and tops of the ears with a gray felt-tip pen.
- Use a pink marker to shade the inner parts of the ears.
- Paint the tassel on the tail orange.
- Use a black felt-tip pen to draw small eyes, a smiling mouth, nostrils and toenails.
Trace the outline of the rhinoceros.
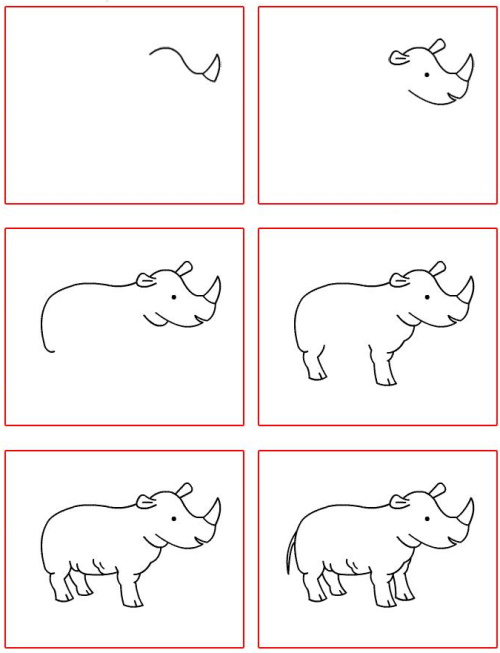
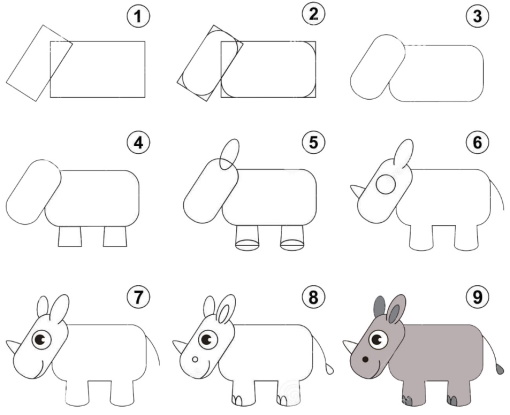
Rhino in cute style
Animals drawn in this style look very cute. They have disproportionately large heads, very small or, on the contrary, huge eyes and tiny paws.
How to draw a cute rhinoceros with a simple pencil:
- Draw an oval placed horizontally. This will be the body.
- Add a slightly larger oval on the left. It will be positioned vertically. The borders of the 2 figures should intersect. This will be the head.
- Draw chubby cheeks on the lower part of the head.
- On the top of the head, draw a fringe of 3 strands sticking up.
- Draw 4 short legs on the rhinoceros.
- Add a small tail.
- Draw a large horn with a rounded tip.
- Draw the eyes as 2 dots.
- Draw a smiling mouth, in the corners of which add 2 circles to imitate a blush.
- Use an eraser to erase extra lines.
You can use any materials to color the picture. The rhinoceros should be gray, and the blush on its cheeks should be pink. The finished picture can be outlined in black.
Contour drawing by cells
The rhinoceros (a drawing for children aged 4-7 years can be done by connecting dots on paper, which are previously placed and numbered by adults) can be drawn schematically in the picture.
In schools, teachers often practice "dictation by cells." Children are given notebook sheets in a cell, where the starting point is already placed. The task of the little ones is to listen to the teacher and draw lines, counting a certain number of cells in different directions.
The result is a schematic image of some animal or object. To draw a rhinoceros with your child in this way, you need to place a notebook sheet horizontally on the table and put a dot in the upper left corner at the intersection of the cells.
Next you should dictate to the child:
- From the starting point 2 cells down.
- 1 cell down to the corner to the right.
- 1 cell to the right, 1 up to the corner to the right.
- 1 right, 1 up, 1 right.
- 1 cell down, 2 cells down to the corner to the right.
- 7 to the right, 3 cells down to the corner to the right.
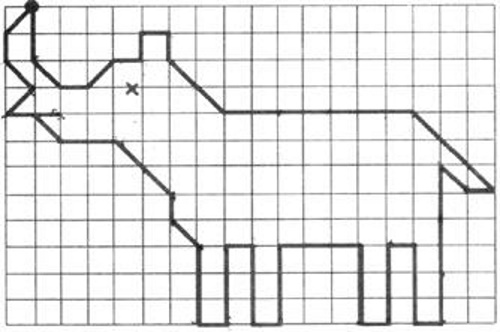
- 1 cell to the left, 1 up to the corner to the left.
- 1 cell up, 7 down, 1 left.
- 3 cells up, 1 left, 3 down.
- 1 cell left, 3 up, 3 left.
- 3 down, 1 left, 3 up.
- 1 cell left, 3 down, 1 left.
- 3 cells up, 1 cell up to the corner to the left.
- 1 cell up, 1 up to the corner to the left.
- 1 cell up one corner to the left, 2 to the left, 1 up one corner to the left.
- 2 cells to the left, 1 up to the corner to the left.
- 1 cell to the right, 2 to the left, 1 cell up to the corner to the right.
- 1 cell up, 1 up to the corner to the right, connect at the starting point.
- Where the animal's eye should be, put a dot.
Dictation by cells helps children develop attentiveness and perseverance, as well as fine motor skills and concentration.
Black and white scratchboard with a rhinoceros
The rhinoceros (a drawing for older children can be done without a pencil sketch) in the picture may look like a schematic sketch scratched on a layer of black paint. This drawing technique is called "grattage". The complexity of the picture depends on the degree of its detail.
To work you will need:
- black gouache;
- black artistic ink;
- wide brush with medium-hard bristles;
- simple pencil;
- a toothpick or a special scraper for grattage;
- white wax crayon.

How to draw:
- Cover the entire sheet of paper with a white wax pencil.
- Mix gouache and ink in equal proportions. Completely paint the sheet with this paint.
- Dry the drawing.
- Using a simple pencil, without pressing, draw the silhouette of a rhinoceros.
- Finish drawing the eyes, mouth, toenails and mark the folds of skin on the body with smooth lines. If desired, you can detail the drawing more.
- Use a toothpick or a special scraper to scratch out the design along the lines drawn with a pencil.
Instead of a white wax pencil, you can use several colored ones to create a bright outline.
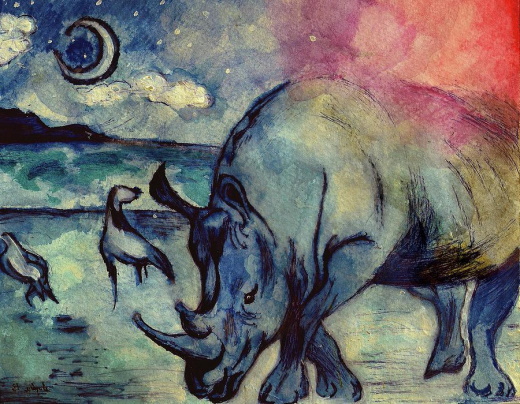
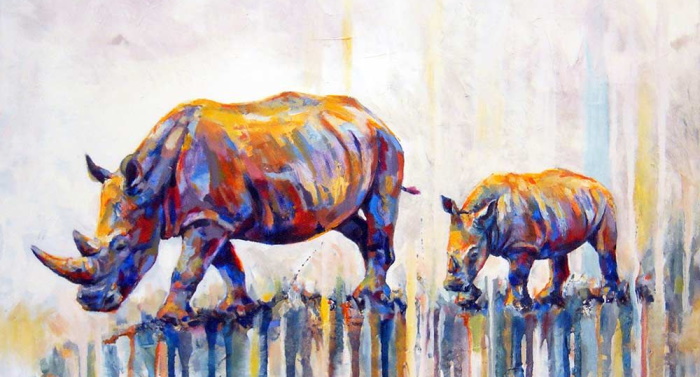
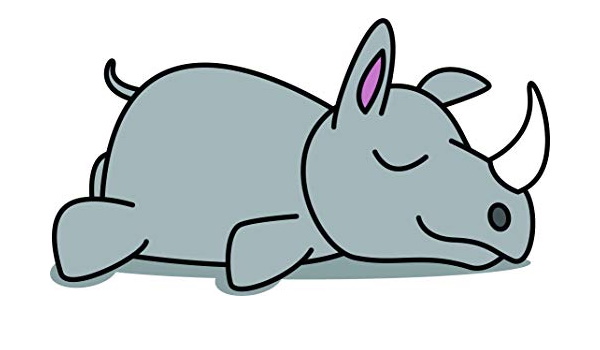
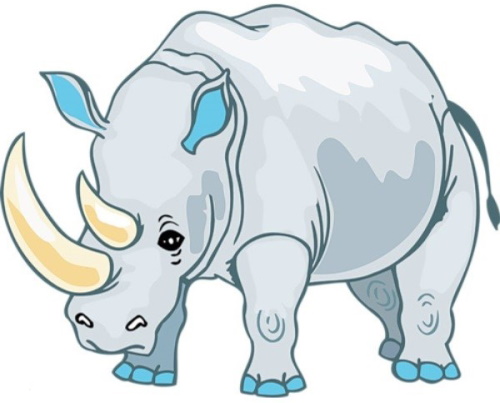
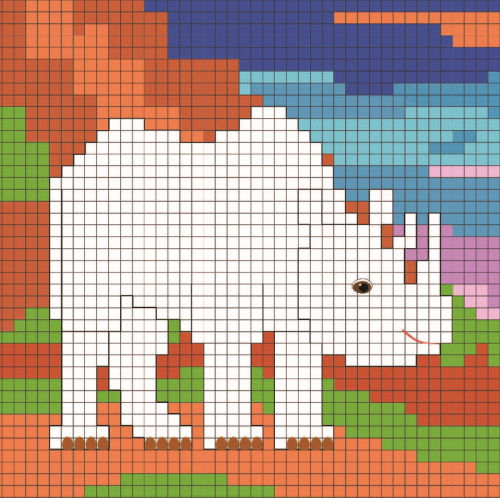
Examples of images for copying, tips for beginners
Tips for aspiring artists and their parents:
- When creating a sketch for a watercolor drawing with a pencil, extra lines should be erased very carefully. Do not allow the top layer of paper to roll, otherwise when applying paint, eraser stains will be visible and the drawing will look dirty.
- To get a light gray color when painting with watercolors, it is not necessary to dilute black paint with white. It is enough to add a few drops of water to the black color. Watercolor is a translucent paint that lies on the paper in a thin layer, so when diluted with water, you will get a light gray shade.
- For children under 7 years old, when making a drawing using the scratchboard technique, you can give them a plastic stack from plasticine to scratch out the outline so that the child does not use sharp objects in the work.
- Finished works made using the grattage technique should be stored in a frame under glass or in a file, otherwise the black paint may crack.
Drawing a rhinoceros will help a child learn more about this type of animal. Parents, in the process of classes with children, should tell them about why a rhinoceros needs such a horn, where these animals live and what they eat. Pictures for copying can be selected from those presented in the article.
Author: Frolova Ekaterina
Video about drawing
Rhinoceros drawing for kids: