Like many other applied types of handicrafts, crocheting allows you to make interesting, unique and practical items. Learning to crochet is not easy, but with perseverance, patience and spatial imagination, you can develop the necessary basic skills.
Even those who do not know how to read diagrams and do not understand how loops are formed (people with a zero level of skill) will be able to navigate using graphic drawings, photographs and text descriptions of techniques.
Choosing a hook
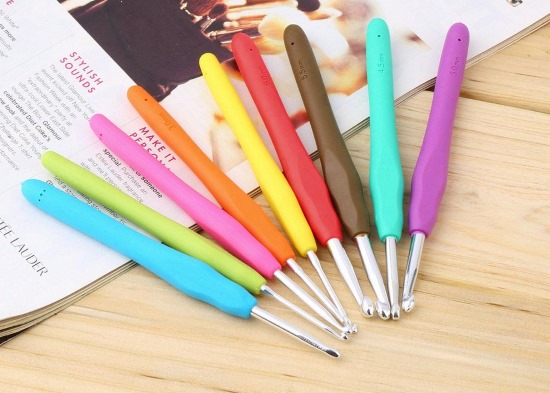
Since the hook is the main tool, it should be comfortable. This is the main criterion when choosing it. Manufacturers produce hooks from a variety of materials, but metal tools have remained the most popular for many years.
Modern hooks are made of stainless steel, it is a light, strong and durable material. It does not wear out and does not stain the yarn (like aluminum), does not bend or break (like plastic and wood). However, this does not mean that all other types of tools are useless.
For example, large wooden hooks are convenient for knitting jersey or mohair yarn, they are light and do not allow the thread to slide. Inexpensive plastic ones are often bought for knitting 1-2 items.
Metal tools can be with or without a handle, both types are convenient. A knitter should try knitting with different hooks to form her own opinion. Some believe that hooks without a handle dig into the fingers too much and twist, others say that a plastic or wooden handle rubs them.
When choosing a tool with a handle, it is worth checking how firmly the metal and wooden (or plastic) parts are connected. Often, the steel hook falls out and has to be glued back on.
By length, the tools are divided into classic hooks (12-16 cm) and tools for Tunisian crochet (20-40 cm). Hooks for Tunisian crochet are also simple and on a fishing line.
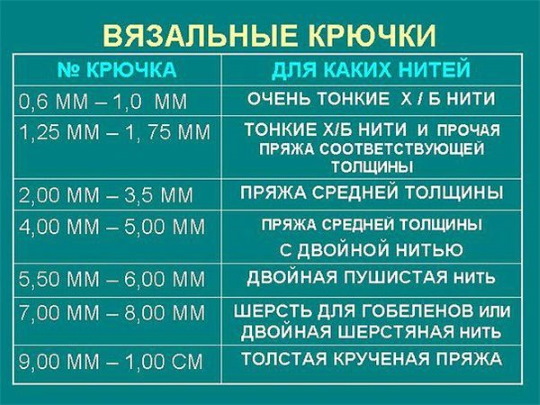
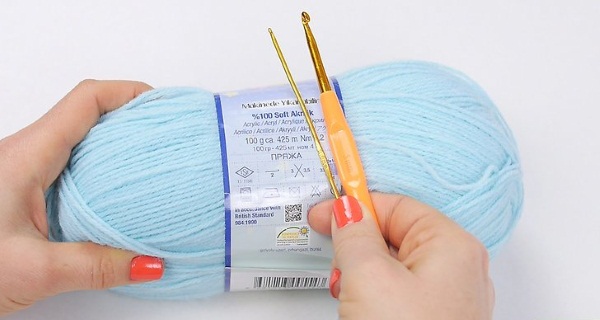
The size and shape of the hook head are of great importance. It should not be too sharp, otherwise it can hurt the skin of your fingers. The size of the loop and the column depends on the diameter of the head, so it is important to choose a hook that matches the thickness of the yarn. Usually, manufacturers of knitting yarn write recommended tool sizes on the labels, but these are more advice than exact instructions.
For example, to select a hook for working with yarn of 400 m/100 g thickness, you need to consider:
- material composition (acrylic or mohair are lighter than wool and cotton, so with the same footage the actual thickness of the thread will be different);
- the type of product that is planned (sweaters and pullovers are not knitted as tightly as hats, mittens and socks. But scarves should be much looser and more flexible than shoulder products);
- individual knitting density (with the same hook you can knit a loose fabric or tighten the stitches and get very tight knitting).
You can learn to crochet from scratch by purchasing several hooks of similar sizes (for example, No. 2.5, No. 3 and No. 3.5) and testing them on the selected yarn.
After washing the samples, it will become clear which fabric best matches the knitter’s idea.
Selecting yarn
For learning to crochet, use smooth yarn with a tight twist. However, you should not buy the cheapest acrylic thread, as working with artificial fiber is not as pleasant as with natural fiber. Hand knitting is always associated with tactile sensations and the choice of high-quality, interesting yarn largely shapes the attitude to the type of needlework as a whole.
Yarn that is easy to work with:
- smooth, without large villi or relief inclusions;
- with uniform thickness (without decorative thickenings);
- with average footage (about 250-350 m/100 g);
- plain (melange thread or sectionally dyed yarn interferes with the perception of the pattern);
- with a mixed composition (thread consisting of cotton with acrylic or wool with the addition of cotton or acrylic fits very well into the fabric).
Based on the recommendations for choosing yarn, you can make a list of material properties that complicate the process of learning to knit:
- uneven thickness, reliefs and colored spots on the yarn;
- too thick fluff and pile (hairs get tangled around the hook, making it difficult to see the texture of the fabric and understand whether everything is connected correctly);
- yarn consisting of many threads that are not twisted together (the hook does not grip the working thread well, it delaminates);
- material made of linen, hard cotton, "squeaky" acrylic;
- yarn that is too thin or too thick to handle.
These tips will help you choose yarn for knitting samples and practicing your skills, but for making clothes or interior decor, you should choose materials based on other criteria. They vary depending on what product will be knitted, for what purposes and for what age.
How to read crochet patterns: nuances
The easiest way to learn how to crochet from scratch is using diagrams and graphic images of basic techniques.
Although all the basic elements in crocheting are performed the same way in all countries, they may be indicated on the patterns with different symbols. There are symbols that are used more often than others, but often designers use their own unique symbols.
In any case, the diagrams are always accompanied by a key to decipher the symbols to avoid misunderstandings and errors. Most often, the key is a table, but it can look like a list or part of the description text.
There are 2 types of crochet patterns: for straight and circular fabrics. Accordingly, patterns can be made using turning or circular rows. Interestingly, circular knitting is used not only to make round motifs and fabrics, but also to knit squares, rectangles, hexagons and even triangles.

Both types of patterns consist of the same symbols, but they look different. Most often, they contain a certain part of the pattern that is repeated periodically: this is the rapport. If we consider a pattern made up of straight and turning rows, the rapport will look like a rectangle (several columns wide and several rows high).
The peculiarity of such schemes is that the number of columns in the lower part of the rapport (in the 1st row) is the same as in the upper part (for example, in the 5th row). This means that the fabric does not expand or contract, it is even. Such a scheme should be read sequentially by rows from the bottom up. The first row (and all odd) is read from right to left, the second (and all even) - from left to right.
Sometimes the first row in the patterns is considered to be a cast-on chain, so the reading order is confused (however, the principle remains). The easiest way to find the beginning of a row is by the lifting loops. Depending on the height of the row, it can start with one, two or more lifting loops.
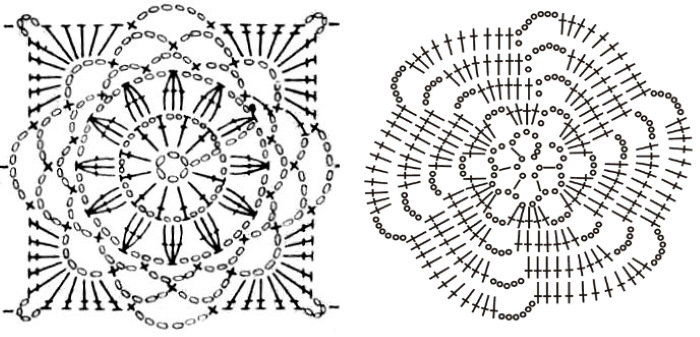
If you look at a circular pattern, its rapport usually looks like a wedge: it is much narrower at the bottom than at the top. This is due to the fact that each row of the circular fabric is wider than the previous one. This is how the motif is formed.
Circular patterns are read from the center to the outer edge. Each row (Rd) is formed in the same direction: from right to left. Such patterns also require that there be lifting chain stitches at the beginning of the row.
The peculiarity of circular rows is that they always end with connecting columns. Beginners often forget about this, but it is an important point that allows you to get a neat and correctly connected motif.
How to hold the hook and thread correctly
Each knitter determines for herself the most convenient method of holding the hook and grasping the thread.
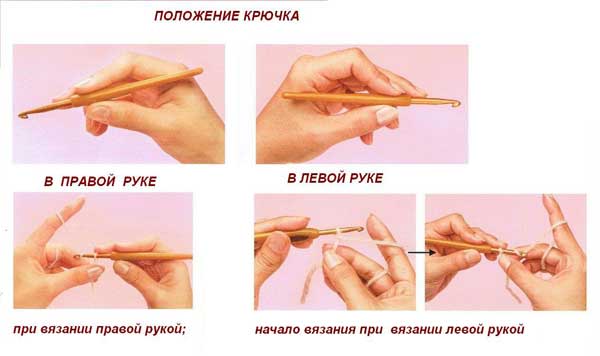
There are 2 most popular methods:
- The hook passes between the index finger and thumb and rests on top of the hand.
- The instrument is also clamped between the thumb and index finger, but its free edge goes under the palm.
The working thread is passed through the index finger of the second hand (left), slightly pulling it. At the same time, the fabric is held with the thumb and middle finger of the left hand, and the index finger is moved slightly to the side.
How to get started
When crocheting straight fabrics, the very first step is to make a chain of air loops (CAL). To calculate the number of VPt, you need to add up the number of Pt in all the rapports and add the VPt of the rise (different patterns require different numbers of Pt of the rise).
Many craftswomen prefer not to calculate the exact number of VPt for the initial row, they simply knit a long CVPt, then knit the first row according to the pattern. The extra VPt are simply unraveled.
It is important to remember that the VPt may turn out tighter than the columns in the following rows. In this case, the fabric will be pulled together at the bottom, which will make the product difficult to use. It is worth knitting the CVPt with a larger hook (2 sizes larger than the tool used to knit the main fabric) or intentionally stretching the VPt when casting on.
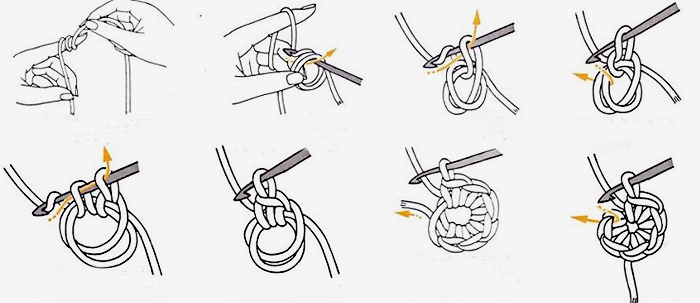
You can learn to crochet circular fabrics from scratch if you practice casting on air loops. However, circular motifs begin to be crocheted by making a ring. The classic way to create a ring is to crochet a short CVPt (4-10 VPt) and close it into a circle with a slip stitch.
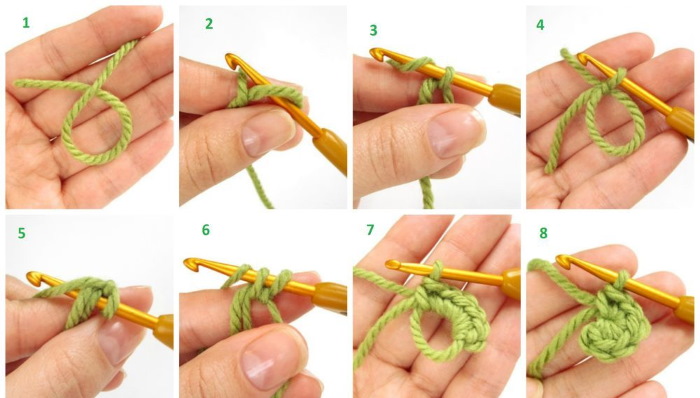
However, in recent years, the amigurumi ring method has gained popularity. It consists of wrapping the working thread around the finger several times, then removing it and knitting the first row of the pattern into the resulting ring. It is important to know that with this method of starting a circular motif, you should tighten the loose thread very tightly and hide its tail securely.
Knitting patterns: basic elements
The set of basic knitting techniques is a kind of alphabet for knitters. It is impossible to read a single word if the letters are not studied.

Likewise, you cannot start knitting patterns before you have mastered the basic elements:
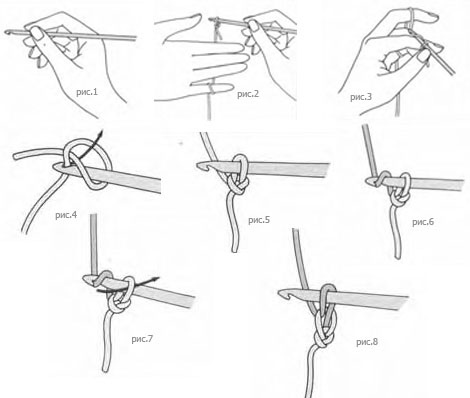
- VPt: to form the first VPt you can use any convenient method.
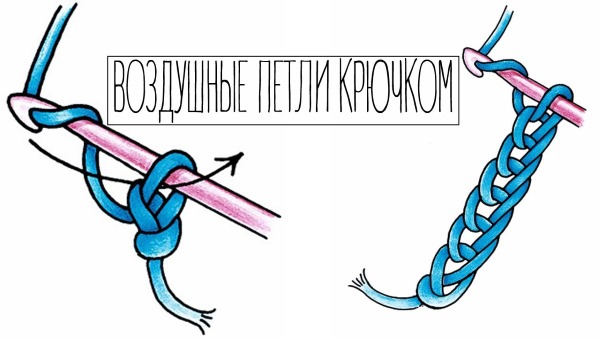
Next, the base of the first VP is taken in the left hand and clamped with two fingers, the RbN is thrown over the index finger. The cr. is inserted into the loop, the RbN is grabbed and pulled through the loop. The rest of the VPs are performed similarly.
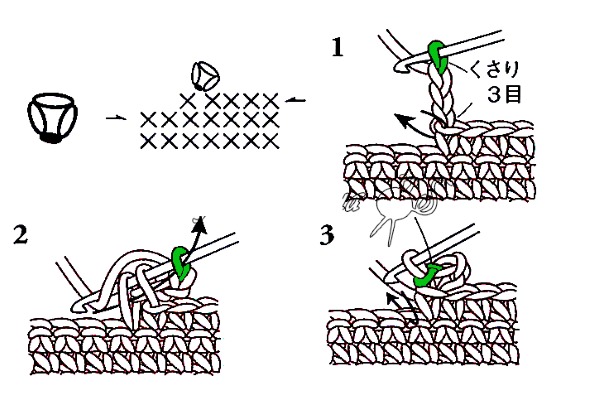
- PlSt — the simplest element that is formed when Kr. enters the Pt of the previous Rd, grabs RbN and pulls this thread through the loop on Kr. On the working side of the fabric, a neat braid is formed, and on the reverse side, a stroke.
There are also PlSt with H. Before inserting Kr. into Pt of the base, you need to make H (move Kr. away from you so that RbN is thrown over it). Then RbN is grabbed and simultaneously pulled through the loop of the previous Rd and through H. Such an element is higher than StBN, but lower than StSN.
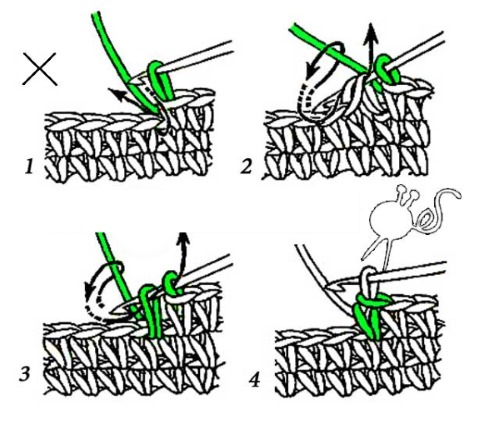
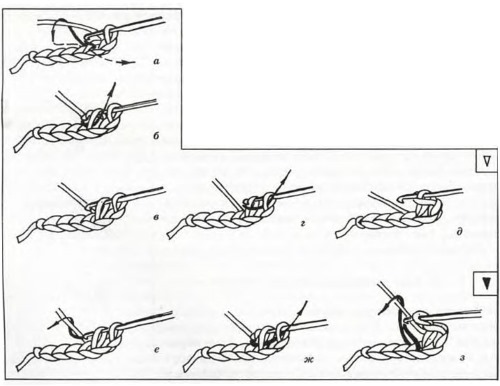
- STBN: to form it, Kr. must enter the Pt of the base, capture RbN and pull it to the front side. Then Kr. captures RbN again and pulls it through 2 Pt.
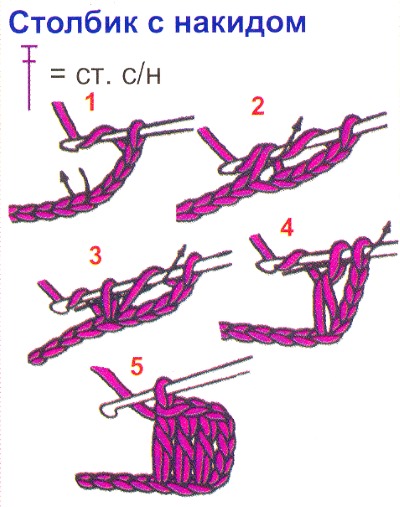
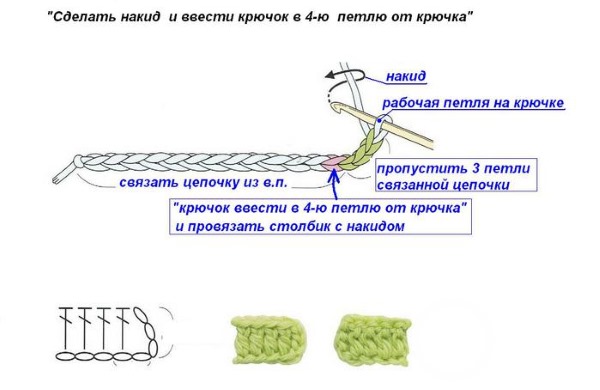
- StSN: first, H is performed. Then, Kr. must be inserted into the Pt of the previous Rd, pick up RbN and pull it to the front side. Then, RbN is picked up again and a new Pt is knitted together with H. After the next pickup of RbN, the last 2 Pt are knitted. Depending on the pattern, the columns can have 2 or more H (3, 4 and even 5).
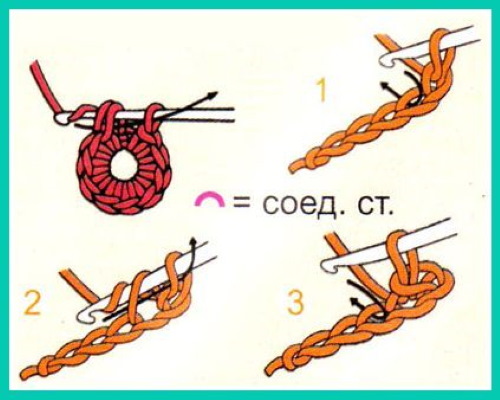
- SSt: in fact, it is the same PlSt, but it performs a connecting function. If you need to match 2 canvases or the end of a circular row with its beginning, then you use PlSt, and in descriptions it is called SSt.
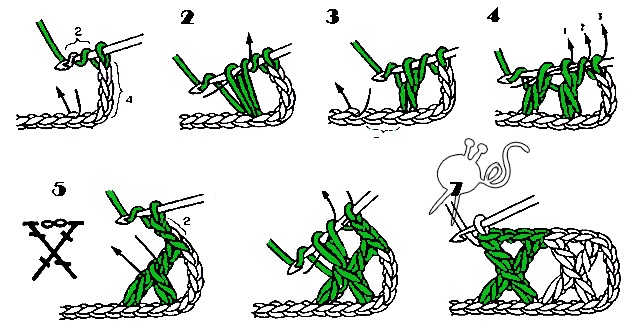
- Crossed StSN. This element is formed by combining two StCH and one VP. First, skip one PT of the base and tie a StCH into the 2nd (it is tilted to the right). Then do 1 VP and tie a StCH, returning 2 PT of the base back (it is tilted to the left). Thus, the second St crosses the first.
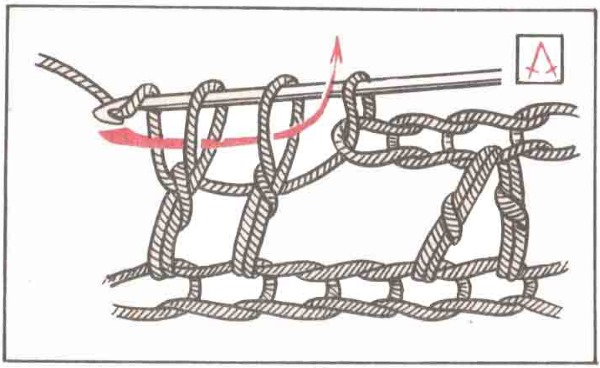
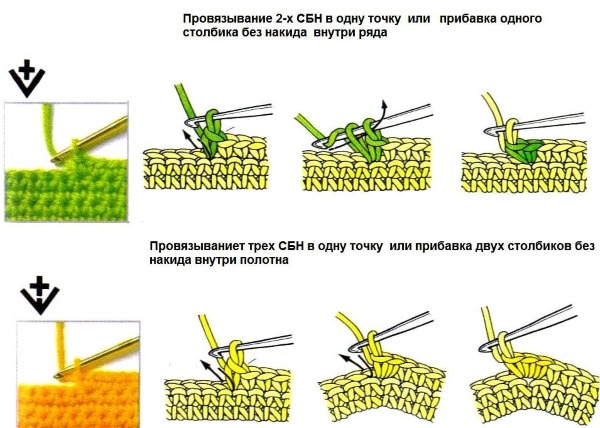
- 2 sc together (sc with a common top). This technique allows you to narrow the fabric, since the upper edge of the Rd is shorter than the lower one. First, Kr. is inserted into the 1st Pt of the base, RbN is grabbed and a loop is formed. Then, without finishing knitting the first sc, begin to knit the 2nd. When there are 2 unfinished sc on Kr., RbN is grabbed and pulled through all the loops.
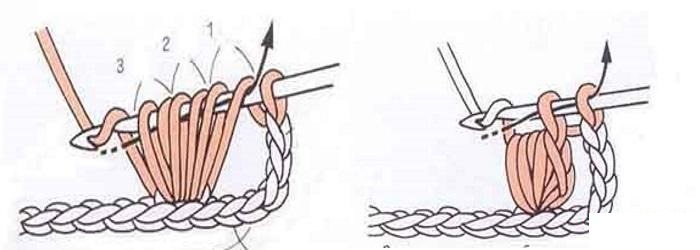
- PShSt: this decorative element is very voluminous and requires more yarn than other techniques. On K. throw H, insert it into the base loop, form Pt on the front side of the fabric. This Pt is pulled out to the desired height.
The actions are repeated the required number of times (3-9 repetitions), introducing the K. into the same Pt of the base, and then simultaneously knitting all the Pt on the K.
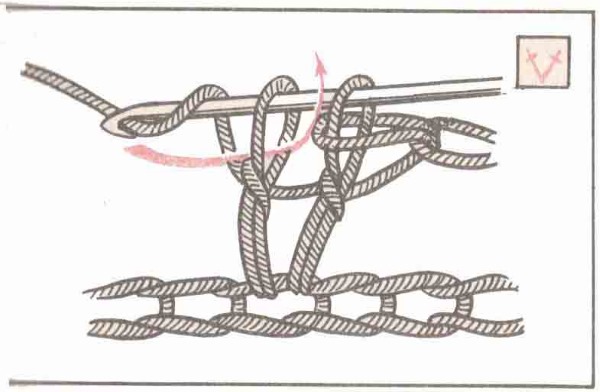
- Unfinished StCH are performed in the same way as two StBN with a common top. The first StCH is knitted to the half, then the second one is started. At the final stage, the RbN is pulled through all the Pt on the Kr.
- Pico — a decorative element used to treat open edges of a product or to include it in openwork patterns. To form it, 3 VPs are knitted in a row, then a K is inserted into the base of the first VP and a SC is made. Thus, the VPs form a small arch or tooth.
- Knitting in the round — is a technique in which each subsequent Rd is wider than the previous one. The circular Rd begins with a VPt turn and ends with a SSt.
- Crayfish step — a type of relief edge binding. These are classic stbn, made in the opposite direction. That is, Rd is formed not from right to left, but from left to right.
- Turning loops — the second name for the lifting VPt. If the Rd consists of StBN, then 1 lifting PT is required, if from StSN — 2-3 PT. The number of turning PT directly depends on the height of the Rd. It is necessary to take into account that the lifting PT replaces the first St in the row.
You can learn to crochet from scratch only after all these elements have been carefully worked out and brought to automatism.
Decreasing and increasing stitches
Once minimal practice has been gained and the simplest elements are performed easily, you can move on to more complex techniques.
For example, it is worth mastering the addition and decrease of loops. It is rare to find a crocheted product without using these techniques.
You can learn to crochet from scratch if you know how to form armholes, necklines and sleeve caps. Even those who intend to make only toys or hats cannot do without the ability to reduce and add loops.
There are several ways to reduce the number of columns in a row:
- skip the base loop and knit St into the next loop (but then there will be a hole);
- knit 2 or 3 sts with a common top;
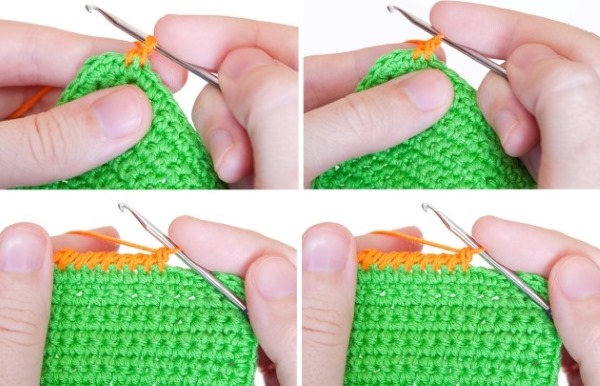
- do not finish knitting the last St in the row (you will get a step);
- knit a half-column instead of the 1st St and start the row with the 2nd St (there will also be a step).
By analogy with the principles of reducing the fabric, we can list the methods of adding loops:
- knit a chain stitch between the sts, above which there will be a new st in the next row (a hole will form in this place);
- perform 2 or 3 St with a common base;
- double the first or last st in a row.
In the case where it is necessary to form a step at the beginning of a row, you can knit the required number of VPt, and then make a column in each of these loops.
Many openwork pattern charts designed for knitting large items (sweaters, pullovers, scarves and hats) already include adding and decreasing stitches. This is very convenient, since you do not need to design the pattern yourself.
Easy Crochet Projects for Beginners
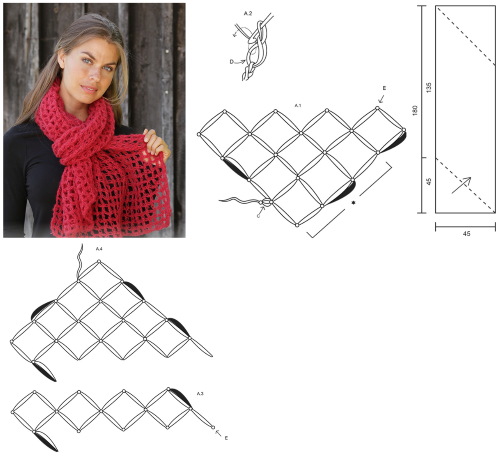
A knitted scarf or stole is a great option for a first serious item. Usually it is a rectangular canvas, made with some pattern or just columns. There are no increases or decreases, so it is impossible to get confused or ruin the project.
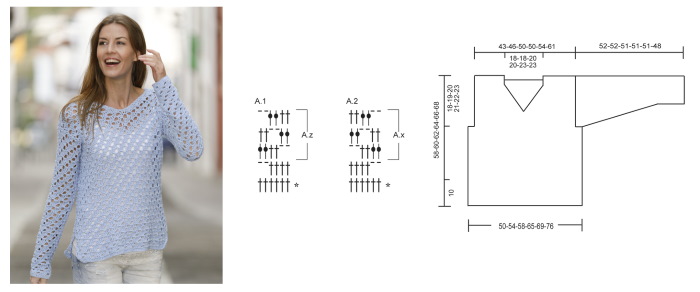
For more daring and confident knitters, a simple sweater or pullover can be an opportunity to show off their skills. Modern fashion allows wearing wide shoulder items with a primitive cut, so it becomes quite easy to model and implement ideas.
In fact, you can even skip the neckline and armholes and knit 4 rectangular pieces (front, back and 2 sleeves). However, clothes with armholes look better, even if they have minimal depth.
Any pattern is suitable for this model: from basic columns to complex openwork ornaments. The front and back pieces to the armholes can be knitted in one piece in a circle or immediately divided and knitted separately. The sections from the beginning of the armholes to the top of the pieces must be done in straight and turning rows.
If desired, you can knit a round, V-shaped or rectangular neckline. A boat neckline also looks great, when the top of the piece is closed evenly and very short shoulder seams are formed (the front is sewn to the back along the shoulders on both sides).
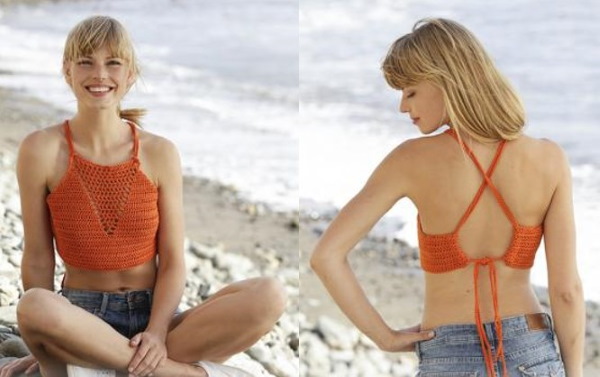
Another model for beginner knitters is a summer top with an open back. Thanks to the technical drawing, you can easily understand how the finished top should look.
Straight sections of the fabric are knitted with double crochets. The central part should be knitted using patterns A.1, A.2, A.3. At the beginning of the row, use pattern A.1, then work according to pattern A.2 and finish the row according to pattern A.3. The final part of the top should be knitted according to pattern A.4.
When the part is ready, you need to knit a long cord. Fold the edges of the part and hem it so that you can tuck the cord inside. For the original top, 100% cotton yarn with a thickness of 200 m/100 g was used. The knitting density was 18 StCH per 10 cm and 9 Rd per 10 cm. For size SML, you will need 150 g of yarn.
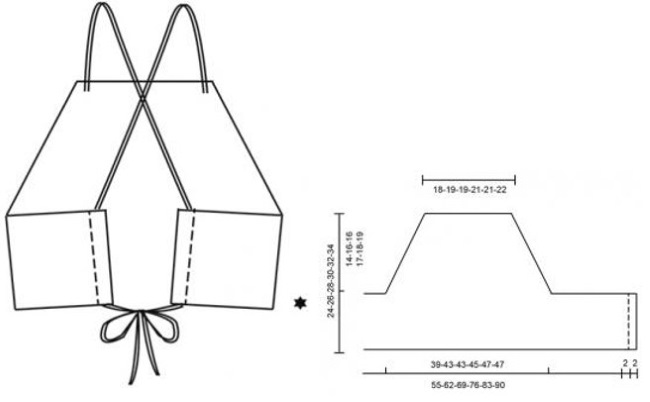

Work order:
- Knit CVPt from 42-44-44 St. Make the first row of StCH, adding one StCH on each side.
- Knit the second Row according to patterns A.1-A.3. When the patterns are knitted once in height, continue knitting with this pattern, adding columns on each side. The total height of the piece should be 13-14-14 Rows. And the width 71-77-77 St.
- On each side of the fabric knit 27-30-38 VPt and in the following rows knit StSN from these loops. At the same time, in the central part of the fabric make a pattern according to diagram A.4.
- Knit until the total height of the piece is 24-26-28 cm in the center.
- Cut the thread, hem the edges of the piece inward by 2 cm.
- Knit 140-150-160 VP for ties, turn the work and make one PlSt in each VP.
At the final stage, you need to wash and dry the product on a horizontal surface, then thread the ties into the top. This is a fairly simple, but very effective and relevant model. Even a beginner who has recently learned to crochet from scratch will be able to cope with it.
Author: Anna Ocean
Article formatting:Natalie Podolskaya
Videos about crochet
How to learn to crochet from scratch easily and quickly:
Well, that's not the end!!! The end of the thread! I didn't even look further :(((