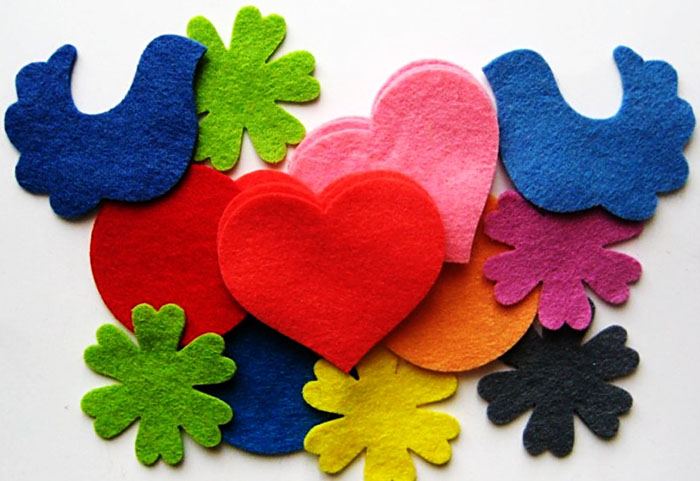
Felt products can be used by children as toys, elements of educational games, decorative craftsThe practicality and safety of felt also makes it one of the most suitable materials for children's creativity.
Necessary tools
To create felt products, you need to prepare the following materials and tools:
| Material/tool | Features of use |
| Set of felt sheets of different colors | Felt sheets are needed for cutting out three-dimensional parts. A certain type of felt by thickness and quality characteristics should be chosen depending on the purpose of the product. |
| Felt scraps | Felt scraps are useful for cutting out small details (eyes, noses of animals, etc.). Therefore, it is better not to throw away the pieces of material left after cutting out the details, but to collect them in a separate bag. |
| Synthetic padding in pieces and rolls | Sintepon is the most accessible material used as a filler for felt products. Rolled sintepon is suitable for thickening the walls of backpacks and bags, piece sintepon is suitable for stuffing soft toys. Instead of sintepon, you can use holofiber. |
| Threads | The threads are selected to match the tone of the felt used. Regular sewing threads, iris, floss and knitting threads of small thickness will do. It is better to choose the type of thread depending on the type of product. For example, the details of a small toy can be sewn with regular sewing threads, and for creating a bag and necklace it is better to take stronger threads. |
| Needle | The needle is needed to sew the parts together. Its size is selected depending on the thickness of the threads and the size of the product being made. |
| Simple pencil | A simple pencil is used to mark the details. It is better to choose soft or hard-soft pencils - they are more visible on the felt. For sheets of dark shades, tailor's chalk is suitable. Markers and pens can also be used for marking, but they have a big drawback - they leave marks on the felt. A good alternative to a pencil and chalk are pens with disappearing paste and a white gel pen. |
| Scissors | To work with felt, it is better to stock up on different types of scissors:
|
| Safety pins | They are used to attach the components of the craft to the base so that they can be sewn evenly. They should also be used to secure paired parts when sewing them together. |
| Glue | Glue is used to fix small parts to the product that cannot be sewn. For example, the reason for this may be that they are too small or that they will interfere with the creation of the stitching. A hot glue gun is best suited for working with felt. If you do not have one, you can use super glue or instant glue, but it must be transparent so as not to leave marks. |
| Decorative elements | With the help of various decorative elements, the product acquires a finished look. The following may be useful for decorating the craft:
|
Selection of material
When choosing a material for making felt crafts, you need to be guided by the type of product itself and its purpose.
There are several types of felt:
- By thickness:
- thin – 1-1.5 mm;
- medium thickness – 1.6-3.4 mm;
- thick – 3.5-5 mm.
- By structure, regardless of thickness, felt can be:
- soft;
- tough.
- By composition:
- woolen;
- semi-woolen;
- acrylic;
- synthetic – polyester;
- synthetic - viscose.
Thin felt is suitable for small items and small details., as they are not too convex, and the product looks neat. Medium is used to make toys, covers; thick is well suited for creating handbags, backpacks, children's educational albums and books.
Soft felt is usually used to create voluminous toys., it is characterized by the lack of elasticity. Hard felt, on the contrary, holds its shape well, does not stretch, but when bent, creases remain on the sheet.
Wool felt has a rough texture. Suitable for creating decorative items, various accessories - anything that does not require frequent washing, since after washing the product loses its shape, changes size, and looks worn out.
Semi-wool contains viscose or acrylic in addition to wool. It is smooth to the touch and is the most popular among craftswomen. However, this type of felt has a drawback - it can lose its shape after a large number of washes and become covered in pellets as a result of prolonged use.
Acrylic felt has a shine and smoothness, and quickly becomes shaggy., but is very easy to care for (easy to clean) and holds its shape well. It is slightly transparent, but this drawback is eliminated in crafts that require duplication of parts (sewing paired parts into one). Acrylic felt is universal - it can be used in the manufacture of any craft.
Polyester felt holds its shape well and does not roll., is highly durable. It is easy to work with because it does not wrinkle, but thin polyester felt can be translucent. This type of material is best suited for making products intended for children or active use.
Viscose felt is flexible and slightly rough to the touch. Due to its antistatic properties (repels static electricity), it is especially suitable for making hair accessories, children's toys, appliques on clothes. It does not collect dust, holds its shape well and does not change its shape after washing.
Synthetic Chinese felt crumbles at the cut points and wears out quickly - it forms pellets. Therefore, it is not suitable for children's products - it can be used to make fridge magnets, decorative pictures - something that does not involve frequent contact with children's hands. Its disadvantage is its high susceptibility to wrinkling.
General principles of making crafts
Felt crafts for children are products, in the production of which it is necessary to take into account a number of important principles:
- The right choice of materials and tools – recommendations and advice on choosing tools for work, filling for products, and the felt itself are given above.
- Correct cutting of parts. This process occurs in the following order of actions:
- First, print out a pattern template from which all the necessary parts are cut out. Instead of a template, you can use a drawing in direct projection, but then you will need to print it in several copies so that you can cut out all the elements superimposed on each other separately (for example, the head and beak).
- Next, each pattern piece is transferred to felt of the required color and cut out.
- Choosing the optimal seam. Of the many types of seams, there are several that are especially convenient when working with felt:
- loop stitch;
- forward needle stitch;
- back stitch;
- blind stitch;
- basting stitch.

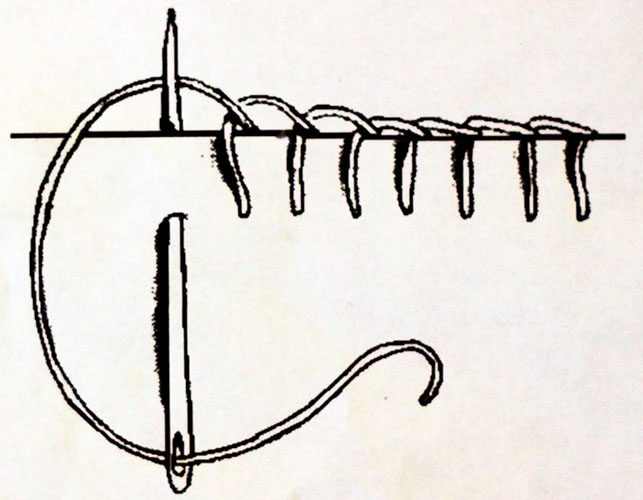
The loop stitch is used for sewing large parts, some paired elements and bases.
To create it, you need to perform a certain sequence of actions:
- First, insert the needle between the two pieces, piercing the top piece and leaving the knot inside.
- Then you need to make a stitch through the edge, piercing both parts through so that the needle comes out from the front side of the top part at the place of the first hole.
- Next, the needle must be passed under the resulting stitch, bringing the thread to the cut area.
- To make the next stitch, you need to pierce the top piece with the needle together with the bottom piece and bring the needle out to the edge, placing the main thread behind the needle.
- The remaining stitches should be done as described in the previous paragraph. The pattern is as shown in the picture below.
The forward needle stitch is a well-known stitch used for basting details and resembles a straight dotted line. When making the stitch, it is important to remember that the stitch length and the distance between stitches should be equal. When working with felt, this stitch, like the back needle, is used to sew on small details or to fix an image on the base.
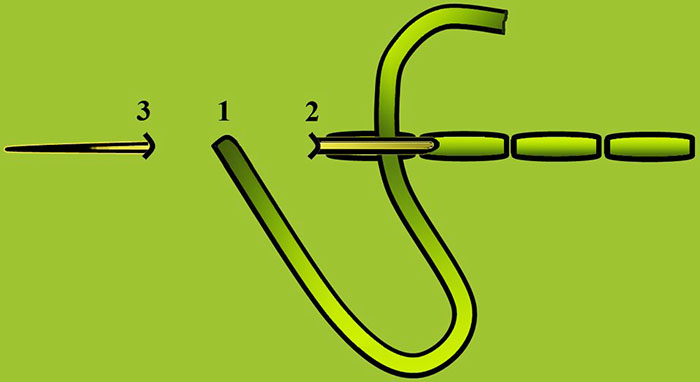
The backstitch looks like a continuous stitch from the back side and like a dotted line without gaps from the front side. The stitch is very easy to make - the main thing to remember is that the needle should always be positioned behind the thread.
The order of the seam is as follows:
- The first stitch is made as usual – with the needle forward.
- Next, you need to step back a space equal in length to the first stitch and bring the needle from the back side to the front side.
- Then, holding the thread with your finger, insert the needle into the end of the first stitch.
- The needle should be brought out at a distance from the second stitch equal to its length.
- So, between the second and third, third and fourth and so on stitches, it is necessary to bring the needle from the wrong side to the front side at a distance equal to two stitch lengths.
A blind stitch is used in the production of soft toys to sew together two main parts (for example, the body and the head). A basting stitch should be used to temporarily secure parts (for example, a tail or paws to the body). After the main seam connecting the two parts has been completed, the basting stitch should be removed.
Owl
Felt crafts for children in the form of an owl can effectively decorate the bedroom. Using the template below, you can make an owl of any size: a large one as a soft toy or pillow, a small one as a keychain, a pendant for a mobile, and so on.
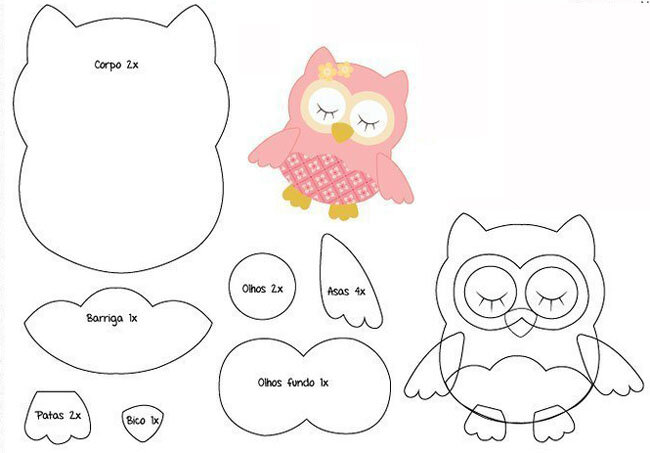
If you don’t stuff the owl and leave it flat, sewing or gluing the parts together, you can get a brooch or a decorative element for a children’s hair clip.
Master class on making an owl:
- It is necessary to cut out the following quantities of parts:
- body – 2 pcs.;
- belly – 1 pc.;
- face (figure eight) – 1 pc.;
- eye (circle) – 2 pcs.;
- beak – 2 pcs.;
- wings – 4 pcs.;
- paws – 2 pcs.
- Next, you need to sew the wing pieces together in pairs to create 2 double wings.
- The next step is to design the face on the front part of the body. To do this, you need to sew on the face, eyes and nose. On the eyes, you can embroider closed eyelids and eyelashes.
- Then the belly is sewn to the lower part of the same body part, but the stitching should only be done in its upper part.
- Now you need to sew the wings into place. If the owl is intended to be used as a toy for a mobile or a Christmas tree decoration, you need to sew a loop to the second part of the body.
- Next, you need to sew both parts of the body with a loop stitch through the edge. When the line reaches the bottom of the body, you need to sew the bottom of the belly and the paws previously inserted between the two parts.
- When sewing the body parts together, it is necessary to leave a small opening for stuffing, after which the seam is completed.
Dog
Master class on making a dog from felt:
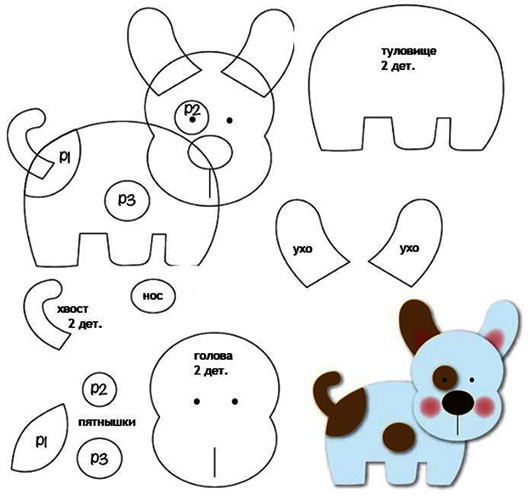
- Cut out the pieces of the required size and color in the following quantities:
- body – 2 pcs.;
- head – 2 pcs.;
- ears – 4 pcs.;
- tail – 2 pcs.;
- nose – 1 pc.;
- spot-1 (p1 in the template) – 2 pcs.;
- spot-2 (p2 in the template) – 1 pc.;
- speck-3 (p3 in the template) – 1 pc.
- Preparing additional elements. The ear and tail parts are sewn together in pairs. If desired, they can be filled with a small amount of filler.
- Head design. To do this, you need to sew on spot-2, a nose detail, and 2 beads in place of the eyes. You also need to embroider the mouth and draw a blush on the cheeks.
- Forming the head. Both parts of the head are sewn together, and it is necessary to sew in the ears, having previously inserted them between the two parts. It is important not to forget to leave an opening for stuffing, which is then sewn up.
- Body design. Spot 1 and spot 3 are sewn into place on the front part of the body. Spot 1 is sewn onto the back part.
- Forming the body. Both parts of the body are sewn together, in a certain place you must not forget to sew in the tail, inserting it between the parts. You should also leave an opening for stuffing, after which continue the seam.
- It is necessary to sew the head to the body with a blind stitch.
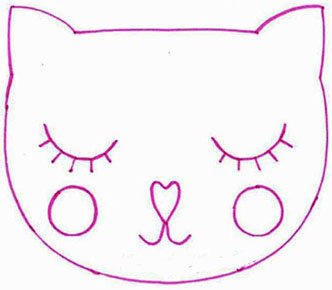
Cat
Felt crafts for children in the form of a cat can be made in the form of a soft toy, a keychain, or a New Year's decoration.
A flat toy without stuffing can be easily turned into a fridge magnet by gluing a square magnet to the back of the figure. You can also decorate a birth certificate and a mobile for newborns with figures of a cat and other animals.
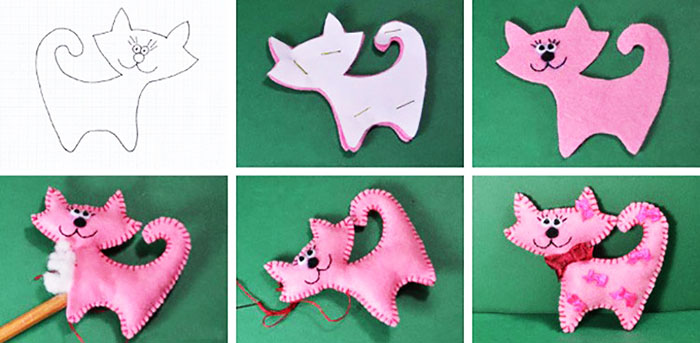
Master class on creating a simple felt cat:
- The first thing you need to do is cut out the parts:
- cat figurine (base) – 2 pcs.;
- nose – 1 pc.;
- eyes – 2 pcs.
- Next, you need to work on the face: sew on the nose and eyes, embroider a smile and eyelashes. The eyes can be made in any of the following ways:
- you can cut out a couple of circles of white and sulfur felt, while the black parts should be 2 times smaller than the white ones;
- you can cut out 2 white pieces and sew beads instead of black ones;
- You can use ready-made eyes for crafts.
- Finally, you should sew the toy and stuff it with padding polyester through the hole left, which then needs to be sewn up. When stuffing, it is better to use a stick, pencil or any other long and narrow object that will help push the padding polyester into hard-to-reach places: into the head through the neck and into the tail. If the cat is supposed to be used as a toy for a mobile or a Christmas tree decoration, it is necessary to sew a loop to its lower part before sewing the body.
Hare
There are many patterns for making this animal out of felt, but the simplest one is presented below.
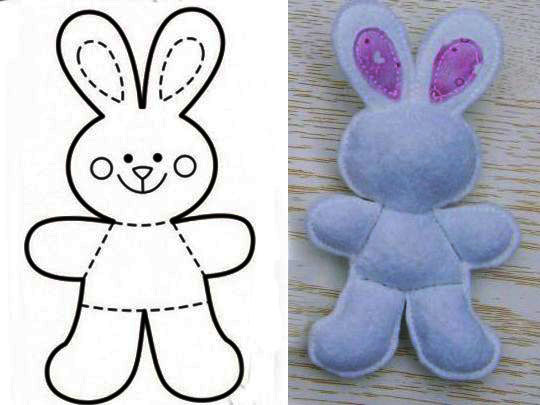
Master class on making a hare:
- The following parts need to be cut out:
- hare figurine – 2 pcs.;
- inner part of the ear – 2 pcs.;
- cheek – 2 pcs.;
- nose – 1 pc.
- Before you start sewing, you need to make a muzzle for the hare. To do this, sew the inner parts of the ears, nose and cheeks to one of the body parts. Under the nose, you should embroider a mouth and a smile. Instead of eyes, you can sew 2 black or blue beads.
- Now you can start sewing and stuffing step by step. Both parts of the hare's body are folded together and secured with safety pins. The ear area is sewn first, which is then stuffed.
- Next, you need to sew the head area on both sides and stuff it, then make a through seam in the neck area. If the bunny is to be used as a toy for a mobile or a Christmas tree decoration, you need to insert a loop between the two parts of the head before sewing it together.
- Next, the left side of the body is sewn together - the area of one front and one back paw, which are then also stuffed and stitched with a through seam. This seam should separate the front paw from the chest, the back paw from the abdomen.
- Then you need to sew the second front paw, stuff it with padding polyester, and make a through seam.
- Then the belly is stuffed and a seam is made separating it from the second hind leg.
- At the end, you need to stitch the second hind leg, leaving an opening for stuffing, after which the seam is completed.
Fox
Felt crafts for children in the form of a fox can be made voluminous or flat.
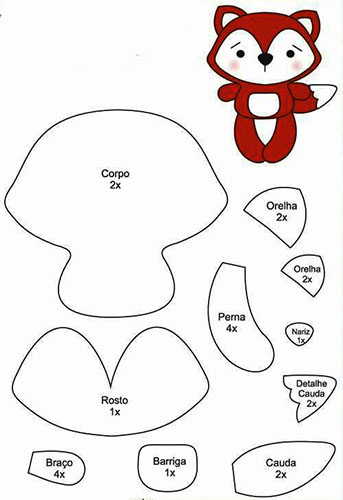
If you don't sew the body parts together at the bottom, you can turn the fox, hare, and any other animal figures into finger or hand puppets (depending on their size).
Master class on creating a felt fox:
- First, the cutting of the parts of the required colors is carried out in the following quantities:
- body – 2 pcs.;
- face – 1 pc.;
- abdomen – 1 pc.;
- outer part of the ear – 2 pcs.;
- inner part of the ear – 2 pcs.;
- front paws – 4 pcs.;
- hind legs – 4 pcs.;
- nose – 1 pc.;
- tail – 2 pcs.;
- tail brush – 2 pcs.
- Now you can start processing the details. The inner parts of the ears are sewn to the outer parts, the parts of the front and back paws are sewn together in pairs. A white tassel is sewn to each part of the tail, then they are both sewn together. If desired, the paws and tail can be stuffed with a small amount of filler.
- Now the main part is formed – the body. The face and belly are sewn into place, then the nose, bead-shaped eyes, and the eyebrows are embroidered.
- The ears need to be sewn to the back (unshaped) part of the body with a basting stitch, which should be removed after the main line is created. The same thing needs to be done with the paws and tail.
- Next, you need to sew both parts of the body, not forgetting to leave an opening for stuffing. To get the stuffing into hard-to-reach places of the body and head, you can use a simple pencil or a long stick. After stuffing, the seam continues.
Lion
It is very easy to make a felt lion. This toy is not intended to be too voluminous, so it is better to use it for metrics, a mobile, or an educational book.
Several lion cubs, made in a certain style, can serve as a decorative element at a children's party.
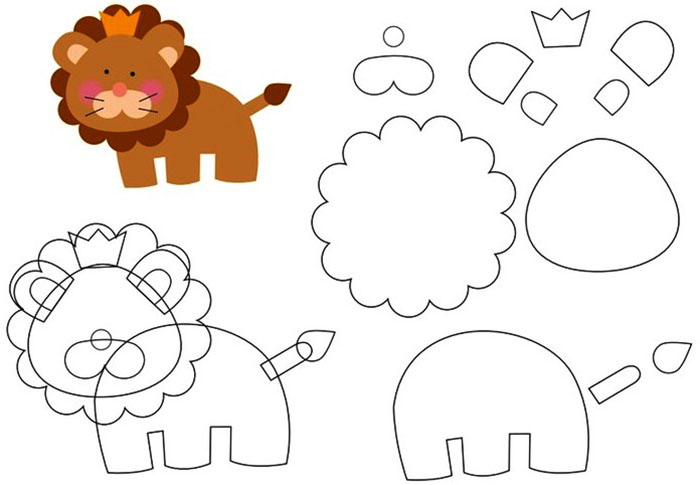
Master class on making a lion:
- There are only a few parts required for cutting:
- face – 1 pc.;
- mane – 2 pcs.;
- body – 2 pcs.;
- tail – 2 pcs.;
- tail brush – 2 pcs.;
- crown (optional) – 1 pc.
- After cutting out the parts, the head is designed. The face must be sewn to one of the mane parts, and then the following steps must be performed:
- cross stitching ears;
- sewing on bead eyes;
- embroidery of nose and mouth;
- drawing blush;
- embroidery of antennae;
- gluing the crown.
- If necessary, you can make a loop - for this, its ends are sewn with a basting stitch to the second part of the mane. Then both parts of the mane are sewn together, while it is important not to forget to leave an opening for stuffing, which should then be sewn up. After making the main seam that fastens these parts, the basting stitch is removed.
- Now you need to prepare the tail. To do this, sew a tassel to each of its rectangular parts, and then sew both sides together. The tail is attached with a basting stitch to the back part of the body.
- Next, both parts of the body must be sewn together, not forgetting to leave an opening for stuffing, after which the seam is finished. After completing the main line, the basting seam should be removed.
- Finally, the head is glued to the body using 2-3 drops of hot glue, and then sewn on with a blind stitch.
Flower
A felt flower can be used to decorate children's brooches, hairpins, bracelets. It can also be used to decorate an educational felt book and to create educational games.
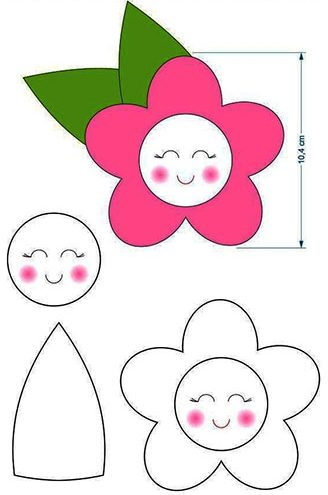
Making a flower is very simple:
- The following parts need to be cut out:
- middle – 2 pcs.;
- petals – 2 pcs.;
- leaves – 4 pcs.
- Then you need to embroider eyes, a mouth and draw rosy cheeks on one of the center pieces. You can also use ready-made "live" eyes.
- Next, you should sew both parts of the middle, not forgetting to leave a small opening for stuffing. After filling with padding polyester, the opening is sewn up.
- After this, the leaf parts are sewn together in pairs and also stuffed through the left opening, which is then sewn up.
- Now both parts of the petal part need to be connected with a decorative seam, not forgetting to stuff them.
- Finally, the center and leaves are sewn to the petals using a blind stitch.
You can skip the stuffing and just sew the paired parts together, and then glue the leaves and the center to the petals – then the flower will turn out flatter.
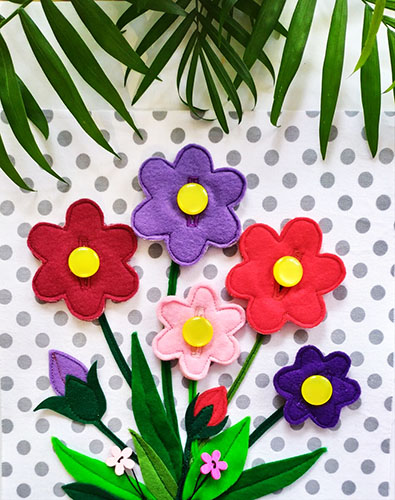
You can make an educational game out of flowers:
- To do this, you need to cut long stems out of green felt and sew them onto a felt base sheet or a book page.
- Then you need to cut out the leaves and sew them to the stems, and sew buttons to the top of the stems - they will be the centers of the flowers.
- On the sewn parts of the flowers, it is necessary to make cuts along which to make a decorative seam - through them the flowers will be put on the buttons-centers.
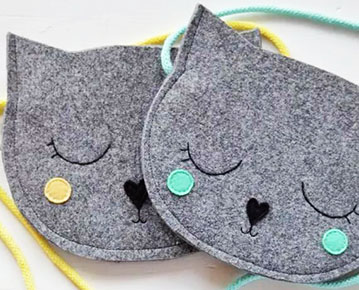
Handbag
Felt products that can be used by children are not only decorative crafts, toys, and Christmas tree decorations.
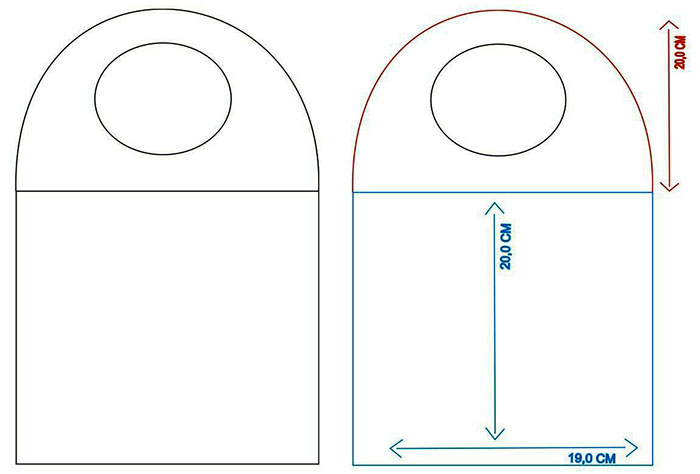
You can create a beautiful handbag for a fashionista from felt, and it’s very easy to do:
- First, you need to cut out the pieces of the required size according to the diagram below.
- Next, the sides of the bag need to be sewn with a loop stitch across the edge along the entire perimeter except for the handles. To make the bag more voluminous, you can cut out 3 additional rectangular pieces - one for the bottom and 2 for the sides, and sew them with a decorative stitch to the sides of the bag. In this case, the sides will not need to be sewn together.
- The front side of the bag can be decorated with felt butterflies, bows, flowers to your taste.
You can use the same principle to make a bag in the shape of your favorite animal's face - for example, a cat. Only instead of felt handles, you will need to sew a ribbon or cord in the ear area.
Felt is one of the most suitable materials for children's creativity and making crafts intended for children. The above schemes and detailed master classes will greatly simplify the process of making attractive products.
Video about felt crafts
6 DIY Felt Craft Ideas: