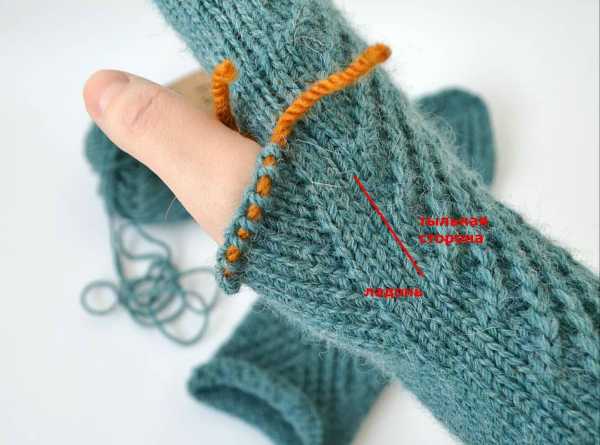
The Indian wedge helps to add loops evenly, starting from the elastic band. As a result, you can knit a beautiful wedge for both the thumb and the entire palm. Due to this, the finished product has an attractive appearance, as well as fits anatomically comfortably on the hand.
Necessary tools and materials
It is recommended to knit an Indian wedge for the thumb with knitting needles from mixed yarn. For example, the composition may include acrylic with wool or polyamide with mohair. In the first version, knitting should be done in 2 threads, in the second - in 1 thread. This material is pleasant to the body, fluffy and soft.
If the finished product is subjected to wet heat treatment, the threads will become fluffier.
To knit a completely closed thumb, a stocking tool No. 2.25 is suitable. To shape an open thumb, it is recommended to use knitting needles No. 3, as well as semi-woolen threads.
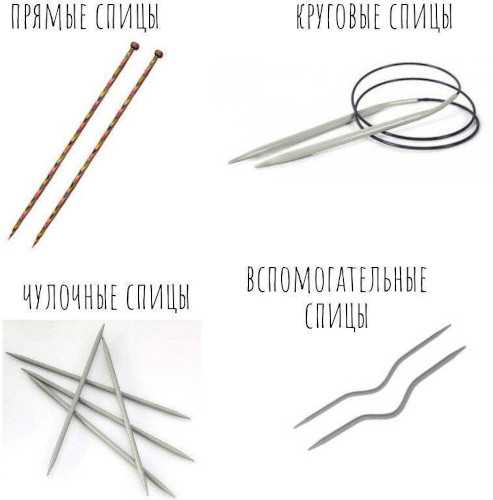
Double pointed needles can have 2 shapes:
| Section view | Brief description |
| Round | They are common and versatile, but are more suitable for experienced knitters. This is because with a round thread, stitches can easily slip off. As a result, you will have to string them again. |
| Cubic | They are considered more convenient because the loops will not slip. At the same time, the stitches will be even and of the same size. The tool is also comfortable to work with, so it is often used by those diagnosed with arthritis. This helps reduce pressure on the joints. |
For beginners, knitting needles made from several materials are suitable:
- Aluminum. They are simple, inexpensive and lightweight. In rare cases, the edges of the tool can be very sharp. However, cheap knitting needles are often subject to bending and can also slip very much in the hand.
- Wooden. The material can be laminated wood or bamboo. It is best to choose a smooth and high-quality tool so that knitting is comfortable. Do not use knitting needles that have cracks and roughness. These defects can spoil the fabric.
- Carbon. They are considered a popular and modern tool because they are comfortable and light. The tip is made of brass, and the handle is made of durable carbon. The transition between them is completely smooth.
- Metallic. They are smooth, light and comfortable, so they are in great demand among craftsmen. When choosing a tool, you need to pay attention to the level of sharpness of the edge so that it does not prick your fingers.
Schemes with description of works for beginners
The thumb in the classic version should be adjacent to the palm, so that the hand looks neat and elegant. To design the Indian wedge with knitting needles, you need to knit additional stitches. This ensures an anatomical fit of the product.
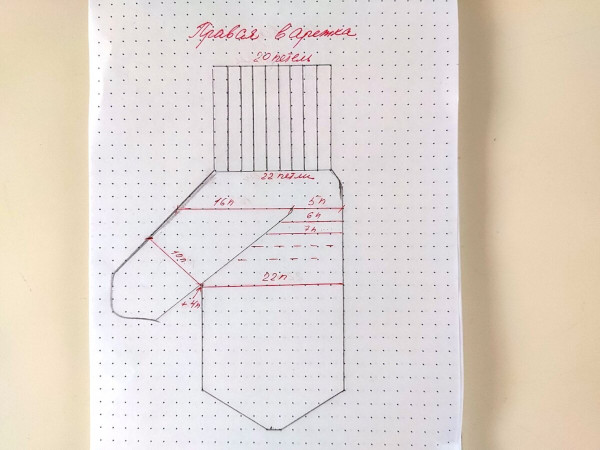
Method 1
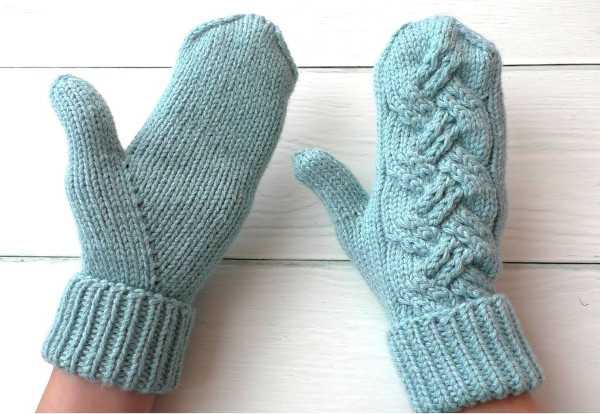
The classic version of the Indian wedge for the thumb with knitting needles should be started with the design of the 2x2 elastic band.
Execution algorithm:
- Initially, make a set of stitches in the amount of 44 pieces. Then make 6 rows, alternating front and back elements in them, 2 pieces each.
- With the transition to the 7th row, cross the front stitches to form a cord. For this purpose, transfer the 1st front element to an auxiliary tool and leave it in front of the fabric. After that, first knit the next stitch, and then the first element that was transferred to an additional knitting needle.
- In the future, similar crossings should be done in every 5th row. If you can’t make bundles, you can use a regular elastic band to create a cuff of the required size.
- In the last row, evenly add 4 stitches, because the hand widens from the wrist. In this regard, when moving to the palm, it is necessary to add loops. Thanks to this, the cuff will be tight on the wrist, without tightening the palm.
- As a result, there should be 48 stitches on the knitting needles.
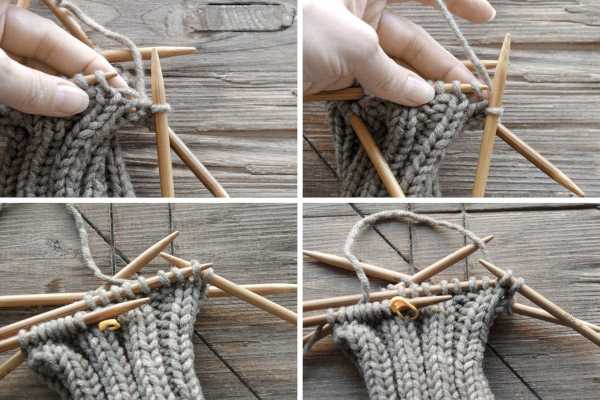
Step by step process of creating a wedge:
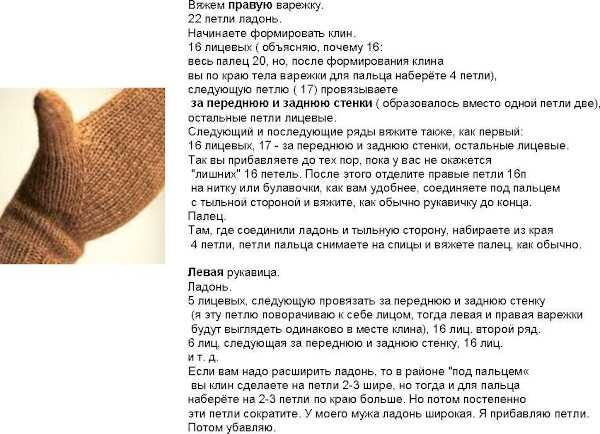
- First, separate the stitches for the thumb. In this case, you will need 1/4 of all the elements, as well as an additional 1 stitch. In this case, select 13 loops for the finger and an additional 2 elements. Thanks to the auxiliary stitches, this part of the mitten will be shifted to the palm area. Due to this, the product will fit comfortably on the hand.
- For the thumb, 13 stitches were allocated, so the increases should be the same number. Auxiliary elements should not be included in the calculation.
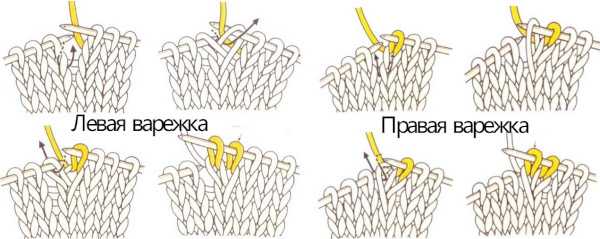
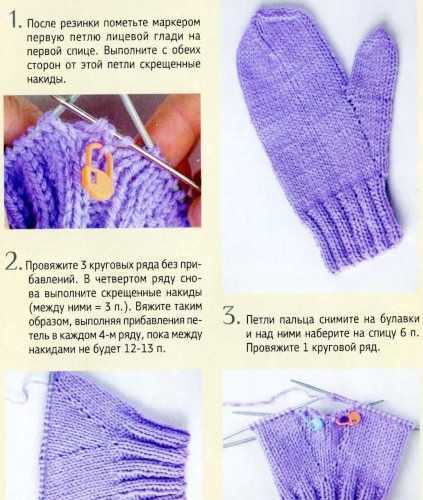
- Place a marker or contrasting thread where the end of the separated 15 stitches is. This will help you know exactly where to make the increases. On the right piece, the increases should be after the marker, on the left – before it.
- For the right mitten, continue knitting the strands from the back in 3 rows. If you have no experience knitting this wedge, it is recommended not to make an ornament to avoid confusion.
- Increases are performed in every 2 rows as a simple yarn over. However, this element must be crossed to prevent the formation of holes.
- Make 13 increases. Then transfer the stitches that were left for the thumb to the thread and tie off. Transfer only 13 elements to the yarn. Keep the 2 additional stitches that were left for a loose fit on the right knitting needle. When making the left mitten, these 2 elements should be located on the left tool.
- The remaining stitches are designed using the circular technique, either with or without an ornament.
- After closing the index finger in each row on the sides, perform decreases. The main thing is that there is the same number of stitches on the tools. If necessary, you can put a mitten on your hand to assess the correctness of the actions.
- Decreases from each side of each row are carried out at the beginning of the 1st and 3rd tools, as well as at the end of the 2nd and 4th knitting needle. In the first case, form the front element and perform a decrease with a right bias (for this, knit 2 stitches together behind the back wall). In the second case, when there are only 3 elements at the end of the tool, perform a decrease with a left bias. For these purposes, turn 2 front elements, and then knit together behind the front wall. The last 3rd stitch should be a front stitch.
- When there are only 8 elements left on the knitting needles, cut the yarn, keeping a 10 cm long end of the thread. Pass all stitches through this yarn and tighten. Bring the end of the thread to the wrong side, secure it tightly and hide it in the fabric.
- Return the elements that have been transferred to the thread to the knitting needles. At the same time, pick up additional stitches on top in the amount of 5 pieces, so that there are 18 stitches in total.
- Continue knitting the finger in a circle. When this part of the product is hidden, perform decreases. To do this, divide the elements into 2 tools in equal quantities. Perform decreases in each row at the beginning and end of each knitting needle.
- 2 extreme elements at the end of the tool turn and knit together for the front wall. At the beginning of the knitting needle 2 stitches are made together for the back wall.
- When there are only 6 elements on the knitting needles, transfer the stitches to the thread and tighten.
- Pull the edges of the threads to the wrong side and hide them in the fabric.
Method 2
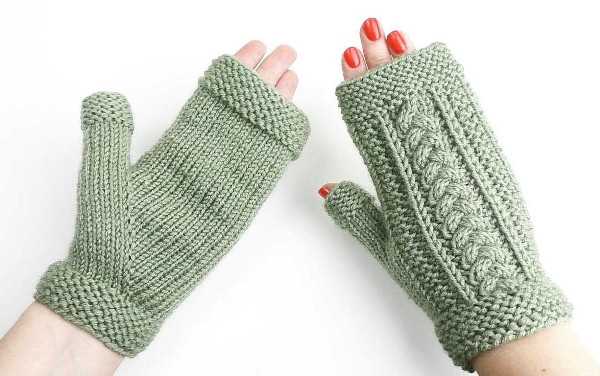
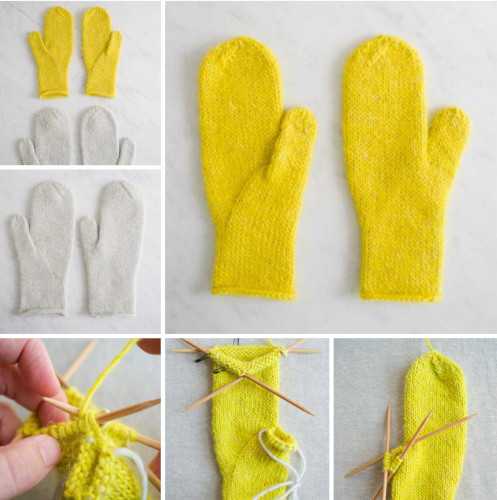
The Indian wedge for the thumb with knitting needles allows you to create open-type mittens. In this case, the design of the thumb will only occur halfway. As a result, when putting the product on your hand, the finger will not be completely hidden in the mitten.
Step-by-step description of knitting:
- Cast on 35 stitches on stocking tools. Then close them into a ring so that 34 elements remain. Distribute this number of loops evenly on 4 knitting needles.
- The next 12 rows are made with a 1x1 elastic band, alternating front and back elements until the end of each row.
- Then, on 2 tools, continue to design the ornament, and on the other 2 needles, make only face stitches.
- In the 8th row, start shaping the finger using the Indian wedge. For this, there should be 8 stitches on the 1st and 3rd tools, and 9 elements on the 2nd and 4th.
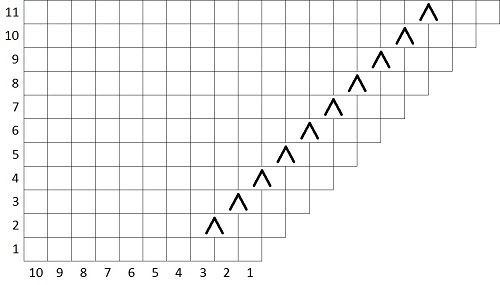
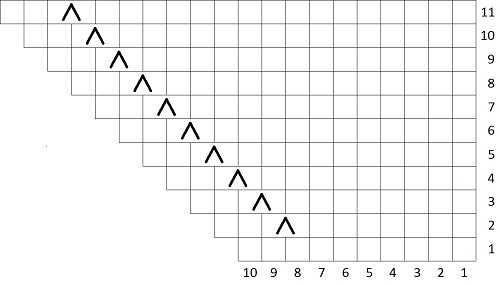
- When making a pattern on the 1st and 2nd knitting needles, make the thumb for the right mitten on the 3rd tool.
- To do this, make 10 rows of increases on a knitting needle. 1 row consists of 1, 3 and 4 knit stitches respectively. After 1 and 3 loops, make 1 yarn over.
- In the 2nd and all other even rows there should be only front elements.
- In the 3rd row there should be 1, 5 and 4 front elements respectively. Between them make one throw over. Finish the row with stitches.
- Row 5 includes 1 knit, yarn over, 7 knit, yarn over and 4 knit stitches.
- Row 7 is the same as row 5. However, instead of 7 front elements, make 9 stitches.
- In the 9th row there should be front elements in the amount of 1, 11, 4 respectively. Between them, carry out one throw.
- After knitting 10 increase rows, move your finger to an auxiliary tool or thread.
- Make the first stitch from the 3rd knitting needle a front stitch. Then cast on 3 stitches and knit 4 more front stitches remaining on the tool after the increases for the thumb.
- As a result, there should be 34 elements on the stocking needles. To design the palm, continue the pattern on tools 1 and 2 to a certain height. According to this pattern, there should be 3 rapports. Close the stitches in any convenient way.
- To complete the finger, add 3 stitches to the elements on the auxiliary tool. Then knit several rows of face loops.
- At the end of the work, close all the elements and cut off the yarn.
Secrets for Beginners
Indian wedge for the thumb with knitting needles will not cause difficulties if you follow useful recommendations:
- For processing acrylic and woolen materials, it is best to use a metal tool, for viscose and silk - a wooden one. If cotton yarn with microfiber was chosen, it is advisable to take carbon knitting needles so that the material can slide normally.
- Before knitting mittens, you need to know the size of your hand by calculating the length of your fingers with the hand and wrist. If you calculate the sizes incorrectly, the product will be crooked and unsightly. In this case, it is recommended to initially knit a control sample. Then you need to attach a ruler to it to find out the exact number of stitches in 1 cm. This figure must be multiplied by the length from the wrist to the hand. Then the result must be divided by a small whole number that is a multiple of 4. For example, if after multiplying the number of stitches in 1 cm by the size from the wrist to the hand you get 54, then the closest whole number will be 52, because it can be divided by 4 without a remainder.
- You should not make the mittens in one layer, otherwise they will be blown through. For knitting, it is recommended to use natural wool or you can add a layer of thin mohair. In this case, the knitted product should be made one size larger so that it can then be felted.
- It is best to start knitting from the edge of the thread remaining during the initial set of stitches. Increases should be tight to prevent holes from forming in these areas.
- When knitting the right mitten, the hole for the thumb should be left at the beginning of the 1st knitting needle, for the left product - at the end of the 4th knitting needle. If this is not done, two accessories will be only for one hand. To prevent the formation of large holes around the thumb, the loops should be cast on from the bottom and top, as well as from each side.
- When using two materials with different compositions, you need to choose yarn with approximately the same length of threads in skeins. In this case, the thickness of the knitting needles should correspond to the thickness of the material. In addition, it is recommended to read the instructions for the care of the threads. Otherwise, after the first wash, the product may lose its appearance.
- It is recommended to make a sample of approximately 10x10 cm in size, and also cut a template out of a cardboard sheet, inside which there should be a square window of the same size as the knitted sample. After that, the template must be placed on the sample. This helps to easily count the number of rows with stitches. For example, if the sample contains more elements than stated in the pattern, the knitting should be done more tightly or use a tool 1 size smaller. But if the sample does not have enough stitches, then the knitting should be looser or thicker knitting needles should be used.
- To connect thin threads invisibly, one end of the material needs to be threaded through the needle and passed through the other end of the yarn by about 5 cm. As a result, a small tail will remain from each material. When knitting is finished, these ends can be cut off.
- When using light threads, it is recommended to place the skein in a bag and tie it. However, you will need to make a small hole in the bag to allow the thread to come out.
- When knitting with the front surface, it is advisable to make the first row with a 1x1 elastic band. This will help to avoid twisting the edge. To hide the edges of the yarn, it is recommended to use a hook. This tool helps to facilitate and speed up this process.
- To introduce a new skein of threads when using thick yarn, it is necessary to slightly unravel the fibers of the latter to form 2 ends. These edges must first be trimmed, and then one end shortened. Similar actions must be done with new yarn. After that, the edges of the old and new threads must be joined and intertwined with each other. It is also permissible to stitch the edges of the yarn with a needle.
- After knitting is complete, it is recommended to hand wash the finished product in warm water, the temperature of which does not exceed 30 ℃. In this case, it is necessary to use a composition intended for wool products, or regular shampoo. For rinsing, use water with a similar temperature regime. Spinning should be done carefully so as not to twist the fabric. After washing, it is recommended to wrap the mittens in a towel for 5 minutes to absorb moisture. The drying process should take place in a horizontal position. To do this, the product must be carefully smoothed out, giving it the optimal shape. The shape that was given is the appearance that the mittens will acquire after drying.
The thumb on the mittens can be closed or open. Everyone chooses the type of finished product that they like best. However, in order for the mittens to be anatomically correct and fit comfortably on the hand, it is necessary to knit with Indian wedge needles.
Video about knitting Indian wedge with knitting needles
Master class on knitting mittens with an Indian wedge for the thumb: