You can knit with knitting needles from front and back loops beautiful and simple patterns, which even a beginner can handle. Knitting is a method of interlacing threads that appeared many centuries ago and has not lost its popularity today.
It is known that knitted items were previously available only to very rich people, but with the advent of modern technologies, things created in this way became available to the common people. Historians have established that the first knitting has its roots in the Ancient East.
How to knit a front loop?
Patterns of knit and purl loops with knitting needles are popular among needlewomen all over the world. Such loops are the basis of knitting art, and beginners go through the process of creating them in their first lessons.
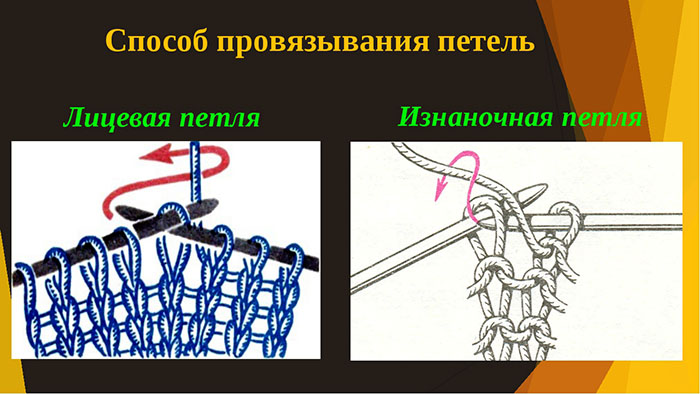
There are several ways to knit a face loop, popularly called "even": for the front and back wall. The first method is also called "classic" and is used by default in most patterns. When the face loop needs to be knitted for the back wall, the creators of the patterns stipulate this separately.
To get a classic facial you need:
- Cast on several stitches onto the knitting needles.
- Release the right needle so that all the loops and the leading thread remain on the left.
- Next, insert an empty knitting needle into the loop from left to right, and, picking up the leading thread, pull it onto the empty knitting needle, leaving the eye of the base loop below.
- After this, the knitted loop remains on the left knitting needle.
Having learned how to create classic knit stitches, you can knit beautiful fabrics or blankets.
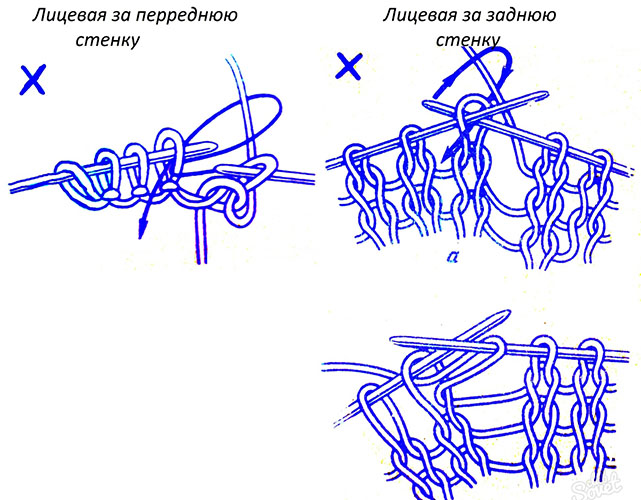
The second method of obtaining a front loop, by knitting the thread through the back wall, is also called “granny’s”.
To create a knitting pattern like this, you need:
- Cast on the required number of stitches onto the knitting needles.
- Release the right needle, as it will be the leading one, and leave all the loops on the left one.
- The thread for creating patterns also remains on the left index finger.
- Next, the working needle is inserted into the knitted loop from right to left, and placed behind the left needle.
- After this, use a free knitting needle to grab the leading thread and pull it through the loop.
- The resulting loop is transferred to the left knitting needle, and the knitted one is released.
This knitting is denser than the classic version.
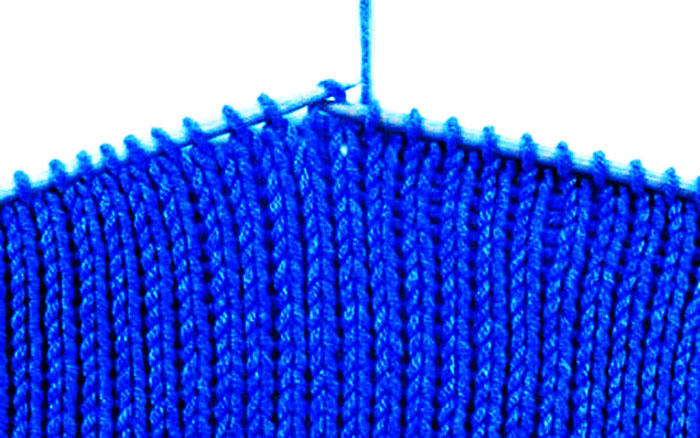
In printed patterns, knit stitches are indicated by an "x", "I" or a completely colored square. A fabric made from only knit stitches is called "satin stitch".
How to knit a purl stitch?
Patterns of knit and purl loops with knitting needles will help to create a product with a unique pattern. To knit masterpieces, in addition to knit ones, you need to learn how to make purl or odd ones. The creation of such loops also involves 2 methods: "classic" and "granny". They differ from each other in how the working thread is captured.
To get a classic purl stitch, you need:
- Cast on the required number of stitches on the knitting needle.
- Release the right needle, leaving the loops and leading yarn on the left.
- Next, insert the right knitting needle into the loop from right to left, leaving the leading thread at the front of the knitting, and hook the leading thread counterclockwise.
- After this, the resulting “ear” is pulled through the loop and placed on the right knitting needle.
- At the last stage, the knitted thread is released into the pattern.
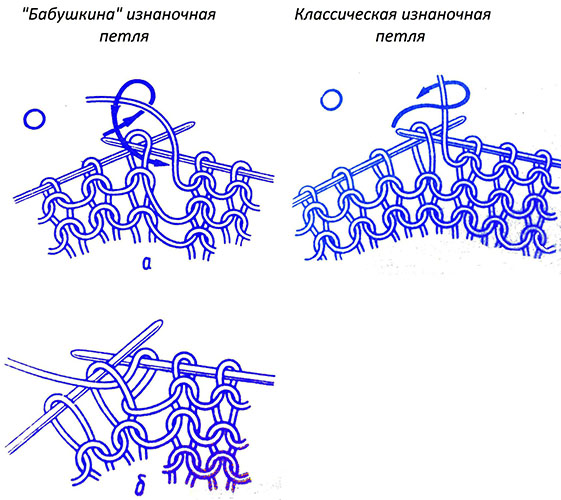
A product made from classic purl stitches is less dense.
To get a pattern of "granny" purl stitches, you need:
- Cast on the required number of stitches.
- Place the stitches and the leading thread on the left needle, leaving the right needle free.
- Next, leaving the leading thread before knitting, insert the right knitting needle into the desired loop and, bringing the leading thread to it, pull it through the loop.
- At the last stage, the resulting eye is placed on the right knitting needle, and the knitted one is removed into the pattern.
Purl stitches in knitting patterns are depicted as "-" or "Ո". Patterns made of only purl stitches are called "stocking" knitting.
Variants of simple beautiful patterns from knit and purl loops with knitting needles. Schemes and description
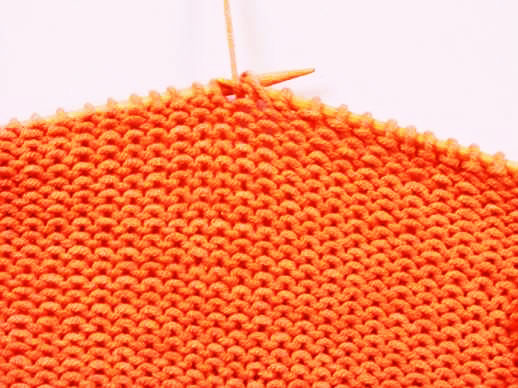
Patterns of purl and face loops with knitting needles form relief products. Classic fabrics are created by alternating them. Usually, knitting begins with faces on the first (and all odd) row and the second (and all even) - knit with purl.
Large loops are used to create scarves, hats, women's sweaters. In men's vests, sweaters and blankets, fine knitting is recommended. The volume of the product also depends on the thickness of the selected thread. Front and back "ears" are also used as a transition between other patterned compositions. For example, you can find front ones between braids or diamonds.
From a combination of simple “even” and “odd” loops we create:
- scales;
- diamonds;
- leaves;
- raspberries;
- blackberries;
- spiders;
- cones;
- asters;
- shadow patterns;
- arans;
- hearts.
By choosing the right threads and knitting needle thickness, even a novice needlewoman can create a beautiful item or accessory that will become a source of pride.
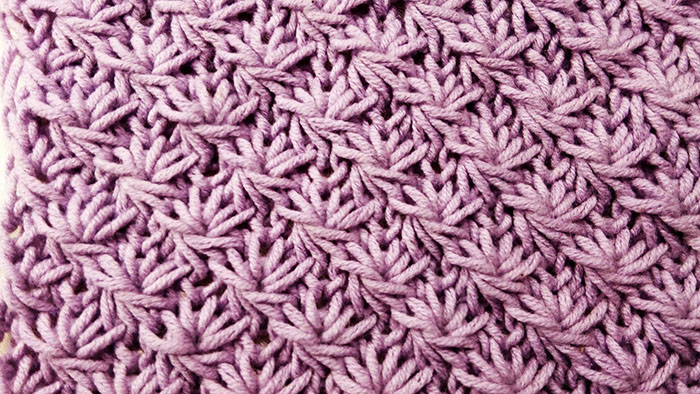
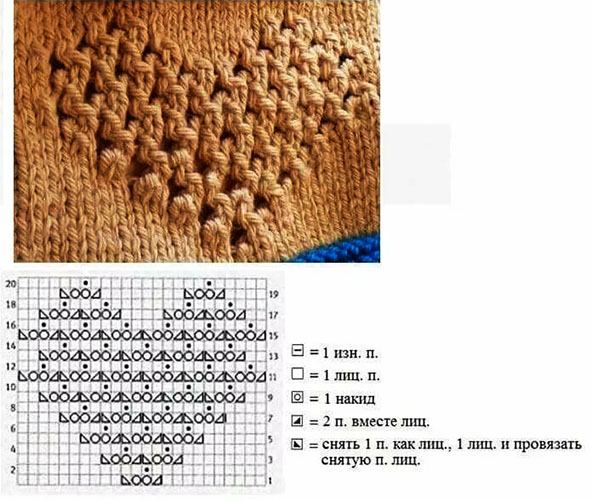
Scales
Patterns of knit and purl stitches with knitting needles are suitable for creating scarves or voluminous sweaters. The "Scales" pattern is popular.
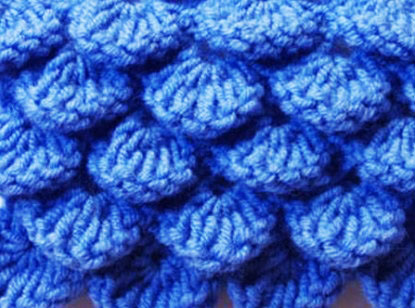

To obtain a volumetric product, you need:
- Cast on the required number of stitches on the knitting needles, for example, 10 (2 edge stitches and 8 main stitches).
- At the next stage, row #1 must be knitted purlwise, removing the unknitted edge loop at the beginning of knitting. The row is closed by knitting the last edge loop also purlwise.
- Row #2 begins with removing the edge stitch, after which a yarn over is made and the next stitch is knitted. The pattern rapport is repeated throughout the row. The last stitch is purl.
- Row 3 begins with removing the edge stitch, after which the yarn over is dropped, knitting the next extended front loop.
- In row 4, remove the edge stitch and knit the remaining 7 ears into one purl stitch.
By following the recommendations, you can get round scales.
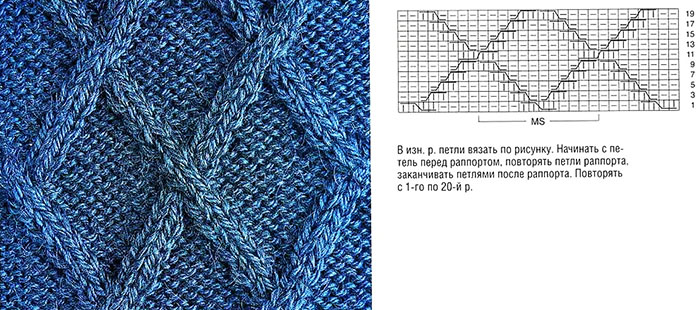
Rhombuses
By alternating front and back stitches, you can create the "Rhombus" pattern. They can be of different heights, densities, and diameters. They can be made with yarn-over transitions or diagonally. The pattern is suitable for knitting sweaters, dresses, skirts, and blankets.
To get diamonds from even and odd loops, you need to:
- Cast on the required number of stitches (for example, 22 together with the first edge stitch).
- Row #1 begins with removing the edge stitch, followed by a knit stitch and 4 purl stitches. The rapport is repeated to the end.
- Row No. 2 also begins with removing the first loop, after which all the front loops are knitted with purl loops and vice versa.
- Row 3, after the edge, begins with 4 purl. Next come 1 even, 1 odd and 1 even loop. After that 7 purl, and again 1 front, 1 purl and 1 front. Finish the rapport with 4 purl.
- The subsequent even rows are created using the classical method, as in row 2.
- Row 5, after the edge, begins with 3 odd, followed by 1 even, 1 odd, 1 even, 1 odd and 1 even loops. Next come 5 purl, after which the rhombus pattern is repeated. Finish the row with 3 odd loops.
- Row 7, after the edge, begins with 2 purl stitches, followed by a diamond pattern, namely 1 knit, 1 purl, 1 knit, 1 purl, 1 knit, 1 purl, 1 knit, 1 purl and 1 knit. Next come 3 odd ears. After this, the row rapport is repeated, finishing knitting with 2 purl stitches.
- Row 9 is knitted like 5, and 11 like 3. And row 13 will completely repeat rapport 1.
Diamonds are a simple pattern that even a novice needlewoman can do.
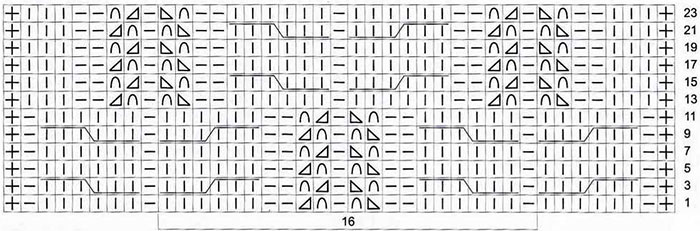
Vertical strip of leaves
Using even and odd stitches, you can create a leaf pattern. To do this, you also need to understand how to make a yarn over or knit several stitches together with the required slope.
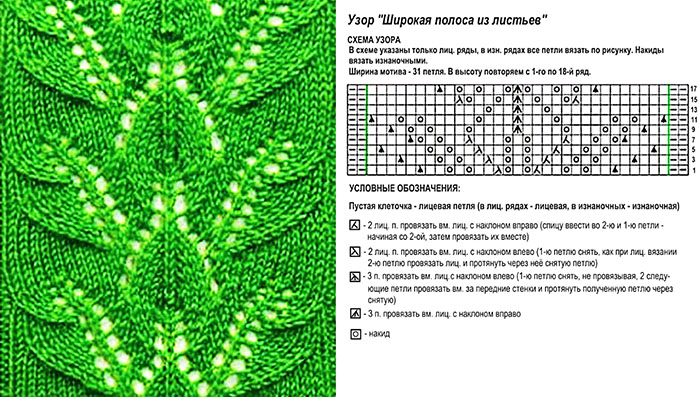
To get a vertical strip of leaves, you need:
- Cast on 34 stitches (including the edge stitch) on the needles.
- Next, the first row begins with removing the edge stitch, followed by a knit stitch and a yarn over. After this, knit 2 purl stitches and 4 knit stitches. Next, knit 3 stitches together and again 4 knit stitches and 2 purl stitches. After this comes a yarn over, even stitch, yarn over, 2 odd stitches and 4 even stitches. Next, knit 3 stitches together, 4 even stitches, 2 odd stitches, yarn over and knit stitch.
- Row 2 begins with an edge stitch and 2 knit stitches. After this, a yarn over, 2 purl stitches, 3 knit stitches and 3 stitches together. Next, 3 knit stitches, 2 purl stitches, a yarn over and 3 knit stitches. After this, the pattern rapport is repeated to the end of the row.
- Row 3 (after removing the edge stitch) begins with 3 knit stitches. After this, make a yarn over, 2 odd stitches, 2 even stitches and 3 stitches together. Next, 2 even stitches, 2 odd stitches and a yarn over. After this, knit 5 even stitches and repeat the pattern to the end of the row.
- Row 4 (after removing the edge stitch) begins with 4 knit stitches and continues with a yarn over, 2 purl stitches and a knit stitch. After this, knit 3 stitches together and repeat the knit stitch again, 2 purl stitches and a yarn over. Next come 7 knit stitches and repeat the pattern to the end of the row.
- Row 5 (after the edge) continues with 5 even, yarn over and 2 odd loops. After that, knit 3 together and again 2 odd, yarn over and 9 knits. Then the pattern rapport is repeated to the end of the row.
- Row 6 (after the edge) continues by knitting 2 front loops together with a left tilt. Then 4 front loops, 2 back loops, yarn over, and front loop. After that, yarn over, knit 2 back loops, 4 front loops and knit 3 loops together with a front loop. Then 4 front loops, 2 back loops, yarn over, and repeat the rapport to the end of the row, finishing it by knitting 2 front loops with a right tilt.
- Row 7 and the following ones up to 10 (after the edge) continue by knitting 2 knits together with a left tilt. Then make 3 knits, 2 purl, yarn over and 3 knits. After that, knit a yarn over, 2 purl, 3 knits, 3 together knit and 3 knits. Next come 2 purl and yarn over. The rapport is repeated to the end, finishing the row and all subsequent ones up to 10 by knitting 2 together knit with a right tilt.
The pattern is suitable for decorating women's sweaters, T-shirts and vests.
Raspberry
The "Raspberry" pattern looks like "Scales". The interlacing of brightly colored threads looks good. In the pattern, the first loop is always removed, and the last one is knitted purlwise.
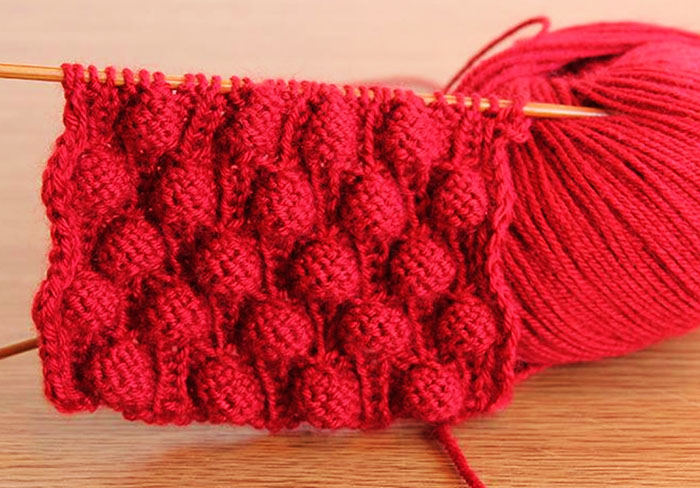
To create a raspberry, you need:
- Cast on 13 stitches (including the edge stitch).
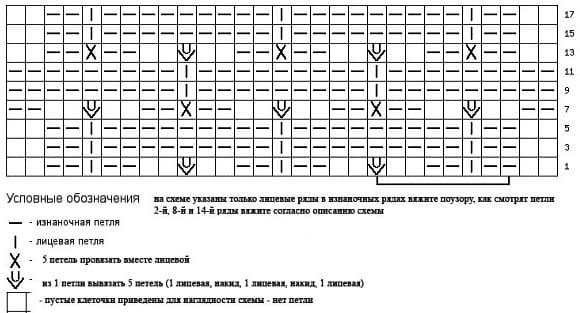
- Row 1 consists of 2 odd, 1 even and 2 odd. Then knit 5 from one loop, knitting a front loop, a yarn over, a front loop, a yarn over and a front loop, a yarn over. Knitting raspberries continues until the end of the row, which is completed with 2 front loops, a back loop and 2 front loops.
- Row 2 consists of 2 knits, purl, 9 knits, purl, 9 knits. In this way, knit the row to the end, finishing it with a purl and 2 knits.
- From rows 3 to 6, loops are knitted according to the pattern: even - even, odd - odd.
- Row 7 begins with 2 purl stitches. Next, 5 stitches are made from 1 stitch, following the example of row 1. After this, 2 purl stitches are made, 5 stitches together into 1 behind the back wall. The rapport is repeated, and the row is finished with 2 purl stitches.
- Row 8 consists of repeating 2 even and 1 odd stitch.
- From rows 9 to 12, the pattern is knitted according to the drawing.
- From the 13th row, the pattern is repeated as in the initial rows.
Craftswomen use raspberries to create children's and women's clothing.
Blackberry
Patterns of knit and purl stitches with knitting needles can look like a blackberry. Relief knitting is pleasant to the touch and looks attractive.
To knit a "blackberry", you need:
- Cast on 10 stitches (including edge stitches) on knitting needles.
- Row 1 is knitted alternating slipping the stitch with knitting 1 purl.
- Row 2 consists of alternating slipped stitch, 1 knit, purl, 1 knit and 3 knitted together purl. The rapport is repeated from 1 knit.
- In row 3, alternate the slipped stitch with 1 purl stitch.
- Row 4 consists of 3 knitted together purl stitches, 1 knit stitch, purl stitch and 1 knit stitch. The pattern is repeated to the end of the row.
- The following rows are knitted, repeating the rapport from 1 to 4.
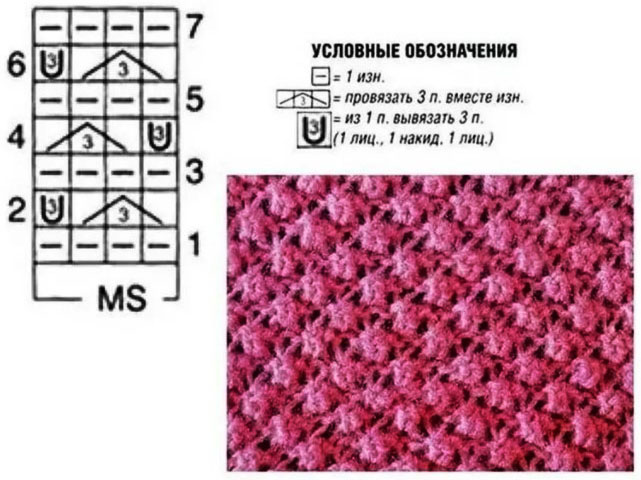
The first loop is always removed, and the last one is knitted purlwise. Blackberries are used to decorate hats, scarves, sweaters, dresses, both for adults and for little fashionistas.
Spiders
The interlacing of purl and face loops can turn into a pattern resembling a spider. The needlewoman chooses their density and their location herself.
To knit a canvas with spiders, you need:
- Cast on 9 stitches (including the extra and edge stitches).
- Row 1 is knitted purlwise.
- Row 2 is knitted with 6 front loops, after 2 and further a yarn over is made. After that 1 front loop.
- Row 3 begins with a purl, after which all yarn overs are dropped, obtaining 5 long loops, which are moved to the knitting needle, after which they are wrapped 2 times with the working thread against the movement of the hands in the clock and not tightened too much. Next, these 5 loops are transferred to the right knitting needle and are not knitted. After which follows 1 purl.
- Row 4 is completely knit.
- In row 5, repeat the steps of row 1, only knit the loops purlwise.
When making a pattern, do not forget to remove the first loop of the row and knit the last one purlwise.
Cones
Before decorating your product with the “Pine Cones” or “Bumps” pattern, you need to learn how to create them in a single copy.
To knit a cone, you need:
- Cast on 5 stitches.
- Next, knit 2 rows in stocking stitch.
- After this, to create a cone in the 3rd row, you need to make 5 loops from 1. To do this, insert the working needle from the front side behind the back wall of the ear and, grabbing the leading thread, knit 1 loop. After this, without removing the loop from the left needle, make a yarn over. In a similar way, create 4 more loops. Then the main loop is dropped into the pattern.
- Rows 4 and 6 are knitted purlwise.
- Row 5 is knitted.
- In row 7, knit 5 loops together and the cone is ready.
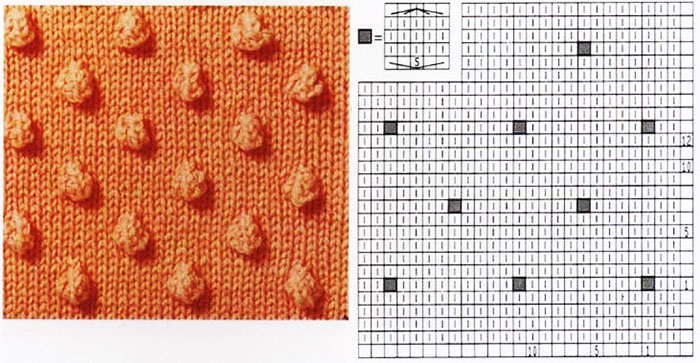
The pattern is suitable for decorating hats, scarves, and blankets.
Asters
Using face and back loops, you can create a floral pattern "Astra" or "Daisy". The principle of obtaining flowers is the alternation of yarns, even and odd ears.
To decorate the product with daisies, you need:
- Cast on 8 stitches onto the knitting needle.
- Row 1 is knitted.
- Row 2 consists of alternating purl stitches and yarn overs.
- Row 3 begins with a knit stitch, after which the next 5 loops, having dropped the yarn over, are transferred to the right knitting needle, and from them, as from one, another 5 loops are knitted. The rapport is repeated.
- Row 4 is created by alternating a yarn over and a purl stitch.
- Row 5 continues with a knit stitch, after which the next 3 are removed to the working needle, and from them, as from one, 3 more are knitted. After this, 1 knit stitch follows, then 5 loops are transferred to the working needle, removing the yarn overs. At the next stage, these loops are returned to the left needle and from them, as from one, 5 are knitted. At the end of the row, knitting 3 as from one is done from 3 loops, and not from 5.
- After this, rows 2 through 5 alternate.
At the beginning of the row, the edge stitch is always removed, and at the end, the last ear is knitted purlwise. The pattern is used to decorate cardigans, sweaters, and hats.
Shadow patterns
From a combination of simple loops, you can create so-called "Shadow patterns", where the picture is not immediately striking, but appears under certain lighting. By alternating front and back loops on the canvas, you can create any idea, from a square or a rhombus to a cat or a star.
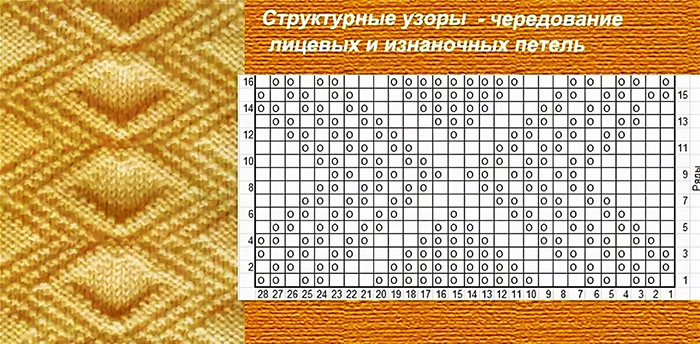
To get a shadow picture, you need to adhere to several principles for creating such patterns:
| Nuance | Advice |
| Drawing | Large geometric shapes or images with clear, smooth edges, without rounding |
| Yarn | Smooth thick threads without fuzz and lumps |
| Colors | You can use either a single-color or multi-colored material. |
| Knitting |
|
Shadow patterns will help needlewomen to realize their most unexpected ideas in knitting.
Irish Arans
Having learned how to create cones and leaves, you can proceed to arans - strands intertwined on the canvas. Braids and honeycombs also belong to this variety, so having learned how to create interlacing, you can consider that you have mastered arans. You will need 3 knitting needles for knitting.
To create a simple aran you need:
- Cast on 15 stitches.
- Row 1 begins with 3 purl stitches, after which the next eye is transferred to an additional knitting needle behind the work. Then follow 2 knit stitches, after which the loop from the 3rd knitting needle is knitted as a purl stitch. After which 1 knit stitch and 2 loops are transferred to the 3rd knitting needle in front of the work. Next, 1 purl stitch and the loops from the 3rd knitting needle are knitted as faces. The pattern is completed with 3 purl stitches.
- Even rows, starting from the second, are knitted according to the pattern.
- Row 3 consists of 2 purl, after which 1 loop is transferred to the 3rd needle behind the work. After that, 2 front loops, the loop from the 3rd needle is turned into a back loop. Next come 1 front loop, 1 back loop, 1 front loop and 2 loops are transferred to the 3rd needle in front of the work, which are knitted with the front loop after 1 back loop. Next, 2 back loops.
- The Aran pattern is repeated from rows 1 to 5.
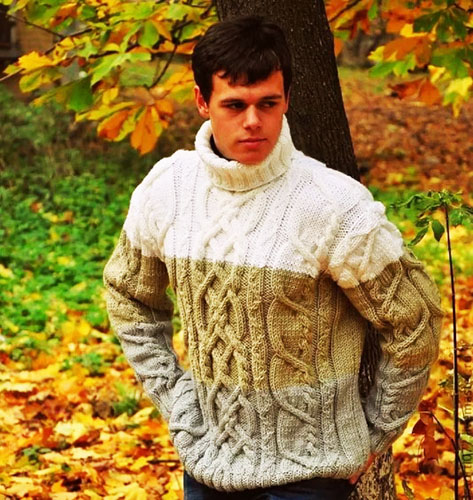
Irish weave is used to decorate sweaters, cardigans, scarves and vests.
Hearts
You can also decorate your knitting with hearts. Simple for beginners are the designs made on the garter stitch.
To knit hearts, you need:
- Cast on 15 stitches.
- Row 1 consists of 4 knits, 2 knits at the same time with a right tilt, 1 yarn over and 5 knits.
- Row 2 and the remaining even rows are knitted only with purl stitches.
- Row 3 consists of 3 knits, 2 knits at the same time with a right tilt, 1 knit, yarn over, 2 knits at the same time with a left tilt and 3 knits.
- Row 5 consists of 2 knits, 2 simultaneously knitted with a tilt to the right, yarn over, 3 knits, yarn over, 2 simultaneously knitted with a tilt to the left and 2 knits.
- Row 7 consists of 1 knit, 2 knits at the same time with a right tilt, yarn over, 5 knits, yarn over, 2 knits with a left tilt, 1 knit.
- Row 9 consists of 2 knit stitches knitted at the same time with a tilt to the right, yarn over, 2 knit stitches, 2 knit stitches knitted at the same time with a tilt to the right, 3 knit stitches, yarn over, 2 knit stitches knitted at the same time with a tilt to the left.
- In row 11, knit 2 stitches, make a yarn over and a double draw through, yarn over, 1 knit stitch, a double draw through, yarn over and 2 knit stitches.
Patterns made from knit and purl stitches will decorate any product, and even a novice needlewoman can make them.
Video about knitting patterns from front and back loops
Master class on knitting a simple volumetric pattern with knitting needles from front and back loops: