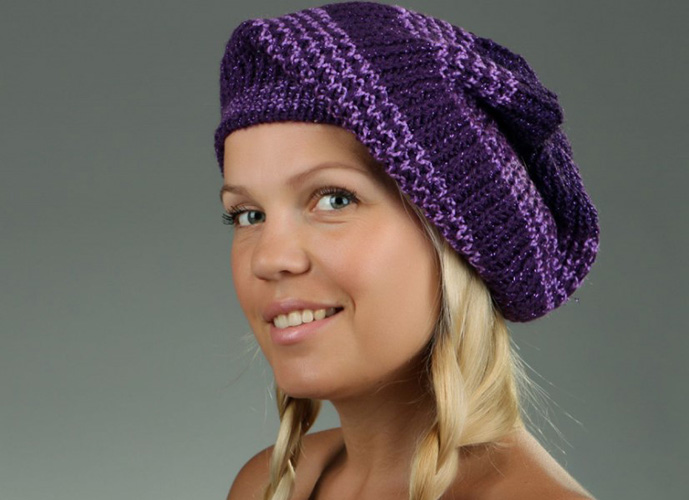
Even a beginner needlewoman can knit a beret with knitting needles. This headdress, which suits everyone. You can choose a knitted wardrobe item for any face and style. There are no age restrictions for wearing a beret, and both a young fashionista and a mature woman can wear it.
Tips and tricks for knitting a beret
It is not difficult to knit a beret with knitting needles, it is enough to choose the right threads, knitting needles and accurately measure the circumference of the head. For beginners, you can choose simple models, and professionals prefer complex patterns and weaves.
To create an exclusive wardrobe item, you need:
- Select a model.
- Select threads and knitting needles.
- Calculate the loops.
- Draw the product on paper.
- Select a knitting method.
- Determine the knitting density.
The choice of the model should be approached thoroughly and the option that suits the type of appearance and the oval of the face should be chosen. After that, the pattern is chosen and suitable yarn and knitting needles are found. If the headdress is needed for the cold season, then wool is selected, and if for spring or summer, then you can opt for thin types of threads.
Manufacturers indicate the number of knitting needles that will fit the yarn on the packaging.
In addition, it is worth considering that using circular knitting needles will make the product seamless, and a divided tool always leaves a canvas that needs to be sewn. You can also crochet a beret.
Once the threads and needles are selected, you need to measure the circumference of your head and calculate the stitches. You will also need to determine the diameter of your headdress.
The calculation is done as follows:
- measure the head circumference;
- the resulting number is divided by 3.14;
- get the required figure.
For example, the circumference is 58 cm, therefore 58/3.14=18.47 cm. If rounded for ease of calculation, the required figure will be 18.5 cm.
Having received the diameter of the beret, add another 2 or 4 loops to this indicator, which are needed for the future seam. Those who do not know how to calculate loops need to knit the obtained diameter and make a calculation taking into account the outer yarn overs. Experienced needlewomen make a 15x15 square and wash it like a finished product.
After drying, measure 10 cm and calculate the number of loops for knitting. If the density of the pattern does not match that indicated in the source, create a new sample with a different diameter of needles.
In order to understand what the headdress should look like, you need to draw its layout on paper. Although the model can be selected from a magazine or a virtual resource, it is easier to navigate with a sketch made by hand. Beginners can make a template to simplify the process.
Selection of knitting needles and threads
Even a beginner craftswoman can knit a beret with knitting needles. Before you start creating a fashionable item, you need to select yarn and knitting needles. Usually, the example indicates what kind of thread and the number of knitting tools were used.
Beginners should remember that the thicker the needles, the larger the knitting will be and vice versa. The density of the product also depends on the diameter of the knitting tool and the thickness of the thread.
To understand which knitting needles to choose, you need to look at the label on the yarn. Manufacturers in most cases indicate which number is suitable for a given material. In the case when the thread is not packaged, you need to poke a hole in the paper with a knitting needle and pull the yarn through it.
If the thread passes through well and does not dangle or, on the contrary, does not stretch in the hole, then the yarn product can be knitted with this number of knitting needles.
| Winter | Summer |
| Angora | Acrylic |
| Alpaca | Bamboo |
| Cashmere | Iris |
| Mohair | Silk |
When selecting threads, keep in mind that the product should keep you warm in cold weather, and be a light and breathable wardrobe item in warm weather. When choosing materials for a headdress, you can also think about decorations. Beads and seed beads are popular among fashionistas.
Knitting technique
You can knit a beret using your favorite pattern.
A headdress of this type always consists of 3 parts:
- Rim.
- The main part.
- Tops of the heads.
There are several techniques for knitting berets:
- from the top of the head;
- from the rubber band;
- cross knitting;
- element by element.
Before starting needlework, beginner needlewomen are advised to understand the technique of adding and decreasing loops. For practice, you can knit a small part of the pattern, repeating it several times.
Fashionable patterns
You can knit a beret using fashionable motifs and patterns. The most common are:
- smooth surface;
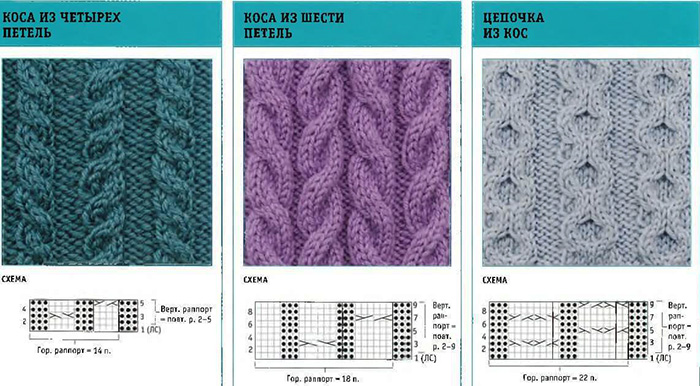
- braids;
- corn;
- leaves;
- rubber;
- honeycombs.
In addition, you can knit an owl, a butterfly or an anagram on a smooth surface.
Patterns, master classes for beginners on knitting a beret with knitting needles
The easiest way to knit a headdress is the elastic method.
To do this:
- knit a base elastic band;
- add loops for the main part;
- form the crown by decreasing the loops to 0.
For those who plan to knit a beret from the crown, you need:
- start knitting from the wrong side;
- create the crown by adding loops;
- form an elastic band.
If a headdress option with different motifs is chosen, the needlewoman should knit the required parts of the same length and sew them together at the end. Fans of transverse knitting create a product from stripes directed not according to the standard pattern. In this way, you can knit a multi-colored headdress.
Classic version of English elastic band made of boucle yarn
You can knit a beret with knitting needles in the classic version with English elastic.
For knitting you will need:
- 500-meter-long yarn (100 g);
- knitting needles No. 2.
You need to work like this:
- At the initial stage, loops and the 1st row are collected.
- Next, knit a 1x1 elastic band 4 cm high.
- After the elastic band, knit 1 row, alternating front and back stitches.
- In the 2nd row, start with the front stitch, then make a yarn over. After that, remove the back stitch onto the right knitting needle without knitting.
- Next, the knitting is turned over and the purl stitch and yarn over are knitted. After that, the yarn over is knitted again and the next stitch is removed without knitting.
- After 15 cm of English ribbing, return to knitting a regular 1x1 ribbing. Thus, knit another 6 rows.
- At the last stage, the loops are recounted and divided into 6 equal sections. At the junction of the fragments, 2 loops are reduced from each part in a row.
- The beret is tightened when there are 12 loops left on the knitting needles.
To make the pattern more voluminous, you can replace the 2 mm diameter knitting needles with 1.5 or 1 mm ones.
Simple beret with braids
To create a beret with a braid pattern you will need:
- acrylic/wool yarn (200 g);
- knitting needles No. 4.
You need to work according to the following scheme:
- At the first stage, for size 52-54, cast on 104 loops.
- Next, knit a 1x1 elastic band 2 cm long.
- After this, start knitting the fabric with braids, making yarn overs every other row. There should be face loops between the braids.
- As soon as the length of the fabric with the pattern is 23 cm, the loops in the rows begin to decrease, forming the crown. At first, the loops are reduced between the braids.
- The last 2 rows are knitted.
In this beret you can combine braids of different types. You can alternate them after 4 rows.
Garter stitch beret in the round without seams
Knitting with circular needles makes the product seamless.
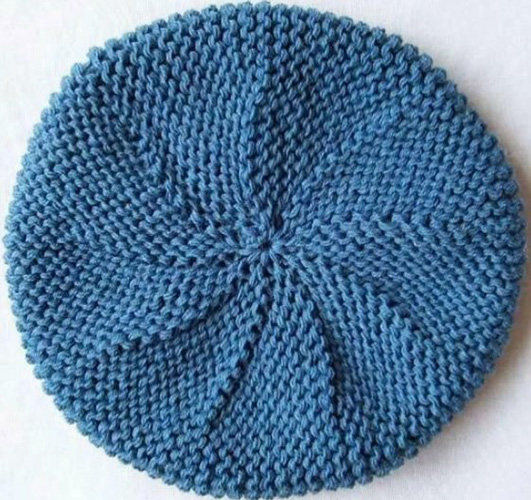
To knit a beret using garter stitch, you will need:
- NORKA Mink yarn (100 g);
- circular knitting needles No. 5.
The following actions are performed step by step:
- At the first stage, cast on 65 loops and close the circle.
- Next, knit 6 rows with a classic 1x1 elastic band.
- In row #7, knit 9 front loops and remove 10 without knitting. Do this until the end of the row.
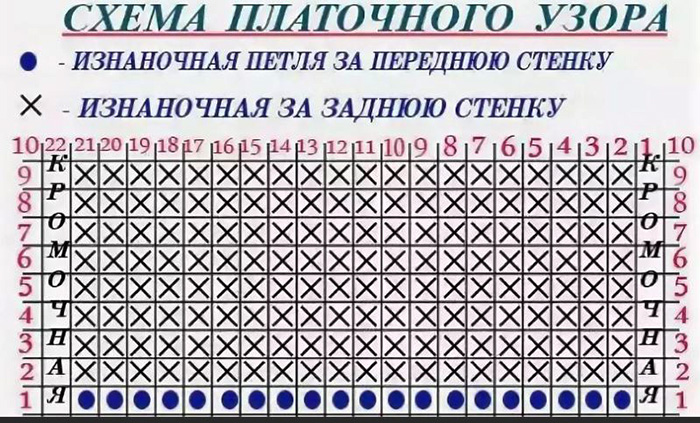
- In row #8, they start making increases, and the fabric itself is knitted with front loops. When there is 1 loop left before the unknitted loop, then the loop in front of it is lifted and the front loop is knitted crossed. After this, no yarn overs are made. At this stage, each fragment contains 10 loops.
- The procedure is repeated in each subsequent row until the number of loops in the fragments reaches 22.
- At the next stage, 10 rows are knitted with single crochet stitches.
- After this, the loops begin to decrease. To do this, knit 10 front loops, and remove the 11th, and knit 12 front loops, pulling through 11. Next, go 20 front loops, and after 21 knit 22 front loops in the specified way. The procedure is repeated until the end of the row.
- The loops are decreased until there are 7 loops left on the knitting needles, which are pulled together with a hook.
The model is knitted with a thread folded in 4 times.
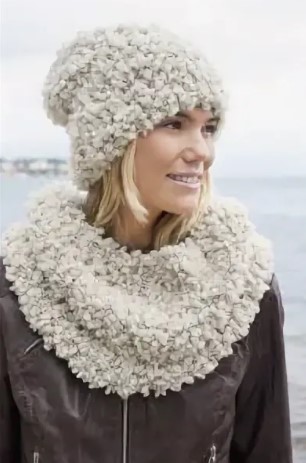
A product made of thick melange threads
A thick thread can make even the most ordinary pattern attractive and unusual.
For knitting take:
- yarn;
- knitting needles No. 9.
The following actions are performed step by step:
- At the first stage, the required number of loops are cast on the knitting needles.
- Next, knit 6 rows with a classic 1x1 elastic band.
- From row No. 7, start knitting the braids according to the pattern and repeat the procedure for row 34.
- From row #35, begin decreasing stitches until there are 15 stitches left on the needles.
- The loops are pulled together and the thread is secured on the back side of the product.
After the beret is knitted, it needs to be washed and dried on a can to keep its shape.
Basque model
You can knit a warm Basque-style beret from cashmere or alpaca.
To do this you will need:
- wool (120 g);
- circular knitting needles No. 3;
- circular knitting needles No. 5;
- regular knitting needles.
To get a warm and beautiful headdress, follow these steps:
- At the beginning of work, cast on 84 loops onto the knitting needles.
- Next, 10 rows are knitted using the “Classic Elastic” style, alternating front and back stitches 3 to 3.
- Starting with row #11, start creating the pattern. To do this, knit 3 purl, 1 knit and make a yarn over. After that, knit 2, 1 purl, 2 knit and a yarn over. Next, knit 1 knit, make a yarn over and knit 1 again. Repeat the pattern until the end of the row.
- In row No. 12, the pattern is repeated, only the front stitches are knitted as purl stitches, and the yarn overs behind the back wall are knitted as front stitches.
- Repeating the pattern, knit 7 rows.
- As soon as there are 48 loops left on the needles, knitting continues on needles No. 3.
- At the final stage, the crown is formed by decreasing the loops in rows. To do this, first knit 3 loops together, and on the next row - 2.
- When there are 12 loops left on the knitting needles, they are pulled together.
The length of the product is 25 cm.
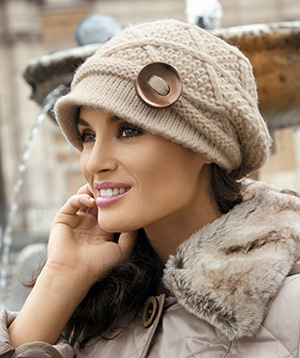
Option with a visor
The headdress can also be knitted with a visor.
To do this you will need:
- yarn (100 g);
- knitting needles No. 5 and 4;
- visor insert.
To get a beautiful headdress with a visor, follow these steps:
- At the first stage, cast on 62 loops on knitting needles No. 4.
- Next, knit 4 rows with a double elastic band.
- After this, starting from row No. 5, move on to knitting the main pattern, which is done with No. 5 knitting needles.
- At the next stage, knit 13 cm using the chosen method.
- Next, the loops begin to decrease, knitting together 6 loops at the beginning and end of the row. Loops are reduced in every 2nd row.
- As soon as there are 14 loops left on the knitting needles, they are pulled together.
- At the next stage, start knitting the visor. To do this, cast on 59 loops along the middle 33 cm of the lower edge of the product and knit them with the front surface, decreasing 3 loops in every second row at the beginning and end of the row.
- After this, 2 rows are knitted without decreasing, and on the 3rd row, 3 loops are added from each edge in even rows.
- At the next stage, 2 rows are knitted without yarn overs in stocking stitch.
To form the visor, it is folded in half, a hard base is inserted inside and sewn.
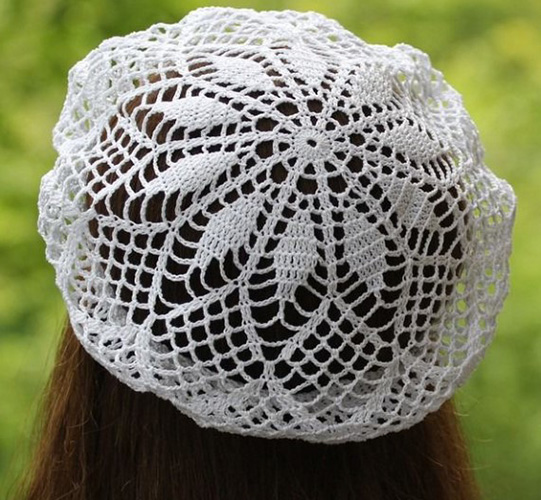
Thin openwork beret for summer with leaves
For the summer, you can knit a fashionable beret with a leaf pattern from cotton or acrylic.
To do this you will need:
- yarn (100 g);
- knitting needles.
To create a light headdress, follow these steps:
- At the first stage, the required number of loops are cast on the knitting needles.
- Next, knit 10 rows with a classic elastic band.
- From row No. 11, begin to increase the number of loops, knitting from 1 to 2.
- The loops must be calculated so that the front loops from the elastic band go into the stems of the leaves and become a continuation of the pattern.
There is also a way to knit such a product from the crown to the rim.
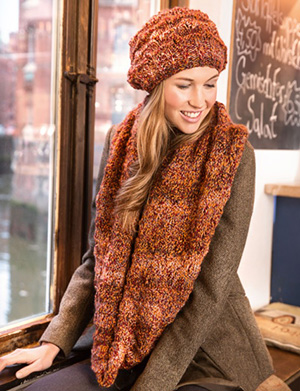
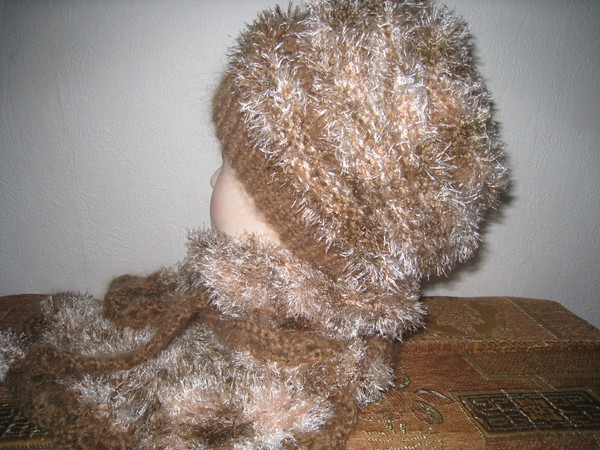
Stylish autumn beret made of grass
You can decorate your headdress with a “Grass” pattern.
For knitting you will need:
- woolen threads (100 g);
- "Grass" threads (100 g);
- knitting needles No. 4-6.
To get a fashionable beret, follow these steps:
- At the first stage, cast on 60 loops of woolen thread using knitting needles No. 4.
- Next, knit 4 cm of the base using the “Classic Elastic” pattern.
- After this, make 1 thread from two types of yarn and continue knitting on needles No. 6, adding 1 loop with a twisted yarn over every 5. Thus, knit 6 cm.
- At the next stage, the loops begin to decrease. To do this, in the front rows, decrease 1 loop every 5.
Takes knitting needles from grass - As soon as there are 8 loops left on the knitting needle, they are pulled together.
The beret is sewn along the edge with a knitted stitch.
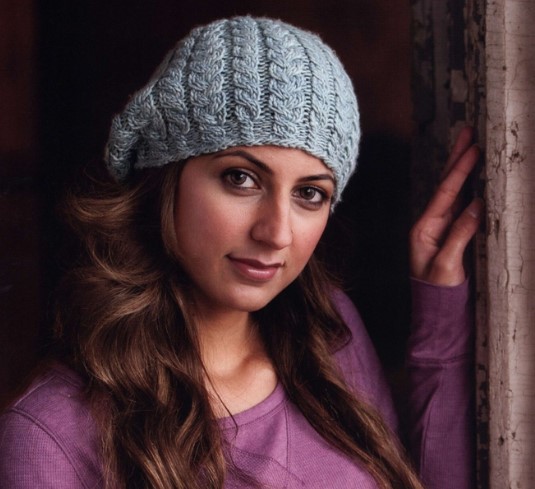
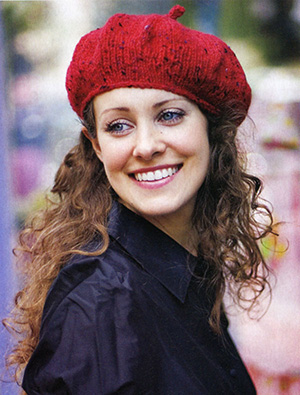
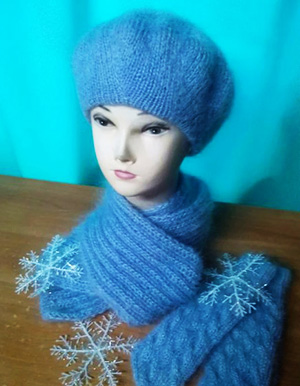
Volumetric model of a French beret made of mohair for winter
For winter you can knit a beautiful mohair headdress.
To do this you will need:
- thread (100 g);
- knitting needles No. 12;
- hook #9.
To knit a French beret, follow these steps:
- At the first stage, 61 loops are cast on to the knitting needle.
- Next, in row #1, knit: 2 front loops, 1 purl and 3 front loops. Repeat the pattern throughout the row. Finish the row with 1 purl and 2 front loops.
- In row #2, knit 1 purl and 3 knit stitches. Repeat the pattern throughout the row and finish with 1 purl stitch.
- Over the course of 20 rows, the alternation of the first pattern is repeated.
- After this, the loops begin to decrease, knitting 1 front 3 back loops. The row must be finished with 1 front loop. At this stage, 31 loops should remain on the needles.
- At the next stage, 2 rows are knitted with a classic elastic band.
- After this, the number of loops is reduced again. To do this, 2 loops are knitted from the slopes to the left. The manipulation is repeated throughout the entire row, and it is finished with 1 front loop.
- When there are 16 loops left on the knitting needles, the fabric is pulled together with the working thread.
The beret rim is made with a crochet hook. The knitting pattern is chosen at random.
Nako Angora Beret
Nako is an Italian designer who created special diameter knitting needles for knitting. The brand's headdress consists of 3 parts that are knitted separately.
To knit an angora beret, you will need:
- thick yarn;
- knitting needles No. 5 and 6.
The following steps are performed in the work:
- At the first stage, 20 loops are cast on for the central pattern using No. 6 knitting needles.
- Next, knit the central braid.
- After this, 75 loops are added to the right side of the strip with a braid knitted in the center.
- At the next stage, knit 10 rows with the front stitch.
- Next, the number of loops is divided into equal parts and after the same distance, 2 loops are knitted together with a tilt to one side. The back side of the beret is knitted according to the pattern, but the loops are not reduced.
- At the final stage, the loops from the wedges are tightened.
If you use knitting needles of a smaller diameter, the beret will be too small.
It is not difficult to knit a beret with knitting needles, for this you need to adhere to the pattern rapport and understand the front and back loops. This type of headdress has long been worn by the French, and over time it became popular all over the world.
Modern industry offers needlewomen yarn for every taste, color and budget, so a beret can be not only plain, but also colored, and can be worn at different times of the year.
Video about knitting berets with knitting needles
Master class on knitting a spring beret: