Waste material is anything that is no longer useful in everyday life and can be safely thrown into the garbage container.
But you can try to give such unnecessary things a second life in the form of various children's crafts, home decorations, unusual decoration of a summer cottage, and also crafts made from waste material with your own hands can act as gift surprises for a loved one, relative or friends.
Crafts from old CDs
It is easy to update old sneakers from waste material with your own hands, pasting them with pieces of disks of different sizes. It is quite possible to give a new look to a guitar, laying out broken pieces of disks in the form of a mosaic over its entire area. You can add mosaics to flower pots, glass in an interior door, tables, chairs.
It is not as difficult as it seems to make a frame from the same pieces for a large mirror on the wall. Even beginners can easily make crafts from whole CDs, for example, a clock. It will be exciting for primary school children to make such a useful craft. It does not bring great ingenuity.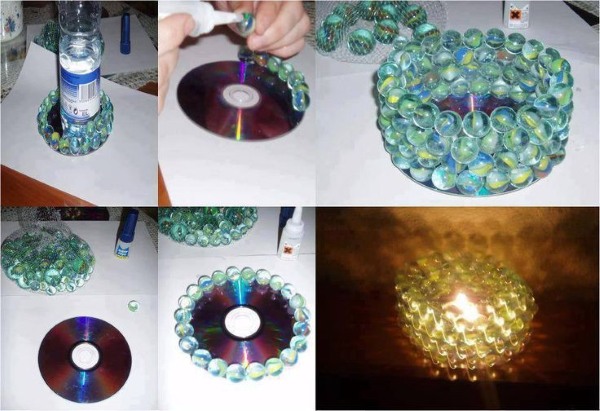
The following parts are required for production:
- CD-disk.
- The clock mechanism is from a working alarm clock.
- Superglue of any brand.
- Unnecessary or unusable keyboard.
The compact disc acts as the basis for the future watch, so any of its sides can be used as the front view. Prepare 12 keys with numbers from the keyboard and only those with the letter f. They are located at the top of the very first line.
Now you should apply glue to the areas, having previously made marks with a marker. For convenience and uniformity, it is better to glue the numbers 3, 6, 9, 12 first. Carefully insert the engine with the hands in the center. The items used must be glued together. After complete drying, you can decorate the clock with additional drawings or fractional decorative ornaments.
Garden crafts from plastic bottles
It is quite easy to make an exotic palm tree from plastic bottles, which will decorate the yard, plant a vegetable garden on a summer cottage.
Required materials:
- Plastic bottles with a capacity of 2 liters, brown and green.
- Large general purpose scissors.
- Stationery knife.
- Drill.
- Steel rod with a diameter of 10 mm.
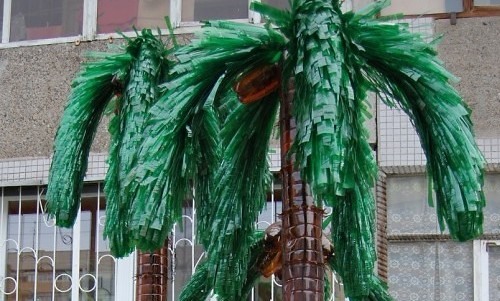
In plastic brown bottles we cut off the upper unnecessary part. The bottom remains 7-8 cm high. Make triangular cuts, in the form of teeth, which will help to create roughness and relief of the trunk. Drill holes in each prepared part with a drill. The diameter of the drill should correspond to the diameter of the rod.
The number of bottles is determined by the desired height of the trunk.
The leafy top of the upcoming palm tree is made from green bottles. You need 5 of them. Cut them lengthwise along the entire length to get two equal halves, which are bent to the sides. Free yourself from the bottom in advance with a stationery knife - you won't need it. Make small cuts on both sides of each half you get. This will create a special splendor for the leaves.
Make a hole in one lid with a drill of 8 cm. Put all the products from brown bottles on a steel rod, having bent the teeth outward in advance. Then put on the foliage. Tightly screw the lid on the last bottle with a neck. Prepare a foundation for installing the palm. The fastening must be reliable, then strong winds, scorching sun, showers and sharp frosts will not harm the palm.
Crafts from bottle caps
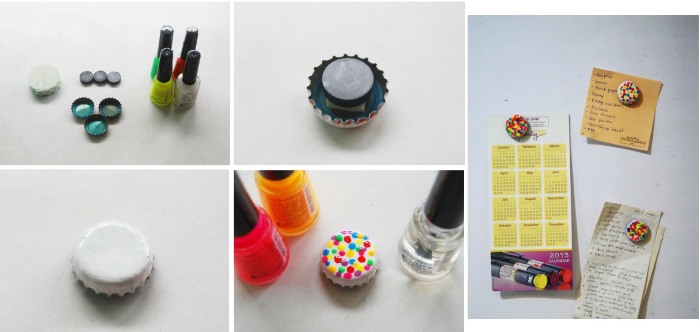
You can easily make unusual fridge magnets from bottle lids that will decorate your kitchen interior.
Simple instructions for making magnets from any bottle caps:
- Attach a magnet to the outside of the lid using superglue.
- Inside the lid, use felt-tip pens to draw the face of the desired smiley, a letter or a number. If the size of the lid allows, you can insert a small photo or a drawing of an animal.
To make a bunch of grapes, you will need to collect several blue or green caps, connecting them together with brown wire or thick thread. You can make cherries from red caps, and take green wire, twist it into the desired shape, it will serve as leaves.
If the passage from the hallway to the room does not have a door, then it makes sense to construct curtains with your own hands from this eye-catching material, using an awl to make holes and floss. Put the details on it, alternating colors. Make several such chains so that they tightly close the passage along the entire width.
Take the wire that will serve as a cornice. Pull it tight and secure it on both sides using screws and a screwdriver. Tie ready-made trinkets into knots on the secured wire. The homemade curtains are ready for use.
The lids can be used to decorate tables and benches in the courtyard of a private house., fences, outer walls of a barn, a shed. To do this, you need to sort the lids by color. Design a pattern or picture of the drawings in advance. You can cut out a finished image and use it as a guide. The lids are perfectly glued to wood, plastic, plywood, iron.
What can you make from wine corks
It is quite easy to make a DIY bathroom rug from cork waste material with your own hands. Such rugs do not absorb moisture and have healing properties for the feet. In advance, take care of purchasing a waterproof base of the desired coverage. You can use a rubber mat if you have one at home.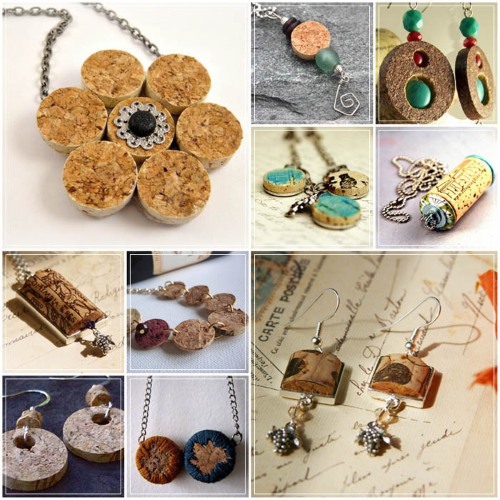
Cut each cork in half with a stationery knife, clean the resulting rough sections with fine sandpaper. Line up the parts along the perimeter for convenience of the further work process, using any type of adhesive. Then fill the resulting space in a row one by one. You can also build a conceived image from the corks for a positive mood and effect.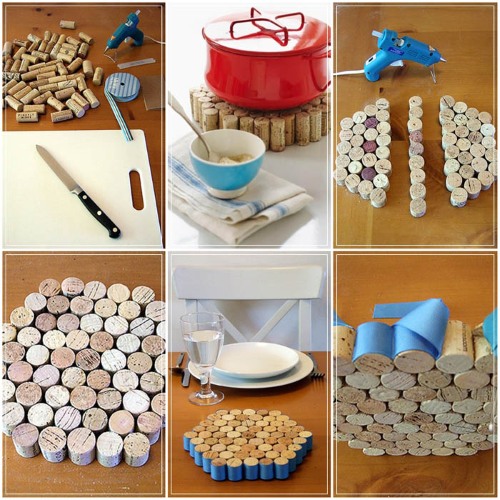
Using the same scheme, wall paintings are made with your own hands.
Place items in a regular photo frame, including your imagination. Decorate with buttons, ribbons, chains, brooches, and various jewelry. You can use corks to cover the wall in the kitchen above the work table, laying them out two at a time, sometimes vertically, sometimes horizontally. Wine corks are ideal for hot coasters.
Master class: applications with disposable plates
The cost of disposable plates is affordable for creativity, making various crafts. It is easy to make masks for children.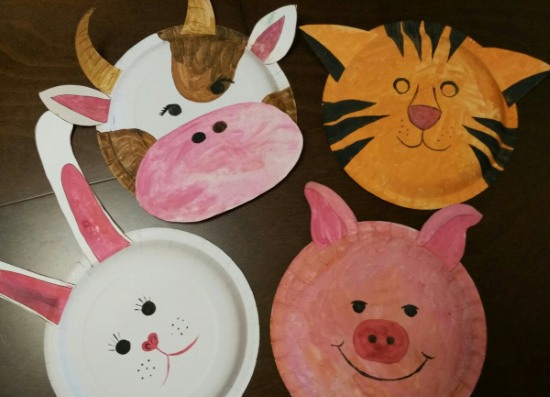
Step-by-step work process:
- On the back of the plate, use a felt-tip pen to mark the location of the eyes of the future animal.
- Use a stationery knife to cut out openings for the eyes and decorate them with black and white paper.
- Draw a sketch of the face of your preferred animal on paper.
- If you decide to make a fox first, then paint the entire back of the plate with orange paint.
- Make ears from orange cardboard. To make the image aesthetically pleasing, cut out shapes slightly smaller than the ears themselves from white paper and glue them inside. Attach the ears using double-sided tape. Make an oblong muzzle from orange paper by folding the paper into a cone. Cut out a circle for the nose from dark gray paper. Cut out two equal shapes from white paper and place them on either side of the nose.
- Glue all prepared items to their designated places.
- Insert the elastic cord into the holes just below the eye holes. The mask is ready to use.
In this way, you can make any animal your child chooses.
A Second Life for Tin Cans
It is possible to make a spinner, an anti-stress toy that has become a sensation throughout Europe, from tin cans. Necessary parts: 2 tin cans – volume 0.33 l, 2 roller bearings of the same size, superglue, weights (small iron balls) of the same size – 3 pcs., manicure scissors and a stationery knife, colored sticky tape.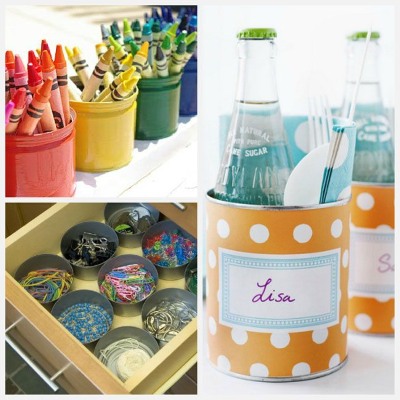
Execution of work:
- Use manicure scissors to cut the bottom of the jars to a height of 1 cm. You need to trim the rough and prickly edges without changing the height of the sides.
- On one tin product we attach weights with glue at an equal distance from each other. Correct fastening of balls will allow to create a spinner with a significant system of inertia of the required speed. That according to technical rules in work the toy will not distinguish a craft from waste materials made by hand from factory manufacturers.
- Then we connect the two resulting parts, putting one on top of the other, the shape should resemble a wheel.
- Now we glue the bearings on both sides, which should be placed strictly in the center in the same position so that the points perfectly coincide with each other, otherwise the anti-stress spinner will not rotate as desired.
- After the glue has completely dried, you need to get rid of the sharp edges of the tin parts, avoiding cuts on your hands. Using colored sticky tape, carefully pulling each time, wrap the toy around the edges. Do not rush, so that bubbles do not form.
- Any uneven areas that go beyond the boundaries are cut off with a stationery knife.
- The bearings can be disguised with buttons of appropriate size for convenient use and stylish appearance.
Decorating glass bottles
You can beautifully decorate a glass bottle using coffee beans. The work is simple and enjoyable. Apply a drop of adhesive to each coffee bean and firmly stick it to the bottle. It is acceptable to stick without any drawing or pattern, or you can develop a sketch of the image in advance. Colored paper is often used to decorate glass bottles.
Crumple the paper, then straighten it out. Apply glue to the bottle. Start from the neck, wrap it around the bottle, pulling the paper tightly, but carefully so as not to tear it. The paper will shrink, lie down with folds, which means everything is done correctly. The main thing is to ensure that air does not get under the paper. Then cut out strips of paper of any color, 3 cm wide. Roll into spirals.
The selected area for the pattern on the bottle is coated with glue. It is also possible to use chocolate foil, newspaper or corrugated paper for decoration.
Crafts from newspapers and magazines
It is easy to make many interesting DIY crafts from old newspapers and magazines, which you can use with pleasure in everyday life. One of the most popular crafts from waste paper material is a basket.
To weave a basket from newspapers you will need:
- acrylic paint in spray form;
- newspapers that have been read several times in everyday life;
- brush with a long handle;
- strong cardboard;
- PVA glue;
- stationery knife;
- scissors.
Cut two identical circles out of cardboard, you will need to use them to determine the size of the basket. Cut newspapers to the size of an A4 sheet. Fix one edge of the newspaper on a pencil and start winding the tube, and after a few turns spread PVA glue along the entire length. Make about 20 of these tubes.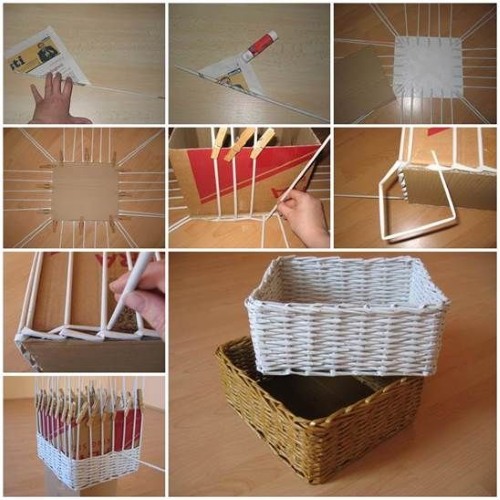
Glue 6 tubes to the cardboard surface, placing them at equal distances, like the numbers on a mechanical watch (6, 8, 10, 12, 2, 4). The remaining tubes must be made flat, straightened with the edge of the palm. After finishing the craft, paint the basket with spray paint.
Craftswomen love to make stylish wide bracelets for their hands from the magazines they read.
For this you will need a pair of handy scissors and a magazine. Cut strips of 10 x 4 cm from the magazine. Fold the resulting piece in half and unfold it back, the fold line should be visible. Fold the two edges exactly to the fold. Fold again, you will get a long strip. Then fold it in half widthwise and unfold it back. Then fold the two sides to the fold line.
You should get a symbol of victory "V". To assemble the bracelet, you need to combine all the available parts. You need to put the ends of one part into the ends of another until you get a chain with 27 links. You need 3 of these chains. Finally, connect the chains together using several blanks of the "V" symbol. Paint or decorate the finished bracelet to your taste.
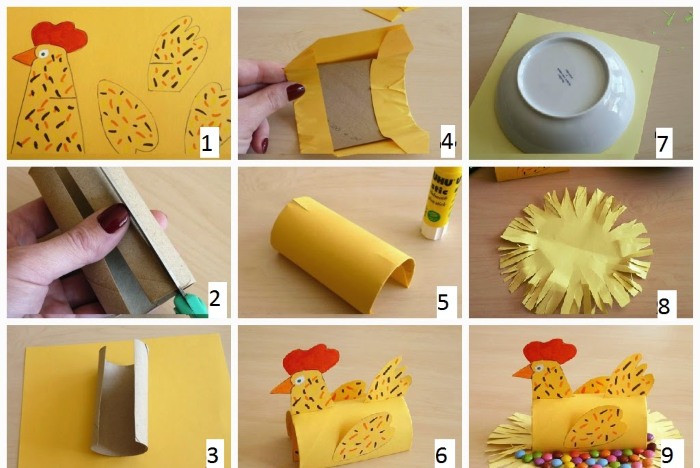
Toys from toilet paper rolls and paper towels
You can make many interesting toys from toilet paper rolls and paper towels. Moreover, even a small child can make such crafts from waste material with his own hands, and a parent will be happy to help him with this. To make the ears of any animal, you need to bend two edges of the roll inward so that they touch each other.
Raise the two protruding ears or position them as you see fit for the chosen animal.
Make a tail from colored cardboard, and cut out wings, a triangular beak, and paws for the bird. Make a trunk and huge ears for the elephant. Make a beautiful, lush mane for the lion - cut out a round figure from cardboard, around which make cuts in the form of scars. Cut out eyes, noses, and a pig's snout from colored ordinary paper. Also cut out a bow, tie, and pockets. When assembling the fake, use ordinary glue.
It is not difficult to make an unusual snake with your own hands from waste material, using paper towel rolls. To do this, you will need to cut the roll into a spiral along its entire length, the width can be different, the narrower the strips, the thinner, but longer the snake. Cut out the shape of the snake's tongue from cardboard. Paint or glue with colored paper.
Using imagination, you can make different animals, little people, and even monsters, which almost all children have a positive attitude towards.
Examples of crafts from cardboard boxes
The easiest way to make cubes is from a tetra pack of milk or kefir. To do this, cut the bottom of two such boxes into an even square. So that all sides are the same height and width. Apply glue to the walls and carefully insert one blank with the empty space into the other. Cut out pictures from newspapers or magazines. Paste them onto all the edges.
Finally, cover with acrylic varnish for decoupage. Glue the ribs with thin strips cut from the album sheet paper. If you put some cereal inside the cube, you will get an original rattle. You can make an organizer for office supplies from a shoe box.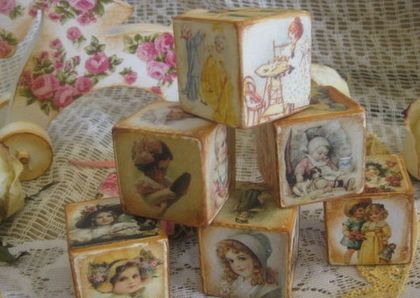
Line the inside and outside of the box with fabric or colored paper with pictures pasted on it, cut out of magazines and newspapers. Measure the width, length, and height of the box. Cut one partition out of cardboard inside along the length and 3-4 partitions along the width of the box.
On the short partitions, make cuts in the middle all the way to the top so that they can be put on the long partition. Coat all the products on the edges with glue and install them in the box. Decorate such an organizer with any material you wish.
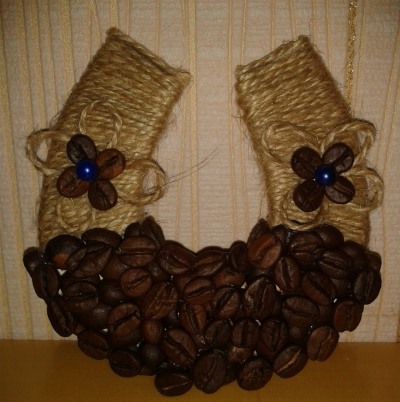
Step-by-step instructions: DIY cardboard horseshoe
For creativity you will need the following materials:
- thick cardboard;
- scissors;
- glue;
- yarn for knitting;
- coffee beans;
- two beads.
Work process:
- Draw a horseshoe template of the desired size on a piece of paper. Cut it out.
- Place on cardboard, trace with a pencil and cut out carefully.
- Tie the workpiece with yarn, forming an air loop. Thread the threads of both ends into the loop, pulling tightly each time, but do not overdo it, so as not to damage the cardboard. With each new weaving, the threads need to be adjusted - they should fit tightly and evenly against each other.
- Hide the ends of the threads and secure them to the back of the piece.
- Apply glue from the bottom of the horseshoe to its halfway point and plant coffee beans on it.
- A little higher on both sides lay out flowers from 8 coffee beans. Place a bead inside each flower. Make loops with yarn around the flowers.
- For the finished amulet, it is necessary to allocate an area above the door.
How to Use Egg Carton Crafts
Egg cartons can be used as bird feeders. To prevent sudden temperature changes from damaging the feeder, cover it with gouache, then varnish it after it dries completely. Separate the lid (if the packaging is small), attach ropes to the 4 edges and hang it on a strong tree branch. Pour bird food into the cells. The feeder is ready.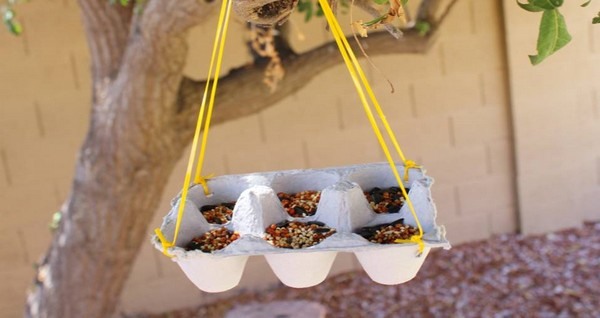
Egg trays are easy to use as vases or fruit stands. Varnish the trays, decoupage them or cover them with a fabric lampshade. It will look original and impressive. You can make souvenir toys: cut out inner cones from egg packaging, they will serve as the body.
After that, cut out the nose, paws, pincers, wings, beak, and comb from the packaging (depending on what animal, mammal, or bird you imagine). Paint them with paints. Glue the blanks to the body. Use buttons or ready-made decorative ones for the eyes. You can get keychains if you make a hole and attach a chain.
Homemade crafts from natural materials
Interesting ideas:
- From walnut shells just make a lot of toys. For example, when making a boat, you need to put plasticine in the shell, put a stick in it, and attach a sheet-sail to it. Even beginners can make a small musical string instrument. Cut the neck shape out of cardboard and glue it to the shell. Paint the hole black. Fasten the strings at both ends with small nails.
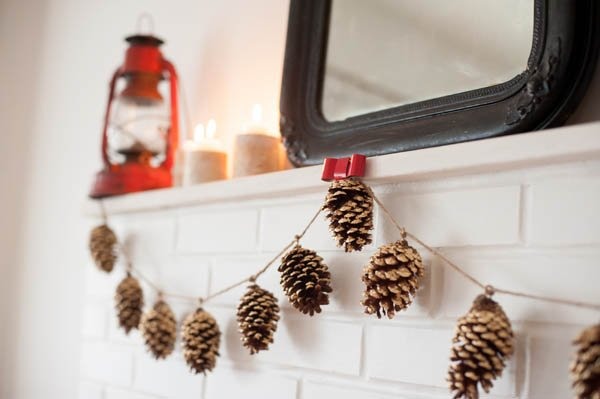
- From cones It is easy to make a forest garland that will lift your spirits on gloomy autumn days. Paint the cones in different colors with acrylic paints or from a spray can. Attach them to a strong string, arranging the color scheme randomly. Hang it in a previously chosen place.
- From pumpkin seeds You can make a beautiful decorative tree. Crumple a ball from album sheets. Wrap it with tape. Insert a felt-tip pen inside the ball - it will serve as the trunk of the future tree. Apply glue to the ball and cover it with pumpkin seeds. Close the gaps with beads and varnish. Seal a baby food jar with thick fabric. Fill the jar with wet sand. Plant the tree.
Having found a catchy material in the house, do not rush to put it in the trash. Put unnecessary things aside until you have free time for original DIY crafts.
Video: DIY crafts from waste materials
Interesting crafts made from waste material, watch the video:
How to make a box from waste material, learn in the video:
To avoid buying flower pots, I use plastic bottles. Cut a five-liter bottle. Mix PVA glue with water and soak the fabric with it. Wrap the bottle with the fabric. Give the fabric wrinkles. Dry well.
Use an awl to make holes along the diameter of the top of the container so that the edges of the bottle can be covered with thread.
Coat any lace with titanium and wrap it around the container in any way.
Once the titanium is dry, paint the bottle with acrylic paint in any color you like.
After the paint has dried, use a sponge to apply another color to shade the future pot.
When the paint dries, the product needs to be covered with solvent-based varnish in a glass bottle.
Using a hot knitting needle, make holes in the bottom of the pots.
In this way, you can create flower pots of any size you choose. And decorate them in any way you like. You can use not only five-liter bottles, but also larger and smaller bottles. For example, a pot made from a two-liter bottle is ideal for some tall, unusual type of cactus or tree. And wide six-liter and ten-liter bottles will be great pots for large flowers.
Good article. I'll use some of the ideas. Lately I've been loving making candles. Here's a tangerine candle:
Take a tangerine. Cut it in half (or cut off the top) and carefully clean out the pulp of the fruit. Prepare 2-3 tangerines in advance, because sometimes the peel breaks in the most unexpected places.
You need to use sticks to clamp the candle wick in the middle and place it on the tangerine bowl.
Melted paraffin, to which it wouldn’t hurt to add citrus essential oil, is poured into the peel.
When pouring, remember that it is better to add less than more, because the mandarin will be left with unsightly dark spots from the paraffin (if you get it directly on the peel).
To achieve a perfectly smooth surface, paraffin needs to be added several times.
That's it! The unusual candle is ready!!!!