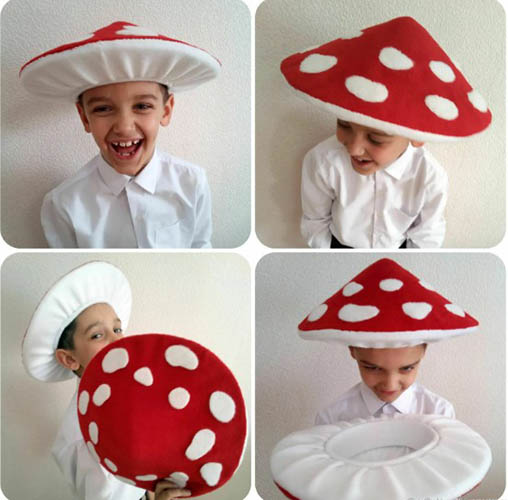
Often at children's matinees in the garden, the fly agaric mushroom appears as a fairy-tale character. You don't have to buy a ready-made suit in a store, because its main parts can be made by hand at home. There are several simple options for making a decorative mushroom cap for a child in kindergarten.
Materials
You can make a fly agaric hat from paper, cardboard, and fabric. The base can also be a ready-made hat that protects from the sun in the summer. In this case, you need to sew a fabric cover on the base.
Paper hats will not last for a long time because they can tear or wrinkle immediately after the performance. For long-term use, it is better to make the product from fabric material.
When choosing fabric material, it is recommended to give preference to:
- velvet;
- plush material;
- synthetics with minimal lint content;
- fleece.
To create a more realistic effect, it is permissible to use suede fabric, leather or a thick, sliding material.
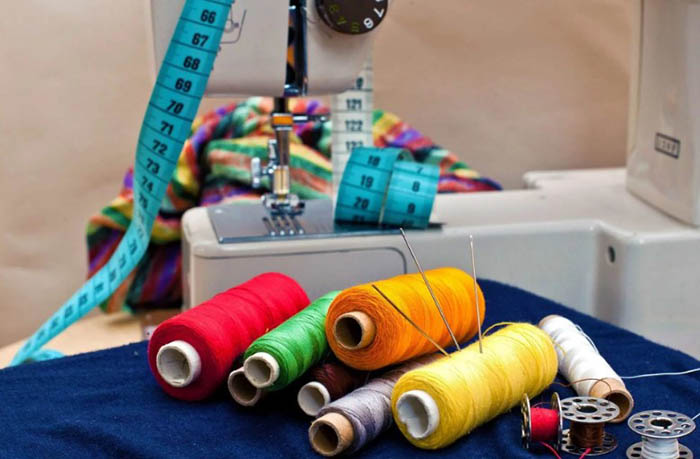
Tools and equipment
The fly agaric hat can be simply glued or sewn.
To make a product, for each option you need to prepare the necessary tools with equipment:
- needle with thread;
- ruler or measuring tape;
- scissors with a pencil;
- tailor's pins;
- sewing machine.
When sewing a product on a sewing machine It is necessary to choose high-quality thread material, which is divided into 3 types according to the composition of the fibers:
| Type | Compound |
| Artificial | Chemically synthesized materials such as viscose, polyamide and polyester are used for creation. |
| Combined | In the production of such threads, for example, polyester and cotton can be combined. |
| Natural | Wool, linen, cotton, bamboo or silk can be used for production. |
The quality of the thread fibers will affect the appearance and durability of the finished craft. In this regard, before purchasing the thread material, it is recommended to check the size, shade and quality characteristics of the product.
In this case, it is recommended to use synthetic threads, because they are smooth, will not tear, and there are no defects throughout the entire thickness. Thanks to this, you can avoid problems during the manufacture of the product.
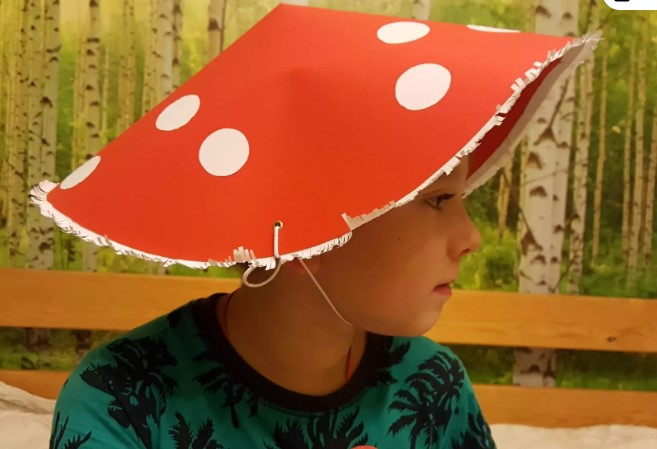
Paper version
You can make a fly agaric hat from a regular sheet of paper. The product will not weigh much, so the child will not get tired of wearing this design on his head while the festive event is taking place.
List of materials with tools:
- 1/2 of a sheet of Whatman paper;
- 1 piece of paper sheet (can be replaced with wide masking tape);
- red aerosol paint (if you don’t have it, you can use watercolors or gouache);
- ruler with scissors and pencil;
- scotch;
- 50 cm long ribbon for creating ties;
- felt-tip pen or marker of a black shade.
Step by step manufacturing process:
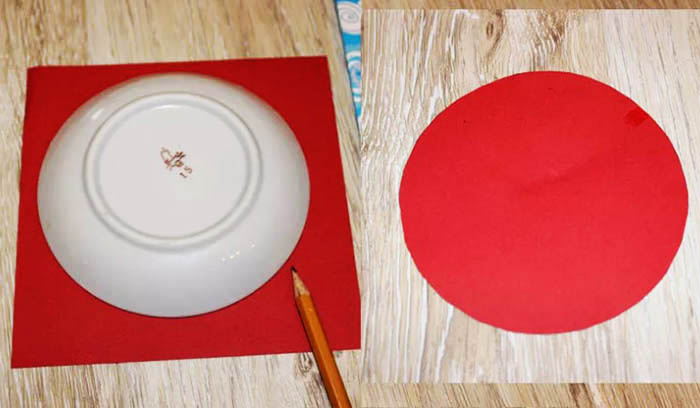
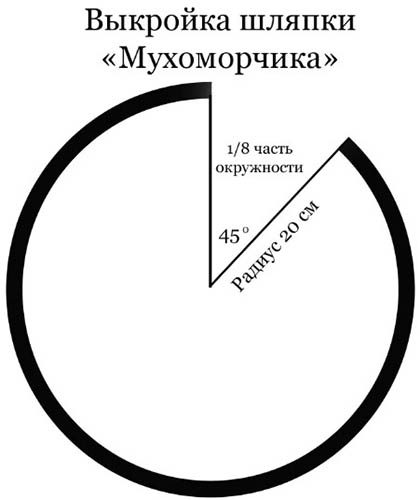
- Draw a circle on the Whatman paper. You can use a bowl or basin for this. Cut out the resulting circle along the outline.
- Additionally, cut the blank to the middle to check that the hat is the correct size for the child’s head.
- Fold a sheet of paper in several layers and draw a small circle. A small cup will do for this. Cut out the blank along the contour. Using masking tape instead of paper, cut out each circle separately.
- Fix the cut out paper circles to the hat using glue. Simply stick the masking tape circles to the base.
- Paint the prepared product red. When the paint layer is completely dry, remove the glued circles of paper or tape.
- To make the white spots contrast with the main tone of the product, outline the circles with the edges of the hat with a black felt-tip pen.
- Place one edge of the structure on top of the other to form the mushroom cap. Glue the edges together using tape.
- From the remains of the Whatman paper sheet, cut out a strip, the width of which should be at least 6 cm. The length of the blank should be 2 cm longer than the circumference of the child's head. If one strip is not enough, you can cut out another strip, joining 2 blanks with tape.
- In the upper area of the strip, make a cut 1 cm deep for ease of gluing to the base.
- Using tape, shape the strip into a circle. Attach the resulting blank to the bottom of the product with tape. However, put the pre-formed circle on the child's head to check that the craft does not fall off.
- To create the ties, glue the ribbon to the finished hat from the inside. To do this, use transparent tape.
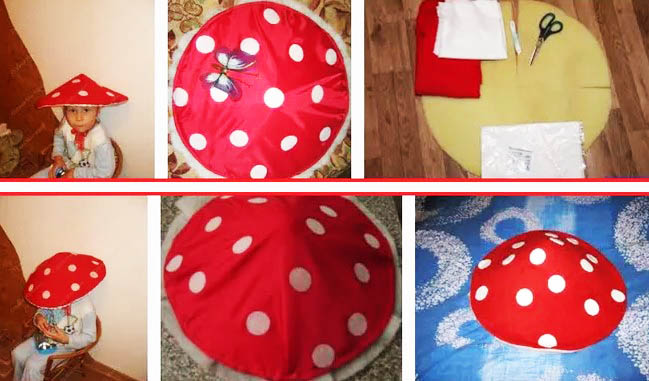
How to sew a hat with ties
You can make a fly agaric hat from fabric material, additionally making ties so that the product stays firmly on the child's head. If the head circumference is more or less than 50 cm, it is recommended to make decreases or increases.
When sewing the product, you need to take into account that the finished headdress will be very voluminous, so the hat for the child must be light and sit firmly on the head. At the same time, you must check that during dancing and jumping the structure will not fall or slide down onto the eyes.
List of materials and tools:
- glue that is intended for fabric material;
- crepe 50 cm long if the width of the fabric reaches 140 cm;
- white fabric material measuring 50 cm (if the cutting width is 180 cm);
- a piece of reddish fabric measuring 70x70 cm;
- holofiber or synthetic padding to fill the structure from the inside;
- elastic band or rubber band 55 cm long.
It is not recommended to use cotton wool for stuffing the hat, because this material is heavy. As a result, the product will constantly shift over the eyes, disturbing the child.
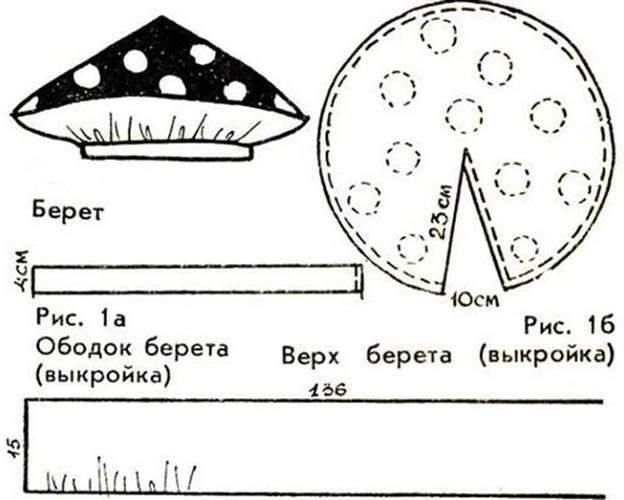
Basically, the pattern of the product includes simple geometric figures. In this regard, it is permissible to cut directly on the fabric material, without using paper patterns. The top of the mushroom should be reddish in color and in the form of a circle, the diameter of which should be no less than 66 cm.
The lower part includes a circle of white fabric, as well as several elements of a white shade. When cutting out the outer circle, special attention must be paid, because this detail includes 2 semicircular parts. In this case, 2 semicircles with a radius of 19 cm must be depicted on the fabric. Additionally, you need to leave seam allowances of 0.5 cm.
The length of the strip of white fabric should be 54.5 cm, the width 5 cm. From white crepe fabric you need to cut 2 strips 23 cm wide and 96 cm long, if the long edges are processed with an overlock. When sewing an edge seam with closed cuts, you need to add 25 cm.
Additional elements of the product are white peas, which must be cut out of the material. The radius of 9 circles should reach 2.5 cm, and the radius of the remaining 13 peas should be 2 cm.
Step-by-step process of sewing a hat with ties:
- Glue the cut out white circles onto the red top circle on the front side, leaving the edges untreated.
- To create gathers along the contour of the red part, lay 2 machine lines. Pull the thread material to a size of 140 cm. In this case, the edges of the white lower and red upper blanks should match in length, so the gathers should be distributed evenly.
- Sew 2 cut semicircles for the bottom part of the product. Leave 20 cm in the seam unstitched so that it is convenient to stuff the hat with holofiber or synthetic padding.
- Along the outer edge, lay several lines to create gathers. Pull the seams to a size of 53 cm, then evenly distribute the formed gathers.
- Iron the strip along the center along the entire length and straighten it. Sew the narrow edges of the strip so that the seam width reaches 0.7 cm. 1.5 cm are reserved for the elastic, so they should not be stitched.
- Fold the strip exactly along the center and sew it to the edge of the bottom part of the product from the inside. The seam should be 1 cm wide.
- Sew the hat into the inner circle of the bottom piece in the place where the elastic band is located.
- Place the lower and upper parts of the product together so that the front parts are inside. Join the structure along the outer edge, the seam width should be no more than 0.7 cm.
- Turn the workpiece right side out and fill it with padding polyester or holofiber through the hole. Spread the selected filler evenly across the entire width of the hat. In this case, you can't overdo it. The main thing is to have volume, but the product should not be heavy. Sew the edges of the hole by hand.
- To create gathers, sew several lines, stepping back 7 cm from one edge of the strip and 1.5 cm from the other.
- The edges of the thread stitches, which were laid 1.5 cm from the edge of the strip, are pulled together to 140 cm. The formed gathers are evenly distributed. The strip with gathers is sewn to the lower part of the product by hand. The stitch is placed along the contour of the structure.
- The edges of the lines, which are located 7 cm from the edge of the strip, are pulled to 53 cm and evenly distributed. Sew the strip with gathers to the lower part of the structure by hand. Place the seam along the line of sewing the hat into the lower part of the product.
- To ensure the product fits comfortably on the child's head, insert an elastic band.
- Additionally, attach elastic band or ribbon to the inside of the hat to create ties.
In the form of a beret
You can make a fly agaric hat in the form of a beret so that the headdress sits firmly on the head and does not require the use of additional ties. Sewing a product of this shape is required if wide brims are not needed. During the work, you need to constantly try on the design on the child to achieve the optimal size and shape of the hat.
Required materials and tools:
- white fabric made of cotton material;
- wide elastic band for underwear;
- paper sheet for pattern;
- needle with thread material and measuring tape;
- red and white fleece;
- filler (in this case, it is recommended to use synthetic padding balls);
- tailor's pins with scissors;
- sewing machine.
Step by step creation process:
- Measure the circumference of the child's head to cut out the pieces on paper. You can use a measuring tape for this.
- On the red fleece draw a circle without a small segment, allowances should be 1 cm. Cut out the depicted details.
- Cut out several circles of different diameters from white fleece. Fix the cut-out pieces to the fabric with tailor's pins and hand-stitch. Instead of fleece, the spots on the fly agaric hat can be made from cotton sponges.
- On cotton fabric, cut out the inner part of the product in the form of 2 fragments of the rim, a rectangular lower part and a circle with a smaller diameter.
- Sew 2 circles together, leaving a small opening for easy turning of the beret to the front side.
- Iron the stitched blanks. Then stuff the product with padding polyester, evenly distributing the filling over the entire surface of the product. Sew up the hole with a blind stitch.
- Proceed to assemble the remaining parts of the future product. First, assemble the lower rectangular part a little. To do this, use a needle and thread.
- Sew the headband pieces together and cut off a piece of elastic band of the desired length.
- Insert the cut piece of elastic into the headband so that the hat stays on the head well. Sew the ends of the elastic to the edges of the fabric material.
- Initially baste the bottom part of the hat to the cone, then stitch it. Carefully sew the headband to the rest of the structure.
- Throughout the work, regularly adjust the beret to give it the desired shape.
- If necessary, a frill made of lace or organza can be sewn to the edge of the hat.
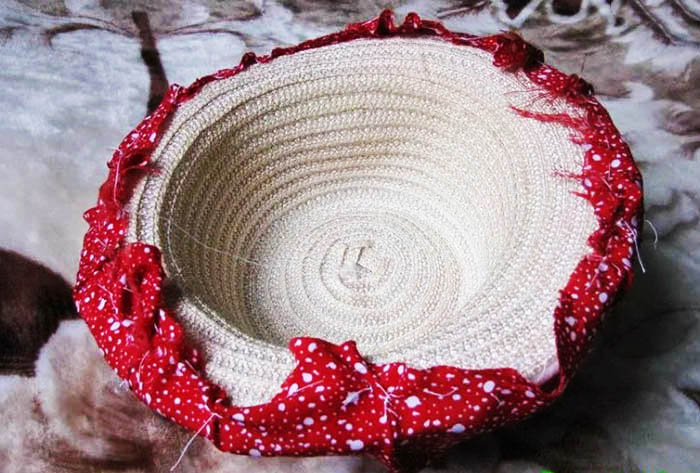
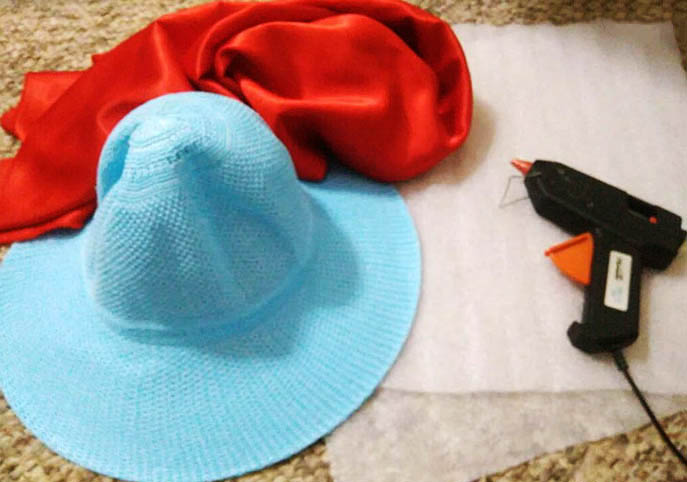
From a beach hat
For quick and easy making of a fly agaric hat, it is acceptable to use a ready-made hat, which is intended for a summer house or a beach. In this case, you just need to collect all the necessary parts and attach them to the finished structure to imitate a mushroom cap.
Required materials and tools:
- white lace fabric;
- white corrugation or pleating;
- red crepe satin with polka dots painted on it;
- scissors with a sewing machine;
- beach hat;
- white knitted material;
- universal glue moment;
- elastic band with thin foam rubber.
To create the product, you can use any sun-protection hat, even one made of rigid strips. The main thing is that the width of the brim is no more than 10 cm, otherwise they need to be unraveled.
If you don't have red polka dot crepe satin, you can use any fabric material of a similar shade. Glue white felt circles on top of the base.
When purchasing pleats, the width of the fabric material should match the length of the circumference of the hat brim.
Step-by-step description of the work:
- If the hat is intended for an adult, first reduce the volume of the product. In this case, cut a strip 53 cm long and 7 cm wide from thin foam rubber. Try the part inside the product, as well as on a child's head. Glue the blank into a circle.
- Cut a strip 53 cm long and 17 cm wide from white knitted fabric. Sew the piece into a circle. Then insert a foam circle into the resulting ring and sew it up.
- Glue the resulting blank into the hat so that the circle protrudes beyond the limits by 6 cm.
- To sew the top cover, cut a ring with a diameter of 50 cm from crepe satin.
- Cut a 14 cm wide circle across the pleating. Stitch the folds on one side. Stitch the other side to the ring, evenly distributing the folds and slightly gathering the ring.
- Process the pleated edge with seams on an overlock. Then stitch the lace onto the pleated edge.
- At a close distance from the stitching line of the lace material, sew on the underwear elastic from the wrong side. Make a zigzag stitch, stretching the elastic as much as possible.
- Place the finished cover on the hat and straighten it out evenly.
The elastic will sit tightly on the foam rubber circle. Thanks to this, the lower part of the cover will not sag. At the same time, the sewn cover can be easily removed from the hat and sent to the wash.
Anyone can make a mushroom cap with their own hands. To make a fly agaric, it is permissible to use ordinary paper or fabric material so that the product will last for a long period of time.
If desired, the craft can be decorated with a caterpillar peeking out from under the mushroom, or a large butterfly. You can also use other materials at hand that you have at home. The main thing is desire and imagination.
Video on making a fly agaric hat