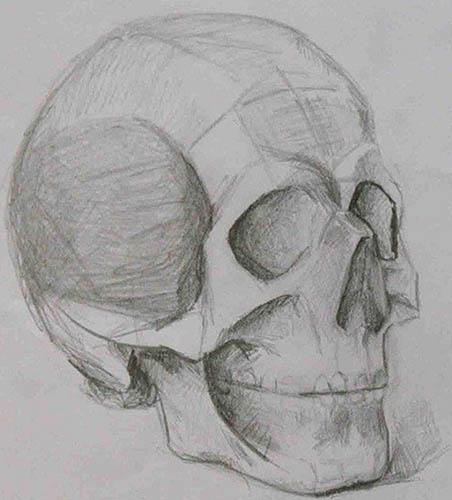
The skull is the bony framework of the human head, according to which the parts of the human face are arranged in a special individual way. It is because of the structure of the skull that its external features are determined.
Men and women have different skull structures, so each has its own characteristic external features. To correctly convey the structure of the head, the artist must understand what lies in its design. Knowing human anatomy makes it much easier to draw a skull or recreate it from its shape a complete portrait of a person.
What is needed for drawing
Drawing with a pencil is considered the simplest; this tool in its modern form appeared at the end of the 18th century. Graphite with clay and its subsequent heat treatment made it possible to make a strong rod and made it possible to regulate the color saturation and softness.
Pencil drawings can be called universal, pencils can be used for sketches, drafts and for finished works.
In order for a child's drawing to become professional, patience and desire are necessary, you need to be familiar with the technique of drawing, understand the rules of composition, correctly use light and shadow, shading and hatching. It is necessary to learn how to hold a pencil correctly and be able to correctly select a subject.
Pencils are distinguished by their softness, which can be understood from the written markings, the letters "H" and "B". Next to the letters are numbers indicating the hardness of the pencil and the pallor or brightness of the resulting line. The higher the digital value near the letter "B", the softer the lead will be and the more saturated the black color will be.
For drawing, pencils of the following markings are most often used:
| NV | Used for sketching |
| 4V, 6V and 8V | Used for applying shading |
To start drawing, you need to prepare the paper. It is desirable that it is smooth and thick enough. On such paper it is easier to correct mistakes and draw small details. You can use special paper for drawing, painting, or paper for graphics or watercolors. Also, you need to prepare hard and soft erasers for use.
According to the advice of professional artists, all auxiliary and additional lines should be drawn without pressing, so that they can be easily erased later.
Master classes for beginners
The skull (the drawing is easy, even a child can draw it) despite its apparent complexity is made quite quickly. The main condition under which a beautiful sketch is guaranteed is a correct understanding of human anatomy and the ability to use pencils.
This part of the human body is a collection of bones that protect a vital organ – the brain, which is the most complex part of the entire human skeleton.
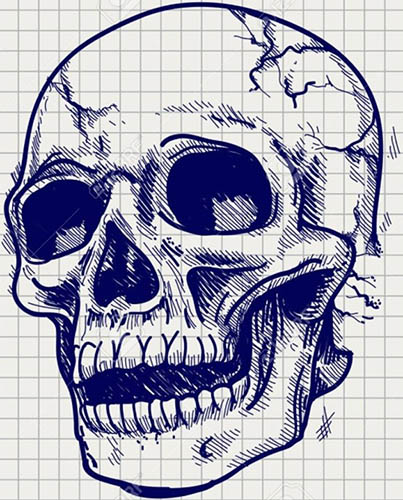
Skull by cells
The easiest way to draw a skull is to use a piece of paper with a checkered pattern.
When starting work, you need to follow the step-by-step instructions:
- at the top of the sheet you need to draw a horizontal line approximately 3 cells long;
- from the line drawn horizontally upwards, you need to draw 2 vertical lines 1 cell long;
- draw a circle from the vertical lines;
- inside the circle you need to draw eyes with a diameter of 1 cell, paint them dark;
- You need to draw a mouth in the shape of a triangle and color it in with a dark pencil.
The finished painted skull can be decorated with various elements:
- fiery flame;
- flowers and bones;
- with cold weapons.
There is an option to take a drawn skull into a table, indicate the word “stop” and “danger” in it, retouch it a little, and you can get a ready-made poster about the threat.
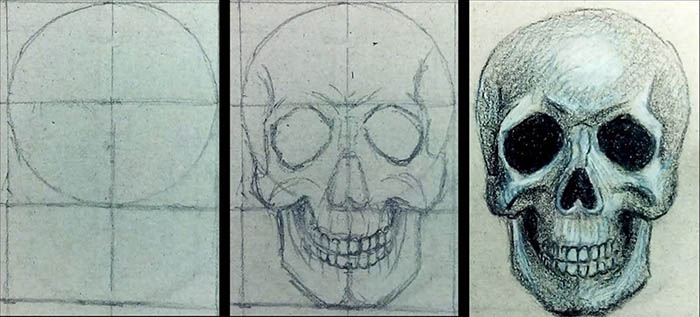
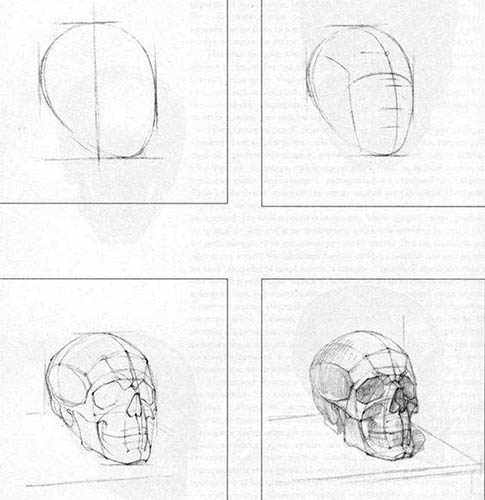
Skull from the front
The skull (the drawing is easy even for beginner artists) can be drawn from the front.
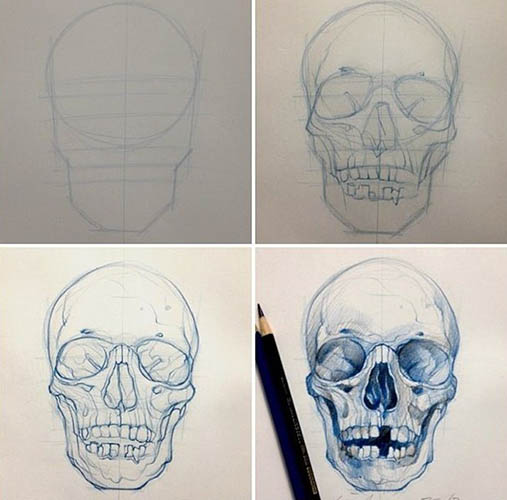
To do this, you need to perform the following steps:
| 1 | Draw a wide circle with a finely sharpened pencil, pressing lightly on it. | The circle will be used later as the top of the skull. If it is difficult to draw a circle of the correct shape by hand, it can be done using a compass or other round object that can be traced. |
| 2 | Draw intersecting lines through the central part of the circle: horizontal and vertical | The stripes should be drawn in such a way that they intersect in the very center of the circle. The line located vertically at the bottom should go beyond the boundaries of the circle, so that later it can be used to draw the jaw and the entire lower part of the skull. |
| 3 | Draw 2 geometric figures resembling hexagons | The hexagons must be drawn under the horizontal line so that their upper part touches the drawn line. The hexagons will represent the eye sockets of the skull, they must be drawn symmetrically relative to the vertical line. The eye sockets occupy half the area of a quarter of the entire circle. Between the hexagons, gaps must be left equal to a fifth of the diameter of the entire circle. |
| 4 | The nasal cranial cavity is drawn | It should be drawn on a vertical line, approximately in the middle of its lower part, under the horizontal strip. The nasal cavity can be approximately at the level of the middle of the already drawn eye sockets. To do this, you need to draw a small horizontal segment, from its ends you should draw straight lines down. After that, they should be brought together at a single point almost at the lowest point near the circle line. The resulting nasal cavity should be diamond-shaped at the bottom and rectangular at the top. |
| 5 | The sides of the middle part of the skull should be drawn. | To do this, draw a thin line from the temple area to the eye sockets on the left side of the skull so that it is at the level of the beginning of the nasal cavity and has a semicircular protrusion outward to its end. In this way, draw the side of the skull on its right side. After this, both lines drawn downwards should be connected approximately at the level of the line of the previously drawn circle. The resulting line, located horizontally below, should be 2 times larger than the drawn nasal cavity, this part will be the middle of the skull. |
| 6 | Upper teeth on the skull | The upper teeth are drawn along the horizontal strip obtained on the circle line, which denotes the center of the cranium. It is necessary to draw vertically extended ovals below this strip, approximately half the length between the lower edge of the nasal cavity and the line of teeth. Three large teeth should be drawn on the right and left sides of the vertical line. Then two smaller teeth should be drawn on the edge, this will emphasize that the teeth recede back. |
| 7 | Applying a contour around the lower jaw | To mark the location of the contour below the jaw, you need to measure the length from the upper border of the cranium to the place where the horizontal and vertical lines intersect. Approximately the same distance should be from the bottom of the nasal cavity to the bottom of the jaw area. Approximately along its line, the jaw from below should be 2 times smaller than the length of the row of drawn teeth. From the ends of the drawn strip, you need to draw segments curled upward, which should then be connected to the lines of the skull from the side. The inclined drawn segments should have approximately the same length as the horizontal line in the middle of the jaw. |
| 8 | Lower teeth | On the lower side of the jaw, the teeth should be drawn the same size as those on the upper jaw. The front teeth should be slightly larger than the back teeth. You can depict the jaws below and above as closed, or you can leave a small gap to emphasize the space between the cranium and the jaw below. If desired, you can skip a few teeth. |
| 9 | Drawing shadows in the eye sockets and nasal cavity | To do this, take the darkest pencil and press hard to shade the eye sockets and nasal cavity. Because they should appear empty and deep, they need to be shaded darker than the rest of the skull. You can shade them using shading or make the coloring more uniform by using the rubbing method. |
| 10 | Giving a natural look to the drawing | It is necessary to erase the circle line with an eraser, as well as all additional auxiliary lines located vertically and horizontally. |
| 11 | Adding depth to a drawing | It is necessary to retouch the image and shade the cranium around the eye sockets where the eyebrows should be located. This area should be darker than the rest of the cranium. At the same time, the shading requires space: on the side of the upper part of the cranium, a strip below the jaw and on the side of the nasal cavity. |
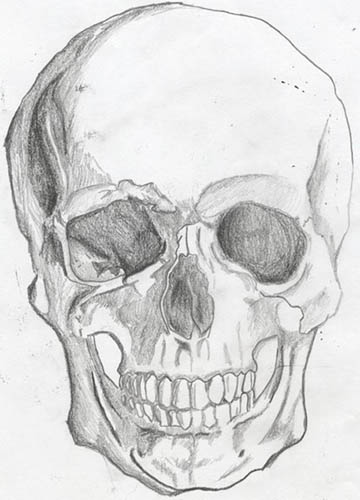
Skull from the side
The skull (the drawing is easy and anyone can draw it) can be drawn from the side view.
To do this, you need to perform the following steps:
| 1 | Draw a circle slightly elongated in the horizontal direction | To begin, you need to draw a slightly flattened oval, which will later depict the skull; there is no need to narrow the ends of the circle. |
| 2 | Draw auxiliary lines on a concentric circle | It is necessary to draw a small circle with a thin strip inside the recently drawn circle, which is smaller than the original by a quarter of its size. After that, it is necessary to draw vertical and horizontal lines through the central part of the cranium so that they have an intersection point in the middle. Next, in order to mark the area of the jaw position, it is necessary to draw a horizontal line from the place where the vertical line will touch the lower side of the inner circle to one of the sides of the skull. |
| 3 | Drawing the boundaries of the jaw on the cranium | You need to draw a thin vertical line where the jaw area will be located. You need to place the pencil at the intersection of the horizontal and vertical lines and draw a strip down from the cranium to the bottom of the jaw. When the line crosses 1/2 of the skull size, you need to draw a segment from this place towards the skull. You need to finish the jaw border inside the concentric circle where the intersection with the additional vertical strip is located. |
| 4 | Designation of eye openings and their darkening | First, draw a crescent-shaped figure in a vertical position, slightly behind and below the eyebrow. This figure should reach the center of the nasal cavity. After that, shade the eye sockets so that they appear empty and deep. |
| 5 | Drawing the bottom line of the skull | You need to draw a wavy stripe at the bottom of the skull where it meets the jaw line. You need to draw the stripes so that it is raised towards the central part of the cranium. Next, you need to draw a wavy horizontal line to the center of the jaw. Then turn its direction and combine it with the circumference of the cranium, this is where its lower edge is. |
| 6 | Drawing the teeth | To draw the lower and upper teeth, you must first draw an elongated line in the shape of the letter "S" downwards to the center of the jaw area, then connect it with two thin horizontal stripes on the edge of the jaw. Draw several teeth near each of the horizontal lines. The teeth that are closest to the S-shaped stripe should be similar in size to the eye sockets. Then you need to draw the teeth in another row, gradually reducing their size so that they are as small as possible from the very edge. At the individual request of the artist, some teeth can be omitted. |
| 7 | Removing unnecessary parts | It is necessary to erase the too striking additional lines located vertically and horizontally with an eraser, then the drawing will look as complete as possible. |
| 8 | Shading of areas | At the very end, it is necessary to make shadows in some areas to give them depth. It is necessary to outline the back part of the cranium so that the bend is more clearly visible. Then you need to draw a shadow in the central part behind the eye sockets, retouch the shadow in the shape of a large crescent, so that it seems slightly uneven. It is advisable to highlight the jaw area, retouch its upper part in the place where it connects with the cranium. |
Skull with sabers
After the child has managed to draw a skull from the front, you can try to draw it with some additional elements. You can try to draw it with a picture of a saber from behind.
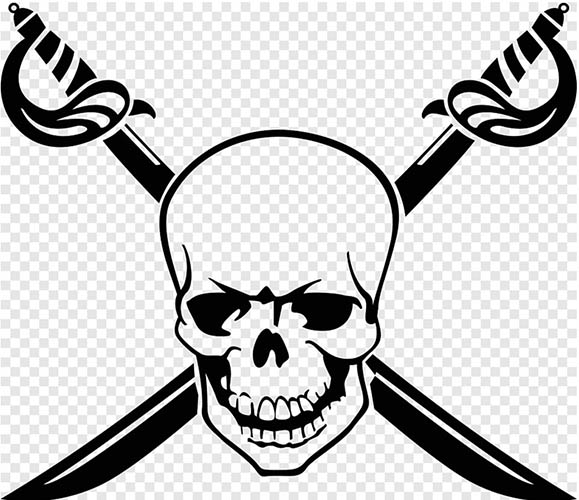
To do this, you need to perform the following steps:
- according to the instructions described above, you need to draw the skull from the front;
- after this, you need to draw the saber handles on the sides of the finished drawing at an angle from below;
- then you need to draw a saber blade at an angle on both sides at the top;
- The sabers crossed behind the skull need to be detailed in their visible part and some parts need to be shaded.
Skull in the Hood
The skull (the drawing is simple and can be slightly complicated by adding some elements) is often depicted in a hood.
To do this, you need to draw a skull from the front according to the instructions described above and then add an additional element.
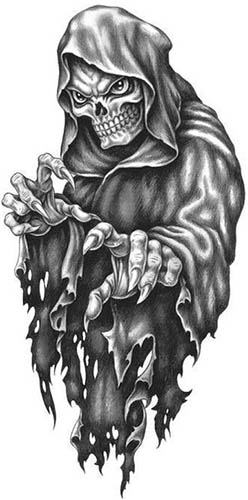
To complete this plot you need to follow the rules:
- sketch out the outline of the hood;
- detail the sketch with natural folds;
- step back a little from the drawing of the skull and depict the bones and fingers;
- outline the borders of the hood with a thick line and apply shadows if necessary.
Skull in Flames
A skull with a blazing fire is a fairly common image used to decorate clothing. A drawing with this sketch can be easily transferred to a sheet of paper. For this, you should use a simple and colored pencil.
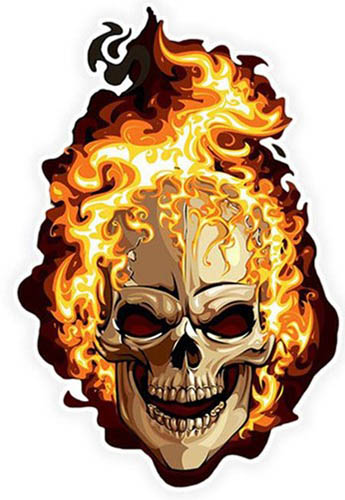
To complete the drawing, you need to follow the recommendations:
- draw an oval, thereby forming the top of the skull;
- extend 2 curved lines from this oval, bent at a right angle, these will later become the eye sockets;
- then use 3 curved lines (shape of an unfinished quadrilateral) connected at right angles to outline the lower part of the skull's mouth;
- use curved lines to form the teeth, placing them along the bottom of the skull;
- erase minor lines at the bottom of the figure;
- inside the skull, symmetrically draw 2 diagonal stripes in the middle and finish them with a semicircle, thus indicating the eye sockets;
- under the eyes in the middle of the skull you need to draw a curved inverted triangle, which will form the nose;
- then shade the triangle and draw a wavy stripe around each corner of the nose;
- then you need to draw the fire flame using several connected curved lines;
- above the skull you need to draw a large flame surrounded by curved lines;
- at the end of the work it is necessary
- Color the flaming skull with orange, yellow or red crayons.
Drawing a human skull is quite easy. With the right approach, it can be made beautiful, despite the seemingly slightly creepy plot.

Such images are very often used on branded items and elegant clothing.

For example, recently the famous brand Bernard Delettres created a large collection of clutches with images of skeletal bones, leading fashion designers worked on this. Also, skull bones can often be seen on scarves of the famous company Alexander McQuenn.
Author: Olga Zhanskaya
Video about drawing