There are a large number of different patterns for crocheting butterflies. Often the product is given an openwork look, but it is also acceptable to do it without gaps in the fabric. Most patterns involve knitting without tearing off the thread material.
It is also acceptable to decorate the parts separately and then join them together. If the butterfly elements were made of a sliding material such as viscose, it is necessary to fix the ends well so that the fabric does not unravel.
Simple crochet butterfly
A crochet butterfly (the pattern of the product is easy to understand, so it is suitable for beginners) can have a dense knitting without gaps. This option is suitable for craftswomen who are just beginning to master the technique of crocheting.
Necessary materials and tools:
| Details | Peculiarities |
| Hook | The size of the tool should match the thickness of the thread material. This will make it comfortable to work with and the product will look beautiful. If the material label does not contain information about the appropriate size of the knitting tool, it is recommended to knit several parts with different hooks. This will allow you to select the appropriate number. |
| Threads | It is recommended to choose linen, cotton and material containing viscose. Butterflies can be made of one or several tones. The color scheme can be varied. The main thing is that the colors harmonize with each other. |
Knitting pattern:
- Initially, make a ring of 9 air loops.
- Separately, on the right and left sides, design the wings in rotating rows.
- In 1 row make 3 air elements and 7 columns with 1 yarn over element.
- Row 2 is similar to row 1.
- 3 row form 3 air elements, 3 columns with 1 yarn over loop, 2 columns with 2 yarn over loops and 2 columns with 1 yarn over element. Connect 2 air elements with a half column with the 8th base loop.
- Make 2 chain stitches, 2 double crochet stitches, 2 double crochet stitches and a single crochet stitch.
- Finish the design of the lower and upper wings separately. It is permissible to add yarn of a different shade.
- To design the upper wing, in 1 row make 3 air elements, 1 column with a yarn over loop, 2 columns with 2 yarn over loops, a column with a yarn over element and a column without a yarn over loop.
- Row 2 consists of 3 chain stitches, 4 dc with 1 yarn over, 1 dc with 2 yarn overs, 2 dc with 2 yarn overs, all knitted together.
- To create the lower wing, knit an air element, 2 columns without a yarn over element, three times 2 columns without a yarn over loop, and also a column without a yarn over loop.
- The butterfly's whiskers will have 4 rows. 1 row consists of 5 air elements.
- In the 2nd row, knit 4 half columns.
- Row 3 consists of 4 air elements and 3 columns with 2 yarn over loops.
- For the 4th row, make 3 air elements with a column without a yarn over loop. Combine the detail with the insect's head.
Little butterfly crochet
The crochet butterfly pattern allows you to create a small-sized product that will look like a bow. Such a detail can be used to decorate children's things.
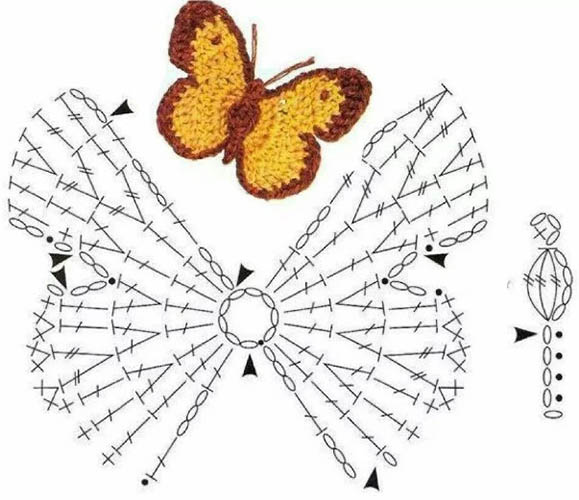
Knitting must be done in a circle. The pattern of the product consists of 2 rows.
Step by step description:
- Create 4 air elements that are closed in a circle.
- In the 1st row, knit 3 columns with 1 yarn over loop 4 times and make arches of 14 air elements between the columns.
- In the 2nd row, make arches from air elements with columns of 1, 2, 3, 4 and 5 loops. Then knit in reverse order.
- To create a mustache, make a chain of air elements and a row of half columns on it.
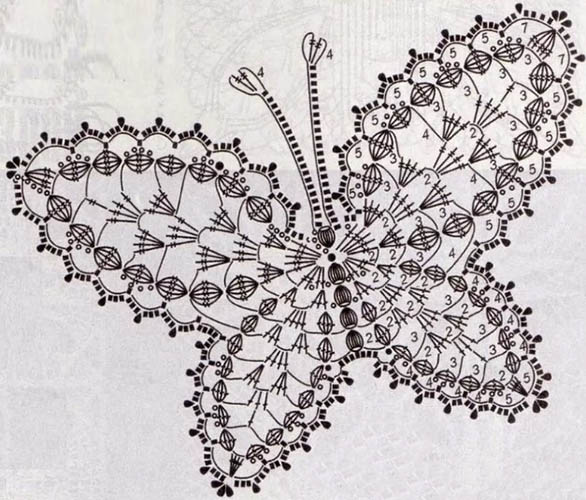
Openwork butterfly crochet
A crochet butterfly (the pattern will allow you to create a beautiful openwork product) can be used as a decorative element of things, a brooch or a detail of Irish lace.
Step by step instructions:
- Make up to 7 turns on a pencil or pen. Tie the finished ring with columns without yarn overs. Trim the edge of the yarn.
- On the ring, on top of the knitted columns, make an additional 5 columns without a yarn over element.
- To decorate the mustache, make 8 air elements. At the end of the chain, make a twisted knot with 3 turns.
- Make blind or connecting elements along the chain of air loops. Make the extreme blind element in the column from which the chain of air elements was formed.
- To complete the first mustache, make 2 columns without a yarn over element. Knit the second mustache using a similar pattern.
- To form the insect's head, make a column without a yarn over element. At the end of the line, knit 1 blind element.
- Turn the fabric and start creating the belly. Knit 2 air elements, 2 columns without a yarn over loop and 3 columns without a yarn over element in the column of the previous row. Make 3 columns without a yarn over loop.
- Turn the fabric and knit 1 blind element, a chain stitch, 2 columns without a yarn over loop and 3 columns without a yarn over element in the column of the previous row. Form 3 columns without a yarn over loop.
- Turn the product and knit 3 new lines similar to the previous one.
- The insect's abdomen should have a narrower shape. To do this, turn the product and make 2 blind elements, an air loop, a column without a yarn over element and 3 columns without a yarn over loop in the column of the previous row. Knit 2 columns without a yarn over element.
- Make a blind and air elements, a column without a yarn over loop. In the column of the previous row, knit 3 columns without a yarn over loop. Make 2 columns without a yarn over element.
- The new row should be similar to the previous row.
- Narrow the width of the belly again, making 2 blind and 1 air elements. In the column of the previous row, knit 3 columns without a yarn over loop. Make a column without a yarn over loop.
- Make 1 blind and 1 air element, as well as 2 columns without a yarn over loop.
- Make a new row without the lifting element, making 2 columns without a yarn over loop.
- Turn the work inside out and knit the connecting elements, fastening with one thread so that the blind loops are not visible. Having reached the nearest tooth, make 1 blind element in it with 2 threads. The belly is ready.
- To create the wings, make a lifting loop, 3 chain stitches, 3 double crochets, 3 chain stitches, a double crochet, 3 chain stitches, and a double crochet again. You should have 3 arches of chain stitches.
- When turning the product, do not perform the lifting element. Under each arch, knit 5 columns without a yarn over element. At the end of the line, form a connecting element into a tooth.
- Turn the product again, forming 2 blind and 4 air elements. On the 3 middle elements of each arch, repeat the knitting from the beginning to the end: a column with a yarn over element, an air loop, a column with a yarn over loop, an air element and a column with a yarn over loop. Repeat this rapport twice more.
- Make a column with an overlay element. Then make 3 air elements with a blind loop in the remaining tooth on the left side.
- Turn the product and make 3 columns without a yarn over element under 3 air loops. Then make 3 air elements.
- Make a column with a yarn over loop under the 3 air elements on which the columns without a yarn over loop were made. This column will serve as the base for the block column.
- Make a block-column with 8 turns. Make a column with a cap element under the air element, on which there should be a block-column with 7 turns.
- Make block columns of 6, 5 and 4 turns.
- Make 2 air elements and a column without a yarn over loop under the air element. Then make 2 air elements and block columns for 5, 6 and 7 turns. Create block columns in turn under the air elements of the previous row. After finishing the row, knit a column with a yarn over element.
- Turn the product. Knit a lifting element with 3 air loops and a column without a yarn over loop. Make arches from 3 air elements. At the end of the line, make 1 blind element.
- Make 3 blind loops along the air elements and turn the product. Under the air elements on the sides, knit 3 columns without a yarn over loop.
- Under each arch above the block columns make 5 columns without a yarn over element. After three such columns make a picot loop. Make a binding of the arches to the end of the line.
- The outermost column with a yarn over element, located on the left side, is tied with 3 columns without a yarn over loop.
- Under 3 air elements, knit 3 columns without a yarn over loop. Then make a connecting element on the belly and cut the yarn.
- To create the second wing from the inside, fix it on the second tooth from the head. Make a lifting element. The rapport, consisting of 3 air elements and a column without a yarn over loop, is knit three times to create 3 arches.
- Turn the product and knit 5 columns without a yarn over loop under each arch. At the end of the line, make a blind element in 1 tooth.
- Turn the product. Make 5 air elements with a column with a yarn over loop. Perform the rapport consisting of a column with a yarn over element, an air loop, a column with a yarn over loop, an air element and a column with a yarn over loop three times. The third time, replace the outermost column with a yarn over element with 3 air loops.
- Make a blind element in the last loop of the arch. Make 2 connecting elements along the side of the arch, and also knit a blind loop in the belly.
- Turn the product. Under the arch on the right side, knit 3 columns without a yarn over. Make 3 columns without a yarn over under the air loops. Form 3 air loops and create block columns for 7, 6, 5 and 4 turns.
- Make 2 air elements, a column without a yarn over loop, 2 air loops. Knit block columns on 4, 5, 6, 7 and 8 turns. At the end of the line make a column with a yarn over element.
- Turn the product and make a lifting element. Above each block-column, make arches from 3 air elements, between which there should be a column without a throw-over loop.
- Make 3 blind loops along the air elements and turn the product, tying the air loops with 3 columns without a yarn over element.
- Make the arches binding as on the first wing. Bind the extreme column with a yarn over loop on the side with 3 columns without yarn over loops, and also make the binding with 3 air elements.
- In the first tooth near the head, make 1 connecting element. Cut the yarn.
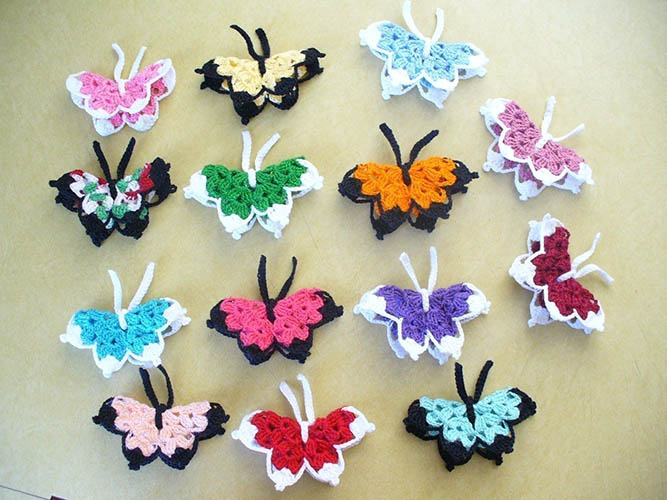
Decorative crochet butterflies
A crochet butterfly (the diagram describes in detail how to crochet the product correctly) can have a decorative look and be used as an interior decoration.
Knitting pattern for the body:
- From grey yarn, make 16 air elements and 1 lifting air element.
- In the 1st row, make a column with a yarn over loop in the second chain element from the tool. Knit 13 columns without a yarn over loop in the chain elements, and also make 2 connecting columns in the chain loops.
- To create 2 rows, continue knitting from the other side of the chain. Make 1 air element of lifting and 2 connecting columns in the air loops of the base of the chain.
- Make a single crochet with 4 half crochets and a single crochet. Make a connecting crochet into the next chain stitch.
- Create a column without a yarn over loop, 2 half columns, a column without a yarn over element and a connecting column. Knit the column without a yarn over loop into the air elements of the chain.
- Form an air element and make a half-column in the outermost air element of the chain. In the lifting loop of the 1st row, knit 2 half-columns.
- Into the column without a yarn over element of the 1st row, knit a half column. Form an air element and make a column without a yarn over loop into the column without a yarn over element of the previous row.
- Make a slip stitch into a single crochet stitch, and a single crochet stitch with 2 half crochet stitches, a single crochet stitch and 1 slip stitch.
- Knit a single crochet stitch, 3 half crochet stitches, a single crochet stitch and make a connecting stitch into the single crochet stitch of the previous row. Cut off the yarn.
Moustache design:
- Connect the grey yarn to the half-column by knitting a chain of 7 air elements and a picot.
- Cut the yarn and hide the edge of the material.
- Similarly, design 2 us.
Making a small wing:
- Join the colored yarn to the body of the insect. Make a chain of 12 air elements. Knit a connecting column in the 6 air element of the chain.
- Make 7 air elements and knit a connecting column into the next half-column of the body. After creating the 3rd row, cut the yarn.
- In the 4th row, join yarn of a different tone and knit in the same way as the previous rows.
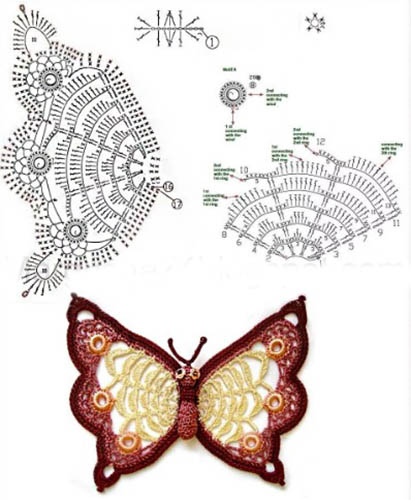
Making a Large Wing:
- After attaching the colored yarn to the body, make a chain of 14 air elements. Knit the connecting column into the air loop.
- Make 9 air elements and make a connecting column in the next half-column of the body.
- Large wing, 3 rows, design similarly to the small wing. Then cut the yarn.
- In the 4th row, add yarn of a different tone and continue knitting.
- After creating 4 butterflies, connect the products together.
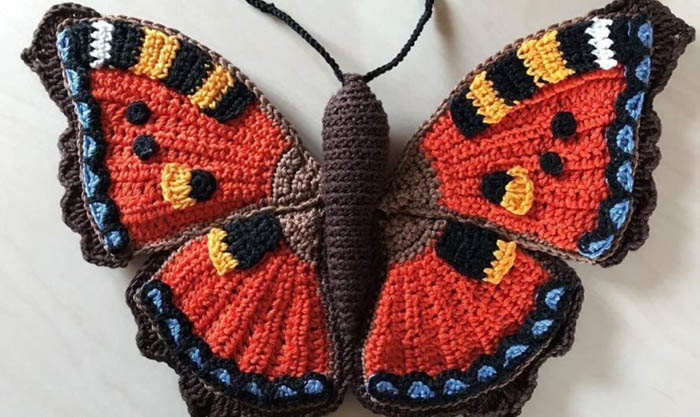
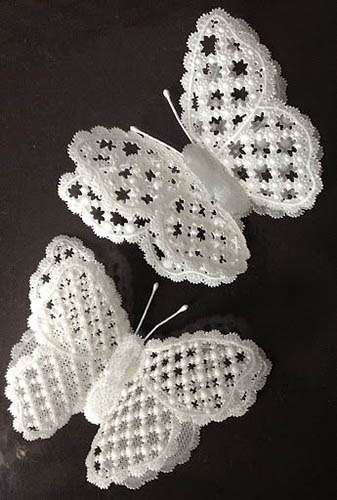
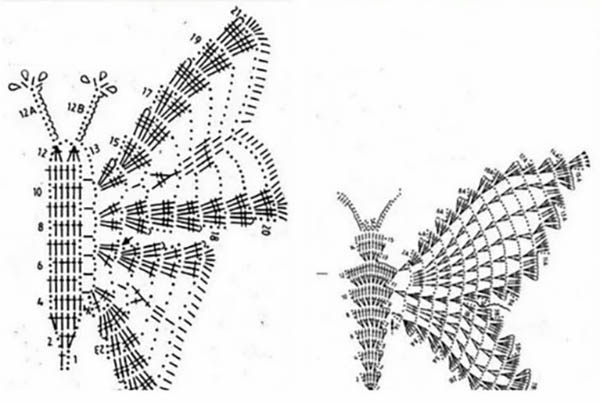
Volumetric
A crochet butterfly (a diagram with a description will allow you to knit a voluminous detail that can be sewn onto a napkin) is suitable for decorating fillet napkins. Initially, you need to knit the main fabric, to which you will later attach decorative elements.
Method of creation:
- Make a circle of 6 air elements.
- In 1 row make 8 groups of 3 columns with a yarn over element in a circle. There should be 4 air loops between the columns.
- In the 2nd row, turn the product, continuing to work in the other direction. In each arch, knit 5 columns with a yarn over loop, 5 air elements and 5 columns with a yarn over element.
- For the 3rd row, between the groups of 5 columns with a yarn over element of the previous row, make one column. In each arch, make 7 columns with a yarn over element, 2 air loops and 7 columns with a yarn over loop.
- In the 4th row, tie the edges with columns.
- Fold the created product in half to create a two-layer butterfly with 4 wings.
Openwork, decorative and various in patterns and designs butterflies are used as decoration for women's and children's clothes, summer headwear, and also house slippers.
The crocheted product is suitable for decorating napkins, tablecloths, curtains and other home textiles. After mastering the simple design scheme of this motif, the pattern can be included in a variety of patterns.
Video about knitting