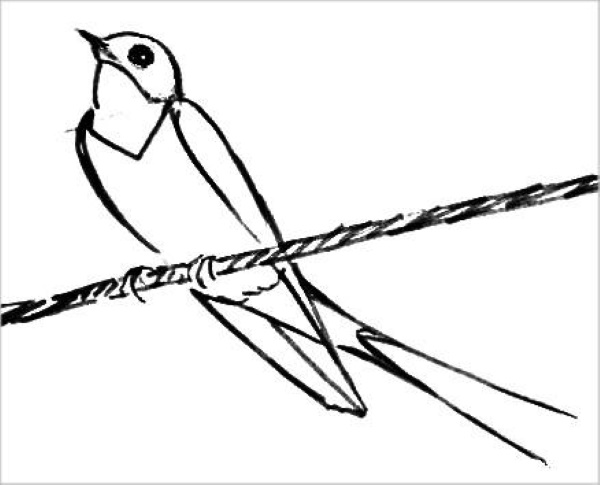
Beautiful drawing of a bird, correctly executed in pencil technique, gives children the opportunity to create pictures for coloring. Only regardless of the composition in which the bird is planned to be depicted, the child should study the rules of construction. Otherwise, the symmetry of the drawing will be broken, and the bird will turn out ugly.
Bird drawing with pencil
Before the image of a bird, you should:
- make sure that the child understands what geometric shapes look like;
- decide on the type of bird (domestic or wild, as well as peaceful or predatory);
- understand how a cockatoo differs from a heron, and an eagle from a dove or parrot;
- know the approximate sizes and habitats for the correct composition;
- explain to the child what birds eat;
- prepare everything you need for drawing;
- Warn your child that pressing hard on the pencil will create thick lines that will be extremely difficult to erase.
What you will need for a simple drawing of a bird:
- album sheet or A4 format;
- simple pencil;
- eraser;
- felt-tip pens.
Basic stages of drawing:
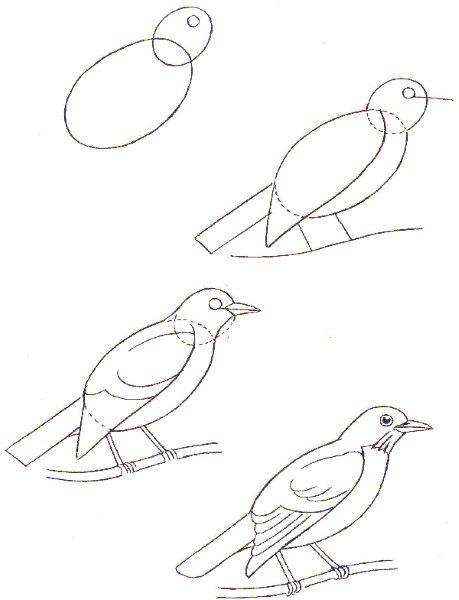
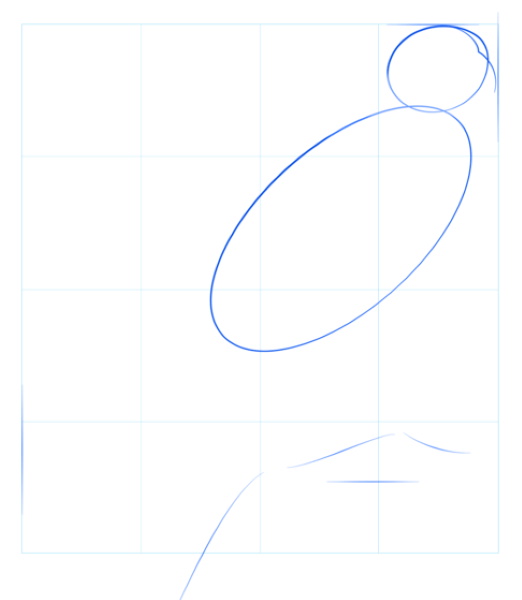
- Place the sheet in a vertical position and visually divide it horizontally in half.
- Draw a circle in the middle of the upper half – the head will be drawn in its place.
- Slightly to the right, at an angle and slightly overlapping, draw an oval - it will serve as the basis for the body.
- In the area of the planned neck, draw 2 connecting lines.
- At the bottom of the oval, add a sharp corner to imitate a tail.
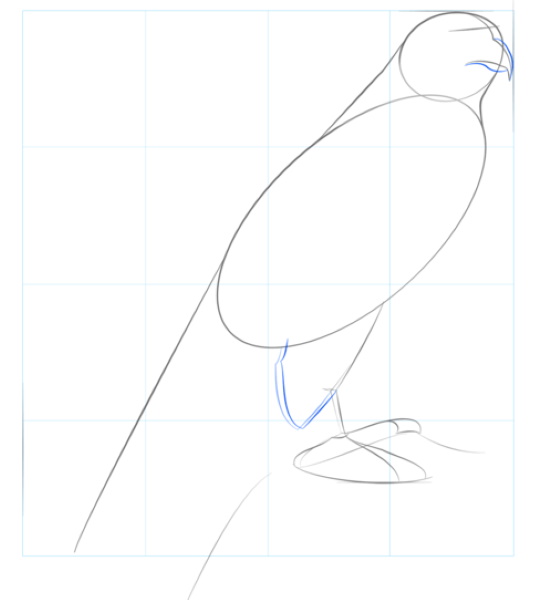
- To form a wing in an oval, draw an arc, the distal end of which will extend beyond the figure and will be slightly raised.
- Draw a line from it to form the corner of the wing.
- Erase the auxiliary lines.
- Draw 6 arched lines under the oval so that they look like paws - at a small distance from each other and with elongated middle fingers.
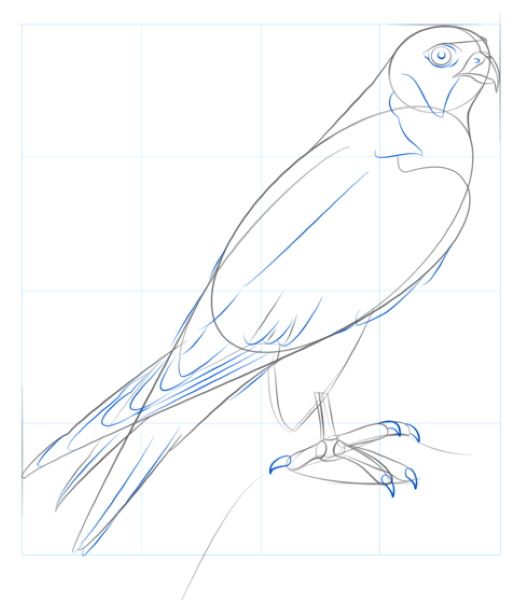
- In the middle of the head, depict a bead, and on the left side, a corner that imitates a beak.
- Add lines to the wing and tail to create feathers.
A drawing of a bird, having such a structure, is considered basic and applicable for small children or those who cannot draw. For others, this task is complicated by greater detail and the formation of a more realistic image.
Afterwards the drawing is painted over. There are no specific requirements regarding the choice of color for the feathers, the child uses the one he wants. The beak can be painted brown, and the eye - black, keeping the highlight in the center.
On the branch
Before depicting a bird on a branch, it is determined what season it is planned to draw:
- if it's winter, you can add snowflakes to the branch, bird and background;
- spring is characterized by the presence of flowers, leaves, and buds;
- in the sultry summer heat before the rain, the leaves shine strongly in the sun;
- In a rainy autumn, the branch will be darkened by moisture and have yellow, orange or red foliage.
The bird's behavior also depends on the time of year:
- in damp weather the bird ruffles its feathers and hides its paws to conserve heat;
- in warm and hot weather – vice versa.
For a child, a more interesting option would be to depict a bird in spring or summer weather, since the drawing will be dominated by bright colors. It can be depicted as if in a 3D projection.
To do this you need:
- Prepare the necessary material. This is a sheet of paper, a pencil, an eraser, a thin brush, a jar of water and watercolor paints.
- Draw a branch. To do this, place the sheet horizontally. To create the effect of near and far objects, draw 2 lines from the lower left corner to the area just below the center. The resulting branch is uneven and has a wider base. From it, draw several long and thin lines upwards (at the child's discretion). On them, in a chaotic arrangement, are leaves and flowers of 5 petals and stamens in the center (circles on short lines).
- Construct the basic image of the bird. It will be located at the intersection of the narrowest part of the near branch with the adjacent far thin one. To do this, at the beginning of the thin part, draw an oval that does not touch it at a slight angle to the left. The distance between this figure and the branch should correspond to the approximate size of the planned paws. From it, 1 line is lowered to the thin branch at a right angle, touching the branch, and the second is twice as short. From it, another line is drawn, only this time to the intersection of the branches. This will imitate the bend in the ankle joint. In the ordinary sense, it is located in the same place where a person's knee is. In the upper part of the oval, draw the same geometric figure, only in a horizontal position and smaller in size. This will be the head.
- Detailing of the body and paws. The shape of the bird's body is outlined with jagged short lines. A thin line is added on each side to form the wings. It is slightly pointed at the bottom - this is how the feathers lie in the area near the tail. On the lines intended for the paws, the plumage is drawn with short strokes in the ankle area. Three dashes are added to the lower area of each line - these are the fingers. The middle one should be slightly longer than the side ones. The fingers go around the branch, since the bird is holding on to it.
- Drawing the head. Inside it, add another oval of short strokes, only slightly smaller. This will make a "face". To get the turn of the head, draw a horizontal rhombus in the left part of this oval so that its right sides are shorter. Divide it in half with a line. This will make a beak. In the center of the upper half of the small oval, draw a circle of strokes, half the size of the beak. This is the eye.
- Finishing touches. The end result of the construction should be a bird with its head turned, but looking straight at the viewer. Next, paint the background (blue sky, green leaves, white flowers, yellow stamens, brown branch, darker in front of the bird). As soon as the paint dries, paint the bird, choosing colors of natural shades.
The drawing of a bird on a branch is ready.
On the tree
Drawing a bird for children, consisting of a composition, always requires understanding:
- construction rules;
- how the light should fall;
- where to place shadows;
- bird behavior under certain weather conditions;
- Nearby objects will always be darker and more contrasting.
If you want to draw a bird on a tree, you should take into account that it is much larger than the bird. As a result, the bird may visually "get lost" in the composition.

To eliminate this problem, it is permissible to use 2 options:
- draw a small tree, but then the whole drawing should look like a cartoon;
- depict part of the trunk, and add more foliage and flowers in the background.
How to do it:
- When depicting a tree in its entire length. The sheet is placed horizontally. In the middle of it, from the middle to the bottom, a wide trunk is drawn, and in it - a hollow and several lines imitating bark. From its upper part, branches are drawn in 3 directions so that the central one is slightly curved to the right and up. Since the trunk is wide, it is advisable to depict a nest at the intersection of these 3 branches. It consists of several thin twigs, woven in a chaotic arrangement. On top of it, a bird is drawn similar to the above method. Only the paws will be partially hidden inside the nest. And then, at the end of each branch, foliage is drawn, giving the shape of a cloud, and at the bottom of the tree - dashes to indicate grass.
- When drawing part of a tree. Then the bird on the branch is not drawn on the entire album sheet, but a little smaller and to the right. To the left of the nearest branch, draw a line to get the side of another one, and on the right side - perpendicularly downwards. As a result, you will get a trunk with the main branch, where the bird is located, and an additional one (which is even larger and located on the left). On it, to imitate the bark, draw wavy and broken lines with a wide middle. Behind the bird, the remaining branches, leaves and flowers are depicted with fuzzy contours.
When coloring, it is recommended to use natural shades and take into account that each object has a cast shadow. Accordingly, in its area the image will be darker. The drawing of a bird on a tree is ready.
In the feeding trough
Drawing a bird for children will become even more interesting if you depict it in a feeder. How to draw depending on the type.
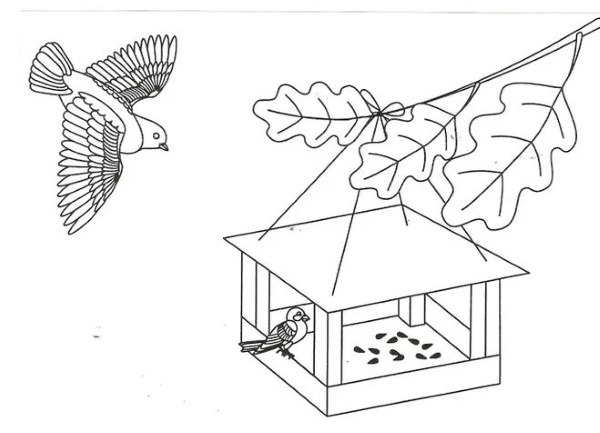
Open:
- As a base, you can depict a house without walls or a pallet of any shape, suspended by strings.
- In the feeder, draw grains and a bird pecking at them. To do this, draw an oval in a horizontal position at a small distance from the tray.
- On its right side, draw a bracket slightly downwards so that the resulting figure with the oval can be compared to the wing of a butterfly. You will get a body with the head of a pecking bird.
- On the left upper side of the oval add a sharp tail, and on the bottom 2 paws. Each has 4 toes: 3 in front and 1 in the back.
- Next, a beak from the first triangle divided in half and an eye are added to the head, and a wing and chest are added to the body.
- Finally, add a branch to which the bird feeder is attached, leaves and a background.
Closed:
- This is a birdhouse that can be nailed to a tree trunk or tied to a branch. This determines what the background will be.
- The hole in the birdhouse should be proportionate to the bird. From it you can draw the bird's head.
- A tray with grains can be nailed to the bottom of the birdhouse. A full-length bird is drawn on it, as in the first point.
The sketch is ready.
On the wires
When a bird sits on a wire, it is not killed by the current because it is in contact with it, not with the insulator. That is why such a phenomenon as a bird on wires is quite common. And such a composition can be depicted with a child.
How to do it:
- Prepare the material. To do this you will need a sheet of paper, a simple pencil, a ruler, an eraser and colored gouache.
- Draw the poles with wires. Since the main object is a bird, the poles will be located along the lower edges of the album sheet. It is placed horizontally. Along its left and right edges, approximately from the middle down, draw 1 line. The left one will be slightly higher than the right one. On these lines, from bottom to top, measure an equal distance, and connect these points. The line should be smooth, slightly bent in the center - that's where the bird will sit. The second one is drawn a few millimeters lower, and between them, draw many oblique lines imitating twisting. You will get a wire between two poles.
- Determine the type of bird. It could be a magpie, a crow or something else, but this lesson will describe drawing a bullfinch.
- Construct an image of a bird. A little above the bend of the wire (at the height of the paws) draw a circle for the body. Overlapping it, but to the left and above - another one for the head. Connect the small circle to the large one on both sides. From the lower part of the middle of the small circle down and to the right draw an arc so that it intersects the body in the approximate area of the tail. You will get a wing. From it and the middle of the lower part of the body draw 2 lines connecting at one point. This is the tail. On it, the body and the wing draw several wavy lines. These are feathers. In the center of the small circle draw an eye, and to the left and slightly below it - an open beak of 2 sharp triangles (the upper one is larger). Divide the head diagonally with an upward curved arc - it will delimit the red and black colors. Next, draw 2 paws holding the wire, and plumage along the edges of the sketch. Finally, delete the auxiliary lines.
- Add a few more birds. If you wish, you can draw a few more birds, only with different turns of the head and body, and a rowan branch in each beak.
- Draw the background and color it. Since the bullfinch is a winter bird, you can depict falling snowflakes on the background, and lumps of snow on the birds, poles and wire. Next, paint the background and, as soon as it dries, the bullfinch. First, mix orange and red in equal proportions, and paint the chest with this color, slightly not reaching the bottom. The wings and back in the upper half of the body are gray, and below - black. In the middle of their dark part, make 3 strokes with white paint. Also paint the eye and head with black. The beak is dark gray, the paws - too, but with small brown inclusions. The rest of the birds are painted using a similar method.
The art of birds on wires is ready.
On the stone
A drawing of a bird for children can also include more complex compositions, for example, its image on boulders. They should also be drawn correctly.

Stages of drawing boulders:
- draw a horizontal line below the middle;
- a little lower, mark the stone so that the top and bottom sides are flat;
- add more boulders on the sides and behind, only of greater height and smaller width;
- cast shadows from them and on them downwards and to the right;
- the largest area is occupied by the main stone;
- the points of contact with the ground and boulders should be highlighted with a darker line;
- moss can be added to some stones;
- Finally, draw a background of trees or rocks.
On the boulder you can depict only a landed falcon, following the following drawing steps:
- Application of basic shapes. Above the stone, draw a circle, in place of which the body will be, and above it - an oval for the head. Both figures are connected with an arc on the left side. This will be the direction of the neck. The circle is visually divided in half. On the right side of its upper half, draw an arc that is 1.5 times larger than the body, and on the left - half of such an arc, only with a "hook" at the end, so that a "broken paper clip" is visually obtained. In their place will be the wings of a falcon that has just landed.
- Drawing the head and neck. In the direction of the arc between the head and neck, but only slightly to the left and from the center of the circle, draw a line. From the oval to the right and slightly down, draw the corner of the square. From its lower right corner to the circle for the body and the arc for the wing, draw a flattened letter "C". You should get a beak, smoothly turning into a neck. In the left half of the oval for the head, draw a circle for the eye and an arc for the upper eyelid. From the side of the square for the beak to the center of the lower side of the oval, draw a line, slightly curved to the left. And from it - an arc to the lower right corner of the square. The base of the beak is complete, it remains to add a comma in the upper left part of the square. This is the nostril.
- Detailing of the wings. On the left side, the wing is almost folded. Therefore, from the point of the "broken paperclip" down, parallel to the body, a line is drawn. From its end, to the right, in a stepped manner, several more lines are drawn, ending in the center of the depicted wing. These are feathers. The last of them is connected to the body by a line parallel to the upper part of the wing. The second will be straightened. Above the large arc, a smooth corner is added in the center - this is the fold continuing the letter "C" from the neck. From the middle of this angle, a distance is retreated downwards to indicate the bottom of the wing symmetrically to the left one and an arc is drawn to the body. On the right, long feathers are drawn in a stepped manner. In the part of the right wing closest to the body, short lines are added upward to imitate fluff.
- Drawing the paws and tail. To continue the cartoon image, the paws can be wide. The left one can be depicted as a cat's foot with a wrist, only with 3 fingers, pointed downwards. The right paw differs from the left one by the presence of a thigh (a line from the wing to the wrist) and fingers. They are drawn in the form of 3 drops, pointed at the top and bottom. The central one is wider than the sides. Both paws are connected with a line at the bottom of the body, and zigzag lines are drawn in the wrist area. From the center of the thigh and the bottom of the body, 2 connecting lines are drawn to the right. This will be the tail, in which 2 long arcs are drawn. These will be feathers.
- Removing auxiliary lines and background from the falcon's side. There should be no excess on the bird.
The drawing of a bird for children is ready, all that remains is to paint it. Natural colors are used for the stones and the background, but the child can paint the plumage in brown-beige colors, or, for example, in blue.
In flight
A child can be taught to draw not only a landed bird, but also one in flight.
| Stages of depicting such a bird | |
| Action | Description |
| Preparation of materials | The child will need a pencil, an eraser and a sheet of paper, which is placed horizontally. |
| Construction of basic forms | To form the body, draw a vertical oval, slightly tilted to the right. Slightly overlapping it, draw a circle at the top for the head, and at the bottom - a triangle for the tail. Long arched arcs are added to the sides of the circle, forming the spread wings. To set their final shape, draw 2 lines, concave downwards, in the direction from the corners of the wings to the planned femur. |
| Head detailing | On both sides of it, draw lines that will later serve as the neck. In the center of the circle for the head, draw a bead. On the left side of the head, draw a beak in the shape of a pick, the acute angle of which is directed downwards and to the right. Then it is divided so that the upper part is pointed and twice as large as the lower one. |
| Drawing the remaining details | The bottom of the wings should be marked with wavy lines imitating feathers. These are wide and long, consisting of lines drawn to the center of each wing. Above, add another 1, only smaller wavy line - fluff. And under the neck, wings, tail and on the stomach, depict underfur with small arched and circular lines. At the level of the lower part of the wings on the body, draw 2 bent paws in the form of narrow hearts with the tip up. The tail is detailed similarly to the wings, only the long feathers have a base near the body. |
| Applying the background | It is started after all auxiliary lines have been removed and the main sketch has been formed. The background can be simply blue, contain clouds or something else at the child's discretion. |

The image of a flying parrot is ready.
Singing
A bird's trill cannot be compared to anything, and you also need to be able to draw a singing bird.
There is an algorithm of actions for this:
- place the landscape sheet vertically;
- visually divide it into 3 vertical lines;
- the middle part of the sheet is divided by a diagonal line to determine the angle of the bird;
- in the center at the top, draw a circle for the head, slightly smaller than half the sheet;
- from it - an oval (slightly overlapping);
- on the sides of it - leaves with the point upwards, without touching the circle for the head;
- from the oval down and along the axis of symmetry draw a tail in the shape of a fan;
- a tuft in the shape of a royal crown is added to the head;
- in the center of the circle, draw a wide jackdaw with long lines to indicate the area of the top of the beak and the bottom of the eyes;
- from the right side of this bird add 2 more wavy lines to get the upper part of the beak, and under it - 2 more, only smaller in size - you get the beak of a singing bird;
- from the beginning of the wavy line to the beak, draw a high arc - this will be the eye;
- the second will be partially hidden and will be depicted up to the middle of the top of the beak;
- pupils made of balls are added to the center;
- at the bottom of the body, close to each other, draw 2 eggs with the points down, and in the upper part of them, 3 more - these are the paws;
- The inner lines of the wings are modified into semicircles to create feathers.
Then, in the tail and on the body, add dashes along the line of feather growth. Next to the area of the visible part of the eye, you can draw a line from the bottom up along its shape. To depict that the bird is singing, add notes from the beak. After that, the sketch is painted over. Since it turns out to be a cartoon character, the child can use bright colors.
A simple drawing of a bird becomes an interesting activity for children of any age. Everything depends on what composition is planned to be obtained. The main thing is to learn how to correctly construct an image and understand how to correctly distribute shadows and paint it.
Bird Drawing Video for Kids
How to draw a simple bird:
all beautiful but put 2 ... 2 ...
ahahahahahahahahaah