It is not difficult to draw realistic beautiful pictures with a pencil from scratch, knowing the basics of drawing techniques for beginners. First, you need to select the necessary tools, carefully study the step-by-step steps, and follow the recommendations of specialists.
What supplies will you need?
First you need to prepare the supplies and tools for drawing.
Pencils, for example:
- "Koh-i-Noor".
- "HOLLAND".
- "Faber-Castell".
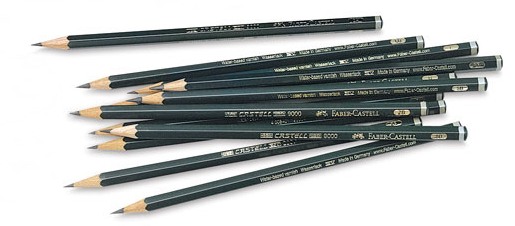
It is important that the pencil leads are not hard and do not scratch the paper. This will help to achieve an even stroke when drawing small patterns.
The letter on the top tip characterizes the hardness-softness of the pencil, you need 2 pcs. hard "H" and 2 pcs. soft pencils "B". Hard models are suitable for drawing skin, soft ones create unforgettable dark accents in the drawing. A white art pencil for toning the paper is a must.
Often, if the shadows don’t turn out well, the problem is in the wrong pencil choice; it’s best to choose “B”, “H”, “2B”.
You will also need:
- Paper is needed in different formats, for example, "A3", "A2". It is recommended to choose not too thin, without relief and embossing. Before buying paper, it is necessary to make a sketch on a small piece, apply a light image. If the paper is very smooth, the image will be pale, on a hard canvas the drawing will be flat.
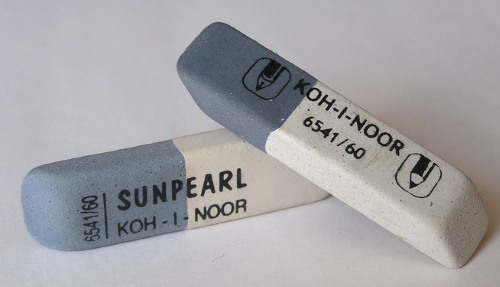
- Eraser For correction, it is recommended to choose a soft one, so that there are no marks on the paper. Too soft is not suitable, it smears the pencil. Many experts recommend cutting the eraser into several parts so that it can carefully remove small drawn elements.
- Nag – a special tool for removing drawings, the texture of which resembles plasticine, removes large and small areas by sticking drawn lines onto itself.
- Paper holder one- or two-sided, includes a stand for pencils, eraser. A necessary device so that you don’t have to hold a sheet of Whatman paper in your hands.
- Stationery knife with thin inserted leads, helps to remove too large strokes from paper, sharpen pencils.
- Standard sharpener for pencils.
It is better not to save on tools and materials, the quality of the result directly depends on this. It is important to prepare a comfortable workplace.
Sequence of copying
Pictures for copying with a pencil are beautiful and realistic, easy to do without special skills, following simple schemes and instructions. The first stages of drawing consist of a light sketch, which includes short, smooth lines, general outlines of the selected object for drawing. It is important to try to capture the moment, pose, movement in general terms.
The easiest way to express your thoughts on paper is a sketch. You need to draw it quickly, without drawing details, with light hand movements, no more than 10 minutes.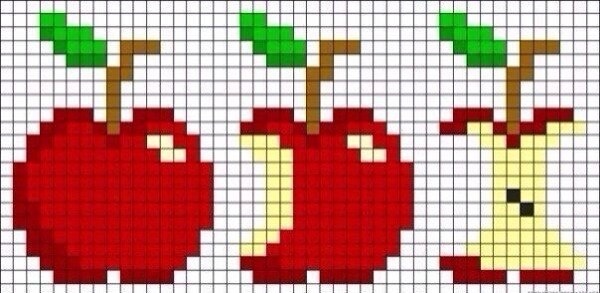
The easiest way is to copy a picture from the original using the “cellular” method.
To do this you need:
- Apply a grid to the original picture using graph paper, a ruler, and a pencil.
- Repeat the grid on drawing paper, measuring 2cm by 2cm.
- To prevent the net from slipping, you need to secure it with buttons.
- Do a little warm-up of your fingers and hands before drawing. To do this, draw any chaotic lines (squiggles, scribbles) on a clean sheet of paper, changing the pressure of the pencil, the angle of inclination. Experiment with the length and shape of lines, strokes.
- Transfer the drawing cell by cell (from cell to cell) onto the surface of the Whatman paper.
- To redraw a large picture, the grid must be proportionally enlarged.
- First, you need to draw the main contour lines and the longest ones. You should start drawing from the edges to the center.
- When drawing small strokes and elements, you need to polish the angular lines. It is necessary to give roundness and smoothness to the drawing.
- To draw a natural object, you need to choose it, for example, a fruit, a vase, a teapot, etc. Carefully examine the object, pay attention to each individual detail, texture, shadows.
- Determine the overall composition, such as the arrangement in space, the curvature of the contours.
This method can be used to draw still lifes, portraits, abstract patterns and much more. The drawing is clean, airy with clear lines.
Pictures for copying with a pencil are beautiful, inspiring with the use of special technologies will look as realistic as possible, it all depends on what exactly is in the picture:
- For correct, realistic portraits It is necessary to look closely at the details and proportions of the face, the features of the hair curls. Study the person's mood, emotions and correctly convey facial expressions.
- If in the original picture anime image, manga you can first skim through and carefully study comics, anime characters, Japanese cartoons.
- Draw people The hardest part is that before this you need to study anatomy, the structure of the skull, the position of the lips, the setting of the eyes, the posture of a person and learn to draw drapery correctly.
Beautiful and realistic pictures will come out if you draw from a copy. When drawing with a pencil, it is necessary not only to follow the technique, but also to pay attention to such details as the correct grip of the pencil.
How to hold a pencil:
- Traditional Method used for smooth, curved lines and small, abrupt strokes. You need to take the pencil in your hand, 2 inches above the tip and hold it like a writing pen. Your hand should be relaxed and glide smoothly across the canvas.
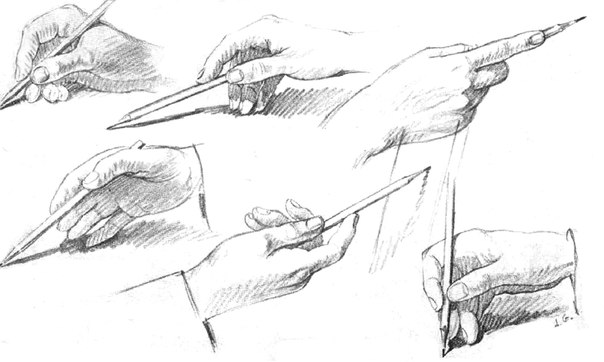
- Hand over pencil position used when it is necessary to convey the depth and density of color. It is necessary to direct the pencil with the index finger, which will be located along the length of the pencil. It is necessary to press hard on the paper when drawing.
- Hand under pencil grip is designed for high-quality application of light, airy lines. The hand should be supported by the pencil with the thumb and index finger. This helps to control the pressure, not only the wrist moves, but the whole hand.
The principles of applying images will help you make any drawing as realistic as possible:
- Basics of Perspective – objects located close should be visually larger, those located further away should be smaller in size.
- The principle of arrangement – objects located at the bottom of the sheet appear closer.
- Law of size – if an object is larger, it means it is visually closer.
- The principle of overlapping – an object superimposed on another will appear visually closer to the person viewing it.
- The Basics of Half-Shadows – the part of the object that is far from the light source should be darker than the base.
- Laws of the Shadow – For a realistic three-dimensional picture, objects in the drawing must cast a shadow.
- Basics of contours – you need to carefully draw the contours of round objects so that they have depth.
- The Principle of Horizon — to create a visual understanding that objects are located in different positions from each other, it is necessary to indicate the horizon line.
- Law of density – receding objects located in the distance should be light, drawn in light lines.
Pencil Drawing Techniques: Shading and Shading
Special techniques help novice artists create realistic and correct paintings:
- Shading with a pencil helps to add more realism to the drawing. Perform the technique along the main strokes to give the shading a natural look. The process is performed using simple zigzag strokes with a pencil. Important! Do not use cotton swabs, paper, or fingers for shading.
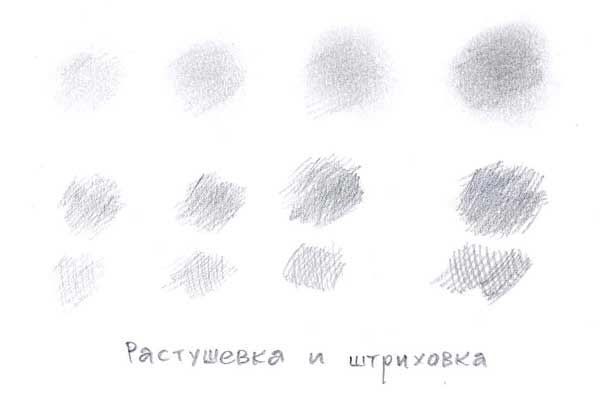
- Pencil shading will help to give the necessary tone to the drawing, is performed with small short lines. This helps to create a carved degree of saturation of the shade. To improve the depth of the pattern, use a cross hatch. In the corners of the paintings, oblique, horizontal hatching will look good. Depending on the number and inclination of the strokes, different degrees of tone, depth of the drawing are obtained. Hatching is performed with standard short lines with the same distance, they should not be chaotic.
- Relief hatching helps to convey the volume of the surface of the object being conveyed. Relief shading is performed with arcuate lines.
Simple pictures for kids
For children and beginners, at the beginning of learning the art of drawing, it is necessary to select simple pictures for copying with a pencil. Easy patterns and sketches will help to draw beautiful pictures.
Among the popular ones, for example, are the following:
- Fish.
- Automobile.
- Tree.
- House.
- Cat.
- Bunny.
Drawing a tree is not difficult, even for a beginner:
- First, draw the trunk, wide at the base, tapering towards the top.
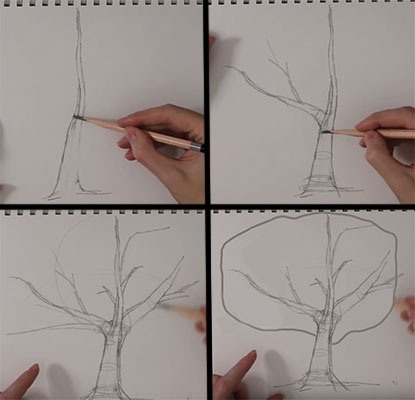
- Having chosen what kind of tree it is, you need to know that the birch should be thin, “slender” with a slight bend, while the oak should have a massive trunk.
- Draw branches, wide at the base and at the bottom of the trunk - larger branches. Branches of any tree begin to grow only from a quarter of the tree and up to the very top.
- On each thick branch, draw small branches that will add realism.
- You can add a few leaves or draw one large crown.
How to draw a shadow
The shadow allows you to give the drawing volume by correctly placing highlights, halo light, penumbra, and main shadow on the drawing. This is a standard formula, according to which all objects are drawn from a person's face to a geometric figure.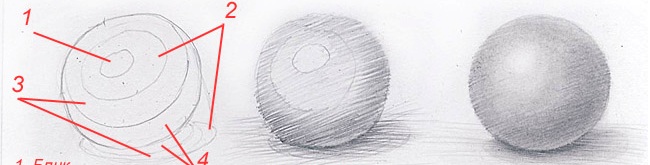
It is important to choose the right place for shadows and shading:
- At the first stage, it is important to make a highlight at point “1” with a white pencil.
- On the second circle, leave a light spot, shade with light lines and blend.
- Make a penumbra in the middle line of the object.
- Create a full shadow along the edges of the object and beyond the edges by shading and blending the area.
Beautiful patterns
Stylish thematic patterns, ornaments are easy to draw on the cells:
- You need to draw 3 vertical stripes.
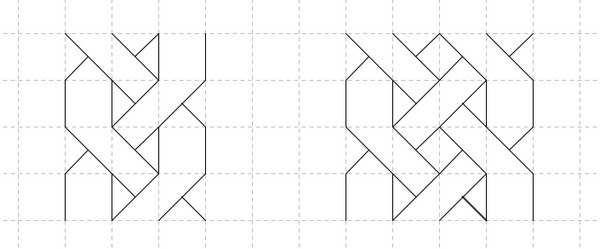
- Make a bend from one corner to another by drawing 2 more lines.
- Make folds in the middle of the ornament.
Drawings "about love"
LOVE themed images – heart, dove, rose, cute flowers, kittens, etc.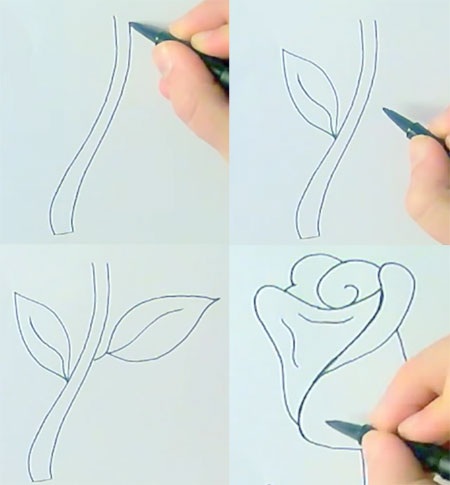
To draw a beautiful “universal” rose, you need to follow the algorithm:
- Draw a smooth, light line on the paper – this will be the stem of the future rose.
- Draw small leaves on the stem in a checkerboard pattern.
- Start drawing the bud from the first oval.
- Make two main petals inside the oval. The middle of the drawing should resemble a rolled-up roll.
- Make small petals on the sides.
Drawing anime characters
The most common anime style drawings are Pikachu and cartoon characters (young guys, girls). The main difference is multi-colored hair, strict facial features, large wide-open eyes.
It's very easy to draw your own anime character:
- On paper, draw the axes from which the head features will begin to be drawn (3\4). Divide the axes into 15 lines, with the same step.
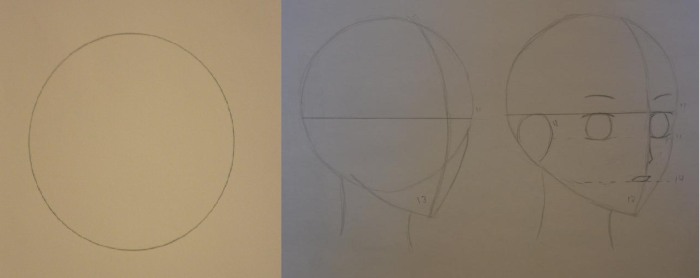
- First you need to draw a circle, draw the chin, making a rounded triangle at the bottom of the circle.
- On line #13 draw the nose and mouth, between lines #11 the eyes will be located, the distance between the eyes should be equal to one eye (approximately).
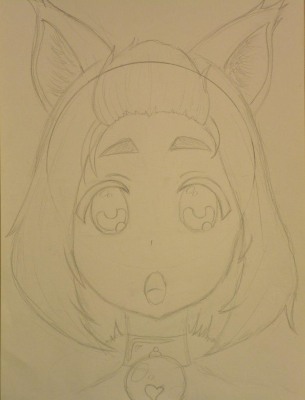
- At the points of line No. 18, make two circles – ears.
- Make the eyebrows like two small arcs the size of the eye.

- Ears can be of different designs: elven (pointed), regular, cat-like.
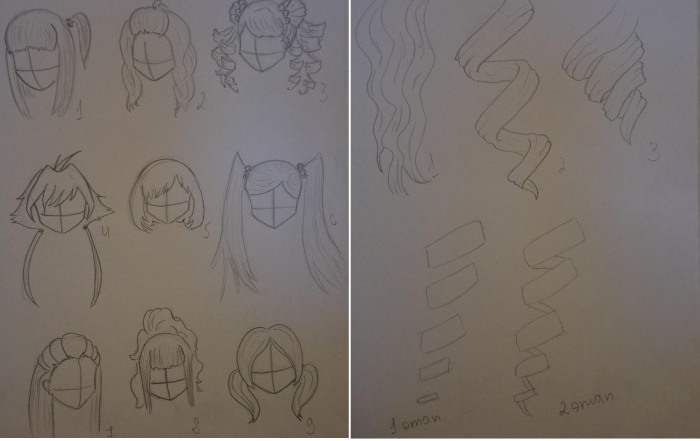
- Hair should be positioned above the head line.
- There are many different hairstyles for anime characters.
This is how any images are created.
Pictures friendship - how to draw friendship
Drawing friendship is not difficult, it is important to choose the right picture. The dove bird is a messenger of peace, friendship and prosperity.
You need to draw step by step, using a simple pencil:
- Any image should start with drawing the outline. This will be the body, head and wings of the bird.
- First, draw an oval, which will be the head of the pigeon, and from it draw an arched line, which will be the body.
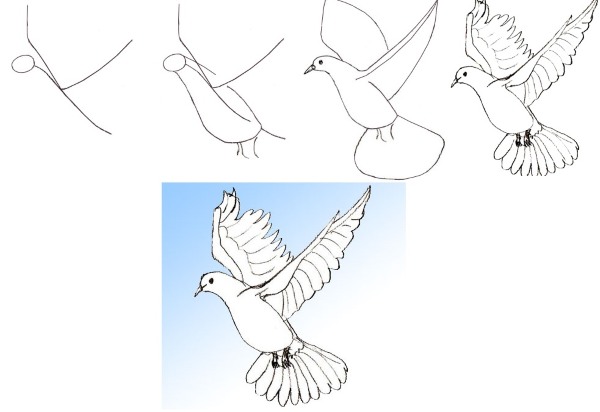
Pictures for copying with a pencil help to quickly complete a high-quality drawing. - To draw a dove in flight, make the wings in the shape of a check mark.
- To give the dove realism and “liveliness”, add several basic lines: the tail line, the outline of the body, and draw the legs at the bottom.
- The final step will be drawing the dove's eyes, beak and feathers.
- Drawing feathers is simple, you need to divide the sections along the contours and extend (round) them to the base.
- The tail feathers should be slightly elongated.
Pictures with music
There are many images that are associated with music and songs, the most popular is the treble clef.
To draw, follow these steps:
- On a sheet of paper, draw a small circle with a simple pencil.
- Draw a rounded line on the right side of the circle and a small line on top. This will be the foot of the treble clef.
- When the leg is long enough, fold the loop down to the right.
- Then draw a counter-clockwise spiral.
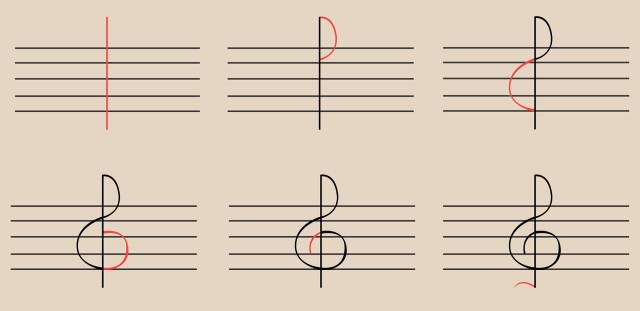
The easiest way to draw a treble clef is to first draw a musical staff - 5 lines.
Pictures for girls personal diary
A teenage girl's personal diary can be decorated with homemade pictures, beautiful, stylish patterns. For such ideas, images of angels, a kiss, Cupid, a heart with wings or a lock with a key are best suited. These will be inspiring, stylish drawings made with your own hands.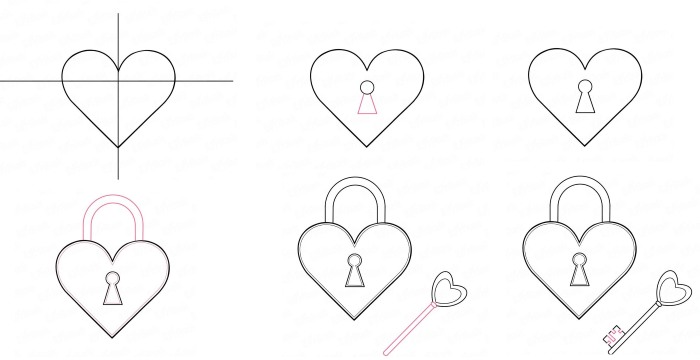
How to draw a heart lock with a key:
- Draw a coordinate axis, in the middle of which depict a standard heart.
- To draw a keyhole you will need to draw two main elements: a circle, using a compass, and a trapezoid below.
- The segment of the circle that overlaps the trapezoid needs to be erased so that the keyhole remains without partitions.
- You can draw the arc by attaching two parallel arcs to the top of the heart. Highlight the groove by repeating the outline of the entire figure to give the drawing a realistic look.
- The key to the lock can be any: in the form of a standard key or a heart on a long stem. To do this, draw a double heart and a long stem for the key.
- Be sure to make a groove inside the keyhole and small notches in the working part of the key.
Learning to draw from scratch is not difficult, you need to devote a lot of time to it, have perseverance. Practice should be accompanied by mandatory criticism from professionals, so that mistakes and inaccuracies can be taken into account in the future. Even despite failures, you should not stop halfway, drawing will help to lift your mood, create a lot of positive emotions, and distract yourself from the gray everyday life.
By devoting enough time to this craft, trying to follow all the recommendations, you can devote your whole life to it, become a professional artist, a fashion designer.. Pictures for copying will help even a child to create a small masterpiece.
By practicing again and again with a simple or colored pencil, new drawings will turn out more and more beautiful. The most successful images can be framed and put in a prominent place. This way, the child will feel the importance of his creations, inspiration will come to him, which will certainly bring pleasure and please those around him!
Video: pictures for copying with a pencil
Pictures for copying with a pencil, see the video:
https://www.youtube.com/watch?v=yNaSn0Tux1o
Cool drawings for copying with a pencil in the video: