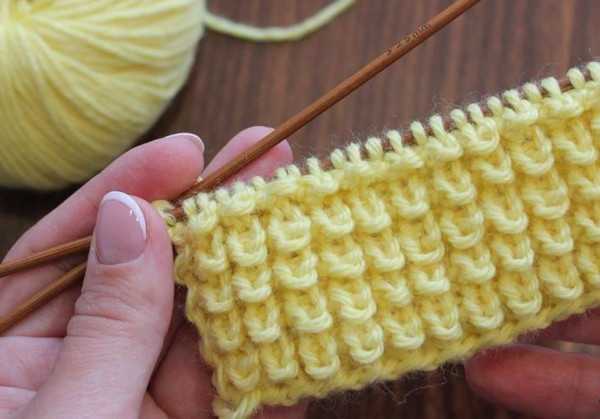
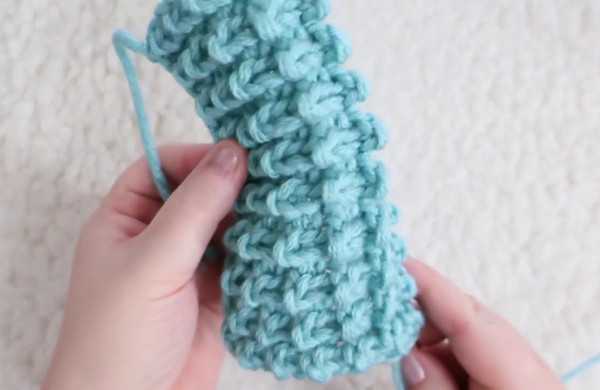
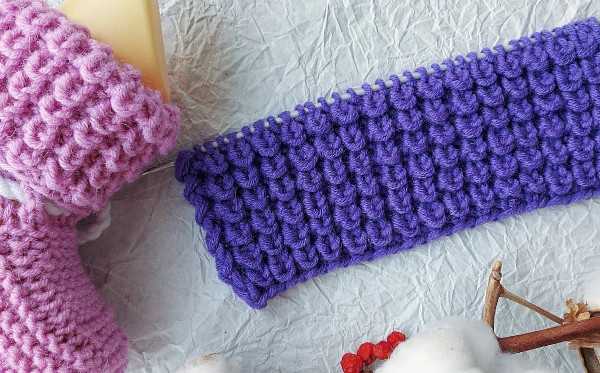
The "Corn" pattern is in great demand among needlewomen because it is easy to create, but at the same time it has an original look. There are a large number of patterns for knitting patterns, with which you can knit voluminous and warm items, such as a hat, beret, or baby booties.
Necessary tools and materials
For knitting a beret, it is recommended to take a semi-wool of medium thickness. The knitting needles should be No. 2.5 and 3. Acrylic thread material is suitable for creating baby booties. Additionally, you need to prepare a hook No. 3 and knitting needles No. 2.
To make the socks, you can use wool or cotton yarn. The first option is suitable for the winter season, and the second for the summer. If you need to make a warm product, the thread material should be thick and include wool. The hat can be knitted from 100% wool, using knitting tool No. 3.
Schemes with description of works for beginners
The "Corn" pattern is characterized by a textured beautiful look, so it is suitable for knitting various accessories, clothes and shoes (for example, footsies or baby booties). The pattern is also suitable for decorating a coat, a warm blanket, a collar and a hat.
When combining an ornament with braids and cords, it is permissible to create a warm, beautiful product with a three-dimensional relief. If desired, different shades of thread material can be combined in the patterns. Due to this, the thing will have a more original look.
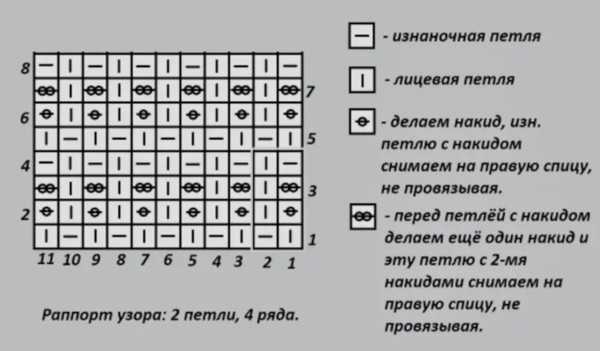
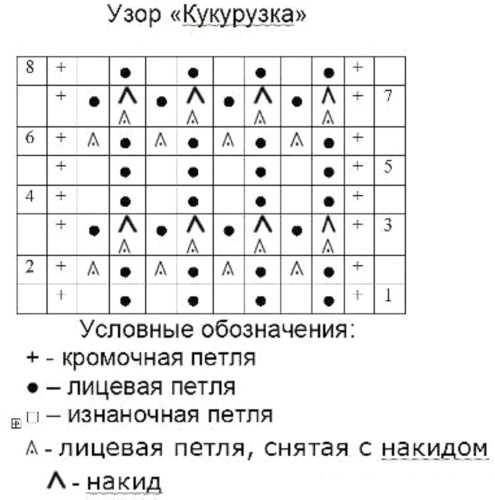
Abbreviations for designating loops and other elements:
| Element | Reduction |
| Loop | p. |
| Front loop | l.p. |
| Purl loop | and. p. |
| Edge element | chrome. |
| *…* | repeat from beginning to end with alternation |
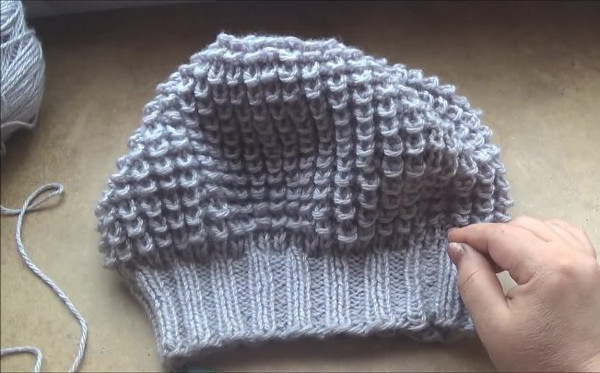
For beret
The Corn pattern with knitting needles (the pattern is simple and does not contain complex elements) will not take much time to create a warm headdress in the form of a beret. To do this, you need to calculate the required number of stitches, creating a sample of threads. Additionally, you need to calculate the number of elements according to the size of the head circumference.
Measurements to take from the head:
- circle;
- the distance from the crown area down to the convex area of the head.
First, you should knit only 10 cm of the sample with the required pattern, and then calculate the optimal number of stitches that need to be dialed to cover the head. In this case, the size of the elastic should be smaller than the main product. The elastic should be measured exclusively in a stretched form.
Step-by-step description of the work:
- Cast on 88 sts using circular tools. The knitting should be tight.
- Then make a 2x2 elastic band, the height of which should be 7 cm.
- Next, take knitting needles No. 4.5 to create the “Corn” pattern.
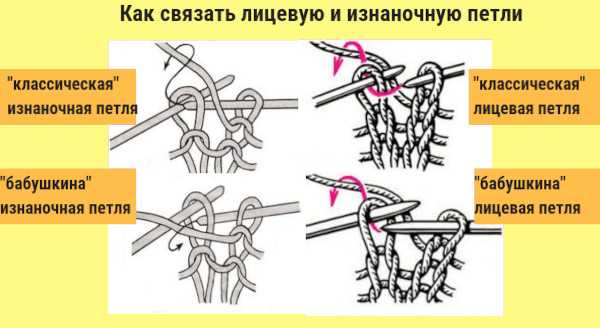
- To do this, make a 1x1 elastic band in row 1. To do this, knit with alternation to the end of the row 1 edge, 1 l. p. and 1 i. p. At the end of the row there should be 1 l. p. and 1 edge.
- In the 2nd row, all the knit stitches should be knit stitches, and the slip stitches should be removed with a yarn over, but not knitted.
- In the 3rd row, add another yarn over to 1 st with 1 yarn over. Then transfer everything together to the right knitting tool without knitting. Make the starting sts as front sts.

- In the 4th row, 1 st with 2 yarn overs is made purlwise, and the i. p. are made knitwise.
- The height of the ornament should be 12 cm, which is equal to 12 rapports. Do not increase, because the fabric will be voluminous.
- In the 13th pattern repeat, close 15 times 3 sts together. Then do 2 repeats in the height of the pattern without increases.
- In the 16th rapport, close 3 sts 10 times. After the 1st relief rapport, knit without increasing the height.
- After completing the 17th rapport, gather all sts onto a thread material and pull together.
- As a result, the circumference of the headdress should be 80 cm, and the circumference along the elastic band should be 53 cm. The height of the pattern will be 17 cm.
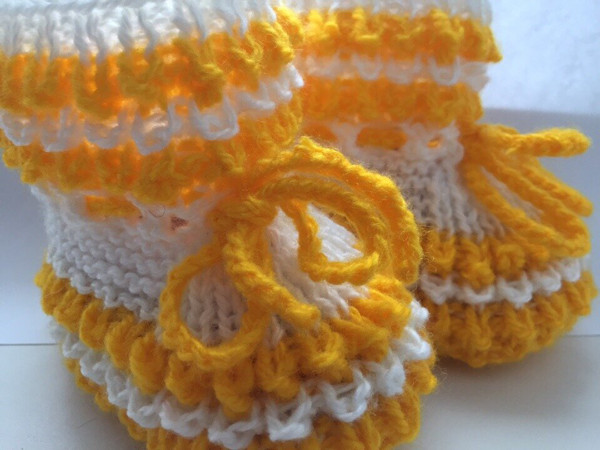
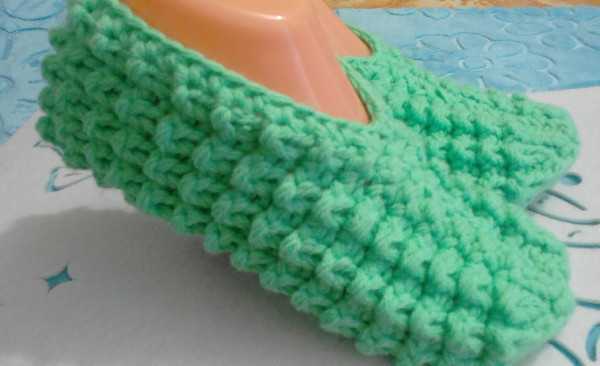
For booties
The Corn pattern with knitting needles (the diagram will allow you to knit a beautiful product for a child) is suitable for decorating warm and voluminous booties in which you can walk around the house. At the same time, these shoes can stretch, so they are suitable for both newborns and children up to 2 years old.
It is recommended to knit with thick yarn or 2 threads to obtain a more voluminous product. Booties can be made in one color or in color.
Step-by-step knitting instructions:
- Cast on 40 sts and begin to form the sole. To do this, make only l sts in rows 1 and 2.
- Starting from the 3rd row, add 4 sts in each odd row. In this case, take all new sts from the constrictions between the elements. Before knitting, twist the constriction to prevent a hole from appearing. In this case, the knitting will be denser.
- In the 3rd row, make an edge, increase 1 l. p., 18 l. p., increase again, 2 l. p., increase, 18 l. p., then increase and 1 edge.
- Line 4 consists of l.p.
- In the 5th row, perform an edge, 1 knit stitch, increase 1 knit stitch, 18 knit stitches, increase, 4 knit stitches, increase, 18 knit stitches, increase, 1 knit stitch and an edge.
- In the 6th row, all sts must be knit stitches.
- Row 7 consists of edge, increase 1 knit stitch, 18 knit stitches, increase, 6 knit stitches, increase, 18 knit stitches, increase, 2 knit stitches and edge.
- Row 8 should be the front row.
- In the 9th row, perform edge, 3, 18, 8, 18 and 3 knit stitches, and also 1 edge stitch. Between the knit stitches, perform an increase of 1 knit stitch.
- In line 10, do only l.p.
- In the 11th row, knit the edge, 4, 18, 10, 18 and 4 knit stitches, and also 1 edge stitch. Between the knit stitches, add 1 knit stitch.
- Lines 12-13 should contain l.p.
- As a result, 60 stitches should be collected on the tool. After knitting the sole, attach the contrasting yarn and start making the "Corn" ornament. Do not cut off the main yarn.
- In line 14, make *l. p. and i. p.*.
- In row 15 *make 1 knit stitch, then yarn over and remove knit stitch without knitting*.
- In row 16, *make the first st knitwise, then yarn over and remove 1 st with yarn over without knitting*. As a result, 1 st with 2 yarn overs should be created.
- In row 17, *the first st should be knit, and 1 st with 2 yarn overs should be purl*.
- Cut off the contrasting yarn, continuing to work with the main shade.
- Repeat the pattern from rows 14 to 17 three times.
- Line 30 should contain only l.p.
- To create a toe in the center of the row, decrease 15 sts.
- In row 31 make *14 l. p., knit two l. p. together 15 times and 14 l. p.*.
- As a result, there should be 45 sts on the tool.
- Lines 32-34 should consist of l.p.
- In the next row, close the stitches on the toe and proceed to the design of the belt. For these purposes, prepare an additional knitting needle.
- In line 35 make 10 l. p.
- Then, using an auxiliary tool, close 25 stitches, continuing to knit the remaining 10 sts with a similar knitting needle.
- 10 l. p., designed at the beginning of row 35, make purl. There should be 20 elements left on the tool.
- In row 36 make 20 l. p. Then cast on an additional 25 stitches onto the tool.
- The next 10 rows are made with garter stitch and the stitches are closed. Be sure to leave an opening for the button.
The second product should be a mirror image of the first, so the belt should be on the other side. On the sole, you need to sew a seam and hide the end of the yarn. Using a crochet hook, you need to tie the toe with a strap, using a material of a contrasting shade.
For traces
The Corn pattern with knitting needles (the diagram suggests creating a warm product for the winter season) is suitable for decorating adult footsies. These shoes can be worn instead of house slippers.
Execution algorithm:
- Cast on 60 stitches and begin to create the “Corn” ornament in 16 rows.
- To do this, in the 1st row, remove 1 edge without knitting, then make *1 knit stitch and 1 purl stitch*. At the end, make 1 edge stitch purl.
- In the 2nd row, remove 1 edge stitch without knitting. Then make *1 knit stitch, yarn over and remove 1 i. p. without knitting*. After 1 edge stitch, make a purl stitch.
- In the 3rd row, without knitting, remove 1 edge, perform *1 knit stitch, yarn over before the stitch with yarn over and remove 1 st without knitting with yarn over*. The outermost 1 edge stitch should be purl.
- Row 4 includes 1 edge stitch, *1 knit stitch and 1 purl stitch* (this should be a stitch and 2 yarn overs), and 1 edge stitch of the purl type.
- In row 17, begin to design the “Small loop” pattern, creating 12 rows, which equal 2 rapports.
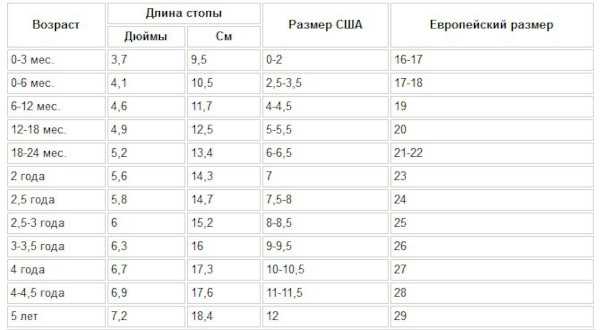
- Then proceed to the design of the toe. To do this, divide all the stitches into 3 parts (23-14-23). Design the central number of elements with the "Corn" pattern to a height of 10 cm. This number is suitable for shoes of size 38.
- Then cast on 30 sts from each side. As a result, 121 elements should be created, which should be decorated with the “Small loop” ornament. This refers to the depth of the sock.
- Then divide the stitches into 3 parts again and start creating the sole (53-15-53). Design the central elements with shortened rows.
- To do this, make 52 stitches in garter stitch, and place 53-54 stitches behind the front wall together with the l.p.
- 13 sts make garter stitch, 14-15 sts together behind the back wall. Then turn the fabric.
- Next, make only the central 15 stitches, making 2 of them together at the end of each row, until all the elements of the sole are covered. At the same time, 15 sts should remain on the tools.
- Then from each side raise 20 sts and create a heel. To do this, evenly decrease the elements to close all the stitches.
- To form the heel, select the central 15 stitches and begin to create shortened rows. In this case, knit 14 sts, and 15-16 sts are made behind the back wall together, l. p. Then turn the fabric over and begin to knit the middle 15 sts again. Knit 14-15 sts together, i. p.
- In the central part of the heel, decrease a few stitches so that the product fits the foot well.
For the hat
The Corn pattern with knitting needles (the diagram describes in detail how to design a knitted headdress) can be used to create a baby hat for a newborn. In this case, it is recommended to take 2 yarns of different colors (for example, white and green) for work.

Step-by-step description of the work:
- With white threads make a set of 52 sts. When casting on stitches, the end of the yarn should be 85 cm long.
- Use the same shade for 1 line of l.p.
- Then change the color and knit 2 rows of LP. Make 6 more rows in the same way. Then make 1 row with green yarn from LP.
- Then proceed to the design of the "Corn" pattern, which should consist of 8 stripes. To do this, in all rows, remove 1 edge without knitting, and design the last edge with an i. p.
- In the 1st row make *1 l. p. and 1 i. p.*.
- In the 2nd row, make *1 l. p., yarn over and remove 1 i. p. without knitting*.
- In the 3rd row, perform *1 l. p., yarn over before the stitch with yarn over and remove 1 st. without knitting*.
- In the 4th row make *1 l. p. and 1 i. p.*.
- When the 8th row of the pattern is created on the front side of the fabric, make another row on the back side, making the knit stitches as front stitches and the i. stitches as back stitches.
- Then start creating the occipital area. For this, a rice pattern or a garter stitch will do.
- Cut the yarn and transfer 19 sts to the right knitting tool. Then insert new yarn and make 13 stitches as they look. Knit the next 2 elements together purlwise.
- Turn the fabric over. Make a knit stitch and vice versa. Make 14 and 1 unknitted stitch together as a front stitch. Turn the work over again.
- To prevent the back of the head from becoming square, perform a throw-over at the beginning and end of the new row.
Corn pattern knitting. Knitting pattern. - Afterwards, decorate the work using the chosen pattern.
- When there are only 5 sts on each side, in the process of shaping the back of the head, at the beginning and end of 1-2 rows, reduce 1 stitch.
- As a result, 1 st should remain on the right side, the stitches for the back of the head should be completely knitted, and the outer element on the right side should be formed together with the back of the head st. The working yarn should be visible.
- Using a free tool, starting from the white set line, lift all the edges.
- Pick up 17 stitches and make them into l.p. Turn the fabric and make l.p. again.
- The side and back parts are designed using the left side.
- From the edge, pick up 17 stitches using a free knitting needle and form a l.p.
- The new line should be white and consist of l. p. At the end of the line, make a set of 17 i. p.
- The next row consists of l.p. At the end, make 3 air stitches.
- Then in a new row make 1 white st and the rest with green yarn.
- In the next row, be sure to prepare a hole for the loops. To do this, make a throw and 2 together.
- Then, using white yarn, make 2 rows of LP and close all stitches.
Secrets for Beginners
Useful tips for beginners:
- This pattern is perfect for making a hat, a warm sweater, a cardigan, because it perfectly retains its shape and will be soft to the touch. Knitted clothes will be warm, because airy stitches will give the product volume. As a result, the body temperature will be maintained longer. Additionally, the pattern can be used when knitting a blanket, a decorative pillow, because it is characterized by high density.
- To get a beautiful beret or hat, the headdress must be designed in a circle so that there is no seam.
- To obtain an even canvas, each stitch must have the same tension. As a result, you can get a beautiful, voluminous and even relief. To learn how to tension the yarn equally, you will have to make a large number of samples. The "Corn" pattern is ideal for solving this problem, because it allows you to achieve equal tension of the thread material so that the product is neat and even.
- To create a voluminous and dense product, stitch removal should be done in the same way as knitting the purl elements.
- If you have no experience in knitting, you can create a three-dimensional pattern using a simplified scheme. In this case, the work will be one-sided, and any number of elements can be used for the ornament. For these purposes, in row 1, you need to alternately make front and back stitches. Row 2 should consist of front elements, and row 3 should be created by analogy with row 1. Due to this, a convex three-dimensional ornament will be formed on the front part of the product.
- Knitting needles can be made of any material. The main thing is that the knitting tools are comfortable to hold in your hand, and your fingers do not get tired from work. It is optimal for beginner needlewomen to use steel knitting needles, because they will not bend.
Initial mastering of knitting lessons often offers patterns for creating simple ornaments and designs. This allows you not to get confused in the stitches, not to make them too tight or loose, and also gives the opportunity to learn how to design even elements. The "Corn" pattern is perfect for such purposes.
Video about the Corn pattern
Master class on knitting a bonnet with the Corn pattern: