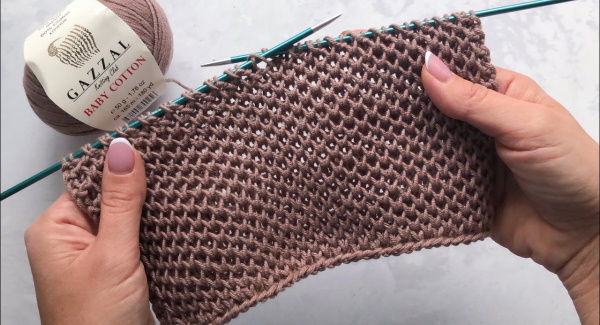
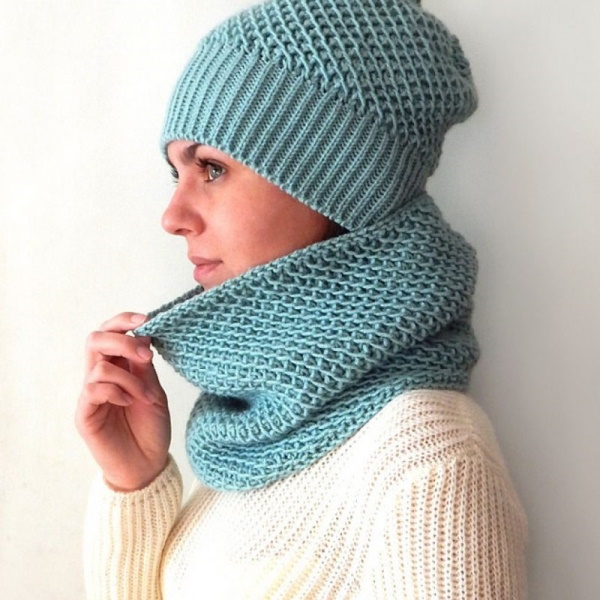
To create a stylish snood, warm scarf and original jumper many needlewomen prefer to knit various patent patterns with knitting needles, which are absolutely identical both on the front and back sides. In order to avoid common mistakes in the process of work, you need to study the patterns and knitting techniques in advance.
You will need more yarn than when working with classic patterns, since the finished item will be elastic and voluminous, which is especially important in the cold season.
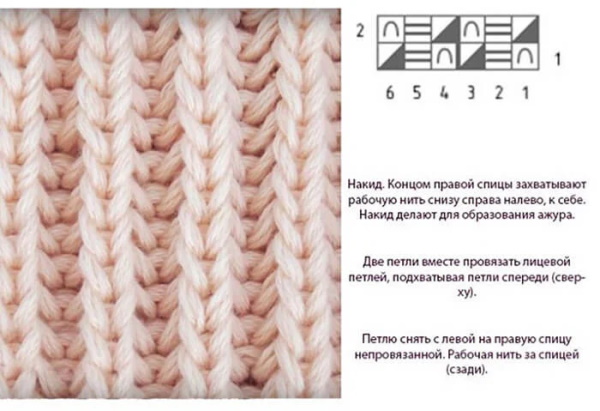
Patent loop
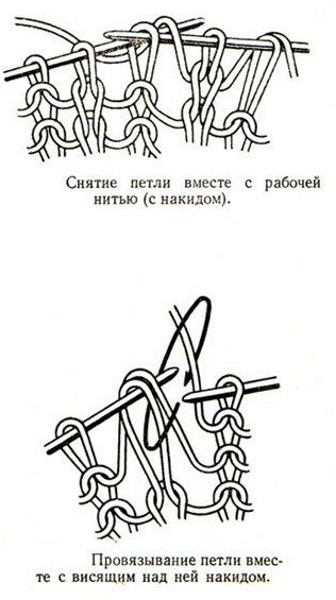
Patent knitting patterns (diagrams, detailed descriptions and recommendations help to knit the necessary wardrobe item so that the result meets all expectations) can be quickly mastered even by a novice needlewoman in order to independently make exquisite, stylish things for the whole family. The main thing in the work is the yarn over, which is knitted and then removed together with the nearest loop, so that in the next row the yarn over is knitted together with the removed loop.
Patent-type patterns include many types of elastic bands, knitted honeycombs, and voluminous braids. If the needlewoman likes to experiment, then she can try different options for shifting loops. By practicing this approach, you can make almost any wardrobe item with interesting voluminous patterns.
These could be:
- Coat.
- Sweater.
- Bibs (chest inserts).
- Air collars.
- Snood, scarf.
- Vest.
- Cap.
Thin yarn is not suitable for this work, as the pattern will not be voluminous. It is also not recommended to choose synthetic threads. It is best to work with mixed fibers, wool and semi-wool (for example, wool + acrylic). Numerous reviews from needlewomen confirm that you should choose semi-wool yarn, which practically does not lose its properties when washed.
There are 2 ways to form a patent loop:
- First, make a yarn over, and then remove 1 loop without knitting. In this case, you can work with 1, as well as 2-3 yarn overs.
- You need to knit 1 loop from the bottom row. Insert the right knitting needle into the loop located 1 row below the row being formed, grab the working thread, and then carefully pull the loop out.
The pattern is voluminous due to the thickening of the threads. The knitted product stretches well. To prevent the fabric from stretching too much, you need to use knitting needles of a smaller diameter.
Patent patterns for women's clothes
If you are working with patent patterns for the first time, then you should start with alternating a slipped stitch, a yarn over, and a front stitch. Almost always, the first and last stitch in each row should be an edge stitch. During the work, you should constantly turn the product from the wrong side to the front side.
After turning the fabric over, use the front loop that was removed together with the yarn over. The fabric is turned over again to knit the edge loop, remove 1 loop and make a yarn over. The rapports (repeating elements of the pattern) are the 2nd and 3rd rows. The fabric is knitted according to a similar pattern until the desired length is reached.
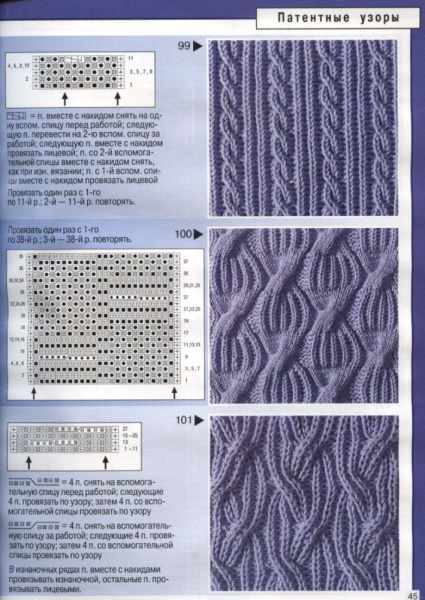
The step-by-step diagrams for making items with volumetric patterns contain the following abbreviations:
- Loop - Fri.
- Yarn over - Nd.
- Front loop - LPt.
- Front stitch - LG.
- Garter stitch - WS.
- Row - Rw.
- Edge loop - KrPt.
- Even row – ЧР.
- Front knitting - LV.
- Purl stitch - purl.
- Purl row – IzR.
- Purl knitting - IzV.
- Raglan bevel - RegS.
No less complex is the technology of creating a patent pattern using the bottom row. Each element is knitted LG, starting from the edge. The fabric is regularly turned over to alternate Pt between the lower Rw and the one on the needles. All actions are repeated until the desired length of the product is reached. The main task of the needlewoman is to be attentive, since 1 incorrectly knitted Pt will spoil the final result.
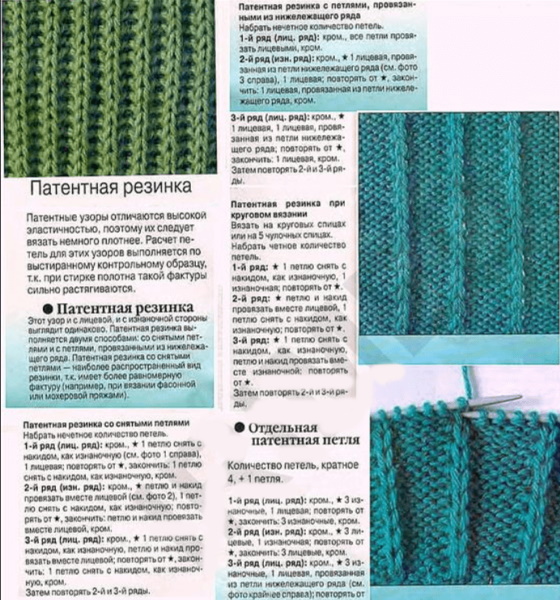
Patent elastic knitting pattern
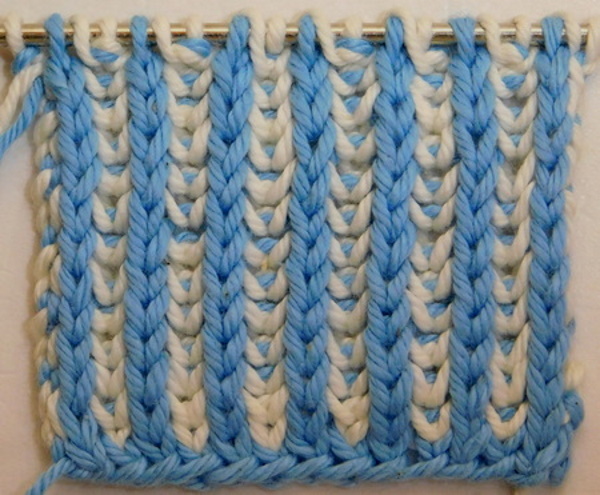
You will need circular knitting needles for this work. A two-color patent pattern looks great. For example, black + white, blue + yellow, red + pink. Almost all patent elastic bands stretch greatly in width, which is why it is better to knit a sample first. This will allow you to correctly determine the number of sts for the cast-on edge and clearly see what the pattern will look like.
You need to be careful when working, because if you make a mistake, you will have to unravel the fabric and start all over again. The finished elastic will have an exclusively decorative value, since it is not suitable for creating strips and decorating the lower part of the sleeves. The finished pattern is not protected from stretching, which is why it can lose its original shape.
Among experienced needlewomen, patent elastic with removed Pt is in great demand. In order to avoid common mistakes in the process of work, you need to knit a sample, dialing 20 Pt for this.
All further actions must comply with the following scheme:
- Rw #1: 1 LPt + 1 IPt. Knit according to this principle until the end of Rw.
- Rw #2: 1 Hd, 1 Pt remove and knit 1 IPt. Repeat the actions until the end of Rw.
- Rw #3: 1 Nd, 1 Pt remove, knit 1 IPt with Nd.
All the following Rw are knitted in the same way as Rw №3. If everything is done correctly, you will get a beautiful English elastic. You can try to knit a patent elastic with Pt from the Rw below. You need to be guided by the same rules as when working with garter stitch.
Scheme of actions:
- Cast on an even number of sts onto the needles.
- The first 2 Rw are knitted only with LPt.
- Rw #3 and all subsequent Rw are knitted as follows: immediately after KrPt, knit LPt. Pass the right needle through the next lower Pt, knit it LG and remove it from the left needle. The third Pt should be the front one. The fourth Pt is knitted LG from the Pt of the lower Rw.
The elastic band continues to be knitted according to the same pattern described in point #3. Knitting based on garter stitch allows you to create an original item. The elastic band will be flat, without protruding elements.
There is another accessible method that can be used to knit a patent elastic band:
- You need to cast on an even number of sts onto the needles.
- Rw #1: 1 IPt + 1 LPt + 1 IPt + 1 LPT. The actions alternate until the end of Rw.
- Rw #2: immediately after KrPt, knit 1 IPt. The next should be LPT, to create which the needle is inserted into the Pt of the lower Rw. The Pt are alternated until the end of Rw.
All subsequent Rw are knitted according to the pattern described in point No. 3. The result will be a voluminous elastic band.
Patent Pattern Honeycomb
Patent patterns are not very durable, but they are voluminous and have an original look. The knitted product is not only beautiful, but also warm and comfortable. According to the rapport, the first thing you need to do is prepare an odd number of Pt.
If you follow the standard pattern, then after the first KrPt there should be a repeat of the knitting Pt:
- Rw #1 (purl): KrPt + LPT. You need to withdraw 1 Pt from Nd as IPt. Again 1 LPt + removed 1 PT and Nd + 1 LPt + KrPt.
- Rw #2 (front): 1 LPT + knit with front thread + 1 Hd. Pt is removed as a purl, while the thread should be behind the work. Again knit 1 LPT and repeat the actions to the end of Rw. The last should be KrPt.
- Rw #3 (purl): 1 KrPt + 1 Pt is removed from Nd (as purl) + knit together with Lpt. Then the actions are repeated, after which 1 Lpt is knitted, 1 Nd is removed as purl and Rw 1 KrPt is finished.
- Rw #4 (front): 1 KrPt + 1 LPt + removal of 1 Pt together with Nd on IPt + 1 LPt. All actions are repeated again. Nd and 1 Pt are removed as IPt + 1 KrPt.
- Rw #5 (purl): 1 KrPt + knit 1 Pt and Nd together with 1 Lpt + slip Nd and 1 Pt as IPt. Repeat the actions. To finish Rw 1 Pt and Nd are knitted together with Lpt + 1 KrPt.
To create the Honeycomb pattern, you need to continue knitting the product, repeating steps 2 through 5 Rw. If you strictly follow the pattern, count the number of Pt and remember which Pt Rw began with, the final result will exceed all expectations. If you make a mistake, it is better to immediately unravel the workpiece and redo everything, since otherwise the knitted thing risks hanging in the closet for many years.
Variants of products with this pattern.
Patent braid pattern
Patent knitting patterns (knitting patterns + detailed description of the work process allow you to easily make a sweater, pullover or any other item that will be stylish, warm and practical, and will also be an excellent addition to everyday, romantic, business style) are voluminous only if the yarn is chosen correctly. You can diversify a woman's wardrobe with a bright pullover with patent braids.
To work on the knitting needles you need to cast on an odd number of sts.
The product is knitted according to the following pattern:
- Rw #1 (front): * 1 LPt + 1 IPt*, 1 LPt + KrPt.
- Rw #2: KrPt, *the next Pt must be removed together with Nd (as a purl), 1 LPT*, the next Pt is knitted as IPt with Nd.
- Rw #3: KrPt, *LG must be knitted together Hd and the removed Pt of the previous Rw, the next Pt with Hd must be removed as IPt*, the removed Pt of the previous Rw and Hd must be knitted together LG + KrPt.
- Rw #4: KrPt, *the next Pt together with Nd should be removed as IPt, Nd + removed Pt of the previous Rw are knitted together LG*, 1 Pt together with Nd remove as IPt. At the end of Rw there should be KrPt. In this case, KrPt at the beginning and at the end of Rw should be knitted IG (knot edge).
When working with voluminous braids, decreases for the right edge are done as follows: 1 KrPt, 2 Pt of the patent pattern, 3 Pt knit together LG. Left edge: remove 1 LPT, 2 Pt knit together LG and pull through the removed Pt, 2 Pt of the patent pattern, KrPt. The pattern must be knitted with a thread in 2 additions. The knitting density should be 17 Pt, 44 Rw of the patent pattern 10x10 cm. To make the back of the pullover, you need to cast on 77 Pt on the needles and knit them with a patent pattern.
When the length of the product is 34 cm, for a neat raglan bevel on both sides, you need to close 2 Pt, then in each 10 Rw 5x2 Pt and in each 8 Rw 4x2 Pt. Only after this do the decreases. If the length of the product is 54 cm, then it remains to close the remaining Pt. To create the front of the pullover, with a thread in 2 additions, dial 77 Pt and knit with a patent pattern.
When the length of the product reaches 6 cm, knit the fabric according to the following pattern: KrPt + 15 Pt of the patent pattern + 45 Pt of the patent pattern with braids. The rapport must be knitted 2 times. After the rapport, knit: 1 regular Pt, 15 Pt of the patent pattern and 1 KrPt. For neat raglan bevels, after 34 cm from the start of work, it is necessary to close 2 Pt on both sides, in each 10 Rw 5x2 Pt, in each 8 Rw 3x2 Pt, you also need to make decreases.
If the length of the fabric is 38 cm, then on all Pt knit only the patent pattern. To make a neat V-shaped neckline, you need to put aside 1 central Pt after 40 cm from the cast-on edge to make each side separately. For the bevels of the neckline in each 2 and 4 Rw close 17x1 Pt. When the length of the product reaches 52 cm, you need to close the remaining 3 Pt.
The left and right sleeves are knitted symmetrically:
- Cast on 49 sts with 2 strands of yarn and knit them using a patent pattern.
- After 2 cm from the beginning of the product, close the PT on both sides to make the RegS from the right edge similar to the back. From the left edge, the bevels are made similar to the front.
- After completing the left bevel, close 1x2 Pt, and then in each 2 Rw 4x2 and 1x1 Pt.
At the final stage, it remains to carefully process all the seams of the pullover and sew the sleeves. To make the neck strip, you need to cast on 122 sts along the edge of the neckline on circular knitting needles. The central one should be LPt. In this case, you need to alternately knit 1 LPt, 1 IPt. For the corner of the neckline, you need to remove 1 st in front of the central st in every 2 Rw, so that the central st + the st following it are knitted together LG and pulled through the removed st. After 4.5 cm of the strip, the sts are closed.
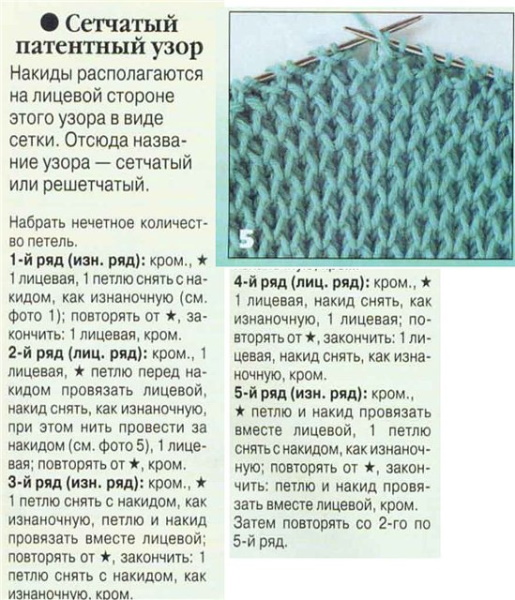
Patent pattern diagrams for knitting a scarf
Patent knitting patterns (knitting patterns allow beginner needlewomen to knit a stylish scarf using the brioche technique, which will be an excellent addition to a winter look) will turn out the same on both sides if you use sharp knitting needles on both sides, since you can knit 2 Rw without turning the work to the wrong side Rw.
To knit a stylish, modern product, you need to prepare yarn of 2 colors of the same thickness, as well as stocking or circular knitting needles. In the process of work, you do not need to tighten the fabric, the original pattern is formed by decreasing and adding Pt in the purl Rw (next to KrPt).
If a beginner needlewoman masters the technique of knitting two-color scarves, then in a similar way she can easily make a warm winter hat. To begin, you need to take knitting needles No. 7 + an additional knitting needle for forming braids and cast on 26 St.
All further actions must be performed in the following sequence:
- Installation Rw: 1 LPT, *without knitting, remove 1 LPT, make Hd and knit 1 LPT*.
- Rw #1-10: 1 LPT, *slip 1 PT without knitting, make Hd, knit 2 PT LG. The actions are repeated again from * to the last PT, which should be a front one.
- Rw #11: 1 LP, brioche braid, (without knitting, slip 1 Pt, make Nd, knit 2 Pt LG). The last steps are repeated 4 times + brioche braid + 1 LPt.
- Rw #12-22: the scarf is knitted in sequence, like the first 10 Rw.
- Rw #23: 1 Lpt, (1 Pt slip without knitting, make Hd, knit 2 Pt LG) – repeat 4 times, brioche braid. Slip 1 Pt without knitting, make Hd, knit 2 Pt LG – repeat 4 times.
The actions are repeated one by one from 1 to 23 Rw until the length of the scarf reaches the desired mark. You need to finish knitting according to the pattern that corresponds to Rw №1-10. In the process of knitting 11-23 Rw, 2 of 6 Pt need to be removed to the knitting needle to make Hd from the previous Rw.
Brioche braids are knitted as follows: remove 6 sts onto an additional knitting needle and place it in front of the work. Remove 1 st without knitting + Hd + knit 2 sts LG – repeat 2 times. Removed sts are returned to the left knitting needle. Remove 1 st again without knitting, make Hd, knit 2 sts as if they were knit stitches and repeat the steps 2 times.
Hat with patent pattern
In the classic version (head circumference 56-58 cm), for work you need to prepare 2 skeins of threads of different shades (for example, black and red), circular knitting needles 3.5 and 4 mm.
A stylish hat with the same pattern on both sides is knitted as follows:
- Using an additional thread and smaller knitting needles, cast on 80 sts.
- Base Rw (black yarn): *1 Lpt, 1 Nd*.
- First Rw (red yarn): *slip 1 st, yarn in back, purl 1 st*.
- Second Rw (black yarn): *1 LP, sl 1 pt, yarn in front*.
- Until the height of the canvas reaches 3 cm, you need to repeat the first 2 Rw.
- It is necessary to drop the cast-on edge and switch to larger knitting needles.
- Decreases: *1 Lpt, Nd, remove 1 Pt*. Along this Rw you need to decrease 32 Pt evenly = 192 Pt.
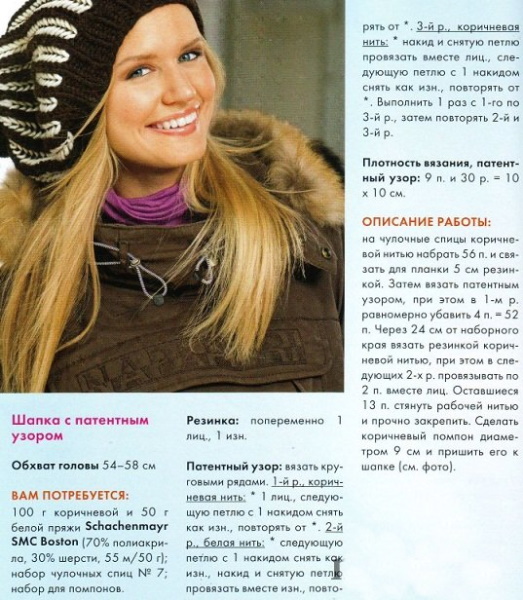
A warm winter hat looks great with voluminous patent braids. Such a headdress can be safely worn not only by young girls, but also by older women.
| Braid Pattern | |
| Rw/thread color | Description |
| 1/red | *Slip 1 st, nd, 2 sts knit IG*; |
| 2/black | *2 Pt knit LG, slip 1 Pt, Nd*; |
| 3-9 | repeat the first 2 Rw alternately; |
| 10/black | *brioche braid, (2 sts knit LG, sl 1 st, nd) – repeat 4 times*; |
| 11-21 | repeat the first 2 Rw alternately; |
| 22/black | *(2 Pt knit LG, slip 1 Pt, Nd) – repeat 4 times, brioche braid with a right tilt*; |
| 23-24 | repeat the first 2 Rw. alternately. |
To complete the hat with patent elastic patterns, continue knitting the fabric, repeating the pattern from 1 to 24 Rw, and then knit from 1 to 21 Rw again.
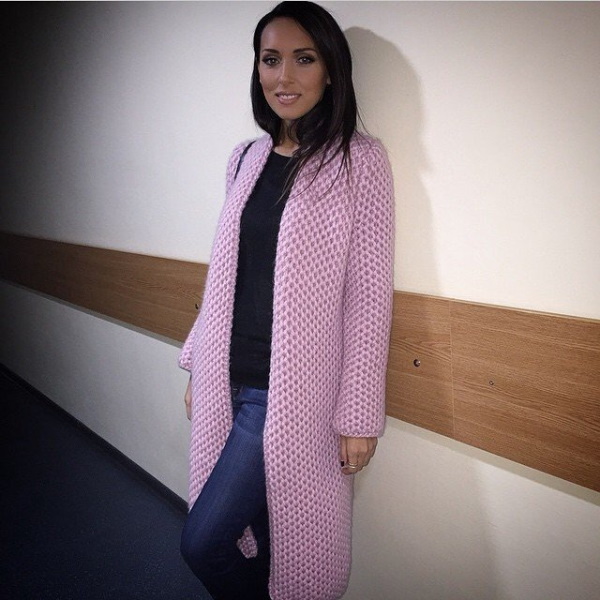
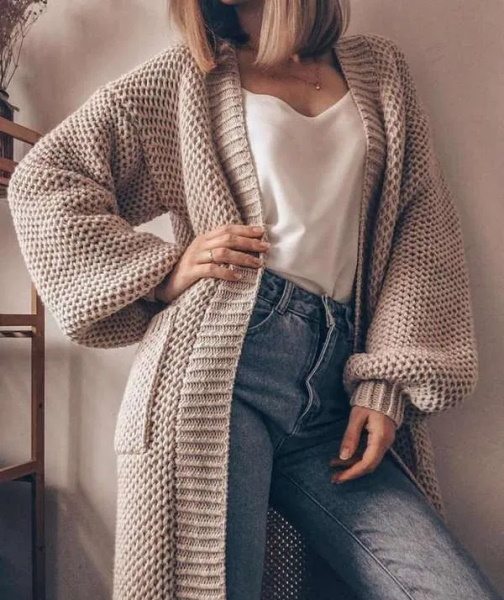
Cardigan
For work you will need at least 550 g of yarn and knitting needles No. 6. To make the back of the cardigan, you need to dial 79 Pt and continue knitting with a patent elastic band so that the length of the fabric is 30 cm. All Rw are knitted with LPT, adding 5 Pt in the first Rw. You need to knit another 36 Rw and make a RegS, decreasing 1 Pt. In all CR, you need to close 1 Pt 19 times. If the length of the knitted LPT fabric has reached 27 cm, then you can start forming a neat neckline.
To do this, 34 Pt in the central part of the row must be closed. The side parts are knitted separately. In the next CR, 2 Pt should be closed from the inner edge, 2 Pt and 1×1 Pt should be removed. As a result, the needlewoman should knit 74 Rw or 30 cm LG. The Pt remaining in the work are closed. To work with the left shelf, 70 Pt must be dialed. In the next row, KrPt is removed, 65 Pt are knitted with a patent elastic band + 1 LPt + 1 Pt removed as if purl + 1 LPt + 1 KrPt.
According to this principle, knit a 30 cm long fabric. In the next row, count 11 extreme sts so that LP knits the remaining 59 sts. Additionally, you will need decreases for the neckline: close 1 st once, close 1 st in CR. Similarly, with the back on the right side, you need to make a RegS. The next 30 cm of fabric are knitted LG and close the remaining 2 sts. The right shelf is knitted according to a similar pattern.
Both sleeves for the cardigan are knitted at the same time. To do this, cast on 45 sts for each sleeve and continue knitting LG. To form the bevels, add 8 sts 1×16 Rw. After this, there should be 59 sts on the needles. If the length of the fabric is 31 cm, then you need to continue knitting with a patent elastic band (another 15 cm). It remains to remove 2 sts once and another 9×2 sts in each 6 Rw. After completing the formation of the shoulder bevels, you need to knit 15 cm and close the st.
At the final stage, it remains to process the shoulder seams. The Pt left on the bar should be cast on to the knitting needles and continue knitting according to the pattern. The first 43 cm of the product are knitted according to this pattern. The Pt is removed again and connected using a neat knitted seam, focusing on the central part of the back. The bar is sewn to the neckline and the bevels of the neckline. It remains to sew the sleeves, side seams and you can try on the new thing.
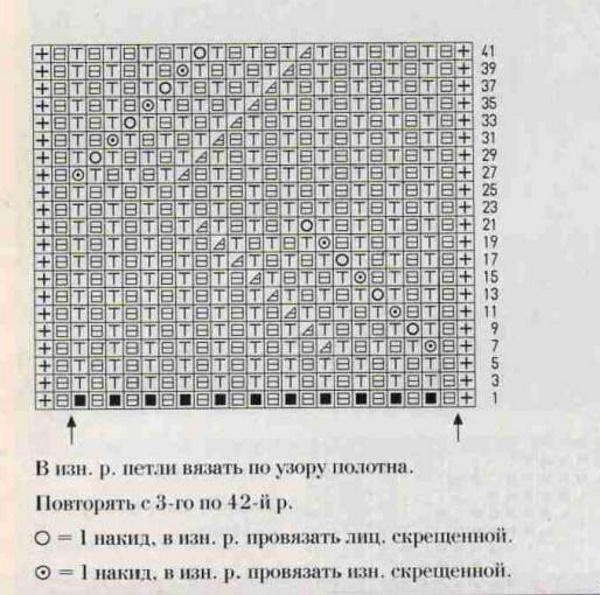
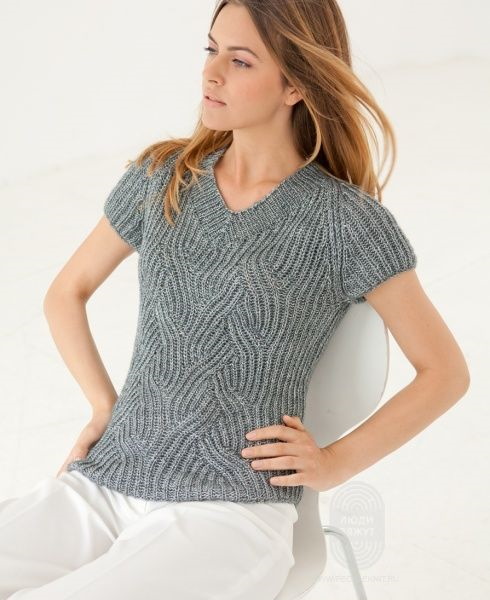
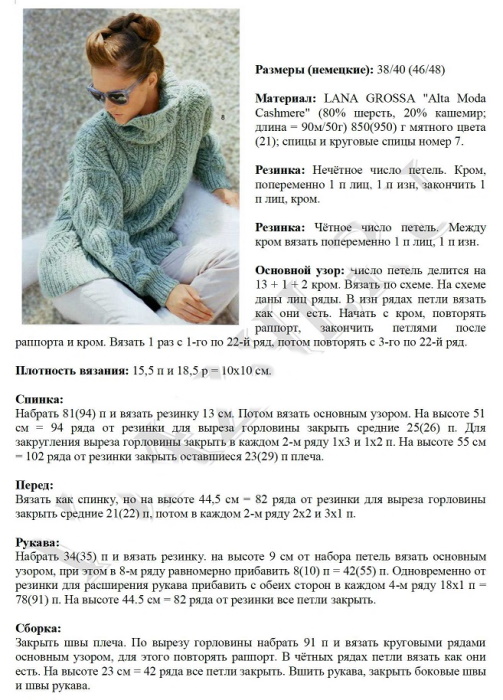
Jumper
Patent knitting patterns (diagrams + detailed descriptions help you knit an elongated jumper with voluminous braids in a few days, due to which such a thing will be pleasant to the touch, warm and universal in a woman's wardrobe) are in demand among experienced needlewomen, as they are successfully used to make different types of knitted fabric. For work you will need yarn, knitting needles No. 4.5 and 5, as well as circular knitting needles.
The jumper silhouette will be straight, the sleeves are set in. Such a thing will perfectly emphasize the figure and will be combined with almost all wardrobe items.
The center of the jumper should have a pattern: patent rib, a large diamond of 2 crossed LPt. The diamond starts with 1 crossing, in the second Rw, 1 Pt is added on both sides for a smooth expansion of the diamond. To achieve a decrease in the diamond, 1 Pt must be removed from both sides at the same time. The braid consists of 4 Pt (after 6 Rw, a cross to the left follows).
The rhombus is formed from 18 sts, for this purpose a semi-patent 1x1 elastic is knitted. It is necessary to knit 16 sts with an elastic band, and cross the next 2 sts (for this, the second loop is knitted first, and only then the first). The slope of the rhombus can be in any direction. The crossing of sts begins with LPt. The jumper must be knitted according to the diagram below. The loops are arranged in accordance with the recommendations. Only the first 2 rows are knitted in height once, and then rows 3 through 12 are repeated.
Scheme of actions:
- Cast on 125 sts on knitting needles #4.5. Start with 1 st and 1 st. The first 3 cm of the fabric are knitted with English elastic.
- With knitting needles №5 create relief patterns. The loops must be distributed: 1 KrPt, part of the pattern on 10 Pt between sections s and w perform 4 times, 42 Pt between w and t, part of the pattern between s and w perform 4 more times, after section y finish 2 Pt.
- To form the RegS, at a height of 25 cm from the elastic, remove 1×4 Pt, in each 2 Rw 1×2 Pt, and also in each 4 Rw 11×2 Pt (45 loops). After 60 Rw from the beginning of the formation of the RegS, the remaining loops are left.
- The front part of the jumper is knitted in the same way as the back.
- Cast on 81 sts on 4.5 mm needles and knit 3 cm with a rib pattern. After KrPt, you need to start with Ipt.
- Continue knitting the jumper with knitting needles No. 5. Distribution of loops: 1 KrPt, between e and w part of the pattern on 8 Pt, between s and w 10 Pt, between w and t 42 Pt, between t and y 10 Pt, between t and j 9 Pt, 1 KrPt.
- For RegS, after 60 Rw from the elastic band, remove 1×3 Pt, in 2 Rw 1 Pt, in each 2 Rw another 1 Pt 14 times.
- At a distance of 25 cm from RegS, the remaining Pt are left.
The remaining sts are successively transferred to circular knitting needles for piping. The remaining 180 sts are knitted in circular rows. The knit stitches are knitted 1 Rw, but at the same time every 2-5 sts are knitted as a front stitch (130 sts). To complete the jumper, knit another 7 circular Rws – 3 cm with a rib pattern, and the loops are closed according to the pattern. All the necessary seams remain to be made.
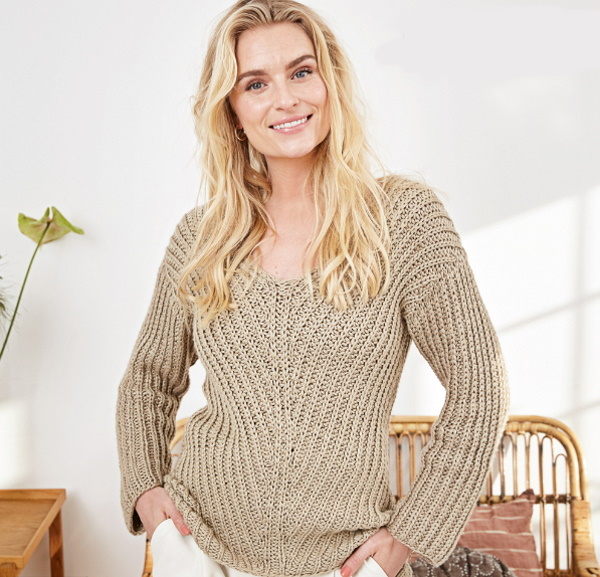
Pullover
To work, you need to prepare 550-700 g of blue yarn (100% sheep wool is perfect), as well as 220-275 g of light blue yarn, which can consist of polyamide, sheep wool and alpaca wool. You need straight knitting needles No. 5.5 and 6.5, circular knitting needles 40 cm long. To create an elastic band, alternately knit 1 LPT, 1 IPt. For the patent pattern, you will need an odd number of loops.
Scheme of actions:
- The first Rw must be a face: 1 KrP, *1 Pt remove from Nd, as with IzV, 1 LP*. Remove 1 Pt from Nd, KrP.
- The second Rw is knitted purlwise: KrP, *1 Pt with Hd knit LG, remove Pt with Hd (as with IzV)*, knit 1 Pt and Hd, KrP.
- Third Rw: KrP, *slip 1 Pt and Nd, 1 Pt and Nd knit LG*, slip 1 Pt and Nd, 1 KrP.
- Fourth Rw: KP, *Nd and 1 Pt knit LG, remove 1 Pt and Nd*. Pt and Nd knit LG, 1 KP.
- 5th Rw: KrP, *slip 1 Pt and Nd, Pt and Nd knit LG*. Slip 1 Pt and Nd, knit 1 KrP. In height, knit step by step from 1 to 5 Rw, and then repeat only from 2 to 5 Rw.
The front part of the pullover and the back are provided with decorative decreases: on the right side - 1 KrPt, 3 Pt of the same pattern on both sides, knit 3 Pt according to the pattern (remove 1 Pt, as with LV, knit the next 2 Pt according to the pattern, pull the removed Pt through the knitted Pt). On the left side - knit 3 Pt + 3 Pt of the patent pattern + 1 KrP. After this, the pullover is ready for the first fitting.
To quickly master the technique of knitting patent patterns with knitting needles, you need to not only follow the pattern and initially dial the required number of loops, but also constantly monitor which loop the row begins with and which ends with. In case of making a mistake, it is recommended to immediately re-knit the fabric so that the finished item does not cause complaints and is one of the most beloved in the wardrobe.
Video about patent knitting patterns
How to make a patent pattern with knitting needles: