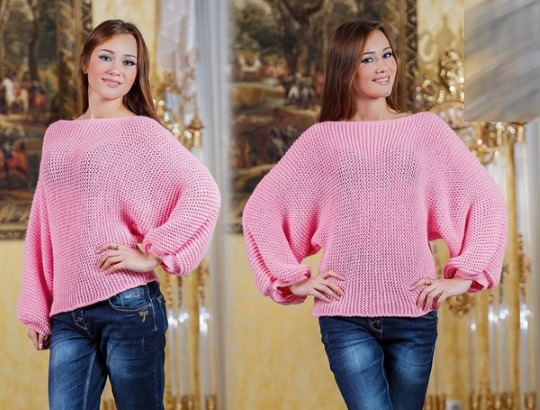
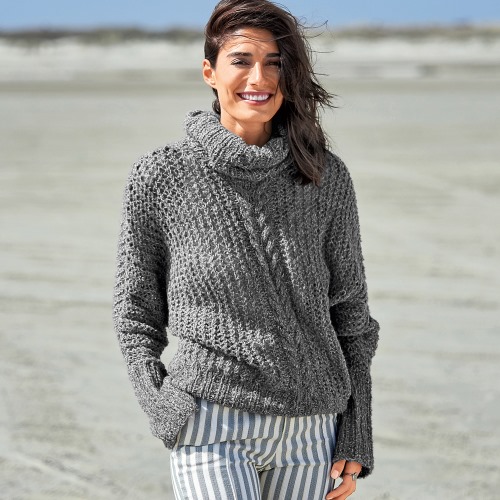
The original "Bat" sweater makes the image more feminine, it is ideally combined with both a sporty style - jeans, and a romantic one - a pencil skirt. The model is easy to knit even for beginners, you just need to choose the right yarn and knitting needles. In order not to get confused in the sequence of actions, you also need instructions and a diagram.
Selection of yarn and knitting needles
The intended product can be intended for different seasons. Therefore, it is necessary to start work with the preparation of yarn and knitting needles. For a spring-summer product, it is worth considering light knitting threads - cotton or acrylic. For an autumn-winter product - wool. To prevent wearing from causing an allergy on sensitive skin, it is worth giving preference to children's yarn.
The Bat sweater can be made in a single color. It is preferable to choose calm colors - black (possibly with a blue tint), brown (from dark to beige), various shades of gray.
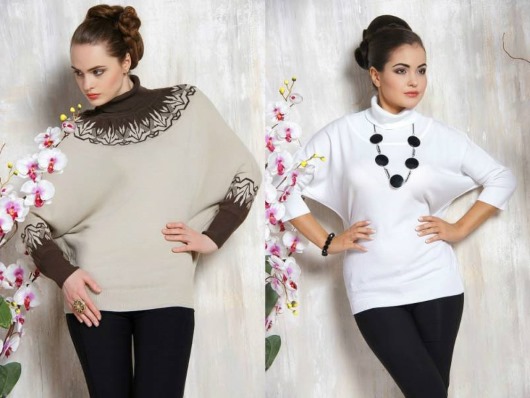
To add a twist to the product, you can play around with an interesting pattern or decor - beads, embroidery. For completely inexperienced needlewomen, it is recommended to focus on unusual yarn - gradient, patchwork or the one that forms an original pattern on the canvas as you knit. In this case, you can work with the front surface.
If the needlewoman has only managed to master the very basics of knitting, she will also be able to fulfill the idea. After all, the "Bat" sweater is an original model that already attracts attention. Therefore, it can be knitted with the most ordinary pattern, using single-color yarn.
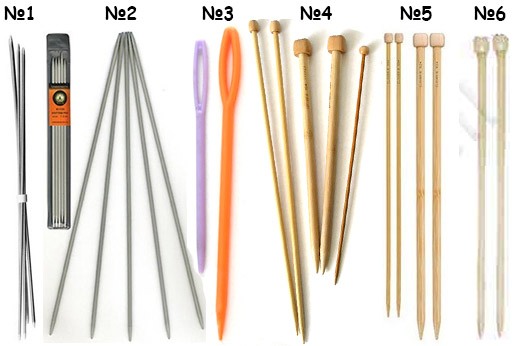
There are no strict recommendations regarding knitting needles, but when buying, you should be guided by the label of the selected yarn. Usually, the appropriate tool sizes are indicated there. If you are planning a patterned or openwork item, it is better to use knitting needles equal to the thread thickness - the pattern will be clearer. If you want to make "chainmail", you need tools with a diameter 3-5 times larger.
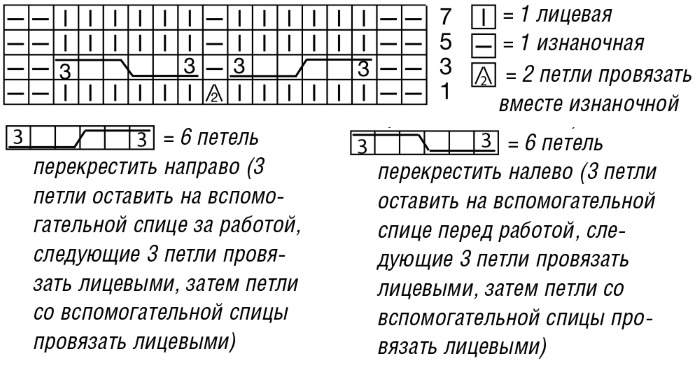
Pattern of the sweater "Bat"
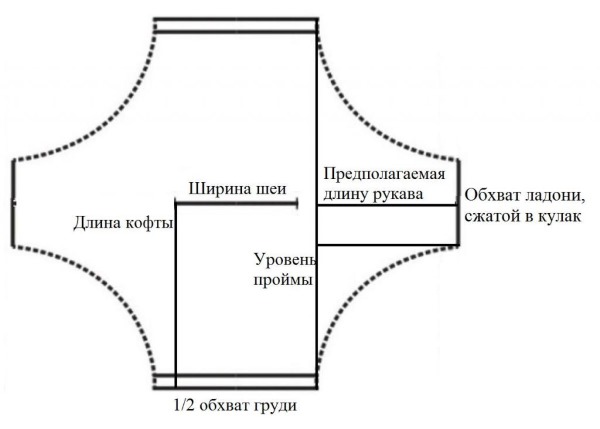
There are many variations of the wardrobe item under study, but they all retain the main detail - sleeves that flare out from the bottom edge. They can be of different lengths, decorated with lace, solid or with cutouts from the shoulder to the cuff - it all depends on the wishes of the needlewoman.
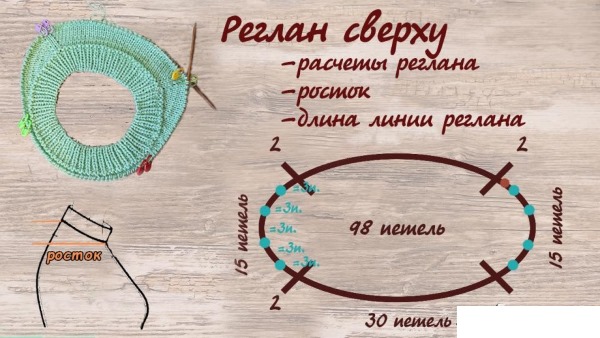
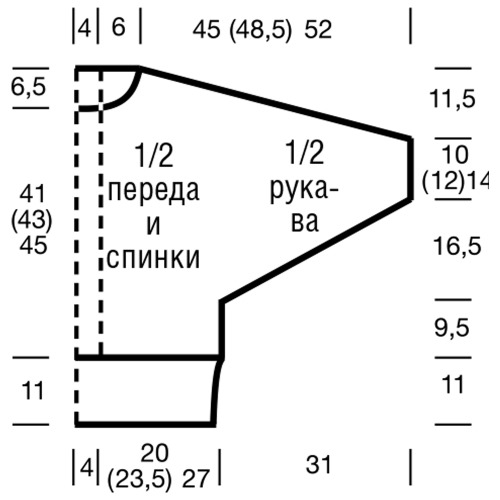
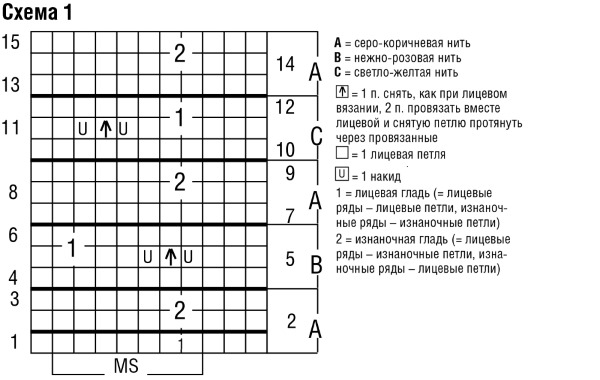
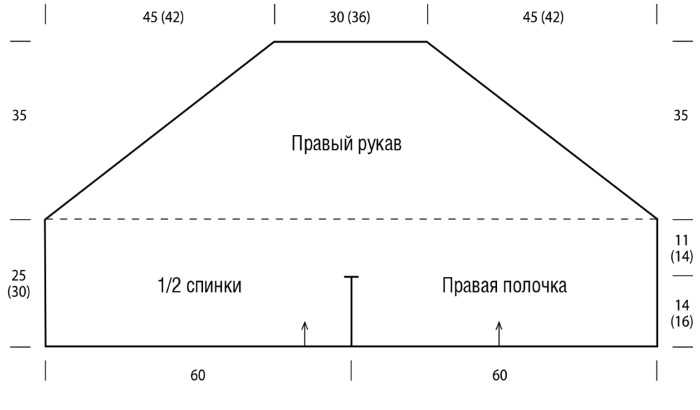
The Bat sweater knitted with knitting needles (the diagrams show a T-shaped product with one-piece sleeves and a wide armhole) is often made with a single piece of fabric in the bottom-up direction.
Knitting:
- You should start from the bottom edge.
- Next, adding loops and forming the sleeve (to the desired length), move towards the shoulders.
- Having knitted the entire front part, you need to leave an opening for the head, closing the loops and restoring them in the next row.
- After this, the product is knitted in reverse order with decreasing loops.
The classic version of the sweater can be knitted differently, making the front, back and sleeves separately. This method is preferred by beginner needlewomen - it does not require special knowledge and skill. However, the pattern will not help even an experienced craftswoman if she does not have the parameters of the person for whom the item being studied is intended.
Back
To connect this and the next parts of the planned wardrobe item, the following parameters are required:
- ½ of the hip or chest circumference (the largest value is taken);
- distance from the bottom edge to the shoulder;
- ½ the circumference of the base of the neck (you can measure the head if you want the collar to be larger).
The "Bat" sweater with knitting needles (you can use both ready-made patterns and your own - sketches, but in any case with the indication of the taken parameters) will not turn out beautiful and neat if you do not prepare a fragment of the selected pattern. If the craftswoman knits with the front surface, she also needs a sample.
It will help you calculate the number of loops and rows:
- The pattern sample is a square measuring 10x10 cm, you need to knit using the knitting needles and yarn chosen for the idea. Otherwise, the calculation will not be accurate.
- On the finished piece, count the number of loops and rows.
- Divide both values by 10.
- Knowing the number of loops (L) and rows (R) in 1 cm, you can convert the previously measured parameters into the required units of measurement. To do this, you need to multiply the L value by ½ the hip (or chest) circumference and ½ the base of the neck circumference. And the R value by the distance from the bottom edge to the shoulders.
- All new values will have to be rounded to the nearest whole number, based on the rules of mathematics, and indicated on the diagram for convenience.
Now you can start working, a standard product is knitted like this:
- Cast on a number of stitches equal to ½ the hip/chest circumference.
- Knit without increases or decreases up to the shoulders.
- Highlight the loops for the collar on the sides with contrasting threads (strictly in the center).
- Close them. But don't break the thread.
The back and front can be knitted separately. Then you need to make a similar part, and then sew it to the first one.
But in most cases the base of the sweater is made of a single piece of fabric. The second stage of this option is described in detail below.
Before
To complete the following part you need:
- Cast on the same number of stitches again in the next row - restore the closed ones, forming an opening for the head.
- Continue knitting to the bottom edge, also without increasing or decreasing.
- Close the loops, break and fasten the thread.
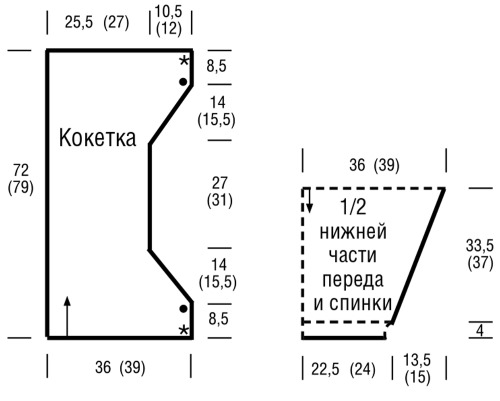
Cropped sweaters are popular at the moment. The model under study is no exception.
To make it, you need to measure:
- ½ chest circumference through the most convex points in front and back;
- ½ waist circumference;
- distance from the intended edge to the armpit.
Then perform simple mathematical calculations:
- Determine the difference between the “chest” and “waist” loops.
- Divide the resulting value by 2 (the wedge must be knitted on both sides), and then by the previously determined number of rows from the bottom edge to the starting point of the armhole.
- Round to the nearest whole number.
Example: if the difference is 40 loops, and there are 25 rows in the specified segment, then it turns out: 40 / 2 / 25 = 0.8 ~ 1. That is, approximately 1 increase in each row. But it should be done at the beginning and end of each row, better after and before the edge.
The front of the product is knitted as follows:
- First, you need to cast on a number of loops equal to ½ the waist circumference.
- Knit, making 2 increases in each row. That is, you should remove the first loop, make a yarn over and knit the row. Before the last loop, make a yarn over and knit the remaining one as a purl. And so on in each subsequent row.
- Having reached the level of the armpits, you need to knit without increases to the top edge of the product.
- Determine the hinges for the gate and close.
To finish knitting the back, you need to restore the loops and then knit in reverse order. The part from the shoulders to the level of the armpit with an even cloth. And then with decreases. That is, knitting 2 loops together before and after the edge loops. Close the loops, break the thread and fasten.
Sleeves
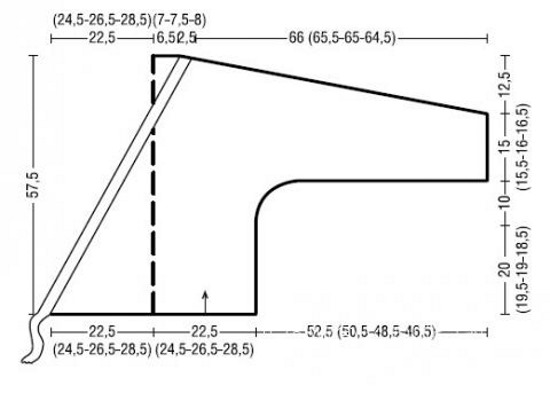
The Batwing sweater can have sleeves of different lengths. At this stage, the craftswoman must decide on this parameter by measuring the distance from the shoulder to the intended cuff.
The diagram also shows that the item being studied has wedge-shaped sleeves. They can be knitted with a smooth or sharp rounding. The first option will be difficult for beginner needlewomen, it requires experience and deeper knowledge of knitting technology.
Therefore, if you have no experience, it is better to act like this:
- Measure the sleeve length, fist circumference (to avoid the cuff from pressing, do not measure the wrist circumference) and the width of the wedge (cannot exceed the total length of the front and back).
- Convert cm to loops and rows by multiplying the value P by the fist circumference and the width of the wedge, and the value P by the sleeve length. Round up to the nearest whole number.
- Calculate the number of decreases: (wedge width - fist circumference) / sleeve length. Round up.
- Mark the point on the finished pieces where the sleeve wedge will begin.
- Using a hook, cast on stitches along the side of the base of the sweater.
- Knit, making decreases based on the calculations made earlier.
- If desired, the cuff can be finished with a single or double elastic band.
- After the loop you can close it, cut the thread and tie it.
- Make the second sleeve in the same way.
Assembly of finished parts
Experienced needlewomen connect the front, back and sleeves using a crochet hook. But for beginners there is a risk that the seam will be too thick, hard and will rub. Therefore, it is better to use sewing threads in the same tone and a needle.
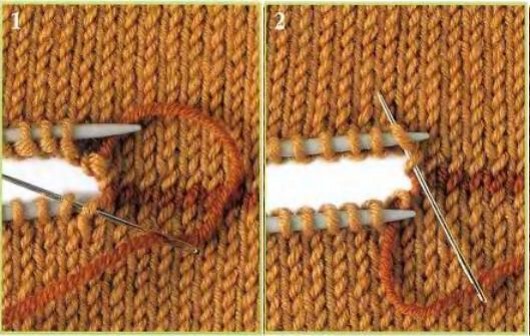
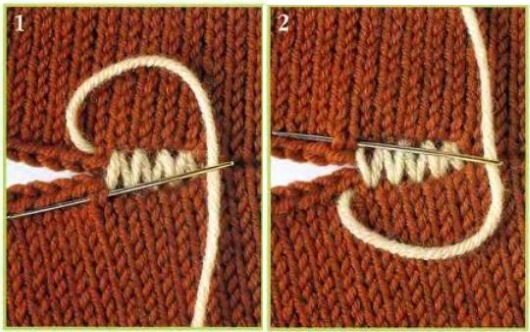
The sweater should be folded with the right side inward, carefully aligned and stitched with a seam through the edge, joining the sides. All threads should be secured and hidden. If desired, the collar and the bottom edge can be tied to give the product a finished look. If decor is provided, now is its turn.
It is important to rinse the finished item by hand and carefully lay it out on a white towel or gauze folded in several layers to dry. Afterwards you can steam it slightly and wear it with pleasure.
Models
Having understood the principle of making a classic model of the product being studied, you will be able to make a more effective or unique version.
However, at the planning stage, it is important to remember that the product itself has a twist and attracts attention. The needlewoman's task is not to overload it. Otherwise, the image will turn out not of a bat, but of a magpie.
Therefore, it is recommended to add only one unusual detail - openwork sleeves, beads along the collar line, interesting yarn, a pattern or something else - at the choice of the needlewoman.
Long sleeve
The Bat sweater with knitting needles (the patterns of which are presented in the article) is knitted taking into account the season of wearing. And we are talking not only about the yarn used, but also the length of the sleeves. So, for autumn and winter you need a warm product. Therefore, it is better to complement it with wedge-shaped sleeves up to the wrist.
Operating principle:
- A short jacket will look ridiculous - not in season. Therefore, the back and front are knitted according to the description for the standard version, discussed above.
- To make sleeves, you need to measure the length and calculate the number of decreases.
- Then connect the parts taking into account the specified parameters.
- Finish knitting. You can decorate the product if you wish.
With short sleeves
For spring and summer, it is wiser to make a cropped sweater. But so that the intended product does not lose its zest, it is better not to make the sleeves shorter than the elbow. Ideally, the cuff should be located in front of this part of the arm.
The technology of execution is simple:
- The back and front are knitted in such a way that a trapezoid is formed. The instructions are presented in one of the previous points.
- Then, using a hook, pick up the sleeves. You can start from the bottom edge, and then decorate the finished product with an elastic band. Better with a single one - it will look more delicate.
- The specifics of knitting decreases are already known, it is only important not to get confused in the calculations.
- The finished sweater is turned inside out and sewn on the sides.
- All that remains is to knit a few rows of elastic along the bottom edge of the sleeves and base.
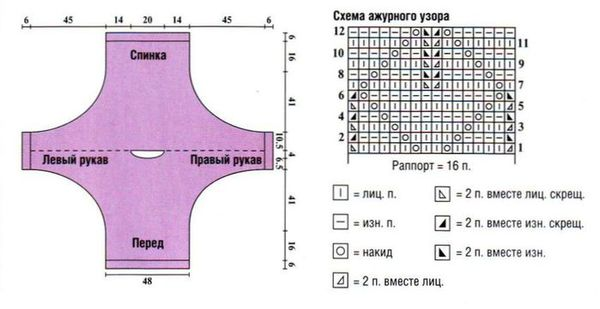
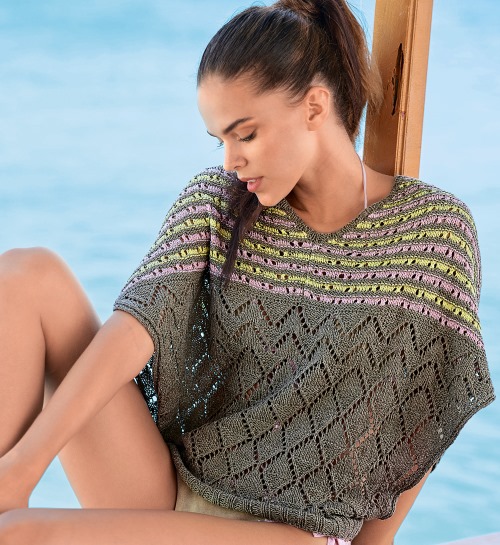
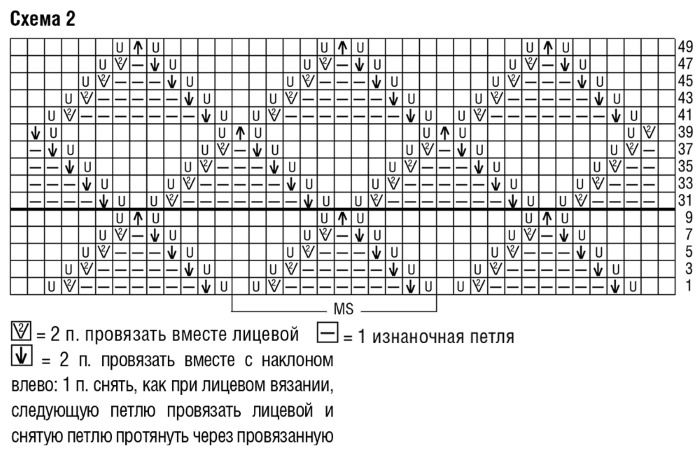
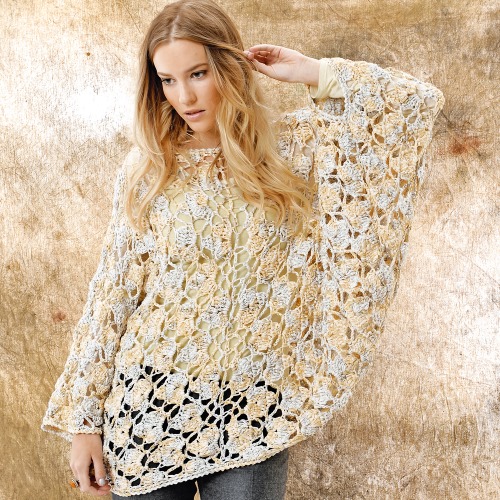
Openwork
If you want to look not only beautiful, but also feminine, you should knit such a model. Of course, it is better to use thin threads for the warm season. Although in winter you will be able to look spectacular if you work with mohair, angora, merino wool, and wear a turtleneck underneath so as not to freeze.
If you want to make a unique product, you can think through the openwork yourself - the number of decreases and increases must match in each row, the front and back sides must also be strictly observed.
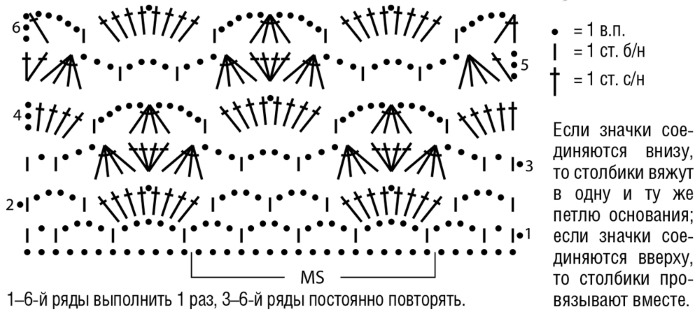
For example, for 8 loops the pattern could be like this:
| Number of loops | 8 | |
| 1 row | Edge, knit, 2 together, 2 knit, 1 yarn over, knit, edge | Total: in a row, first 1 loop is closed (2 together), and then restored (1 yarn over). |
| 2nd row | Purl only | All the hinges are in place |
| Subsequent rows | Pattern repeat | |
By smell
The Bat model does not necessarily have to be a stand-alone item. An unusual jacket or wrap-over sweater is an option.
To do this, you should:
- Knit the back, close all the loops, cut and hide the thread.
- Calculate the number of increases: (½ hip circumference - 40) / rows from shoulder to hem. Round up.
- Next, you need to cast on 20 stitches. Knit, adding stitches according to the calculations.
- When there are 20 rows left, finish decreasing and knit with an even fabric. In this place (on the side) you need to pick up loops and make a tie.
- In a similar manner, but in a mirror image, make the second shelf.
- Connect the front and back along the shoulder seams.
- Knit the sleeves.
- When joining the product along the side seams, leave a slit on one side to pull the tie through.
There is nothing complicated about knitting a Bat sweater. But first, you need to determine the season of wearing, choose a convenient tool and suitable yarn, make a sketch of the idea, take measurements and make simple calculations.
If you outline a clear plan of action, you won't have to redo the same thing several times. Then not only the result, but also the creative process will bring great pleasure.
Article formatting:Natalie Podolskaya
Video about knitting a batwing sweater
Openwork blouse "bat" - diagram and description of knitting: