Quilling is the art of making figures and pictures from paper strips twisted into spirals of different shapes and sizes. The technique for making crafts is simple and accessible to beginners. Having mastered the basic patterns, you can begin creating more complex pictures.
Tools and materials
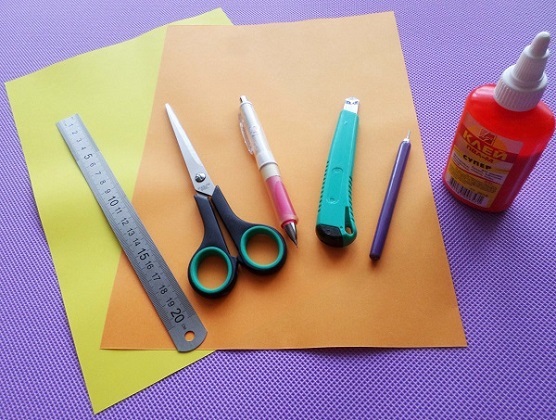
When starting to master the art, you need to take care of preparing the necessary tools and materials in advance.
What you need for creativity in the quilling technique:
| Paper strips | This is the main working material. They are purchased ready-made in special sets or cut manually from special paper. The paper for quilling should be the same color on both sides and inside, a regular colored stationery set will not work. The color and texture of the paper strips can be chosen any, depending on the imagination of the master and the type of craft. The standard length of all strips is 28-30 cm, if necessary, they can be shortened or lengthened independently. |
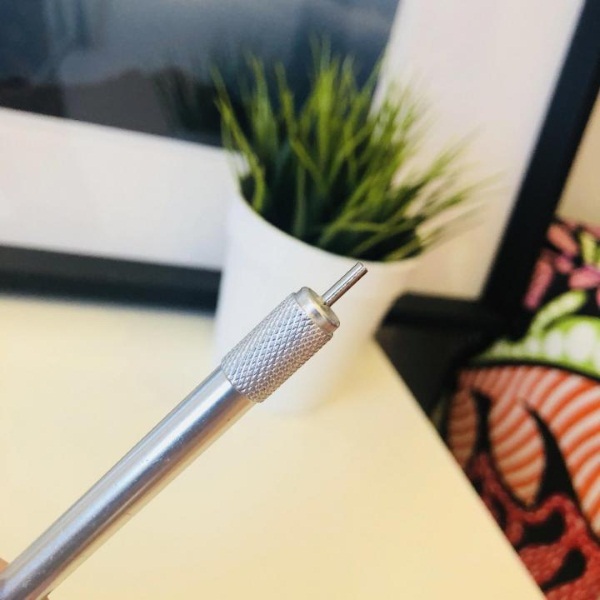
| Quilling pen (rod) | This is a special tool made of wood or metal, with a fork at the end. One end of the paper strip is inserted into the slot of the fork for subsequent twisting. The height of the fork can be different: from 3 mm to 1.5 cm, its choice depends on the parameters of the paper strip. A quilling pen is not a necessary tool for beginners, it can be easily replaced with a toothpick, a thick needle or a match. However, using a special tool significantly speeds up and simplifies the work. |
| Diameter template | This is a large rectangular ruler-template with round holes of different diameters. It is indispensable for measuring and adjusting the size of twisted elements that must be the same. Having formed a spiral, it is placed in a hole of the required diameter, and measuring similar parts occurs according to the same diameter. |
| Tweezers with an angled tip | is needed for laying out ready spirals when assembling a picture. It is also used when forming a spiral, for tightly pressing the end of the strip when gluing. |
| Glue | Experienced craftsmen recommend using PVA, but it can be replaced with a good quality glue stick and transparent glue. |
| Craft templates | This is a base drawing onto which twisted paper strips are laid out and glued. |
| Small scissors | They should have straight blade edges for cutting fringe and fine details. |
| Ruler, pencil, stationery knife | are needed for marking and cutting strips. The ruler should be steel, because the plastic one is quickly deformed by the knife blade. |
 There are many more quilling tools, their range is increasing every year. Thanks to these tools, you can significantly improve the quality of work, reducing the cost of time and money. But you can buy them in the process of mastering the basics of art, and everything that beginners need is described above.
Useful tips
Quilling crafts for beginners, the schemes of which are presented below, are made according to certain rules. In order for the picture to be beautiful, and its production to take a minimum of time, it is necessary to follow the useful advice of experienced craftsmen.
Useful quilling tips for beginners:
- The optimal paper density is not less than 120 g/m22 – then the parts will hold their shape better, the craft will be durable, and the paper itself will not be damaged by the adhesive liquid.
- When gluing the spiral and forming the picture, do not drip too much glue. If it gets on the strip in large quantities, it can lead to deformation of the paper.
- To make the figurine neater, when gluing the parts together, you need to attach them to each other with safety pins.
- To prevent the spirals from sticking to the table or sheets of paper, use a cork mat, foam plastic or thick cellophane as a base when gluing them.
- To make the craft more colorful, you need to use stripes of different shades and combinations of these stripes to create curls.
- The work's originality is given by the harmonious combination of different types and shapes of spirals.
- If one strip is not enough to form a certain curl, you need to connect the edges of two strips with a drop of glue. After applying the edges, they need to be pressed tightly against each other so that the transition is unnoticeable.
- To make a three-dimensional part, you need to twist a spiral from a strip whose length is increased several times. Then you need to give the curl a certain shape and attach the remaining parts to it using glue.
- When working with the quilling technique, you need to work without haste, be careful and always keep your work area clean.
Basic elements of quilling
Quilling crafts for beginners (diagrams of various options are offered below) are assembled from small elements that professionals call "modules". Modules can have different shapes: from a regular circle to a triangle and even a heart.
They are created using the same principle of twisting and gluing, as a result of which the strip turns into a part called a "spiral". By pressing with fingers on certain parts of the spiral, a module of the required shape is formed.
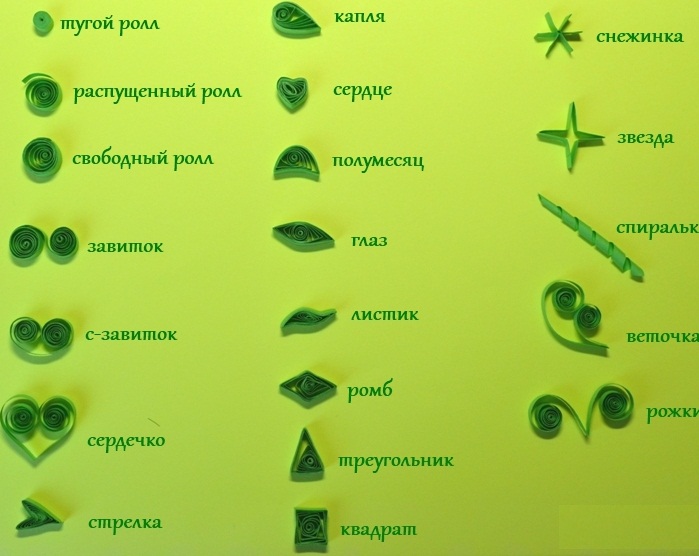
Basic elements of quilling:
- tight spiral;
- cone;
- free spiral (circle);
- curl;
- oval;
- horns;
- drop;
- petal;
- sheet;
- heart;
- eye;
- square;
- semicircle;
- triangle;
- paw;
- crescent;
- arrow.
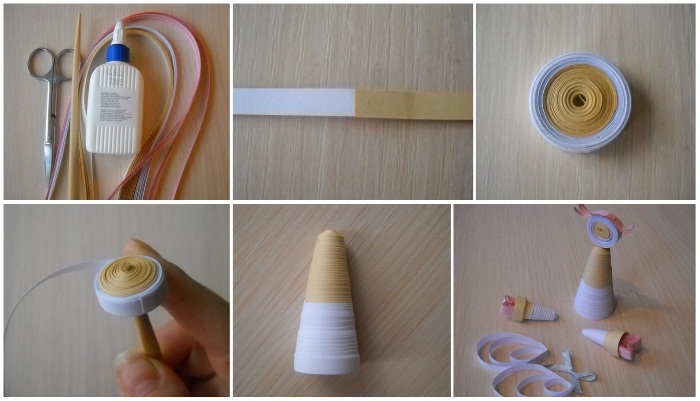
Most of the parts are formed from a tight spiral, which is made as follows:
- You need to take the paper tape in your left hand and the twisting rod in your right hand, and secure the end of the strip in the slot of the rod.
- By rotating the tool clockwise, you need to twist the tape into a spiral around the rod. The thumb and index finger of the left hand should fix the part to form even curls.
- At the end, you need to put a drop of glue on the free end of the spiral and press it to the part using tweezers.
To obtain a cone, the tight spiral is carefully removed from the rod and with its help the inner curls are slightly pushed forward, giving the appropriate shape.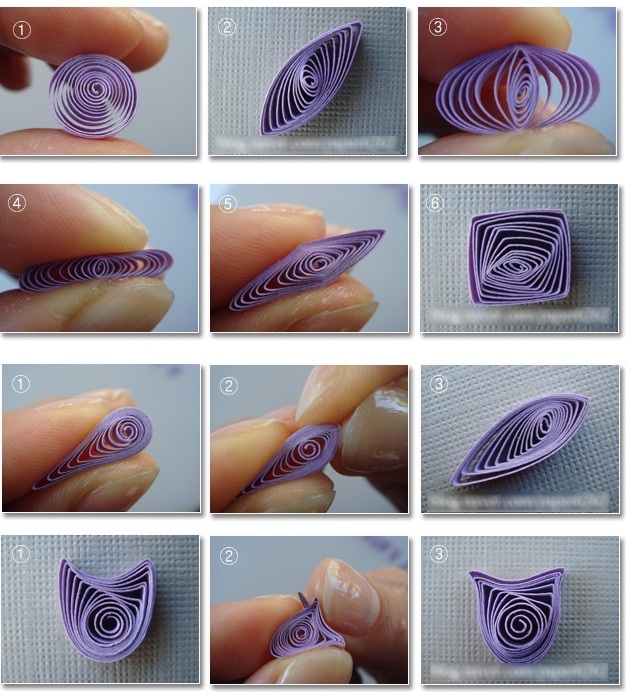
The oval module is made in the same way as a tight spiral, only the strip is twisted onto a thick rod (instead of it, you can use a simple pencil or pen). Then the resulting part needs to be slightly flattened on both sides.
To obtain a loose spiral, the tight spiral must be removed from the rod without gluing it, and allowed to unravel slightly. The second option is to perform rotating movements with the fingers of the left hand in the center of the part to loosen the spiral.
The following elements are performed on the basis of a free spiral:
- The curl is the same free spiral, the end of which is left unglued.
- The crescent is made from a basic shape, flattened into an oval and curved at the edges.
- The drop is formed by squeezing the loose spiral with your fingers from either side.
- It is easy to make a petal from a drop - to do this, you need to bend the compressed corner.
- The eye is made by lightly pulling the loose spiral in opposite directions and pinching it with your fingers at the edges.
- If you bend the sharp edges of the eye in opposite directions, you get a leaf.
- To form a semicircle, the base shape is clamped so that its upper part is rounded and the lower part is straightened.
- To obtain a triangle, the free spiral is compressed in three places.
- It is very easy to make an arrow from a triangle - to do this, one of its sides is bent inward.
- The paw is formed from the same figure, two opposite sides of which are bent towards the center.
- A square is a basic piece compressed on four sides.
To make the horns, you need to fold the strip in half and twist the right side clockwise and the left side counterclockwise into a spiral. The heart is made using the same principle, only the right and left parts are twisted in the opposite directions to the horns.
Flowers for Beginners
Quilling crafts for beginners (diagrams are given below) are made from a large number of basic elements. One of the simplest quilling figures is a flower.
What you need to prepare:
- standard set of tools for quilling;
- set of safety pins;
- paper strips of 3-5 colors.

To create the simplest flower, you will need several loose spirals. One of them will serve as the center, the rest - petals. The center can be twisted from a double strip - then it will be larger.
Another option is a flower made of drop-shaped figures, of which you will need 6-8 pieces, and 1 free spiral for the middle. You can also use petal or eye modules to create a flower. To make the drawing more voluminous, the petal details are laid out in two layers: lower and upper, but then you will need much more of them.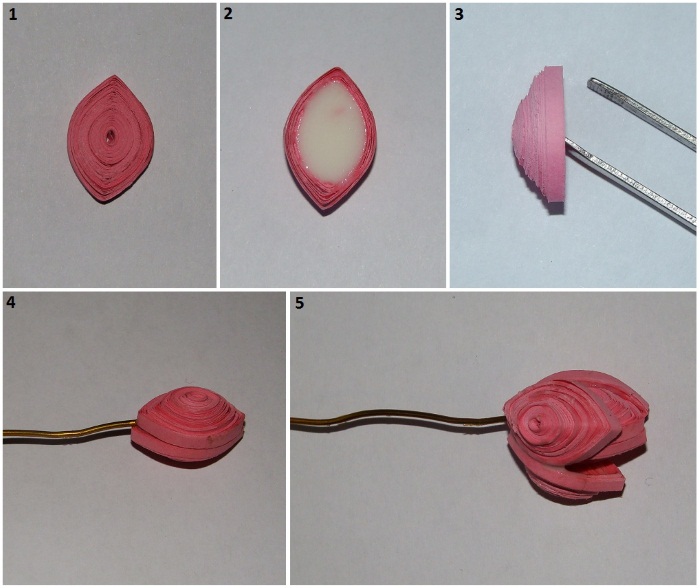
It is not difficult to assemble the flower:
- First, you need to prepare the required number of petals, centers and leaves.
- Place a drop of glue on the base of the future postcard, attach the middle piece and press it down lightly.
- Glue the petals around the center in the same way. If you want to make a three-dimensional flower, then glue the petals in a second layer on top of the first.
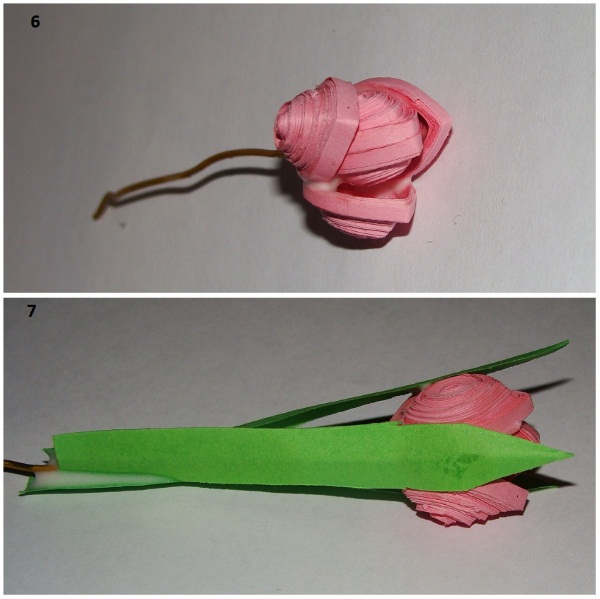
- The stem can be made from a strip of paper, twisted on one side closer to the edge. The strip is glued to the base edgewise.
- Leaves need to be glued next to the stem.
- You can decorate the card with horns and hearts.
Snowflakes
You can decorate a New Year's card or a Christmas tree with a snowflake made using the quilling technique.
To make it you will need:
- standard set of tools for quilling;
- safety pins;
- 23 paper strips of the same color and size.
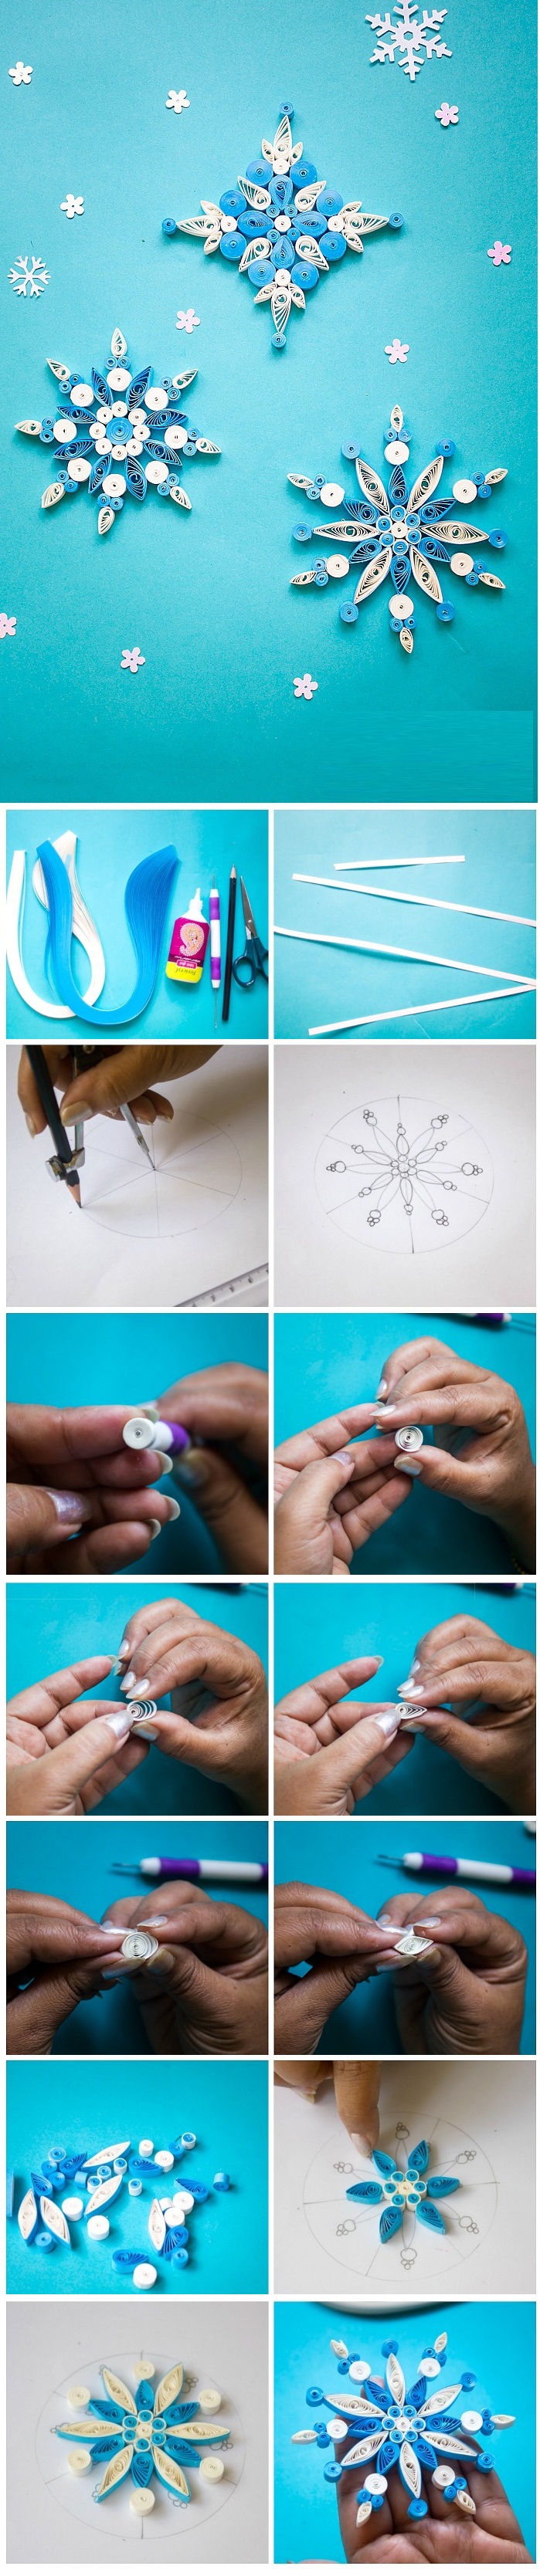
How to make a snowflake:
- First, you need to make 5 small loose spirals with an offset center. To do this, you need to cut 3 strips in half and, having twisted the first one into a tight spiral, carefully place it in the 10 mm diameter hole of the stencil.
- Next, you need to make 4 exactly the same elements, form a loose spiral from them and glue the edge. To remove the part from the stencil, you should pick it up in the center with a toothpick and press it lightly with two fingers.
- Using a quilling rod, you need to shift the center of each module downwards and fix it in this position with glue.
- The resulting 5 elements need to be placed in the center of the base, aligned, pinned. Then glue the parts together and remove the pins.
- The next step is to make 10 leaf modules and glue them to both sides of each small free spiral.
- Next, you need to make 5 large free spirals - they are twisted from solid strips. In order for the elements to be even, they should be laid out in a stencil with a diameter of 2 cm. After shifting the center, the parts need to be glued in wide gaps between the leaf-shaped figures.
- To complete the picture, you need to make 5 tight spirals that are glued into the wide spaces between the leaf-shaped figures.
- After the glue that holds the parts together has dried, you can glue the snowflake to the base, or pull a thread through the middle of any tight spiral and hang the snowflake on the tree.
Butterfly
Quilling crafts for beginners, the schemes of which are given below, can be made in interesting shapes, one of them is butterflies. Butterfly figures of different sizes can decorate the interior of the living room and children's room, or decorate the school assembly hall before the matinee.
To make a butterfly you will need:
- standard set of tools;
- safety pins;
- paper strips of 2 colors: pink and black;
- Butterfly diagram drawing.
The details must be made in shades that will harmonize with each other.
Step-by-step description of the manufacturing process:
- The pink stripes need to be made in different sizes:
- 1*5 cm – 4 pcs.;
- 1*10 cm – 6 pcs.;
- 1*20 cm – 2 pcs.
- Black stripes are needed for edging, so you should prepare several pieces of standard size (0.5*30 cm).
- Using a rod, you need to twist tight spirals and place them in stencils of three different diameters so that loose spirals are formed from tight ones.
- Carefully remove the circles with a toothpick and glue their free ends.
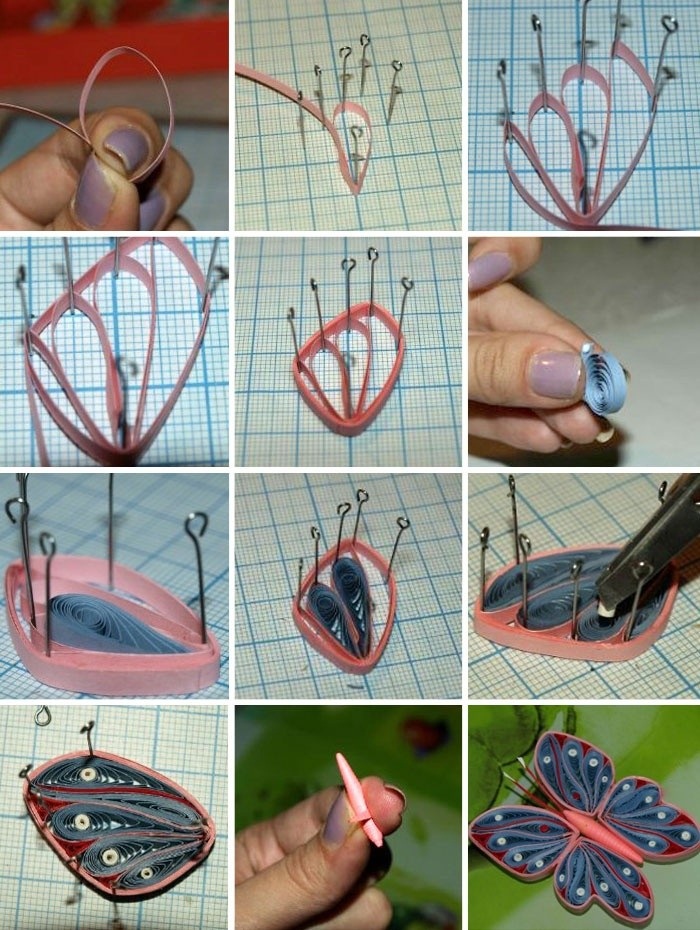
- Each piece needs to be shaped like a teardrop.
- Now you need to lay out the parts according to the diagram by 3: 2 smaller ones are glued to the large drop on both sides. At this stage, it is important to ensure that the tails of each trio of parts are at the same level.
- As a result, you should get 4 triplets of parts. A black border should be glued to each of them. To make the frame hold more firmly, it is better to wrap it around a group of elements in 2 or 3 layers.
- Next, you need to make the butterfly's body. To do this, take a black ribbon and fold it in half. From the fold line to the middle, the strip needs to be greased with glue and pressed down. The free ends should be twisted into horns.
- The body is ready, now you can assemble the butterfly. You need to carefully glue the wings to the body, and then attach the figure with pins to the cork board so that it retains its shape when drying.
- At the end, the figure is glued to the base. Instead, you can make a ring from a black strip and place it between the antennae, and thread a thread through the ring - now the butterfly can be hung.
Mouse
For beginners who have mastered the production of the basic elements of quilling, it will be very easy to make a nimble mouse.
To do this you will need:
- standard set of tools for quilling;
- safety pins;
- paper strips of the same size: 1 pink, 6 gray strips and 1 black.
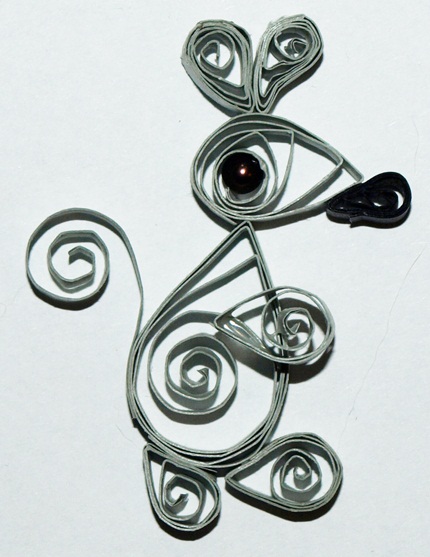
Step by step production:
- The first element will be the mouse's body - it consists of a semicircle module. To make it, you need to connect 2 gray paper strips.
- The finished semicircle must be attached to the board with a safety pin.
- From a new solid grey ribbon you need to cut off half and twist one side into a horn.
- The resulting tail should be glued under the bottom of the body so that the horn is on top and the curl is directed inward.
- From the next whole strip you need to make a drop, attach it to the mouse’s body on the opposite side from the tail – this is the head.
- To make the nose, you need to cut half of the black ribbon and twist it into a tight spiral of the smallest diameter, using a stencil.
- Each inner part of the ears consists of half a pink strip twisted into a teardrop shape.
- The pink drops need to be wrapped 3-5 times with halves of gray strips.
- Now you can glue the ears and nose to the body and leave the mouse to dry.
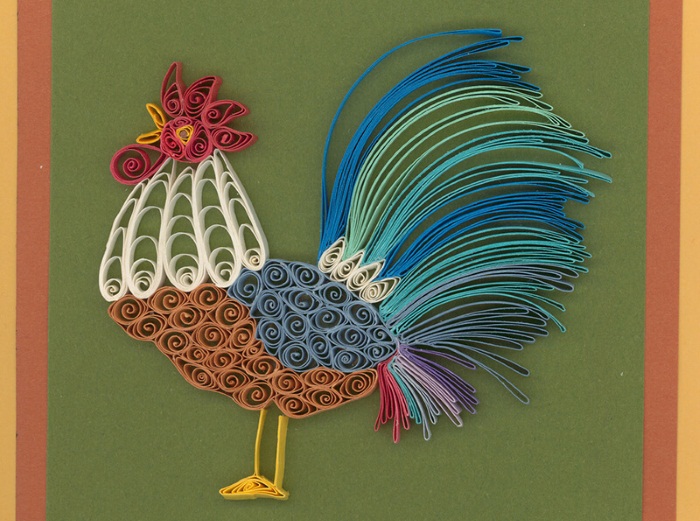
Rooster
The rooster figurine can be made in different ways, but the simplest one involves filling the pattern with multi-colored drop modules.
Materials and tools:
- standard set of tools for quilling;
- drawing-diagram of a rooster;
- paper strips of 7 colors (quantity depends on the size of the drawing).
Manufacturing:
- First, you need to twist the whole strips and halves of strips of 4 colors into loose spirals of different sizes (there should be 2-3 sizes). To form them, use a diameter stencil.
- Then you need to form drops from the spirals and start filling the rooster's tail, laying out the figures in different directions and gluing them to the pattern. Each tail feather is a separate color.
- Next, you need to make droplets from white stripes and lay them on the top of the breast.
- The comb will consist of 3 free spirals of different diameters. Its largest part is made of 3 glued strips, for its formation you will need a stencil of a larger diameter. The second part of the comb is twisted from 2 strips, the third - from one.
- When all the comb parts are ready, they need to be fastened together and glued to the pattern.
- The lower part of the breast and head should be lined with light yellow droplets, leaving some space for the eye.
- The wing is laid out with dark yellow or orange drops with the addition of a few white ones.
- To make the eye, glue the black and white ribbon together, twist them into a tight spiral, starting from the black side. The diameter of the spiral depends on the size of the space left in the drawing for the eye.
- To form the beak, you need to glue 2 red strips together, twist them into a loose spiral of the desired diameter. Then the spiral needs to be turned into an arrow module and glued to the beak location.
- The paws are made from orange strips. For each paw, take a whole strip and fold it in half. Then form claws and a spur from one half. The paws need to be glued to the drawing edgewise.
- At the end, the drawing needs to be framed. To do this, it is necessary to glue the drawing along the contour with multi-colored stripes laid out on the edge.
Chrysanthemum
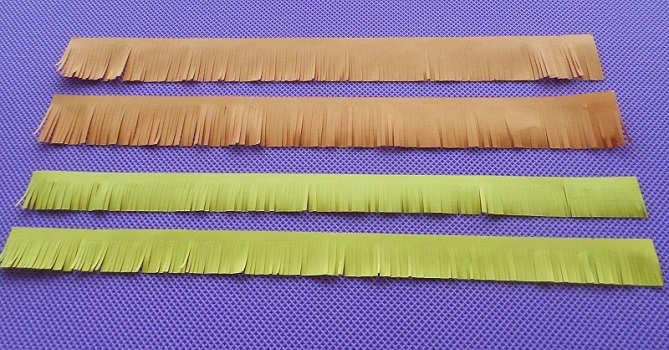
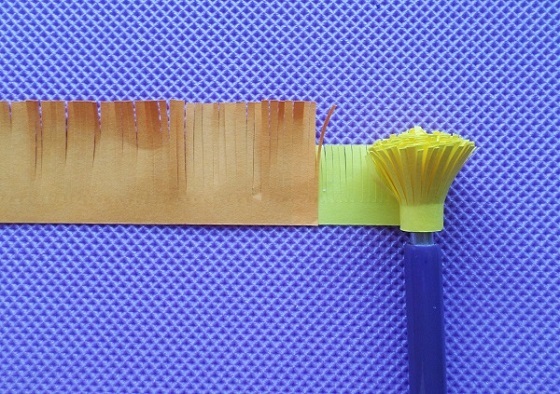
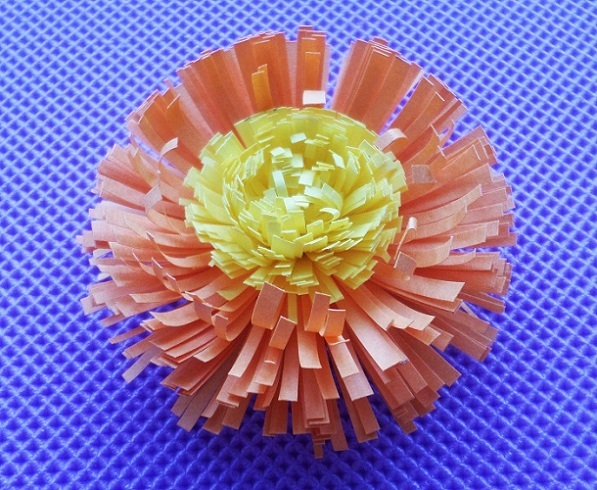
Quilling crafts can be made from paper strips cut into fringes. All actions are carried out according to the usual scheme for a beginner, and cutting will only increase the time it takes to make a picture. An example of creating pictures from strips with fringes is chrysanthemums: thanks to this treatment of paper before rolling, the flowers turn out lush.
What you will need:
- standard set of tools for quilling;
- 3 wide paper strips of white or yellow color (5*30 cm);
- 15 standard stripes of red and green colors (0.5-1*30 cm).
How to make chrysanthemums:
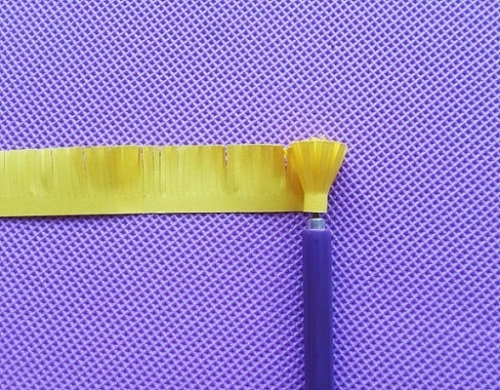
- On one side of each wide strip you need to cut a fringe, leaving 5 mm from the edge.
- The fringed strips should be twisted into a tight roll (like a tight spiral) using a rod, periodically lubricating with glue. The end should be glued to the roll itself.
- Now you need to straighten the flower, making it lush, and slightly curl the edges of the fringe with a rod.
- In the same way, you should make 2 more flowers.
- The finished chrysanthemums need to be placed on the sheet and glued. If desired, you can make a vase for them from a rectangular piece of paper, or you can simply decorate them with stems and leaves around them.
- Now we need to make decorative elements. To do this, green stripes are twisted into horns with different directions and into leaf modules. Red stripes are twisted into tight spirals of small diameter, their tip is glued.
- You can arrange decorative elements as you wish.
Christmas tree
It is not difficult to make a simple Christmas tree using the quilling technique; you can use different manufacturing methods for this.
For this New Year's craft you will need:
- standard set of tools for quilling;
- 20 standard size green paper strips;
- 2 standard size brown strips;
- 14-20 standard size color strips;
- A set of safety pins.
How to make a Christmas tree from triangle modules:
- The tree branches will be 7 triangles, each of which should be twisted from a pair of glued strips. For the same purpose, you will need 2 triangles made from a spiral of a smaller diameter, but also from a pair of glued strips. Instead of triangles, you can make drop or eye figures.
- The top is also formed from 2 glued strips: for this, the free spiral must be transformed into an arrow module.

- The tree stump is made from 2 glued brown strips twisted into a triangle.
- To make a Christmas tree ball toy, you need to glue 2 strips of different colors and twist them with a rod into a tight spiral, then place them in a template of the desired diameter. After this, the spiral should be carefully pulled out and the tip glued.
- When all the details are ready, you can start laying out the tree. You need to start from the top - it is glued to the background sheet. Then the figures of branches and stumps are laid out and glued. At the very end, the tree is decorated with balls.
How to make a Christmas tree from loose spirals:
- Each green strip needs to be twisted into a loose spiral with an offset center. The diameter of the modules can be different: for this, you should use a stencil.
- Next, you need to lay out the spirals on the background sheet, starting with 1 piece, which will serve as the top. You need to lay them out in a free order, in the form of a triangle, placing the spirals in several rows. Each row should have more pieces than the previous one.
- The brown strips need to be glued together and made into a rectangular module, this will be the tree stump. It should be glued under the bottom of the tree.
- Tight spirals of different diameters must be twisted from colored strips. They can be used to decorate the branches of the spruce.
Little angel
A gentle angel will be a great addition to holiday decor. You can use it to decorate a postcard or a Christmas tree.
What you need to prepare:
- standard set of tools for quilling;
- 6 beads;
- safety pins;
- 19 white stripes 0.5-1*30 cm.
The process of making an angel:
- First, you need to make 3 parts, for which you will need 1 strip each. This is the angel's head and small inserts for his outfit. The head is made first: to do this, you need to twist the strip into a tight spiral and place it in a stencil with a diameter of 1.5-2.5 cm. When the part has acquired the desired diameter, it should be carefully removed from the stencil and the tip glued.
- In the same way, only using a stencil with a smaller diameter, you need to make spirals from the next 2 strips. After gluing the tip, the parts should be turned into drop modules.
- Now you need to take the next strip and cut it into 2 equal parts. From one half you need to make a horn figure and glue it to the angel's head. In this case, the twisted ends should be located on the sides of the head, resembling curls.
- The next stage is making the body or top of the angel's clothing. This part is made from 2 glued strips. They need to be twisted into a loose spiral, from which the eye module is formed.
- The angel's wings are also twisted from a pair of glued strips each. They should have the shape of a petal.
- To make 3 pieces for the bottom of the angel's clothes, you need to glue 3 strips 3 times. Each trio needs to be twisted into a petal module.
- When all the elements of the angel figure are ready, you can assemble it. You need to glue the top of the clothes to the head, and the wings and bottom of the clothes to it. Between the three parts of the bottom, you should glue 2 small inserts made in stage 2.
- Now you can decorate the angel figurine with beads, gluing them on as you wish.
The art of quilling is not only an interesting, but also a useful pastime. Even beginners can create worthy crafts. To make figures, it is not necessary to use special patterns - you can trust your intuition.
Article formatting: Vladimir the Great
Video about quilling
Basic elements of quilling: