Schemes with description snood pattern knitting with the approach of cold weather became popular among needlewomen. Historians have known the word "snood" since the 8th century, because that is what they called a headdress-net for long hair.
The accessory was mandatory for all classes, and its quality and the material it was made from determined the social status of a woman.
Necessary tools and materials
The knitting pattern for a snood, the diagram with a description of which is often found in fashionable thematic magazines on handicrafts, entered modern fashion in the 1940s and smoothly transformed from a hairnet into a hat, and then into a tube scarf.
The snood has many popular names. For example, it is also called an endless scarf, a loop, a tube, a neck warmer, a collar or a turtle neck. Translated from English, the word means "leash".
The modern version of the snood is a seamless round scarf made of wool, mohair, cashmere or cotton. Sometimes fur products are also found. The popularity of this accessory is due to its versatility.
It can be worn as:
- scarf;
- hat;
- hood;
- cape;
- bolero;
- top;
- skirt;
- dress.
It is equally suitable for both women and men. At the same time, the fashionable accessory matches any style of clothing, be it business office, walking or evening.
To make a warm tube scarf, experts recommend choosing yarn such as:
- "Alpaca";
- "Angora";
- "Cashmere";
- "Merino";
- "Mohair".
Alpaca is the name given to yarn made from the wool of South American mountain llamas. Each adult animal produces no more than 3 kg of wool per shearing. Pure thread from this natural material is rarely found on sale, as it is very expensive.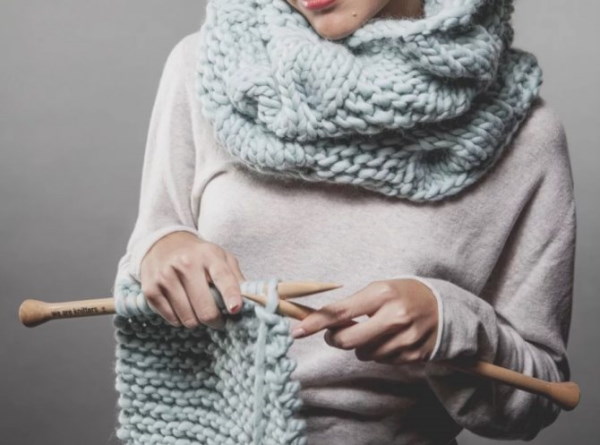
Products made from llama wool are warm, light and dirt-repellent. To add volume to the yarn and reduce its weight, acrylic thread is usually added to it. There are 2 types of alpacas: suri and huacaya. The former are very rare animals, while 95% of the yarn sold is made from huacaya wool.
Angora thread is made from the down of Chinese rabbits. The material is distinguished by its soft, thin and very fluffy pile, and 1 animal produces more than 1.5 kg of material per year. Animal down in its pure form is difficult to fix, so it is mixed with acrylic and other materials to give it the desired qualities.
Angora products retain heat well, are weightless and very fluffy. In addition, the thread is easily dyed, taking on any desired color. The disadvantage is that over time, the thin fibers fall out of the product, leaving only the usual warm fabric.
Cashmere is considered an elite material. The yarn is obtained from the undercoat of mountain goats living in Nepal, China and India, and 1 animal produces no more than 0.2 kg of fluff at a time.
Pure cashmere thread is thinner than human hair, so products made from it are light, soft and delicate. In addition, the yarn has a noble, slightly perceptible shine. Cashmere items are thin, durable and wear-resistant, for which they are highly valued in the fashion world.
Merino yarn is a material obtained from the wool of the eponymous sheep with a thin fleece, which are found in North Africa, Spain, Australia and Asia Minor. The main difference between this material and other woolen ones is that it absorbs moisture well, remaining dry.
Merino yarn products are breathable, retain heat, and are elastic. The material is hypoallergenic and does not prick sensitive skin. Items made from it are wear-resistant and wash well.
Mohair is another natural yarn suitable for knitting winter clothes. The thread is made from the wool of Turkish goats living in the mountains of the province of Angora. Mohair used to be called angora, but after the appearance of Chinese yarn with the same name, it was renamed to avoid confusion.
Mohair products retain heat well and, at the same time, allow the body to breathe freely. The material does not cause irritation or allergies. Mohair does not wrinkle and almost does not burn, which makes it one of the favorite materials for creating warm things.
Experts recommend when choosing yarn:
- Crumple the ball in your hands.
- Smell the material.
- "Fluff" the end of the thread.
- Read the ingredients on the label.
- Find out how to care for a product made from the selected material.
When buying, you need to take the skein in your palm and slightly crush it. The test will show how the material behaves when in contact with the skin and what sensations it causes.
You need to understand how the thread smells in order to determine its quality. If the skein has an unpleasant stale or barely perceptible chemical smell, then you shouldn't buy it.
Experts recommend "fluffing" the end of the thread. To do this, place it between your thumb and forefinger. By fiddling with the material, you can determine how quickly it will fall apart and how long a thing made from it will last. The test also allows you to see the quality of the thread winding and understand whether the fiber is uniform.
Before buying any item, you should always familiarize yourself with its composition. This way, the quality of the yarn and how much of it is needed to create a tube scarf are determined. In addition, the manufacturer usually indicates on the label the appropriate diameter of the knitting needles or hook that can be used to work with the material.
It is necessary to ask the seller how to care for products made from the yarn you like. This is necessary in order to extend the life of things and make wearing more comfortable.
Having decided on the choice of threads, proceed to the selection of knitting needles and additional auxiliary tools. The snood is usually knitted with circular knitting needles. Thus, the item turns out to be one piece without a seam. Some use separate knitting needles, and at the end of the work, sew the two halves together with a mattress stitch.
To select the correct diameter of the knitting needles, you need to make a hole in the paper and pass the thread through it. If it passes freely and does not sag or catch on the edges, then the diameter of the knitting tool is selected correctly.
The knitting needles can be made of metal, plastic or wood. The main thing is that their ends are not too sharp and not blunt. In addition to knitting needles, experienced needlewomen recommend having several plastic marker pins, a soft tape measure, a needle and scissors.
Schemes with description of works for beginners
A pattern for a snood with knitting needles, a diagram with a description of which can be of varying complexity, can be selected for both experienced needlewomen and beginners. Scarves-collars are made with several types of loops.
| Name | How to knit |
| facial | knit by pulling the working thread through the right eye from behind |
| purl | created by pulling the working thread through the left eye from the front |
| edge first | always removed untied |
| edge last | knit either purl or knit (depending on the recommendations) |
| yarn over | made between the loops, throwing the working thread onto the knitting needle, and knit in the next row |
Also in knitting there is such a concept as "Rapport", which means repetition of a pattern. It is usually marked in the diagrams with an asterisk "*". It is placed from the beginning of the pattern to its end.
In addition, there are abbreviations in needlework. For example, "лп" is a front loop, and "ип" is a back loop. The edge loop is designated as "кр.", and the yarn over is "нак."
The most popular patterns for snoods are:
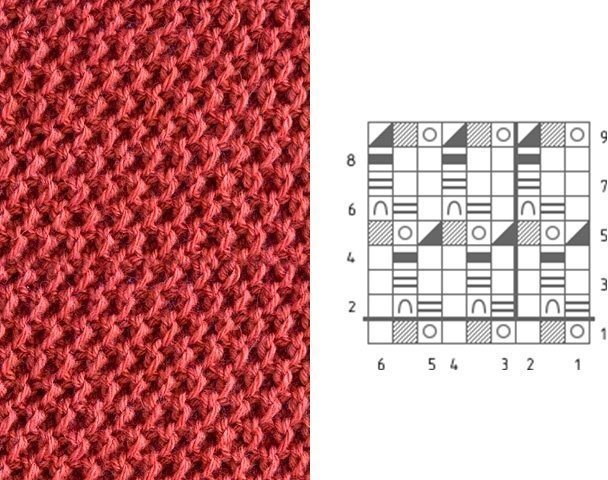
- "English elastic";
- "Christmas tree";
- "Cell";
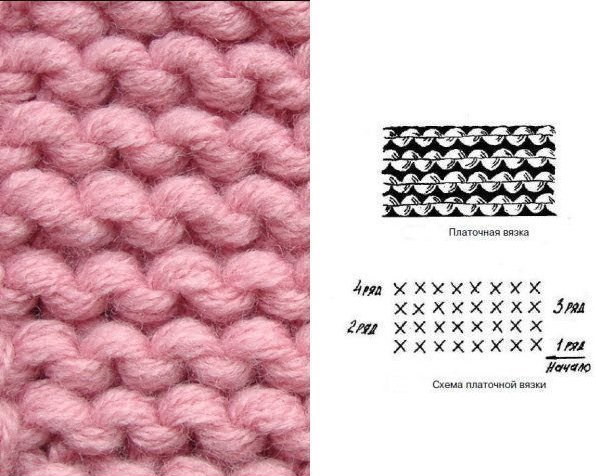
- "Garter stitch";
- "Honeycombs".
Each of the listed techniques uses front and back loops. The patterns are easy to make and even a novice needlewoman can handle them.
Before you start knitting the collar, you need to take a few measurements.
To do this:
- Place a centimeter from the hollow between the collarbones to the chin. Measuring the height of the neck will allow you to calculate the comfortable width of the scarf. The resulting figure should be multiplied by 2.5.
- Spread your arms to the sides and apply a centimeter from the fingertips of one hand to the fingertips of the other. This is the minimum length of the clamp in 2 turns.
Experts note that for adults, the width of the snood usually varies from 25 to 30 cm. The length of the product ranges from 140 to 160 cm.
English elastic
"English elastic" is one of the simple techniques, where a certain number of front loops are alternated with back loops and yarns. To knit an endless scarf with this pattern, you will need 0.15 kg of yarn, knitting needles with a fishing line of the required diameter and scissors.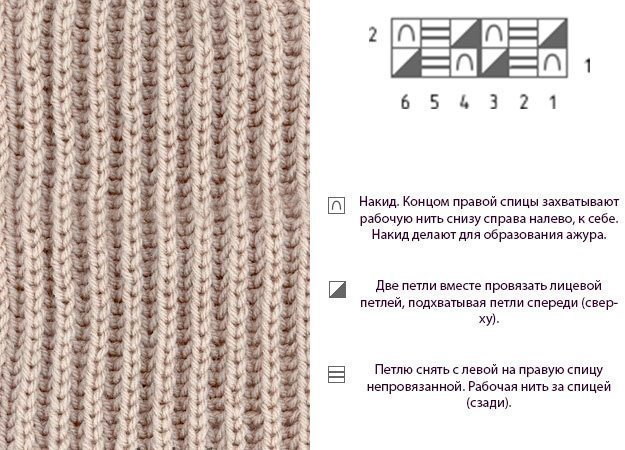
To create a fashionable accessory you need:
- Cast on 181 stitches.
- Start working in garter stitch, where rows 1 and 3 are knitted only with knit stitches.
- Knit rows 2 and 4 purlwise.
- Alternate front and back rows until the fabric is 2.5 cm high.
- Continue working using the English elastic technique.
- Knit row 1, alternating yarn over, slipped stitch, knit stitch, yarn over, slipped stitch. Repeat pattern to end of row.
- Place a colored marker at the end of the row to make it easier to navigate.
- Create row 2 by purling the yarn over, making a yarn over and slipping the next stitch unworked. Repeat alternation to end of row.
- Knit row 3, where the 1st is a yarn over, followed by a slipped stitch, and knit the yarn over from the previous row, and so on until the end of the row.
- In row 4, repeat the pattern of row 2.
- Knit row 5, where the pattern repeats row 3.
- In row 6 the pattern looks like in the other even rows.
- Knit row 7 as row 5.
- Alternate work with the pattern from rows 1 to 7, following the pattern repeat until the fabric reaches 25 cm.
- Knit another 2.5 cm in the same way as at the beginning of the work, using garter stitch.
- At the end of the work, close the loops.
The resulting product does not need to be sewn. It can be tried on, washed and worn.
Christmas tree
The pattern for a snood knitted with knitting needles, the scheme with the description of which is also often found in knitting publications, is called "Herringbone" or "Fishtail". After work, a characteristic triangular ornament appears on the fabric.
To work on a snood scarf you will need 0.1 kg of yarn, separate knitting needles of a suitable diameter, a needle and scissors.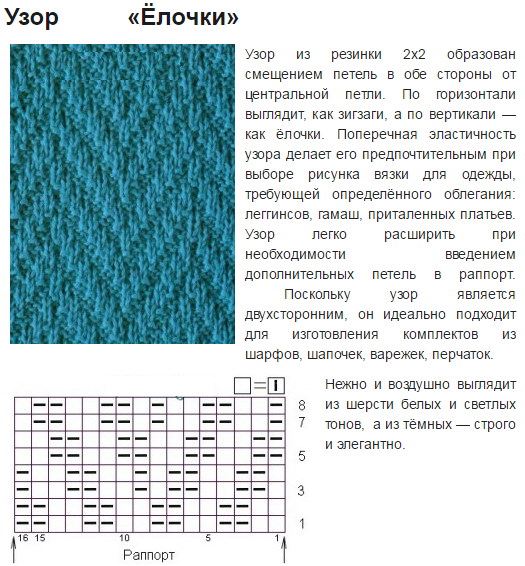
To knit a collar with a fashionable pattern, you need:
- Cast on 50 stitches.
- Knit row 1, alternating 4 purl, 1 knit, 1 purl, 1 knit, 4 purl. Repeat the pattern to the end of the row.
- Form row 2 by knitting stitches according to the pattern on the fabric.
- Knit row 3, alternating 5 knits, 1 purl, 1 knit, 1 purl, 5 knits.
- Knit all even rows according to the pattern formed on the fabric.
- Knit row 5, alternating 6 purl, knit, purl, knit, 6 purl.
- Row 7 consists of repeating 7 knits, purl, knit, purl, 7 knits.
- Knit row 9, alternating knit, 7 purl, knit, 7 purl.
- Row 11 consists of repeats of knit, purl, 7 knit, purl.
- Knit row 13, alternating knit, purl, knit, 7 purl, knit.
- Form row 15 by repeating knit, purl, knit, purl, 6 knits.
- Row 17 consists of 2 purl, knit, purl, knit, 5 purl. Repeat the pattern to the end of the row.
- Knit row 19, alternating 3 knits, purl, knit, purl, 4 knits.
- Close the loops when the length of the fabric is 140 cm.
Before trying on the product, sew it together by joining the free edges of the scarf.
Cell
The pattern for a snood knitted with the name "Cage" is easy to make. It is suitable for those who want to decorate their snood with an elegant "checkerboard".
For the slave you will need 0.1 kg of yarn, separate knitting needles, a needle and scissors.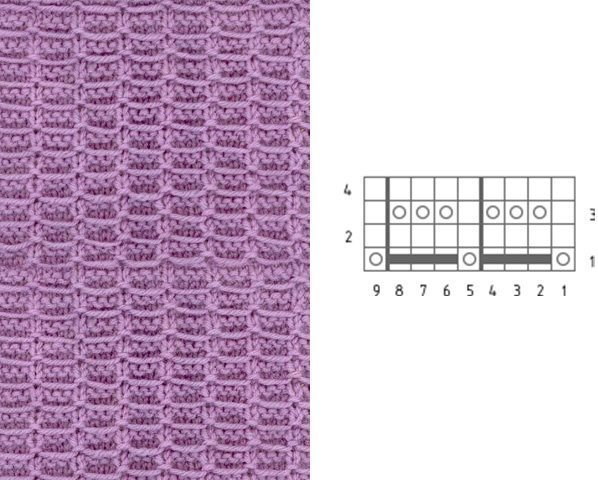
To knit a fashionable accessory, you need:
- Cast on 44 stitches.
- Knit row 1, alternating 4 knit, 4 purl, 4 knit, 4 ip.
- Form row 2 and the remaining even rows following the pattern on the fabric.
- Repeat the pattern of the 1st row in row 3.
- Knit row 5, alternating 4 purl, 4 knit, 4 ip, 4 knit.
- Repeat row 5 in row 7.
- Knit row 9 as 1st, alternating 4 knit and 4 purl.
- Repeat the 9th row pattern in row 11.
- Knit alternating knit and purl squares until scarf measures 150 cm.
- Close the loops.
At the end of the work, they begin to assemble the clamp. To do this, sew its free ends, twisting the fabric to create a wave.
Garter stitch
You can also decorate a tube scarf with garter stitch. Despite the simplicity of execution, the pattern on the fabric looks impressive.
For knitting you will need 0.15 kg of yarn and separate knitting needles. You will also need a needle and scissors.
To knit a collar using a simple pattern, you need:
- Cast on 45 stitches.
- Knit row 1 with knit stitches.
- Form a row of 2 knit stitches.
- Knit the entire 160 cm of fabric with knit stitches in even and odd rows.
- Close the loops at the end of the work.
To finish working on the snood, you need to sew it. To do this, connect the 2 free ends of the fabric with a needle and yarn thread. To make it easier to sew the scarf without worrying that the initial knot will be visible, you need to leave another 20 cm of free working yarn thread after closing the loops. After that, thread it into the needle and make even stitches, connecting the edges.
Honeycombs
The "Honeycomb" pattern looks beautiful on thick yarn. It contains elements of English elastic.
To work you will need 0.2 kg of yarn, circular knitting needles and several large pins.
To knit a fashionable warm accessory for winter, you need:
- Cast on 160 stitches.
- Knit row 1 with knit stitches.
- Form row 2 according to the pattern on the fabric.
- Knit, alternating patterns of the 1st and 2nd rows to a height of 2 cm.
- Start creating a pattern.
- Knit row 1, alternating knit stitch and 1 slipped stitch behind work.
- Form row 2 and the remaining even rows with knit stitches.
- Knit row 3, alternating between knit stitch and slipped stitch.
Repeat alternating rows 1 to 2 until the piece is 35 cm high.
 At the end of the work, the loops are closed.
Secrets for Beginners
The knitting pattern for a snood, the diagram with the description of which is popular this season, can be both large and small. The choice of ornament depends not only on the thickness of the yarn, but also on the type of face of the person who will wear it.
Fashion designers advise girls with large features to choose patterns with small knitting details, as this will balance the silhouette and make the image harmonious. The same method of choice is suitable for people with a different type of appearance.
Designers recommend choosing the color of yarn based on your appearance type. For example, warm and not flashy colors of threads suit people with warm eye and skin tones. Those with a cold appearance should choose the same colors in clothes and accessories.
There are several secrets to knitting a fashionable snood.
Beginners should know that:
- You always need more thin yarn than thick yarn.
- Simple patterns look better on large threads.
- An elastic band with any pitch is a universal ornament for a snood scarf.
- The wide "pipes" can be worn as a bonnet.
- A double product is warmer than a single one.
- Before the main knitting, you need to create a small sample from yarn on the knitting needles.
- Circular needles should have a smooth transition between the metal and the cord.
- When knitting in the round, work only with the outer rows.
- The snood can be decorated with beads, buttons, tassels and fringe.
- It is better to take yarn with a small reserve.
A diagram with a description of a pattern for a snood with knitting needles will be useful for beginner knitters. The more carefully the needlewoman follows the recommendations, the better the product will turn out. At the same time, you should not be afraid to experiment or make your own adjustments, which will make the snood scarf even more unique and individual.
Video about snood patterns
Knitted snood. Ideal pattern for snood: