A New Year's deer made of wire is an interesting and attractive craft. To make it, you will need simple tools, common and accessible materials, a sketch made on paper. And a beautiful toy shimmering with garland lights will decorate the house.
Tools and materials
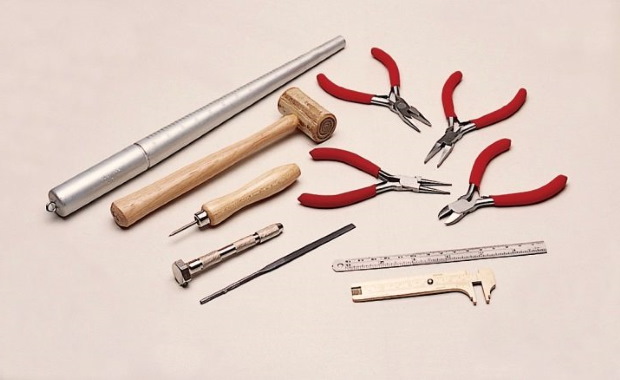
To make the proposed toy, you need to prepare the following tools and materials:
- Thick paper such as Whatman paper.
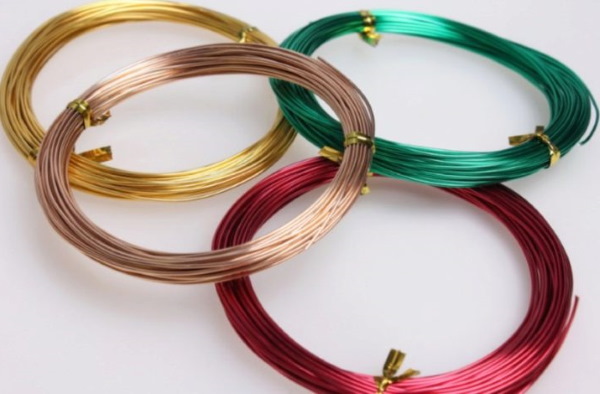
- Galvanized steel wire with a diameter of up to 2 mm.
- Masking tape or a soldering iron with soldering acid.
- Pliers.
- Round nose pliers.
- Nippers or side cutters.
- Decorative elements (threads, rain decoration, etc.).
- Electric garland.
- Scissors.
The wire deer, the sketch of which is presented below in the text, is made according to a drawing. The amount of paper for the drawing is determined based on the dimensions of the future figure. Also, based on the dimensions of the future toy, the amount of wire needed for the work is calculated.
The choice of masking tape or soldering to connect the elements of the sculpture is determined by the skills of the person who will create it. This article will focus on attaching pieces together using masking tape.
When using soldering, it is important to remember that a soldered joint does not withstand mechanical stress well and special knowledge and experience are required to perform it.
Wire Deer Drawings and Sketches
Before you start working with wire, you need to determine the dimensions of the future figure and take them from here, or select them in another way.
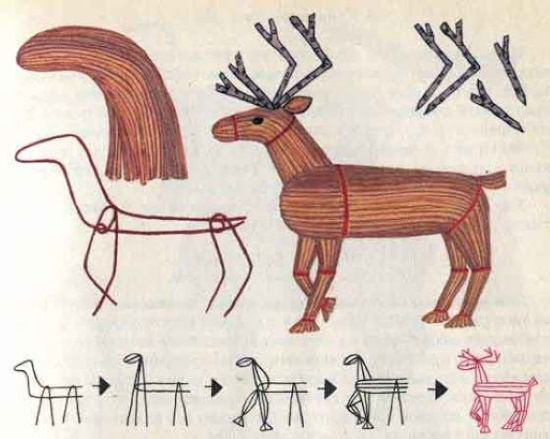
Fig.1 Sketch of a deer made of wire
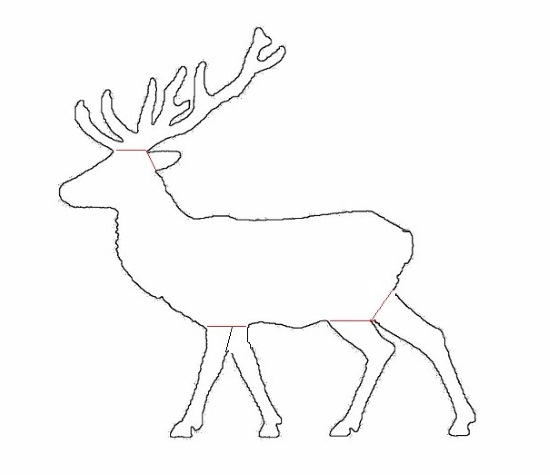
After selecting the drawing, you need to adjust its size to the size of the future figure. When making a sketch, you can use the Fotoshop editor. With its help, the original size can be significantly increased and divided into sheets of A4 paper. Then glue the individual sheets into one integral sketch.
Having received a sketch in 1:1 scale, divide it into separate parts. The lines of division of the figure are highlighted in red in the drawing.
The "body" of a deer can be divided into "antlers", "ears", "front legs", "hind legs" and "trunk".
Fig. 2. Body outline.

Fig. 3. Ear contour.
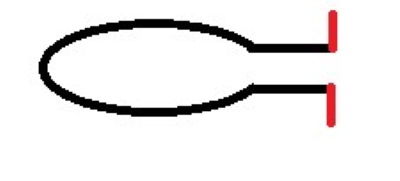
Fig. 4. Contour of the horns.
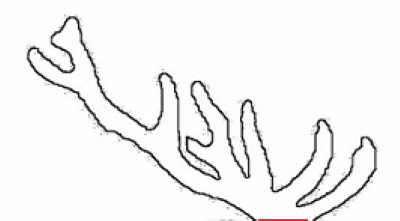
Fig. 5. Outline of the front legs.
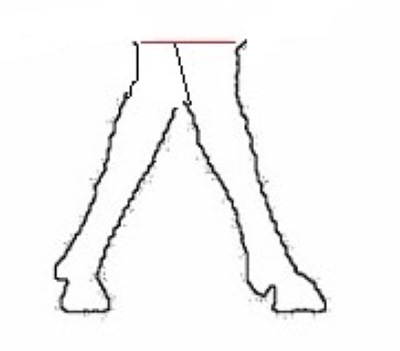
Fig. 6. Outline of the hind legs.

In all sketches, except for the body, the places where these body parts are attached to the body are shown in red lines. To simplify and facilitate the work, the front legs can be made identical, with only the attachment elements differing.
Sketches of all parts of the deer made of wire for further work should be transferred to thicker paper.
Step-by-step diagram of assembling a deer from wire and garland
The proposed scheme for creating a deer does not contain any strict metric dimensions and is created intuitively. The use of this method opens up unlimited possibilities for individual preferences.
The diagram itself is shown below:
- Making the body.
- Creating ears.
- Bending of horns.
- Preparing the front legs.
- Making the hind legs.
- Creating a tail.
- Assembling the figure.
Each assembly stage is discussed in more detail below. Photos of the author's figure will be added to the description of some stages for a better understanding of the process.
Step #1. Making the body
The creation of the body is done as follows:
- The perimeter of the contour is measured.
- Based on the result obtained, the required piece of wire is measured.
- By applying wire to the contour, the required configuration is bent.
- The joint between the beginning and end of the wire is secured with masking tape.
After receiving the basic outline of the body, the distance between the upper and lower parts is measured in several places. If we are talking about a living creature, this will be the distance between the lower abdomen and the upper back.
The resulting size will be the diameter of the ring, which will need to be bent from wire and then inserted into the measurement location, perpendicular to the main contour.
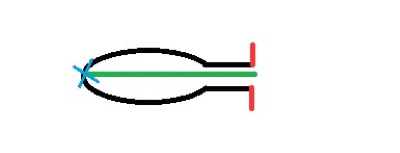
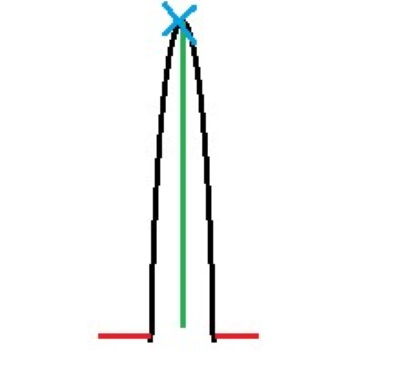
Fig. 7. Scheme of placement of reinforcing and contour parts on the deer’s body.
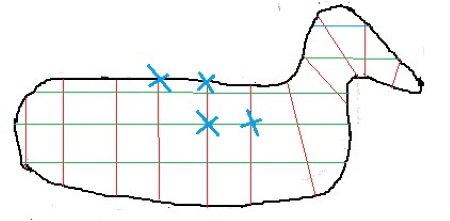
The drawing shows the approximate locations for installing contour rings, which help to form a three-dimensional figure, in red lines.
The green lines show the longitudinal reinforcing wire inserts that secure the outer parts of the red rings. The beginning of each longitudinal line is on the front part of the contour, and the end is on the back.
The blue crosses show the places where all the wire intersections are fastened with masking tape. Thus, each red ring will be fastened not only to the main circuit, but also to each green "amplifier".
The more red rings and green reinforcers are installed, the stronger the figure will be. However, an excessive number of these parts is also undesirable - this will lead to an increase in the weight of the figure and an overuse of wire.
Step #2: Making the Ears
The wire deer, the sketch of which is quite simple, in the second stage involves making the ears. They are also made by bending along the paper contour.
To add volume, if the ear is to be decorated, another detail is added perpendicular to the main contour. It is made of wire and performs both functions: contour and reinforcement. The red lines on the contour show the bends of the main contour of the ear, with which it is attached to the body.
Fig.8. Refining the “ear” detail.
The diagram does not show the bend of the "amplifier" with which it is attached to the body. It should be noted that the ear amplifier is installed after the ear itself has already been installed on the body. This will make it possible to determine the place to which this amplifier will be attached.
Step #3. Bend the horns
The deer antlers are created in the same way as the ears – by bending them along the outline of the drawing. The black thick line in the picture shows the place where the horns are attached to the body. The blue mark shows the junction of the beginning and end of the work. Due to the small size, the horns are made without circular reinforcements, so they turn out flat.
To provide strength, jumpers are installed in the structure between the upper and lower lines of the horns. In the figure, they are marked in green.
Fig.9 Making horns.
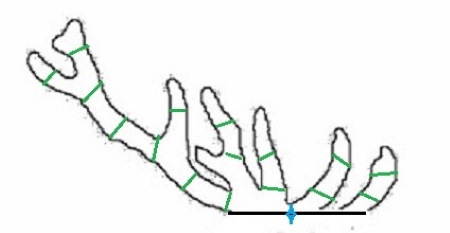
The joints between the green jumpers and the outline of the horns are secured with tape or soldering. The horns are made in the form of two identical parts, which are alternately installed on the left and right sides of the head.
Stage #4. Preparing the front legs
Despite the fact that the front legs are depicted as one piece in the drawing, it is better to divide them into two separate pieces. After bending the wire contours of both pieces, contour rings (red lines in the drawing) and longitudinal reinforcements (green) are added to each of them, as when creating the body.
As with the ears, the upper part of the legs shows the red lines where the contour wire bends, which must be taken into account when bending the leg contour. Each leg will be attached to the body with them. The red lines inside the leg contour are contour rings.
Fig.10 Front legs
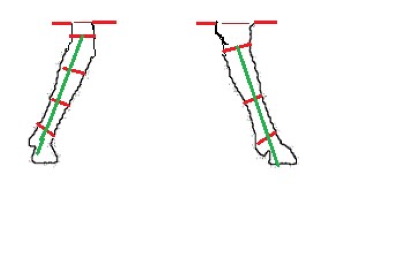
When creating legs, the same rule applies as when making the body - the more contour rings and longitudinal reinforcements, the stronger and more beautiful the leg will be.
A deer made of wire (the figure sketch can be of any size) has several ways of execution. When creating your own version, you can refuse to bend the complex contour of the hooves and make the legs without them. If desired, they can be highlighted after creating the legs by winding several turns of thick thread or thin wire over the leg contour in its lower part.
Step #5. Making the hind legs
The hind legs, similar to the front ones, are divided into 2 parts and each leg is bent separately. Contour rings and longitudinal reinforcements are also installed in them. Do not forget about the bends for attaching the leg to the body. The main difference between the hind legs of a deer and the front ones is the knee joint, which bends backwards. Therefore, when creating the hind legs, you need to remember this.
Fig.11 Hind legs
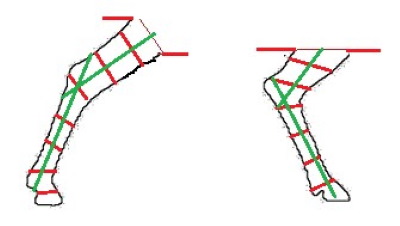
When making the front and back legs, you need to remember that they perform the same functions in the figurine as in a living creature - these are support points. For good stability of the "deer", the legs are attached to the body so that their location is as close as possible to the natural "option".
For reasons of stability, all legs are made as strong as possible, achieved by installing the maximum number of contour rings and longitudinal reinforcements. In the author's version, 6-7 contour rings and 2 longitudinal reinforcements are installed on each leg.
Step #6: Creating the Tail
Although it is not necessary to make a tail for the sculpture, this part of the body will not add any special complexity and will not take much time. Of all the parts of the figure, this part is the simplest. From the wire you need to bend a triangle with a rounded top and add a reinforcement to it, similar to making ears.
Fig.12 Tail
Also leave bends at the tail for attaching to the body and add 1 reinforcement. The best option would be to install the reinforcement to the tail already attached to the body - this will make it easier to determine its length and attachment point. After making all the parts separately, you can start assembling the figure.
Step #7. Assembling the figure
It is best to start assembling the figure by attaching the legs to the body. This solution is easy to explain: when "assembling" the legs, the body will have to be turned several times from left to right and back and forth.
It will have to be placed several times alternately on the left and right sides. If you first install the antlers and ears on the deer's head and the tail on the back, these elements will interfere and may be damaged.
Therefore, it is better to assemble the figure in the following sequence:
- Attach the legs to the body.
- Place horns on the head.
- Put the ears back in place.
- Set the tail.
If desired, the order of the ears and tail can be changed, but the horns must be installed after the legs. The horns are a bulky part and, at the same time, the weakest, so if you install the ears first, they will create an obstacle when installing the horns.
A semicircular crossbar must be installed between the branches of the horns. One edge of the crossbar is fixed to the left branch of the horns, the second to the right. The bend of the crossbar, in this case, will lie on the body, and at the point of their contact it must be attached to the body. This crossbar will serve as an additional reinforcement and will give the horns greater strength.
The same jumpers need to be installed between the right and left legs in front and behind. After installing the last part, the assembly of the deer can be considered complete.
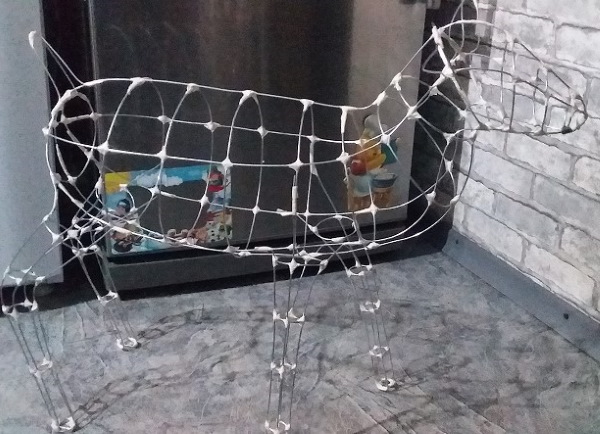
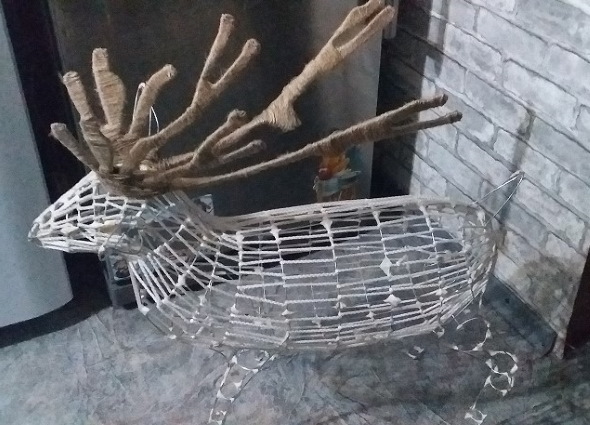
In the photo, the deer's antlers are not installed, since further decoration of the figure was intended from the very beginning. It would have been problematic to wrap the antlers installed on the deer with threads. They were first decorated, and then, in their finished form, installed in place.
Fig. No. 13 Assembled deer without installed antlers
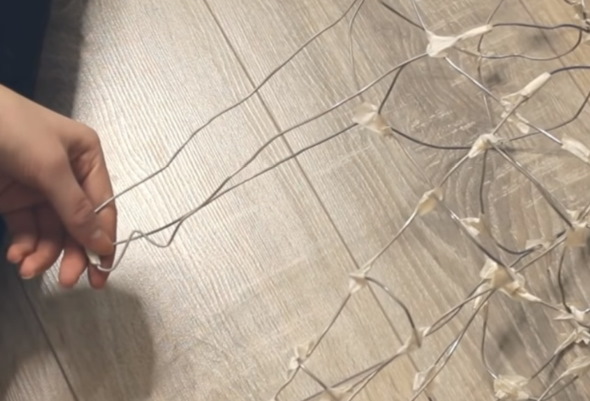
A wire deer, the design of which you can come up with yourself, is easier to make in wire form and immediately place a garland on it.
This task can be accomplished in various ways, depending on the technical capabilities of the designer. If he has a long garland with a large number of lamps or LEDs, it can be randomly placed inside the figure.
Another method involves placing the garland wires on the main wires of the frame. The garland or garlands are pre-fixed to the wires temporarily, with pieces of transparent tape or thin wire, with the possibility of adjustment. After the garland is evenly distributed over the frame, the temporary fasteners are replaced with permanent ones.
When fixing the garland "permanently", you need to remember that the insulation of the wires of the garland is thin and can be easily damaged. It is advisable to make a turn of transparent tape on the wire where the wires are adjacent to the wire before fixing it.
An option for placing a garland on the figure above. Another option would be to decorate the wire "skeleton" of the figure.
Decorating ideas
There are many options for decorating the figure - it all depends on the imagination of the performer. There is an option with wrapping the deer with a thick nylon cord, which will allow you to later apply a coloring to the deer's body that imitates the natural coloring.
To make this type of decor, you will need the following materials and tools:
- nylon cord, 4-5 mm thick;
- any twine, different colors possible, Ø up to 1mm;
- wide double-sided tape;
- colorless glue "Master";
- scissors;
- narrow paint brush;
- safety pins.
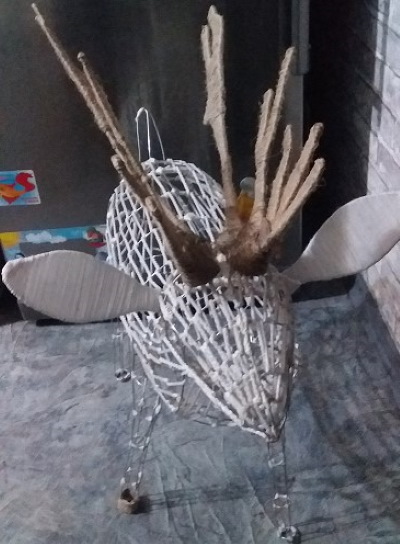
Work begins with decorating the horns – they are worked with separately from the body:
- They are wrapped with thick twine, coating each turn with transparent glue.
- After the glue has dried, the horns are put back in place.
- Then they make a longitudinal winding of the body, laying turns between the reinforcement wires, and winding the thread around the wires of the contour rings.
This will additionally close the gaps between the reinforcements. This will allow you to make a figure with smooth lines, eliminating protruding parts of the wires.
Fig. No. 14 Deer with installed antlers and longitudinal rows of winding threads.
The next stage will be finishing the ears - they are also wrapped with thin twine. In the presented version, the twine is white - everything depends on the decision of the performer.
Fig. No. 15 Ear decoration
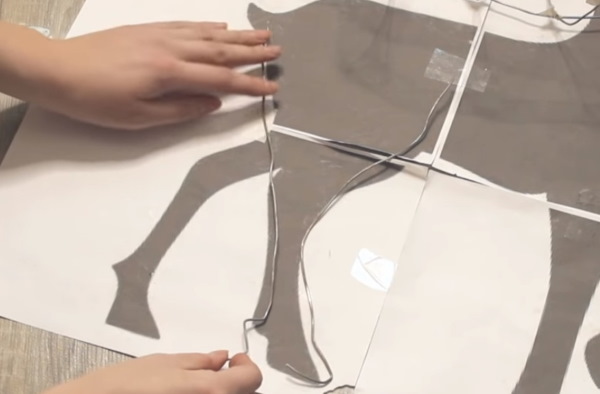
The body decoration starts from the middle - there is a flat wide place, which is easiest to wrap. In this way, the performer will acquire a skill that will help when decorating other, narrower and more complex places.
Step by step:
- Cut off a small piece of tape – 10-15 cm long.
- The uncovered, sticky side is glued to the wire frame. It should be glued so that its edges fall on the wire with the possibility of wrapping it with the ends of the tape.
- The figure should be wrapped with tape so that it covers the entire plane of the body with a strip 5-6 cm wide. Then the protective film is removed.
- In any convenient place, apply the beginning of the thread to the tape and secure it with a pin.
- Make a loop of thread around the body, pressing it against the tape and pulling it slightly.
- The resulting coil is adjusted, positioning it so that it is as perpendicular to the body as possible.
- A narrow strip of glue is applied to the side of the first turn, to which the second turn will be adjacent. The second and subsequent turns are applied according to the “turn to turn” principle, smearing the free side of each of them with glue.
- Having used up the entire length of thread, secure its end with a pin.
- If you can’t coat each turn with glue, you can wind 5-6 turns “dry” and coat them with glue from above, while they are already wound.
In some places, especially in the transitions "body-leg", "body-ears", "body-horns" and "body-tail", it is possible that voids may form between adjacent turns of the winding. They are filled with pieces of thread of the required length, inserting them between full turns.
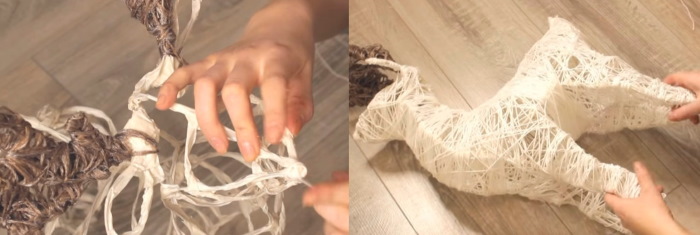
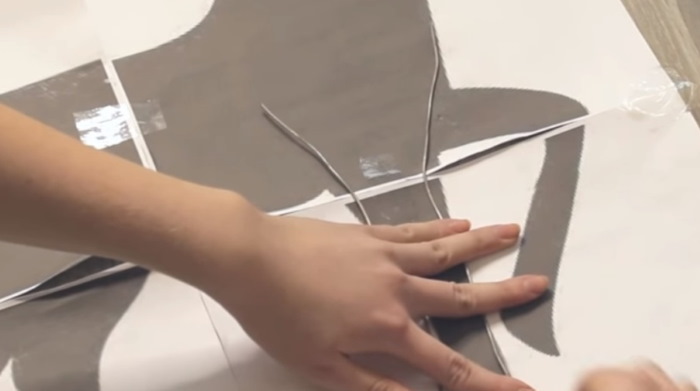
Another decoration option could be finishing using polyethylene film:
- The film is cut into pieces, these pieces are rolled into balls or lumps and used to fill the internal cavities of the figure.
- Then another part of the film is cut into strips 1-2 cm wide and of a length convenient for work, for example, 25-30 cm.
- The deer is then wrapped in these strips so that they overlap slightly.
- For greater strength, the strips can be coated with transparent glue before wrapping.
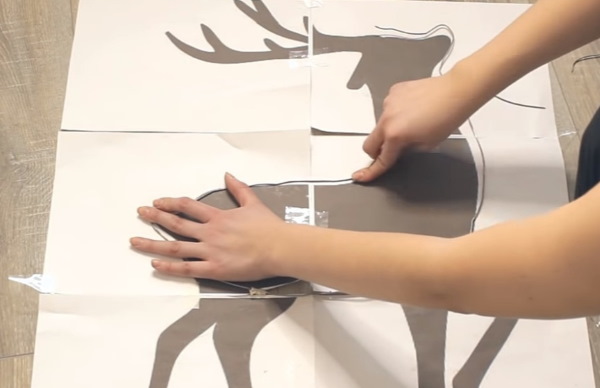
Fig. 16 Film finishing
In this version, the garland is placed either on top of the inner filling before wrapping with film strips, or on top of the finished figure.
Deer Mounting Options
The given assembly technology is approximate and does not claim to be inviolable. The dimensions can be small, for a tabletop version, and quite large for the production of floor, outdoor versions.
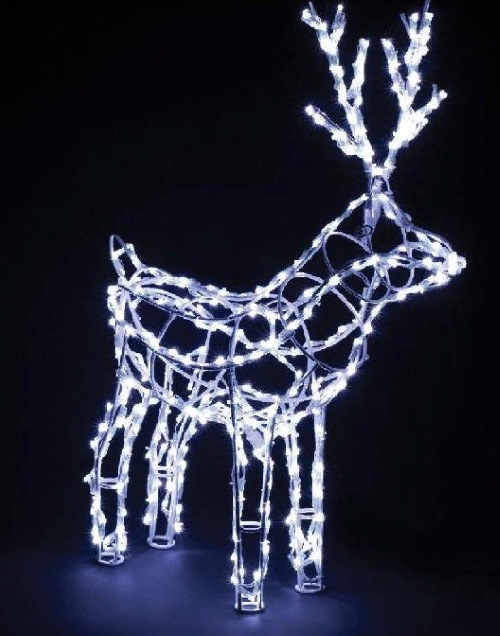
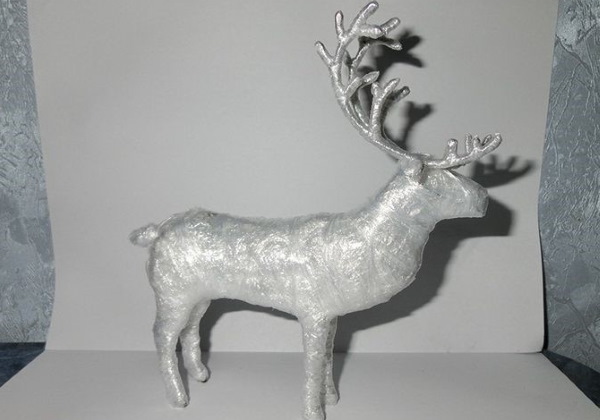
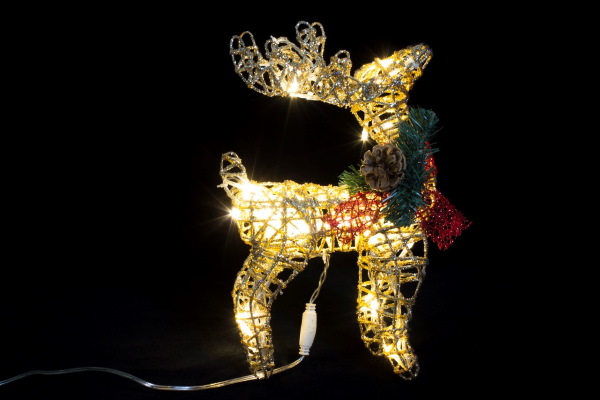
Tabletop version decorated with garland and tinsel:
The options intended for outdoor installation will only require adjustments to the frame assembly methods. The main supporting elements of the frame - the deer's legs, the body contour itself, its contour rings and reinforcements, as well as the antlers in their entirety - are best made from thicker wire. The wire connections are made by welding, with subsequent painting of the entire figure.
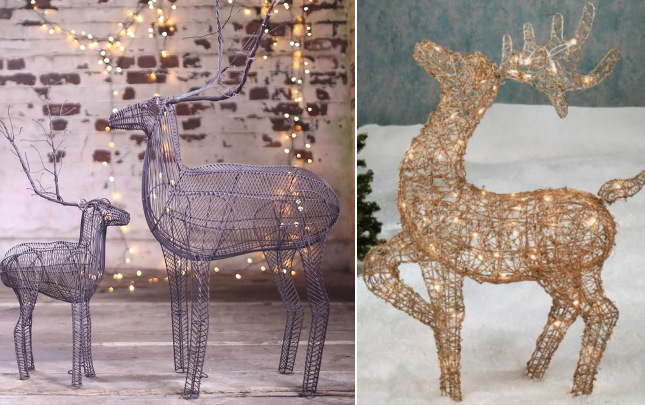
Outdoor option for placing a deer:
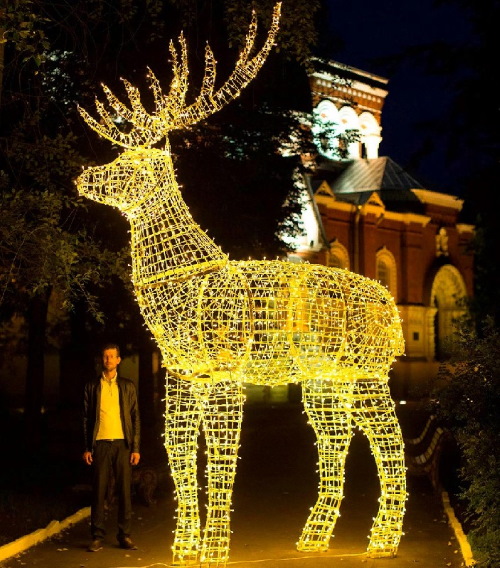
Placing the figure outdoors, in addition to using welding to make the frame, will require the involvement of electrical specialists when installing lighting. Outdoor placement requires the use of wires with stronger insulation, and a different, more durable way to attach them to the frame.
In case of using a large number of lighting elements, it is necessary to carry out a correct calculation of the consumed electric power, to avoid overloading the existing electrical network. The figure "deer made of wire" is a huge field for creativity, both in the technical version, when creating a frame according to a sketch, and in the design version, when decorating.
Video about the craft
Deer made of wire and garland:
Thank you for the article, clear, detailed, accessible.