For children learning the secrets of painting, fruits are the best subject for drawing, due to their simple form, bright colors and lack of strict requirements for proportions. In order for the resulting picture not to disappoint the creator, it is first necessary to understand the basic principles of the image and composing still lifes from them.
Tools and materials
Not everyone becomes a great artist, but drawing skills are useful to everyone. Adults need to support the little artist in his endeavor, providing everything necessary for creativity.
To do this, you should answer the following questions:
| Question | Answer |
| What to draw? | Fruits. It is advisable to select specimens of simple form, uniform color and medium size to simplify the task as much as possible. Their number should not be too large: do not get carried away with complex compositions. |
| What to draw on? | Canvas and glass, stone, wood are best left to experienced painters. For a beginner artist, the best option is smooth, thick paper without gloss or embossing. The optimal format is A4 or A3. |
| What to draw with? | To begin with, use a simple pencil, since a pencil drawing is easy to correct and does not require much experience and knowledge, which are not yet available. When they appear, you can move on to watercolor and gouache. |
| How to correct the drawing? | To do this, you will need an eraser of medium density, moderately elastic, which will not scratch the paper and will be able to easily remove unsuccessful pencil lines. |
When buying everything necessary for a little artist, you should focus on the average price. It is not advisable to buy too expensive tools and materials from the start, and working with cheap pencils and paper will not give the child pleasure, and the desire to master the art of drawing will quickly disappear.
Rules for Beginners
There are several basic rules for depicting objects, the observance of which will help you master the drawing technique faster. They are simple and often intuitively guessed.
Rule of mutual arrangement of objects
Items of the same size placed in a row look boring and do not create perspective. The picture will look three-dimensional, harmonious and beautiful if the items on it partially overlap each other or there is a small distance between them.
A still life that combines these two types of arrangement of drawing elements looks even more interesting. This allows you to create a sense of volume and depth: in the drawing, some elements partially overlap others or are at a distance.
The most advantageous arrangement of objects is considered to be a triangular one. The top of the triangle is the highest point of the tallest object, and the elements of a smaller height form its base. There are also horizontal and circular ways of arranging the elements of a still life.
Rule of color selection
A large variety of colors will make the design colorful and eye-catching, so usually 2-3 main colors and their shades are selected.
If there are a lot of fruits, and they all differ in color, then one of the colors is made dominant, and the rest should complement it.
The rule of the center of composition
In a still life, one of the objects should be in the focus of attention, stand out sharply in color, size, shape, its position, attracting the viewer's attention. When composing a composition, you need to determine this object in advance and place it in the center of the composition.
Rule of proportions
It is not necessary for all fruits and other objects in the drawing to be depicted in natural size, but it is necessary to maintain the size ratio, otherwise the drawing will look unnatural.
The Rule of Perspective
Closer objects are located at the bottom, are larger in size and are drawn in more detail. Objects located further away are placed higher on the sheet, partially overlapped by other, closer objects. They are drawn with a few strokes, without detail. This allows for the impression of volume.
The Shadow Rule
The shadows of all objects must be directed in the same direction, otherwise the drawing will not look realistic. Objects and parts of objects that are in the shadow have a darker color, and those that are well lit have a lighter color.
To create a glitter effect, it is enough to leave an unpainted area of the object's surface, having determined in advance where exactly it should be located relative to an imaginary light source. Due to shadows and highlights, a sense of volume and a shiny surface is created.
Sheet layout rule
The drawing will look good if it occupies the middle of the sheet, leaving a small clear space on the sides, top and bottom, with less space always left at the bottom than at the top. This creates the illusion that the objects depicted are standing on some surface.
The sizes of the depicted objects must correspond to the size of the sheet, and not be too small or too large, touching the edges.
Still life of fruits in pencil
The pencil is the most popular drawing tool among beginner artists, since it readily forgives the inexperienced master's mistakes and allows them to be easily corrected. But it is necessary to take into account that pencils have different degrees of hardness and, accordingly, are intended for different types of work. The hardness of the pencil is determined by the marking.

When working on a still life, you will need the following pencils:
- hard (H) - for a sketch;
- semi-rigid (HB) – to draw contours;
- soft (2B) – will allow you to create shadows;
- colored pencils - for coloring. There is no need to buy an expensive set consisting of a huge number of colors and shades at first: 6 basic colors are enough.
Still life with fruits for children, when working, in addition to pencils, will require the presence of:
- Knife or sharpener. Pencils need to be sharpened correctly: hard and semi-hard pencils should be sharpened so that the lines they leave are thin. Soft and colored pencils should have slightly rounded tips.
- Eraser. A regular one, which has a soft and hard side, and a kneaded eraser, which can take any shape you need. It is used to remove small details that a regular eraser cannot handle.
- Papers. The best option is thick and smooth Whatman paper. Paper that is too thin, fleecy or has a textured surface is not suitable for drawing.
Where to start
It is best for children to begin still life by creating a composition of fruits, which will become a model for the future masterpiece.
To do this you need:
- Select the necessary fruits and other objects that will be in the drawing, for example, a vase.
- Lay them out beautifully: each fruit should be clearly visible, but at the same time, partially covered by other fruits or objects. Only in this case will the image look complete and three-dimensional.
- Choose a favorable angle, based on the relative position of the elements of the composition and how they are illuminated. The greatest expressiveness is given to the drawing by side lighting. It is not recommended to position yourself opposite the light source.
Once the composition is ready and the point from which it looks most impressive has been determined, you should choose the central figure to which the main attention will be directed and begin drawing.
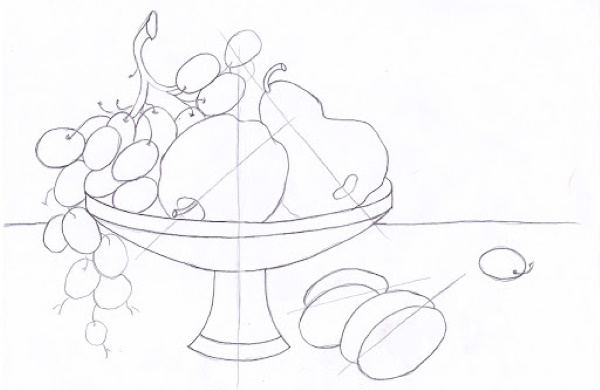
For example, you can create a still life by choosing as a sample:
- bunch of grapes;
- apple;
- pear;
- several plums;
- a beautiful vase.
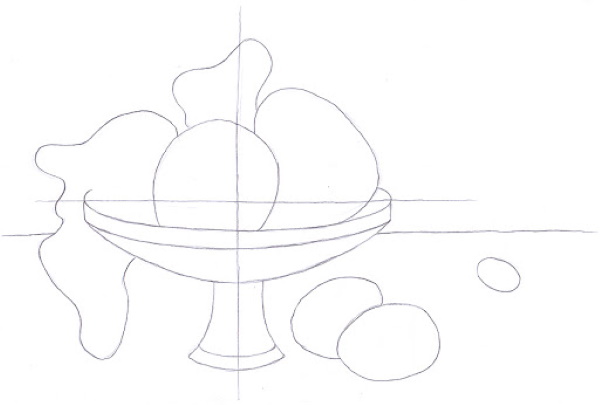
To depict them you should:
- Draw a horizontal line that will become the edge of the table.
- Find the center of the composition. It may not coincide with the center of the sheet, but you should not place it too close to the edge.
- Outline the main elements of the drawing.
The main task of this stage is to correctly position the future drawing on a sheet of paper, observing all proportions.
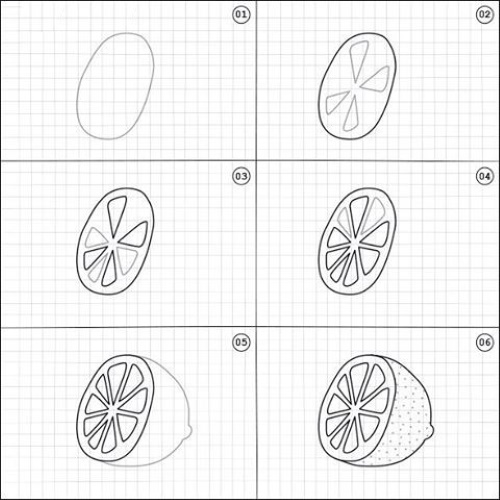
How to draw fruits
To turn circles and ovals into images of fruit, you need to:
- Find and mark their axes of symmetry in the figure.
- Detail the shape and mark the depression at the stem of the apple and pear, provide them with tails and draw each grape.
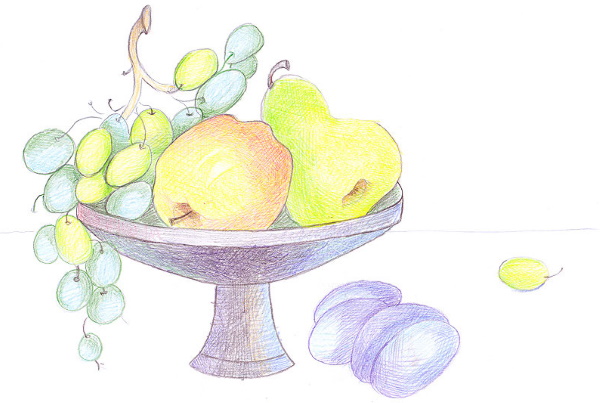
- Color the fruit. It is recommended to do this with strokes. At first, they should be barely noticeable and rare, only indicating the direction of the shading, and then add a more intense color: with this method of coloring, the risk of error will be minimal. When applying shading, you need to ensure that it does not go beyond the boundaries of the objects.
How to draw fabric
Fabric lying flat is depicted with intersecting strokes, imitating the interlacing of threads. Sometimes drapery is used to create a background. To draw fabric gathered in beautiful folds, you will have to practice, trying, for example, to depict a small table covered with a tablecloth.
The work is divided into several stages:
- Use an oval to depict the horizontal surface of the table and draw the bottom of the fabric at random.
- Using the bottom as a guide and in accordance with the existing curves, mark the folds.
- Apply shading: darker in the recesses, lighter in the protruding areas.
- Create a shiny effect by shading.
How to finish
At the final stage, the image needs to be made more realistic by correctly applying shadows. To do this, you need to determine where the light is coming from, which areas will be in shadow, and which will be well lit.
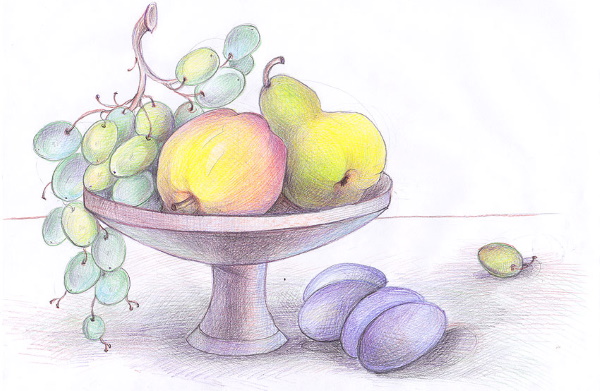
If you want to make the drawing contrasting, add dark shades to the shaded areas. To make the image clearer, you can use a semi-hard pencil to draw the contours of objects (the contours can also hide minor hatching flaws).
How to draw in color
Still life with fruits for children with paints is best done after mastering pencils. This is a more difficult job, since it will be difficult, and sometimes impossible, to correct the mistake made. You will need some experience, patience and accuracy.
Gouache
Gouache is a water-soluble glue paint that has become popular for children's creativity due to:
- good covering ability;
- quick drying;
- ease of dissolution in water;
- at an affordable price.
To work with gouache you will need:
- hard pencil;
- sheet of whatman paper (A3 or A4 format);
- gouache (for simple drawings you can buy a regular school set of 9 colors);
- thin brush;
- water.
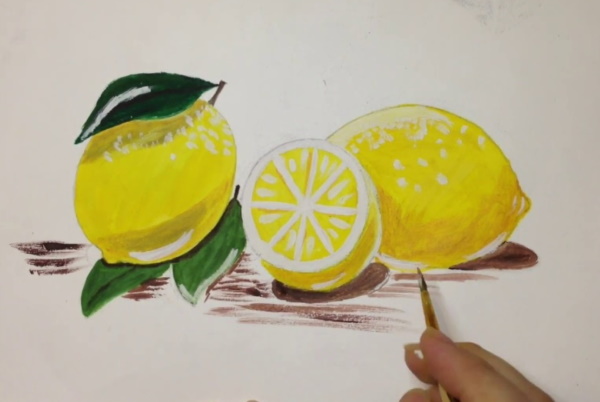
A simple form with which the first gouache drawing will be created can be, for example, lemons. The initial actions are no different from those done for the pencil drawing.
It will be necessary:
- compose a composition;
- choose a favorable angle;
- determine where the light is coming from;
- make a sketch on a piece of paper.
There is no need to try to make the contour lines perfectly even and geometrically correct: there may be unevenness and defects on the lemon peel.
Gouache has a thick consistency: if you use it in its original form, you will not be able to achieve uniform coloring, so it needs to be diluted. However, you do not need to pour water into the paint: just wet the brush and mix a little gouache with it.
The following shades will be required:
- green – to color the leaves;
- brown – for shadows on the leaves and under the future lemons, as well as at the last stage to create the surface of the table;
- yellow - lemon peel and pulp:
- orange - to create shadows on the lemons. It will be applied with short strokes after the previously applied paint has completely dried;
- whitewash – to draw the zest and add shine to the skin and leaves.
Watercolor
Among the advantages of watercolor is the ability to create effects of haze, translucency and smooth transitions from one color to another. However, painting with watercolor paints is a more complex process than using gouache, requiring certain skills and accuracy.
An inexperienced artist can first try using watercolors in fragments, adding some bright details to pencil drawings with their help, and only then move on to completely watercolor paintings.
The following nuances of this type of paint must be taken into account:
- You can't use thin paper, which will immediately get wet and warp. You will need Whatman paper with a density of at least 300 g/m2, optimally – 600 g/m2.
- A small format won’t work either: the best option is a standard A3 sheet.
- Cheap paints, spreading on paper, will not lie beautifully on it. You will have to buy a professional set: it will cost more, but working with paints will become much more pleasant and easier.
- Stationery brushes are not suitable: you need those that are designed specifically for watercolors, preferably of different sizes, for painting large and small areas.
- The paint mixing container should be white, otherwise it will be impossible to choose the right shade. For painting, it is better to prepare 2 containers with water: one for rinsing the brush, the other for diluting the paint.
- Before starting work, it is advisable to experiment with paints to evaluate their “character”, learn the necessary ratio of water and watercolor, understand how to obtain a particular shade and learn everything about the properties of certain colors, shades and their combinations.
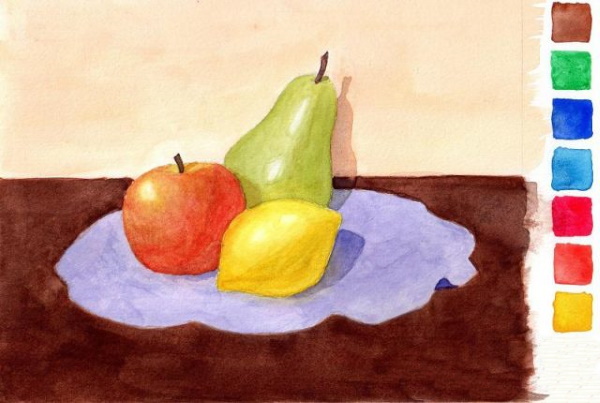
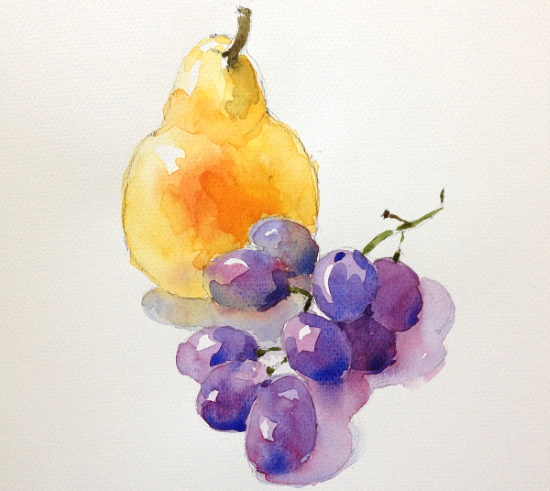
For the very first drawing, you should choose a simple composition using large fruits. For example, you can try to depict a pear and grapes.
Still life with fruits for children using watercolors is done in the following stages:
- Create a pencil sketch.
- Cut out with watercolors: the pear with light cadmium. When the paint dries, "brown" its side by adding red cadmium. Paint the grapes with blue cobalt and carmine. Both on the pear and on the grapes, you need to leave unpainted areas where there will be highlights.
- Apply shadows. To emphasize the shape of the pear and grapes, you need to apply shadows with a darker paint. In this case, you can use yellow cobalt with the addition of ochre for the pear, and a mixture of "carmine + ultramarine" for the grapes.
- Draw the stem of the pear and the grape vine using grass green with some cadmium red added.
When working with watercolors, it is necessary to take into account its features, knowledge of which will help the little artist to minimize the number of mistakes, avoid disappointment and, as a result, cooling off towards the drawing process itself.
Namely:
- To make the paint translucent, you need to increase the amount of water. Mixing with white will not give the desired effect, but will only deprive the watercolor of brightness, making it cloudy.
- When painting, you need to move from light to dark. First, apply a lighter paint, and then, on top of it, apply darker shades.
- The peculiarity of yellow is that it covers all other colors, so it must be applied at the very beginning.
- Opposite colors (such as red and green, orange and blue, purple and yellow) when mixed produce gray: it is recommended not to place them next to each other or to be extremely careful when coloring.
- Not enough water in watercolor will make the paint very thick, and the strokes will not lie evenly. On the other hand, the more water, the more transparent the paint will be, so it is necessary to look for a "golden mean".
Partially correcting the mistakes made will help preliminary application of liquid primer to the sheet of paper. This will allow easy scraping of dried paint, but will also make the surface of the paper more slippery, and the process of drawing - more difficult.
Still life for children 2-3 grade
Younger schoolchildren enthusiastically take up drawing, but due to the restlessness typical of this age, insufficiently developed fine motor skills and inability to concentrate for a long time, they quickly “cool down”.
Lessons should not be too long, interesting for the child and fun.
It is advisable to choose simple objects as an object for sketching. To begin with, you can offer your child to learn to draw 1 fruit, for example, an apple. When he gets the hang of it a little, try to draw a simple still life of apples.
To do this, you need to perform the following steps:
- Make a sketch, marking the location of each element of the still life, observing the proportions.
- Draw the details of each apple, mark the place where the highlight will be and the depression near the stem.
- Remove unnecessary lines and draw the outline of the drawing more clearly.
- Apply shadows.
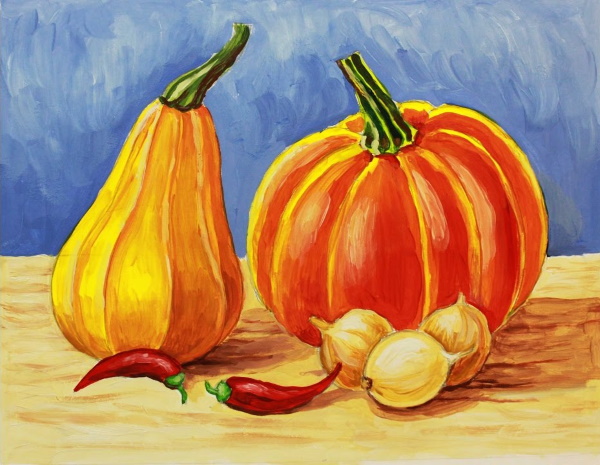
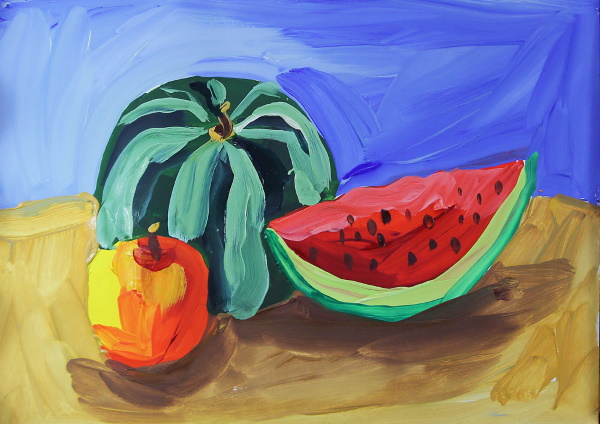
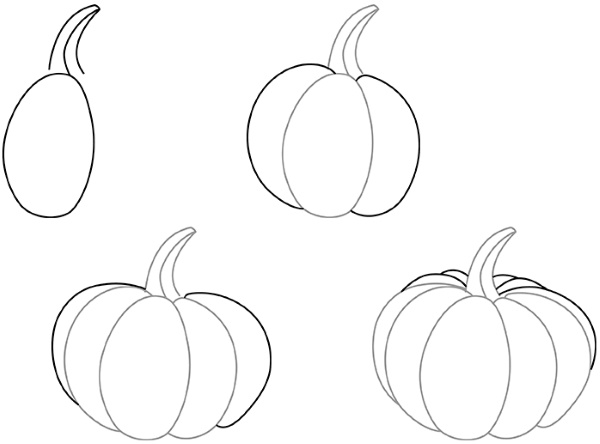
Later, when the pencil is mastered, you can move on to drawing with gouache, choosing large objects of simple configuration as "models". You can start with a still life of 2 pumpkins.
The work is carried out according to the following algorithm:
- Draw a horizon line and mark the places where the pumpkins will be located.
- Give the pumpkins the desired shape, add tails.
- Outline a few smaller objects that will add variety to the future still life. In this case, it will be an onion and a chili pepper.
- Use curved lines to create “slices” on the pumpkins, remove unnecessary details, and draw the outlines of the objects more clearly: the pencil sketch is ready.
- Start working with gouache. First, create a background using light blue and blue paint.
- On a large pumpkin, outline stripes in yellow, then paint it in yellow-crimson tones. Since the light will fall on the pumpkin from the left, the left side is better illuminated and is lighter in the drawing, and the right side will be in shadow, so it gets more crimson.
- Smooth out excess contrast with light, short strokes: now the transition from dark to light will become smoother, and the image will be more realistic.
- Using a light shade of orange or white, add highlights: the pumpkin skin will become shiny.
- Paint the smaller pumpkin in the same order. Use yellow-orange shades for it.
- Paint the pepper red, the onion light ochre with orange added to the shaded areas.
- For the tails, use green paint and a little yellow to create a tint.
- Paint the table brown and create shadows with a darker tone of paint. The work is finished.
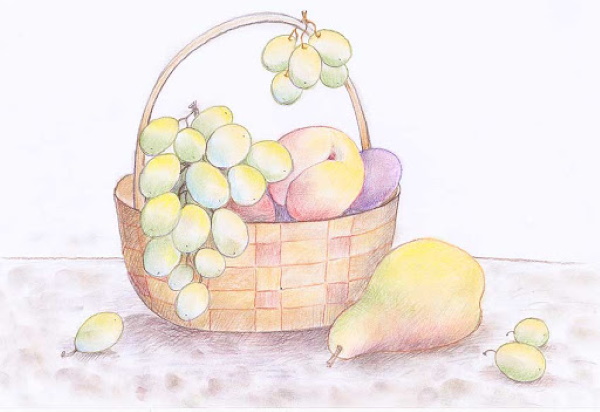
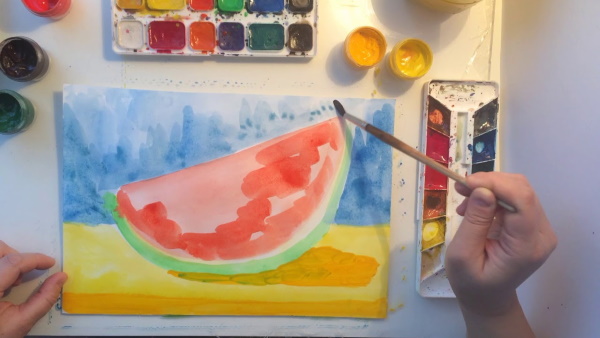
Still life for children grades 4-6
Children of middle school age are already more assiduous, their fingers are well developed, and their ability to concentrate is quite high.
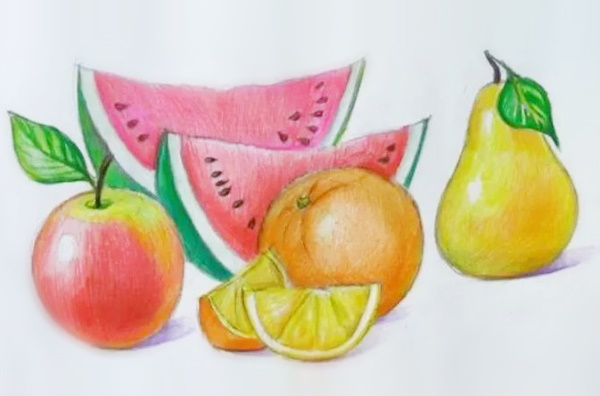
A still life with fruits for children in grades 4-6 can consist of a larger number of objects, for example:
- 2 watermelon wedges;
- orange (whole and slices);
- apples;
- pears.
The stages of drawing are as follows:
- Make a pencil sketch in which the positions of all elements of the future still life will be marked, taking into account their sizes.
- The central figure is an orange (circle), behind it are 2 watermelon slices. To the left of the orange is an apple (circle), to the right is a pear (2 circles of different diameters, the smaller one above the larger one). In front of the orange are 2 orange slices (2 semicircles).
- Draw small details (leaves, cuttings), mark future highlights, remove unnecessary lines and outline the outlines of objects more clearly. The sketch is completely ready, you can get out your colored pencils or gouache, watercolors.
- Paint the orange and its slices in yellow and orange. Be sure to leave a small area unpainted to imitate a glare of light. To depict the pulp, apply radial strokes with a yellow pencil, leave the zest white. A little white will give the slices a light wet shine.
- Color the watermelon, not forgetting the seeds, as well as the apple and pear.
- Draw veins on the leaves, decorate the fruits with stems, add shadows, and the drawing is ready.
So step by step you can complicate the compositions, adding new, more complex details to them. The acquired skills of drawing still lifes with fruits will be useful to children in adulthood, developing observation and accuracy in them, even if the chosen specialty will have nothing to do with drawing.
Video about still life with fruits
Video tutorial on drawing a still life with fruits in a vase for children:
OK
Amazingly kind, simple, beautiful lesson!! Thank youu ...
How to subscribe? I would like to see more lessons. They gave me visual arts with children with disabilities. It's interesting. I try. The right hemisphere helps out. Thanks again!!!!!