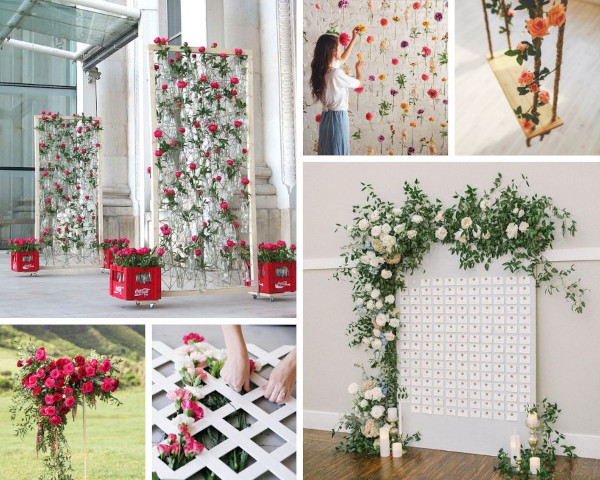
Photo zone – this is a place for taking photos, which brings a festive atmosphere. A unique element of any event can often be found in restaurants, at off-site banquets, at home.
But ready-made options do not always fit the theme of the event, so now you can create a unique area for photo sessions with your own hands. This can be a fun pastime that allows you to experiment with various design elements and materials.
Frame and fastenings for photo zone
The frame and fasteners are important elements necessary for creating a photo zone with your own hands. They allow you to give shape and stability to the structure, as well as hold all the elements of the photo zone in place.
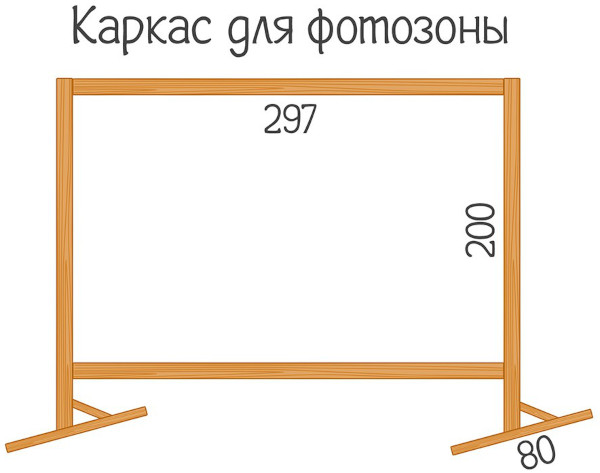
The choice of material depends on the shape and size of the photo zone, as well as how high the structure should be. A DIY photo zone looks much more interesting than a custom model.
To make a beautiful ornament and frame, you can use various materials such as:
- wooden blocks;
- metal pipes;
- plastic tubes;
- ready-made bamboo structures;
- cardboard blanks.
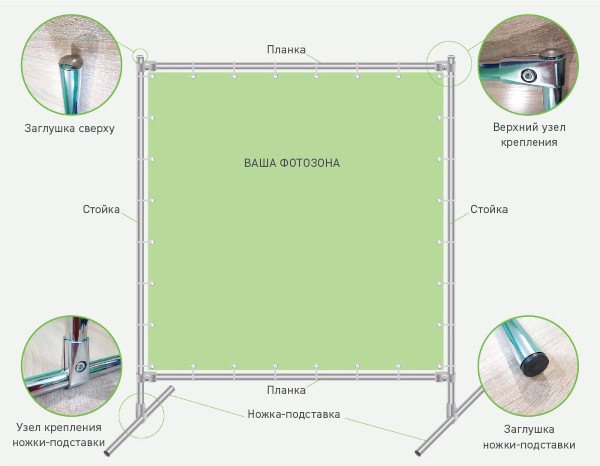
The fastenings may also vary depending on the material used for the frame. For wooden structures, you can use self-tapping screws or metal corners, and for metal structures, welded joints or fasteners such as bolts and nuts.
If you plan to use flowers, greenery or other decorative elements to decorate the photo zone, you will need additional fasteners.
These can be staples, wire or special fastening clips that allow you to securely fasten the decorations in the intended place in the exact position in which they will look perfect.
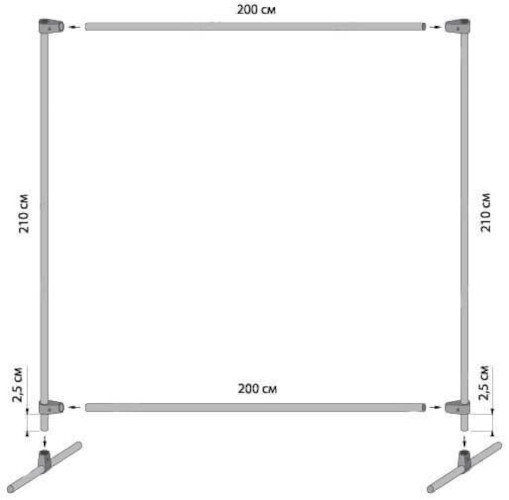
The dimensions of the photo zone arch may vary depending on the desired effect and the area for installation. It is also worth considering the safety and stability of the structure for all guests of the event.
DIY Themed Photo Zone Ideas
A DIY photo zone can be created not only from a frame. It is enough to decorate the wall, add decorations and you can use an improvised studio. Fabrics, flowers, balloons and even themed accessories, for example, for Halloween or New Year's Eve, are suitable as decorations.
For my birthday
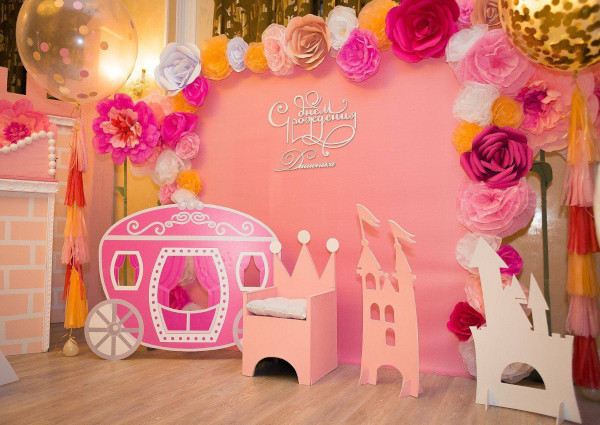
One of the most popular occasions for creating a photo zone is a birthday party. A fairy-tale style structure is a great way to create a magical atmosphere at an event.
To create it you will need:
- Creating a background. This can be a canvas with an image of a castle, a forest, a starry sky. You can use fabrics and paper to create texture and volume in the background.
- Decorations – they should emphasize the theme of the fairy tale. For example, to create a photo zone with the theme of "Alice in Wonderland" you can use mushrooms, clocks, card suits and other elements associated with this fairy tale.
- You should add props that will help create interesting and funny photos. For example, for a photo zone with the theme "Little Red Riding Hood" you can use a basket with food, a red cloak and other items related to this fairy tale.
If you don’t want to make a structure, you can use a free wall at least 2 m wide. There should be no sockets, cords or unnecessary objects on the surface.

- Stretch a 0.3-0.5 mm wide fishing line along the wall. Secure the ends to decorative nails. You can use pushpins.
- Threads with balls and colored paper decorations will hang from the wire.
- For each thread from the floor to the stretched line, you need to cut several threads of the same length.
- From tissue paper you need to cut out large circles of different colors, or two-color materials to create a gradient.
- Each circle must be placed on a fishing line.
- Place balls of a suitable color in the center.
- The bright composition can be diluted with branches of artificial plants and greenery.

Photo zones of this type are considered thematic, abstract and can be made from any materials with your own hands. Most often, balls, paper lanterns, artificial materials, fabrics for drapery are used.
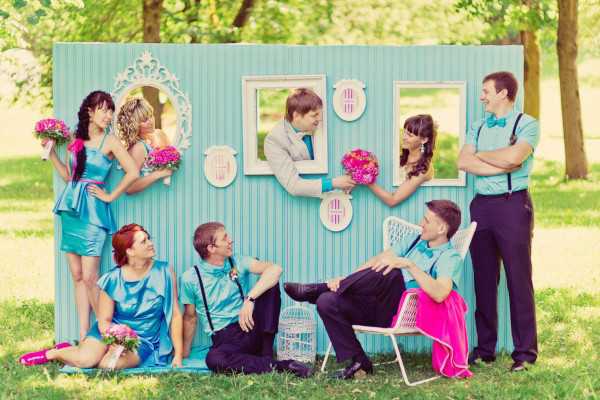
For the wedding
Wedding photo shoots are held both outdoors and indoors. If the newlyweds do not want to book a hotel room for the "bride's morning", they can make a background for photos at home.

- You should choose a well-lit corner of the room, free of furniture and photographs on the wall.
- To decorate, you will need a frame. You can make it from a telescopic clothes hanger, or stretch a fishing line and attach it to nails.
- If you use a window and a windowsill, it is enough to rehang the curtains and cover the window with thick paper. In this case, the color of the curtains should be saturated, opaque, so that the paper sheet is not visible when shooting.
- The curtain or tulle can be hung on a fishing line. The curtain should be played up and decorated with flowers. Artificial branches in the same color as the fabric will do.
- To create contrast, you can complement the corner with a beautiful, bright, warm-toned garland.
- On the adjacent wall, you can hang a vintage-style mirror, install a pouf for the dressing table, make vintage boxes or crates and complement the plot of the wedding fairy tale with them.
- If you have a projector, you can point it at the adjacent wall. Instead of a mirror, hang a sheet of white paper on which the pictures will be clearly visible.
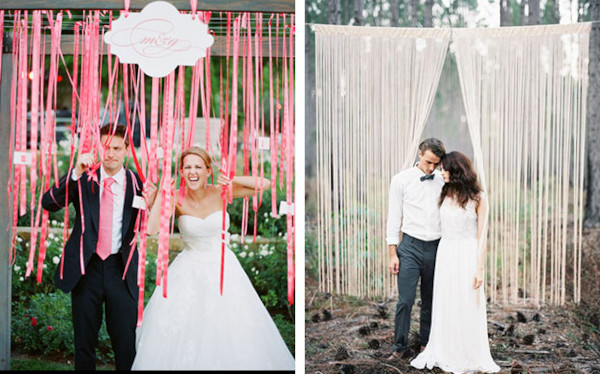
A photo zone at home can be made from scrap materials. This is a great way to add uniqueness to a wedding and preserve bright moments for a lifetime. It is important to remember that the main purpose of a photo zone at a wedding is to create memorable memories for the newlyweds and their guests.
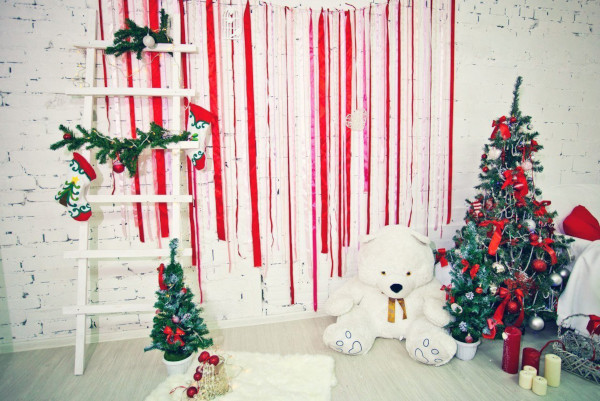
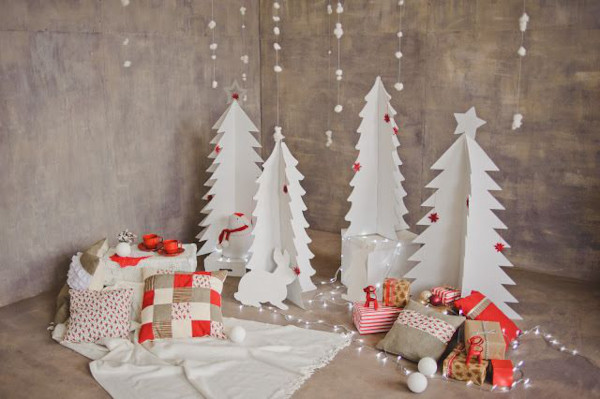
For New Year
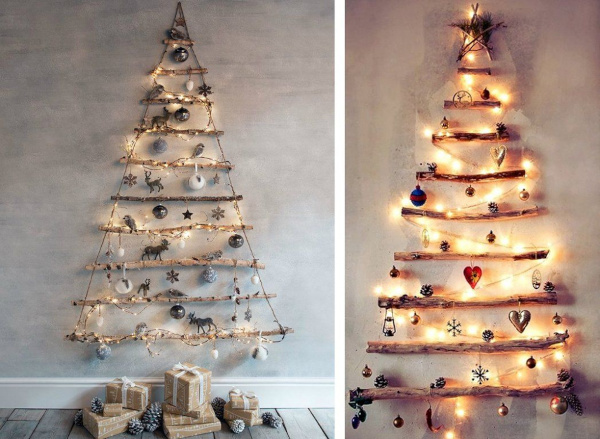
A DIY photo zone made from Christmas trees is a great way to create an original decoration for a New Year's photo shoot or a festive event.
A few steps to help you create a photo zone from Christmas trees:
- Materials: To create a photo zone you will need Christmas tree branches, garlands, pine cones, tape, wire, and fasteners.
- Size: It is necessary to determine the scale of the photo zone that corresponds to the event. Christmas trees can be of different sizes, so you need to choose the optimal size that will fit in the chosen place.
- Background: You can use white fabric to create a winter landscape, or any other applique on the canvas. Bold holiday decorations made of bright toys will do.
- Assembly: You should start by assembling the photo zone using wire and fasteners. Create a base for the trees using wire and fasteners. Place the base on the background, center it and fasten it.
- Adding elements: You can add Christmas tree branches to the photo shoot area using tape. The branches should be arranged so that they resemble the shape of a Christmas tree. Don't forget to add cones and other decorative elements.
- Adding garlands: You can use garlands to outline the trees by wrapping them around the axes. Garlands will add brightness and fun.
- Final check: make sure the photo zone looks beautiful and safe.
No photo shoot during the winter holidays and Christmas Eve is complete without angels, flowers and tinsel. As an interpretation of the attitude to winter celebrations, you can make the main decoration for the Christmas tree and put it under it - a small sleigh with toys in the form of angels and artificial snow.
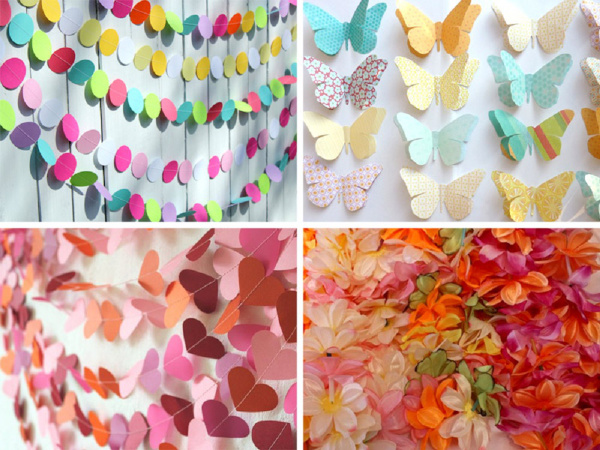
Garlands
A garland photo booth is a great way to create a fun and colorful backdrop for photos at any event. There are many different types of garlands that you can make yourself.
Here are some of them:
| Types of garlands | Manufacturing methods |
| From paper | You can make various figures from paper and connect them with a thread or ribbon to get a bright and original garland. It can be hung on the wall to make a beautiful and unusual background for photos. |
| From photographs | You can print out your favorite photos and connect them together with a thread or ribbon. You will be able to personalize the exhibition "in time". |
| From flowers | You can use artificial or fresh flowers and connect them together. The garland should be hung on the wall or create a curtain from it. |
| From beads | You can use various beads on a fishing line or wire. Complement the decoration with ribbons or braid - to show the entourage of a festive mood. |
| From the tapes | You can use ribbons of different colors and sizes to create a spectacular garland. Improvised ribbons intertwined with bright lights will look beautiful. |
| From bottles | You can use glass bottles and decorate them with LED lights. It reminds you of an abandoned hut, which still has a cozy atmosphere. And on a winter evening you want exactly this slightly ridiculous atmosphere. |
| From confetti | You can use different colors and shapes of confetti, connecting them together with a thread. |
| From LED lamps | Today, LEDs can be used as stand-alone elements, as well as pendants. Multicolored patterns and unusual colors allow you to create an unusual decoration for the New Year. |
These are just a few examples that you can make yourself. The garland will be a great addition to the photo zone and will help create a beautiful and unusual background for photos.
From balls
A DIY photo zone can be made from colorful balloons. This inexpensive tool will make the holiday unique and set a color theme. Balloons can be of different sizes and shapes.
Most often, photo zones are decorated with several batches of balloons. You can make something similar at home. The main thing is to make the work easier with a manual pump. Hot glue, threads and sketches will come in handy to fasten them together.

- You will need matte, single-color round balls. You can replace them with oval ones.
- You should inflate large balloons with a diameter of 60 cm. This is the largest form, usually matte, glossy and with glitter.
- Medium-sized balls have the same shape. They can be white or have a tint.
- The small balls turn out to be the most saturated, so they will have to fill the space between the other balls.
- Hot glue can be used to assemble the decorations. It does not affect the quality of the balls, they do not burst or deform.
- Large balls need to be tied with a thread. This will make it easier to create a composition. It is important to combine the balls by color.
- Small and medium-sized bunches of balls need to be tied around the frame. It can be made of foam plastic and weighting material, penoplex, cardboard or improvised materials.
- Most of the balls should be laid around one "leg" of the base. Gradually, the structure should be raised up in a spiral.
- Smaller and medium sized balls should be placed parallel to the floor.
- Small balls can be used to cover the space by gluing them between other balls.
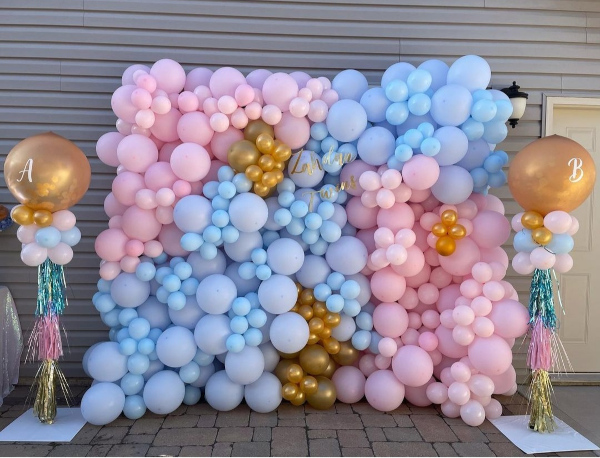
Such a simple composition can be decorated with unobtrusive flowers, branches of greenery and shiny fabric.
From paper
The most obvious choice would be a paper flower arrangement. You can get by with fan flowers, corrugated umbrellas or flat appliques. But voluminous flowers made of corrugated paper are considered the brightest and most suitable for creating a budget photo zone.
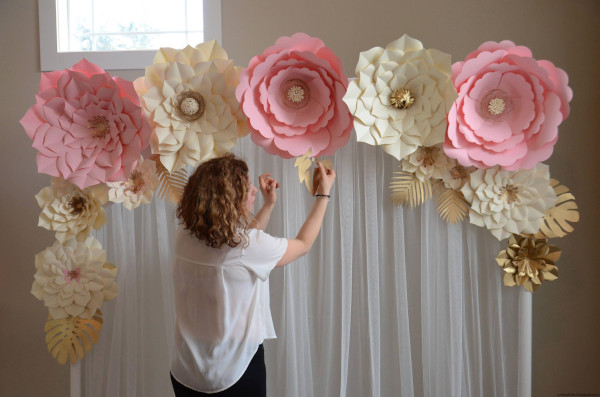
- Peonies and chrysanthemums can become an accent for the photo zone. They can be made from Italian corrugated paper.
- Having cut out petals measuring 3*4 cm, you need to round off 2 edges of the patch. There should be more than 200 such pieces.
- The line that has rounded edges on the sides allows you to stretch the top of the bud. This should be done with all parts.
- Next, you need to fold 4 petals to form a bud in a plane. The edges will be curved and form a wavy line.
- Next, you need to make larger petals for the 2nd, 3rd and 4th rows. The sizes for each need to be increased by 1.5*2 cm. Do the whole work again.
- Large petals need to be bent - the rounded edges need to be wound around the pencil in the opposite direction, and the middle between them - inward.

This way you can construct a composition from lush bright accents in the form of flowers to small ones, for example, from the upper left corner to the lower right. This will create a gradient.
With ribbons
Thin ribbons look beautiful on solid color backgrounds, which can be used as a basis for creation.
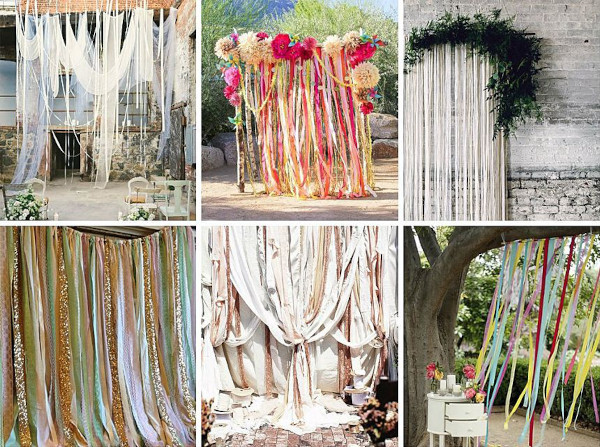
Since it is impossible to form a fabric without gaps from airy ribbons, you can use light tulle (euro mesh) for the combination. Airy clouds of material create a mysterious atmosphere, and if autumn reigns, then the colors of forest mysteries will penetrate into this story.
- Stretch the first layer of dark-colored tulle onto the wall or frame. A thick, rich orange or green will do. Let these be the colors of the forest.
- Stripes of light tulle will look good against its background - orange, yellow, red, bottle or olive shade, dark red, brown. Anything that resembles an autumn mood or sets its tone, feel free to attach to the knot.
- The knots can be covered with foamiran leaves or both parts of the knot can be made equal in length.
- In some places you can darken the background, this will create depth of the background. Ribbons can accentuate the bright stripes of tulle, emphasizing their presence and shade.
- You can attach green tulle to the ceiling to imitate tree crowns. If you stretch a lot of threads, you can wrap them around the tulle so that it hides the thread and hangs from them.
- You can plant foamiran leaves on the fishing line and create an accent in the space – let it be leaf fall.
- On the Whatman papers glued together, you can draw and cut out a schematic tree. If you mark it behind the tulle and illuminate the entire area (behind the scenes) with a spotlight or lantern, you will get a shadow from the tree. It looks like a real one, standing somewhere in the distance.
- You can put a lot of pillows in the place where the base of the tree trunk begins. It would not be superfluous to decorate everything with a web of ribbons.
- There may be a bench in the middle so that guests can take photos.
Such a charming atmosphere is suitable for a home photo shoot or a guest photo shoot at a convenient opportunity. For example, celebrating September 1, Halloween or another harvest holiday.
Live flowers
Working with fresh flowers is much more difficult – it’s all about timing. In order for the photo zone to be usable, it’s worth considering the peculiarity of maintaining the freshness of flowers. There are several options for decorating the photo shoot zone.
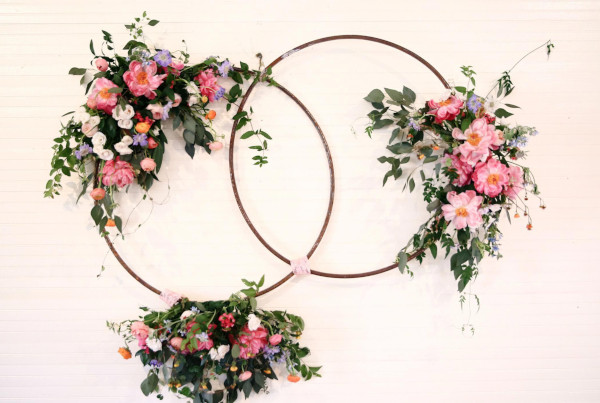
And for them you will need:
- various flowers and greenery of your choice;
- rubber or metal rings of different diameters;
- threads or wire;
- scissors;
- ribbons or braid for decoration.
Steps to create a photo zone:
- Prepare flowers and greenery, sorting them by type and size.
- Connect the rings with thread or wire to create different shapes and sizes of circles.
- Wrap the rings with greenery, securing it until the ring is tightly covered with greenery.
- Add flowers, placing them on top of the greenery, and secure them so that the bases face the background wall.
- Continue adding flowers and greenery to create a dense composition.
- Add ribbons or braid for decoration and secure them to the headband.
A ready-made photo zone can be used to create bright and memorable photos. It should be taken into account that fresh flowers quickly fade, so the photo zone should be created immediately before the event and updated during the process.
You can also use a floral oasis to keep the composition in its original form for several days, taking into account the time for preparation and design.
Candle decoration
The photo shoot location, decorated with candles, does not require chairs or benches.
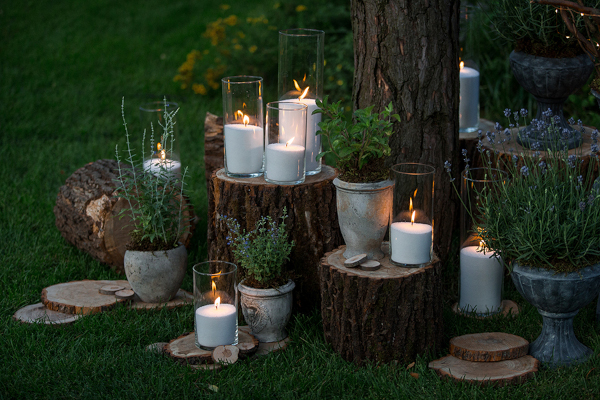
In such an atmosphere, it is better to create a romantic aura, for which you will need:
- beautiful candles of different sizes and colors;
- matches or a lighter;
- decorative elements for decoration (eg flowers, ribbons);
- additional items to create coziness and atmosphere (pillows, blankets, flowers in pots).
The best choice for placing such a photo zone would be a small courtyard or street.
Here it will be easy to imitate the flame of real candles by replacing them with lamps:
- Place candles in the chosen place for the photo zone, creating a beautiful composition. Use candles of different sizes, shapes and colors to create interesting combinations.
- Light the candles and make sure they are stable and do not pose a danger to surrounding objects.
- Add decorative elements - put pillows on the floor, throw a blanket over them. It is acceptable to dilute the atmosphere with bright, juicy colors.
- If there are trees nearby, you can place a hammock and hide the wires in the crowns. The foliage will hide all the defects.
- Artificial candles can be hung under the foliage – it all looks very romantic and festive.
Creative people will love this idea, especially if they can get hold of stumps and moss. In the designated corner, you can make an applique - the composition resembles a little fairy's house.
Other ideas
A photo zone made of frames can be very stylish and original, ideal for events such as weddings, birthdays, photo sessions and other special occasions.
Here are some ideas you can use:
- Make a large frame background. You can combine several together to make it look more interesting. Wood, plastic or metal can be used as a material.
- Make frames with photos. You can use both ready-made frames and paintings, adding an element of history and personality to the photo zone.
- Background made of natural materials. Create a background of dry branches, greenery, flowers or stones. This will be a great choice for creating a summer photo zone.
- Use frames with flowers. Such ikebana will be relevant in spring and summer.
Such ideas can be born upon arrival at the location of the photo shoot. Some people prefer the vintage style, others like to create walls from pallets. This is a great idea for placing decor - use pallets as shelves or stands.
Tips and tricks
The most difficult to execute are photo zones dedicated to specific events. These can be military themes, references to Hollywood films, retro style.
Antique cameras, theater props, furniture from the 50s – all of this is impossible to bring to life and replicate with your own hands. That’s why many resort to professional photographers.
However, if you have time and ingenuity, you can always figure out how to replace the palm trees and sand or recreate life-size plaster statues. It will be more difficult with street lamps and the city landscape, but even here it is enough to stretch a poster and light a couple of lamps.
Photo zones created with your own hands will always reflect the style that the manufacturer puts into the idea itself. And it would be in vain to talk about the compatibility of decor, color schemes or additional elements.
The main thing is that the celebration took place, and the guests could enjoy colorful memories from the celebration, where there was an improvised, non-customized area for photography.
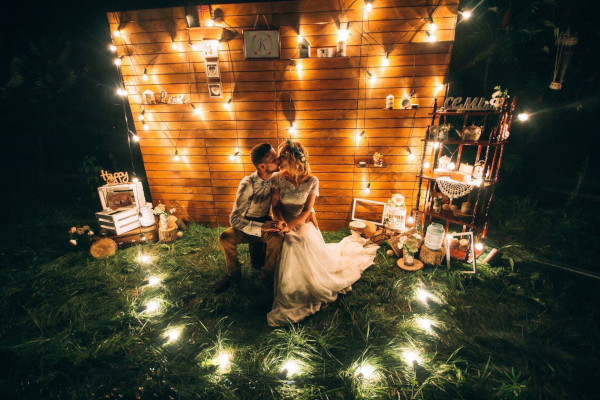
Video about creating a photo zone
DIY Round Photo Zone with Balloons: