Rose is a classic flower, beloved by women. Live flowers are short-lived, but there is a way to prolong their beauty - make a rose from an unfading material. For this, you can use various improvised means, such as a ribbon. This article will describe several ways to make a rose with your own hands.
Materials and tools for making roses from paper, ribbon, fabric
Roses made of paper or fabric are an original decoration for gift boxes, interiors and decorations. They can be used to add zest to clothes or add a touch of originality to accessories. Roses made of ribbon are gaining popularity and are used for wedding bouquets and bridesmaid bracelets.
When making a rose with your own hands, depending on the material, certain tools are used:
- scissors;
- ribbon;
- wire/cord;
- lighter.
If the rose is made of fabric, you will need to have threads and needles on hand. In some cases, regardless of the material chosen, it is necessary to use glue.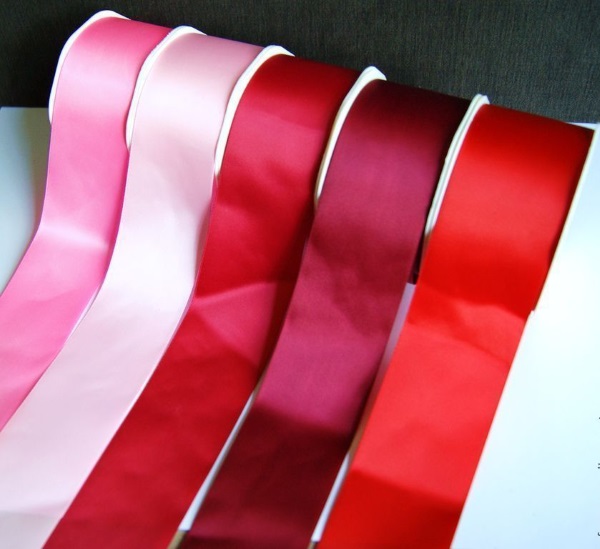
When choosing a ribbon, you should pay attention to its width, since the size of the resulting rose will depend on it: the wider the ribbon, the larger the flower.
Step-by-step instructions for making roses from paper, ribbon, fabric
How to make a rose from a ribbon is of interest to those who want to create an unusual gift. To do this, first of all, you should prepare the necessary tools. It is important to have them immediately at hand so as not to interrupt the process. The area used should be light and clean. Among the many options for making roses, there are ways where you need to prepare leaves and petals separately.
In such cases, you should know in advance how many blanks you will need in order to calculate the amount of material:
| Number of petals (pcs.) | Number of leaves (pcs.) | Number of sepals (pcs.) | |
| Big rose | 21 | 9 | 1 |
| Medium rose | 10 | 6 | 1 |
| Little Rose | 5 | 3 | 1 |
Rose from corrugated paper
Corrugated paper is an ideal material for creating flowers and decorating any decoration. It is elegant in itself, does not wrinkle, stretches well and has a dense base. Roses of any size can be created from corrugated paper. It does not need to be painted, since this material comes in all colors. Even a beginner can work with it.
Tools needed to make a rose from corrugated paper:
- rosebud colored corrugated paper;
- green corrugated paper;
- scissors;
- cardboard;
- pencil;
- ruler;
- thread;
- wire.
There are several options for making roses from this material.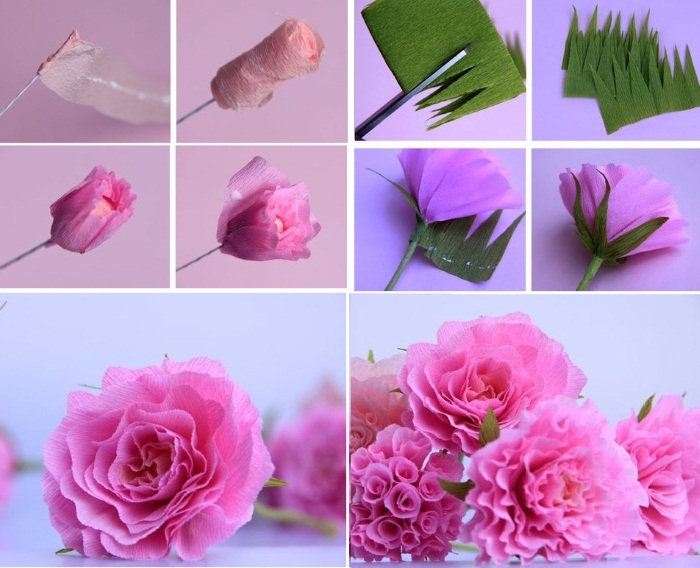
The easiest of them is done as follows:
- Cut corrugated paper (for the rose) 20 cm wide and 60 cm long (the stretchy part is used for length).
- Fold the paper in half, giving it a width of 10 cm. Glue the ends together.
- Fold the workpiece accordion-style to a width of 8 cm.
- Cut out a sample of a rose petal from cardboard, 8 cm wide and 6 cm long. Place the blank on corrugated paper and cut out. The petal should taper to 2.5 cm at the bottom, then turn into a rectangle 2 cm wide (leave the edges connected). Its length at the bottom is equal to the size of the accordion. You will get a long ribbon of petals (17 petals are enough for one rose).
- Place the wire vertically to the beginning of the ribbon and tightly wind the first petals onto it. Continue winding the remaining petals more loosely. Wrap the bottom of the petals (rectangle shapes) tightly with thread for fastening.
- Prepare a piece of green corrugated paper 10 cm wide and 13 cm high. Fold it tightly like an accordion and trim the edges so that the end becomes pointed. This will be the sepal.
- Place the rose into the sepal and secure with thread.
- Cut out leaves from the remaining green paper. Wrap the remaining part around the wire, giving it the appearance of a stem. Make 2 copies of each leaf and glue the wire between them. Having prepared 3 pairs of leaves, connect the ends of the wire together and attach to the stem, making sure that the wire is not visible. The number of leaves and the size are adjusted as desired.
You can make a rose from individual petals from corrugated paper. This option is more suitable for creating large roses.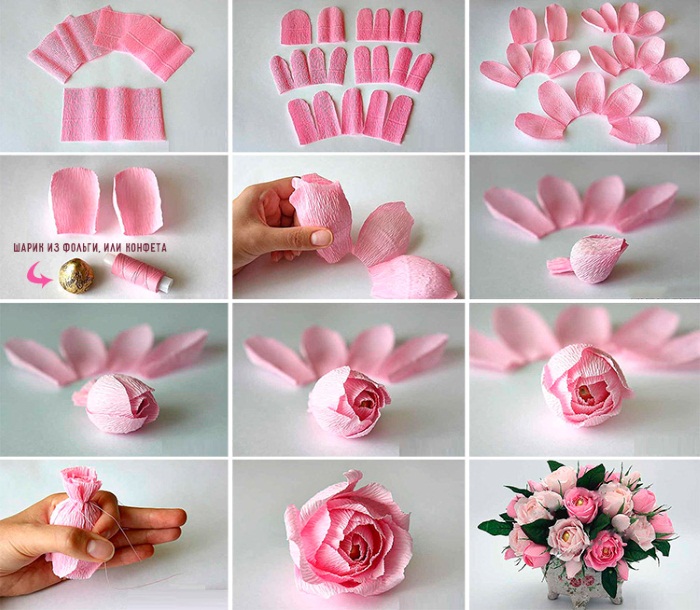
To do this:
- Prepare a sample of the petal from cardboard and cut out the required number from corrugated paper. The petals may not be the same size.
- Give each petal a natural look by curling the ends and bending the middle.
- Roll the first petal into a tube in the shape of a core.
- Glue smaller petals to the center in a circle. Then attach larger petals. Repeat until you run out of petals.
To prevent a large rose made of corrugated paper from falling apart, you can glue it to cardboard.
Rose in origami technique.
The flower can also be made from improvised means, for example, from paper. Having learned the method below, you can make a rose from napkins using this principle.
It is done as follows:
- Turn the paper into a long piece 3 cm wide.
- Fold the left corner inward at an angle of 120°.
- Fold this edge again at the same angle.
- Start twisting tightly from the folded end.
- After the folded parts are twisted, continue to roll the paper, bending the corners as in the beginning. Hold the stem with one hand so that it is fixed.
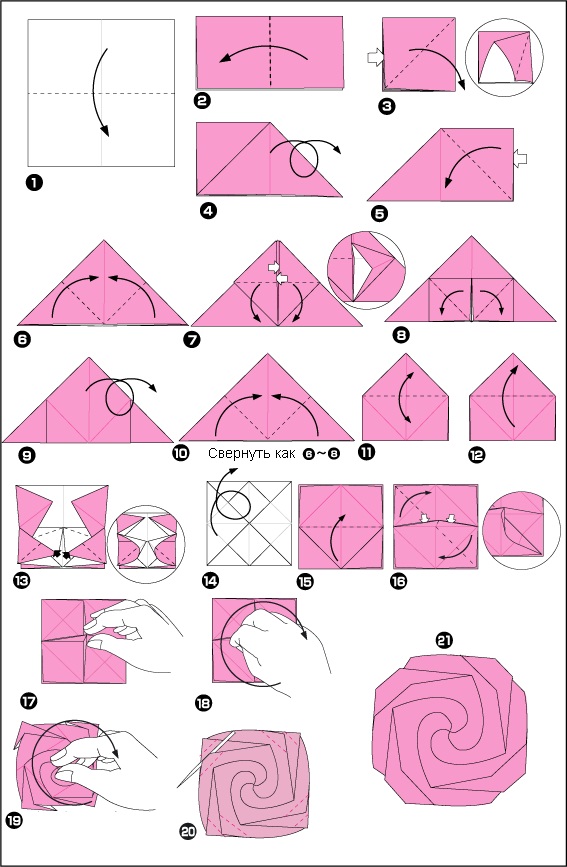
- Fold the end of the paper inward and attach it to the leg.
Roses from money
If you can't choose a gift for a holiday, when the only solution is to give money, you can play up your gift by turning bills into a rose. This original way of presenting money cannot go unnoticed.
To make such a flower you will need:
- several bills of money;
- a finished stem from an artificial flower;
- artificial leaves;
- thin green ribbon;
- wire.

Step by step actions:
- Fold the bill in half and twist the corners into a tube (left corner inward, right corner away from you). This will be the base of the bud.
- Fold the next 2 bills into a "V" shape so that all 4 corners are visible. Roll the corners inward into a tube.
- Thread the wire horizontally between each bill and point the ends toward each other to form an inverted "U". Place the bills with all four corners folded in through the wire, with the bend facing outward, like rose petals.
- Assemble the rose by placing the resulting leaves on the base of the bud. Use your thumb to make a cup-shaped hole, giving the leaves a natural look.
- Attach wires with leaves to the stem using thin tape.
Rose from a whole ribbon
How to make a rose from a ribbon is worth knowing for everyone who loves original decorations of accessories. Ribbon is a unique material from which you can create flowers of any size and type. When choosing a ribbon, you should consider the width, length and density of the material.
To make a rose from ribbon you will need:
- ribbon;
- lighter;
- scissors;
- thread of the color of the ribbon;
- glue.
The easiest way to make a ribbon rose is as follows:
- Fold the ribbon evenly like an accordion, 7 cm wide.
- Without reaching the end, cut the top part into a petal shape.
- Lay out the ribbon and singe the edges with a lighter so that they do not fall apart.
- Using a thread in the same color as the ribbon, sew a basting stitch along the entire length of the ribbon from the bottom side.
- Tighten the threads, helping with your hand to create a beautiful rose. From the beginning of the ribbon, make a bud with your hands, twisting it into a tight tube.
- Use glue to attach the petals to each other.
The second method, where you don’t need scissors, is done as follows:
- Lay out the ribbon lengthwise with the wrong side facing you. Treat the edges with a lighter.
- Leaving 4 cm from the left end, fold the right long edge towards you at an angle of 30°. Secure with a pin.
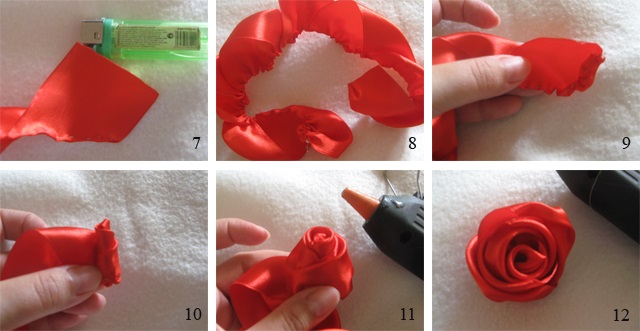
- Bend the same edge away from you by 30°. Secure.
- After creating several corners, lay a basting stitch, then continue to bend the corners. Do this along the entire length of the tape. To create a lush rose, 10 corners are enough.
- Twist the remaining 4 cm of ribbon (this will be the core) and tighten the thread, forming a rose. Secure the bottom part with thread or glue.
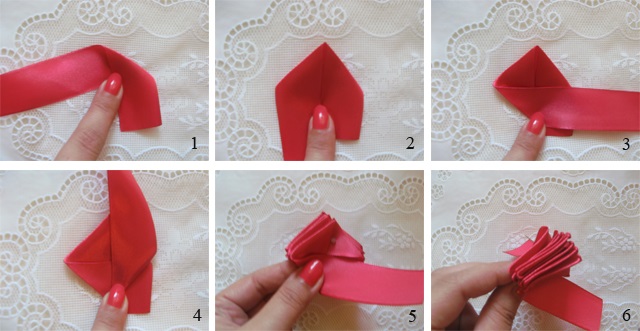
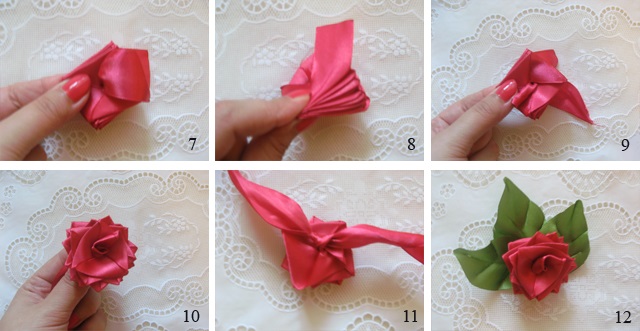
Pleated Rose from Satin Ribbon
How to make a rose from a ribbon can be found in the following instructions. You will need a thin satin ribbon, a needle and threads in the same color. From these materials you can make a pleated rose.
https://www.youtube.com/watch?v=VJN60AkLSmk
It is done as follows:
- Lay the tape out lengthwise on the work surface with the right side facing you. Step back 6 cm from the right edge and bend it towards you at an angle of 90°. Fix it with your finger. This side of the tape will not be needed anymore.
- Bend the left long edge of the ribbon to the right corner and place it under your finger. This will create something like a roof of a house.
- Fold the end of the left edge to the side, exposing the front side. You will get an isosceles triangle. Then fix the junction of the two ribbons with your finger, grabbing the side turned to the right and bend the left edge up. The upper part of the isosceles triangle will be on the left.
- Repeat this procedure along the entire length of the tape, using your fingers to help secure it.
- Secure the ends of the ribbons, turn the rose over and shape it. If necessary, you can use threads to secure the leaves.
For this technique of creating a rose, a wide ribbon is not a suitable material, since it will look very rough. A small rhinestone in the same color can be glued to the core of the resulting pleated roses.
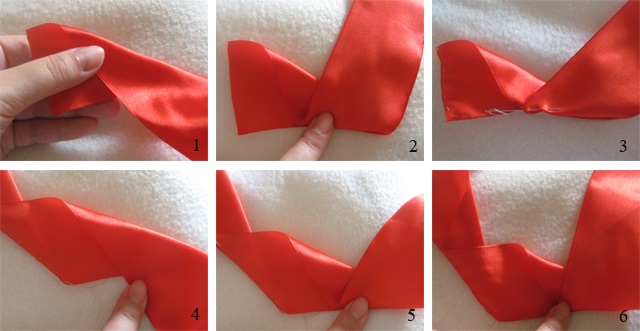
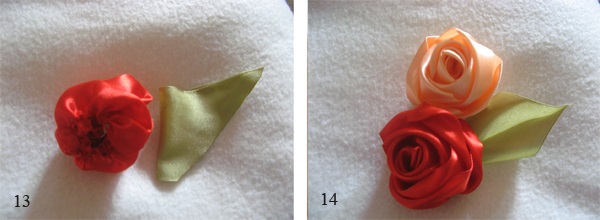
Rose from pieces of ribbon
A rose can be created using pieces of ribbon.
To make a beautiful bud, you need:
- Make 7-8 cm long pieces of ribbon. It is advisable to singe the edges with fire so that they do not fall apart. This will be the rose itself.
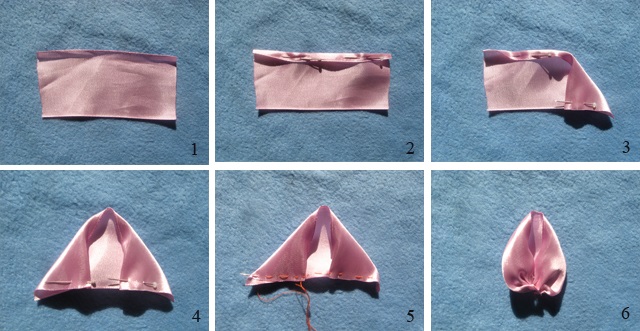
- Take one piece with the wrong side facing you and fold the top part inward by 1 mm. Secure with pins.
- Fold the right and left corners inwards towards each other by 90°. You will get an isosceles triangle. Leave a distance of 1-2 mm in the middle.
- Remove the top pins and secure the bottom part with a 0.5 cm long basting stitch.
- Tighten the threads to create a petal shape.
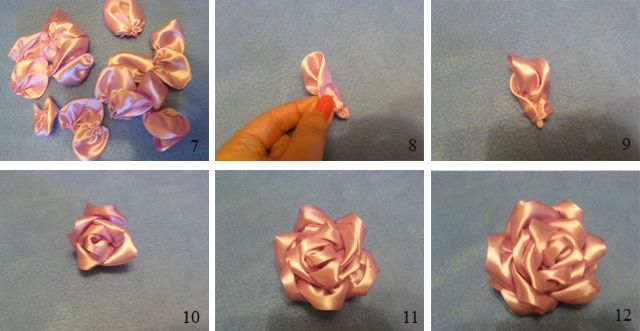
- Make petals from the remaining pieces in a similar manner. Once the blanks are made, you can begin to assemble the flower itself.
- Connect the side parts of the first petal with your fingers, forming the center of the bud. Attach the remaining parts evenly around it. You can use threads or glue to secure them.
Rose from ribbon with wire edges
Anyone can learn how to make a rose from a ribbon. Of all the ways to create a rose, using wire edges is one of the fastest. A two-color ribbon is perfect for such a flower, where the middle is red or white, and the lower and upper parts smoothly flow into green or another dark color.
Step by step instructions for making a rose with wire edges:
- Fold the tape in half and machine stitch as close to the edge as possible in the part where the edges join.
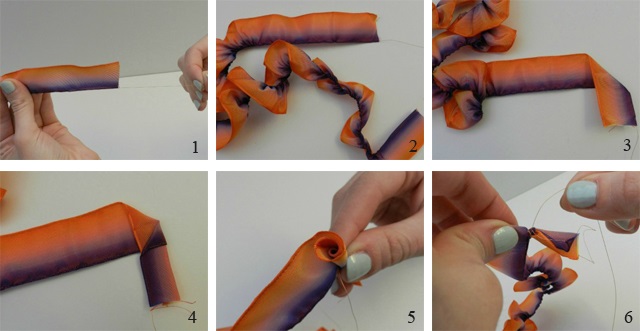
- Thread the wire through the ribbon and secure it with your fingers at the bottom, leaving 4 cm without it at one end (this will be the core of the flower).
- Lay out the ribbon so that the wire is at the bottom and the part without it is on the right. Fold the ribbon on the right at 90°. Make a bud out of this part by twisting it. Secure the bottom edge with wire.
- Pull the tape tight, shortening the wire by 10-15 cm, but do not cut it.
- Wrap the ribbon around the bud, securing the lower parts with excess wire.
DIY Fabric Rose from Organza
In addition to ribbon, money and paper, a rose can be made from organza. This delicate material produces an airy, elegant flower that is easy to make even for a beginner.
Materials required:
- organza;
- glue;
- scissors;
- lighter
An organza rose is made as follows:
- Make 25 pieces of organza into a square shape with a diameter of 8 cm.
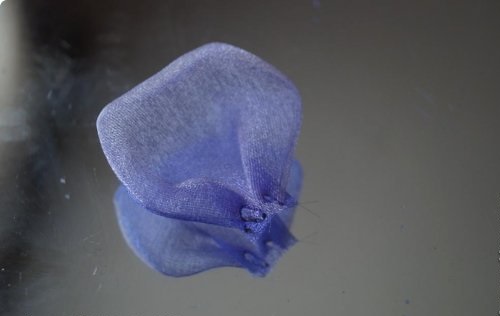
- Fold the first piece of organza into a triangle with the sharp corner down and coat the right side with glue at the fold, leaving 2-3 mm. Roll it into a tube, starting from the right side, to the end. This will be the core of the bud.
- Place each remaining piece with the wrong side facing you like a diamond and make a triangle with the corner down.
- Fold the right side of the resulting triangle onto the left side.
- Raise the left corner upward so that this corner is 2-3 cm higher than the right one.
- Fold this corner down to the right corner line and turn it up, without going beyond the line. Secure with a pin. You will get folds on one side and an uneven triangle on the other side, which should be folded in the same way.
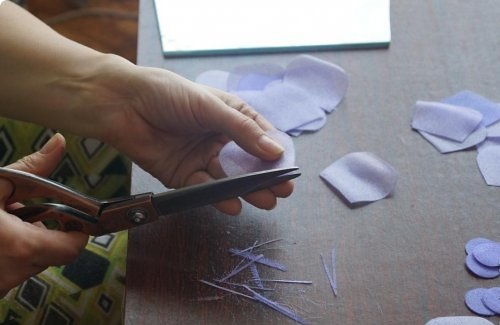
- Cut off the lower edges of the resulting petal, which hang unevenly. Treat the end with fire so that the fabric sticks together.
- Assemble the rose. To do this, lay out 6 petals in a circle. Glue the next 6 petals on top, moving away from the edge by 3-4 mm.

- The third row consists of 5 petals. Each top sheet is placed between the bottom two to avoid gaps.
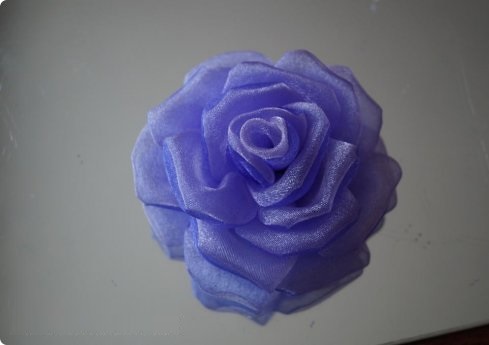
- The next row is laid out from 4 petals. Place the central part of the bud in the middle and fix it with glue.
Rose from foamiran
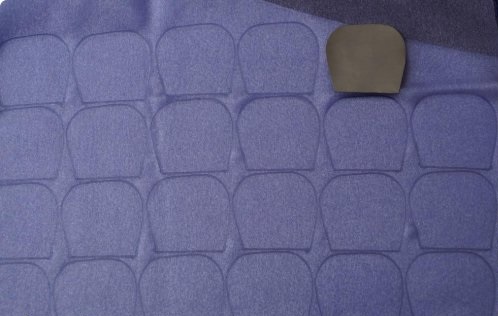
You should work with foamiran carefully, as this material can tear during the process. Before moving on to the stage of assembling the rose, you should take care of creating extra petals.
To make the material more flexible, it can be heated with an iron. While the foamiran is still hot, it is given the necessary shape. The iron is used strictly before the material is painted.
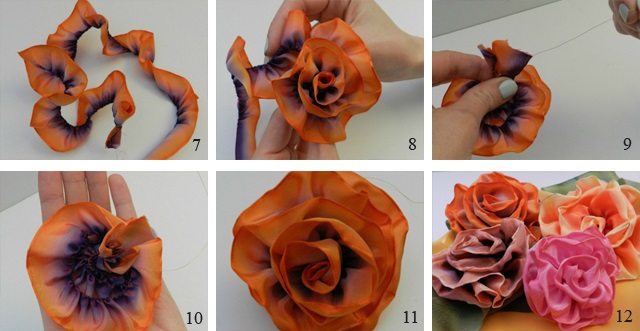
The most beautiful foamiran rose is a tea rose, which is made as follows:
1. Draw and cut out on cardboard templates:
- petal size 4x4 cm – 7 pcs.;
- petal size 5x6 cm – 20 pcs.;
- sheet size 5x6 cm - 5 pcs.;
- sepal size 7x6.5 cm – 1 pc.
2. Before cutting them out of foamiran, trace them with a sharp object like a toothpick. Each petal can then be painted as desired.
3. Heat the petals with an iron, then tuck the ends so they remain curled.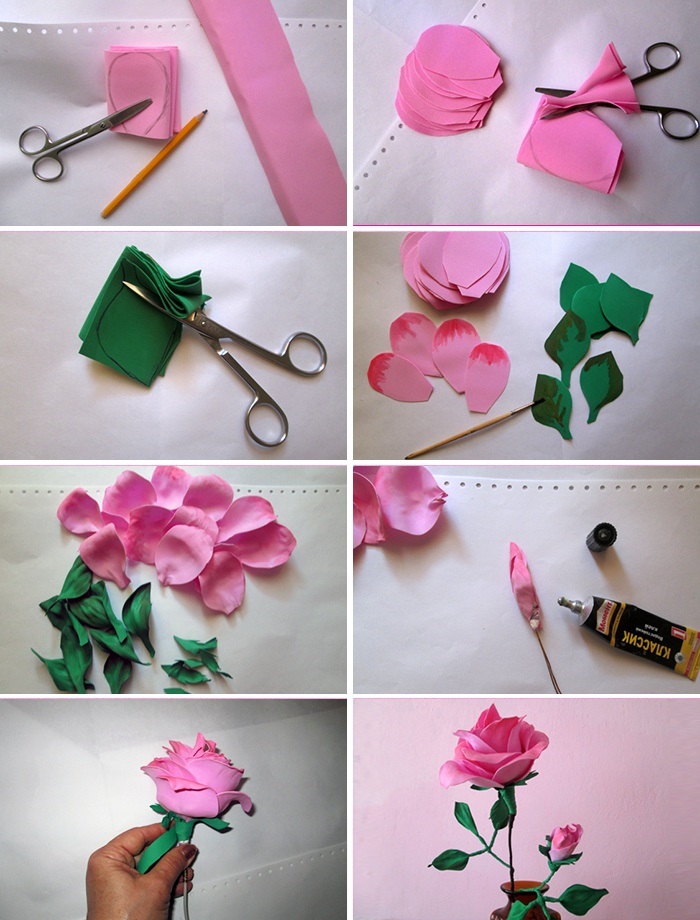
4. Heat the leaves with an iron and bend the edges to give them a natural look. Paint them green. Draw lines on each leaf with a toothpick to make them look like real leaves.
5. Glue small pieces of cotton wool onto each petal and leaf. These will be the attachment points. Paint them.
6. Assemble the rose by joining the petals in the places where the cotton wool is glued. If there is not enough cotton wool somewhere, you can glue more in the process.
7. String the sepal onto the wire, connect the ends and put the rose on it.
8. Decorate the wire with leaves.
How to make kanzashi from ribbon roses
In addition to the usual methods of making roses, there is a method called "kanzashi". The kanzashi technique is similar to the process of making petals from a cut-off tape. A rose made using this technique turns out very neat and looks beautiful in clothing decoration.
The easiest way to make roses using the kanzashi technique is as follows:
- Measure the width of the satin ribbon and cut it into pieces of the same length to create squares.
- Place the square with the wrong side facing you in the shape of a diamond. Connect the top corner to the bottom, forming a triangle.

- Fold the right and left corners of the triangle so that their ends are connected at the bottom. There will be a gap at the top.
- Cut off the lower corner with scissors, singe with fire, fix with threads and tighten. Make such petals from the remaining pieces, except for one.
- Place the remaining piece with the wrong side facing you in the shape of a diamond and twist. This will be the center of the bud.
- Assemble the rose by attaching petals in a circle to the center of the bud.
Another easier way to use the kanzashi technique:
- Make rectangular pieces of tape 12 cm long with a tape width of 5 cm. Singe the edges.
- Twist one section into a bud shape, and place the rest with the wrong side facing you. Bend the top inward, leaving a distance of 1.5 cm between them.
- Lay a basting stitch and pull the threads together. This will be the back side.
- Bend the resulting petal and singe the top with fire to give it shape.
- Glue the bud to the wire, then the remaining petals in a circle.
For a more natural look, you can use two colors of tape - dark and light, using the light one in the middle and the dark one on the edges.
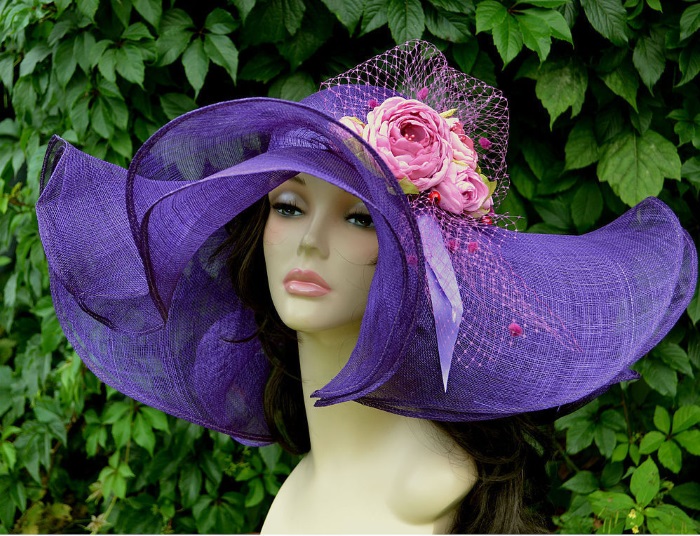
Decorating headwear and accessories with ribbon roses
You can add variety to any headdress with ribbon roses:
- hats;
- hats;
- scarves;
- summer panamas;
- berets.
In addition to headwear, roses can be used to decorate various accessories:
- gloves;
- scarves;
- bags;
- wallets.
All you need is a flight of fancy. Depending on the color of the headdress or accessories, the colors of the rose are selected. A combination of several colors at once looks original. The size is selected individually. To make the composition more interesting, you can make several sizes and combine them.
Ribbon is the easiest material for making flowers, because you can immediately take it in the desired color and size. Multi-colored ribbons can be combined, making a whole composition of roses. In this case, a whole rose can be made of different colors or one rose with multi-colored petals.
The disadvantage of this material is that it easily crumbles, so you need to work with it very carefully, immediately processing the ends after the scissors. Alternatively, ribbon roses can be decorated with beads or seed beads. Pearl beads will look beautiful in the center of the flower, and the edges of the petals are sometimes sprinkled with glitter.
You can put round candies in roses made of corrugated paper, wrapping them in shiny foil. In this case, you do not have to prepare the core of the bud separately, and candies in flowers will be an unexpected surprise.
Article formatting: Vladimir the Great
Video on how to make a rose from foamiran
Realistic rose made of foamiran:
What a delight it turns out to be!