Plastic modeling material that hardens in the air is called light plasticine. Making crafts from this elastic mass brings not only pleasure, but also benefit.
With the help of such modeling, fine motor skills are better developed, thanks to which the child's brain is correctly formed. There are even entire master classes that gradually introduce all the nuances of the process and interesting ideas for modeling.
How to make slime from light plasticine. Master class
Slime is a colorful and elastic anti-stress toy that is best made using proven recipes. Slimes made from lightweight plasticine are then high-quality and relatively inexpensive in composition. Using an airy ingredient for modeling in the recipe allows you to create elastic and long-lasting slimes. Below are methods for making slimes yourself.
Made from lightweight plasticine with the addition of lens fluid
Required ingredients and tools:
- 1 portion bottle of air plasticine;
- PVA glue – 100 ml;
- warm water – 10 ml;
- soda – 0.5 tbsp;
- contact lens fluid – 0.5 tsp;
- disposable syringe;
- stirring agent;
- deep container.
The manufacturing process step by step looks something like this:
- First, you need to knead the bright plasticine mass in your hands, then tear it into small pieces and combine it with glue.
- To obtain a uniform consistency, all these components will have to be stirred for a long time and thoroughly. After 5 minutes of such work, a fairly light and uniform mousse is obtained.
- Next, 10 ml of warm water is added to the mass using a syringe, as well as soda dissolved separately in the liquid.
- The solution for lenses is poured into the mass that has been mixed after this and it continues to be processed in the same way until it finally turns into an elastic slime.
From lightweight plasticine with tetraborate
To do this, take:
- PVA or silicate glue;
- 1 dose of air plasticine;
- 20 drops of activator in the form of tetraborate.
This method is similar to the first, only thickening is done with the help of another component that replaces the lens fluid.
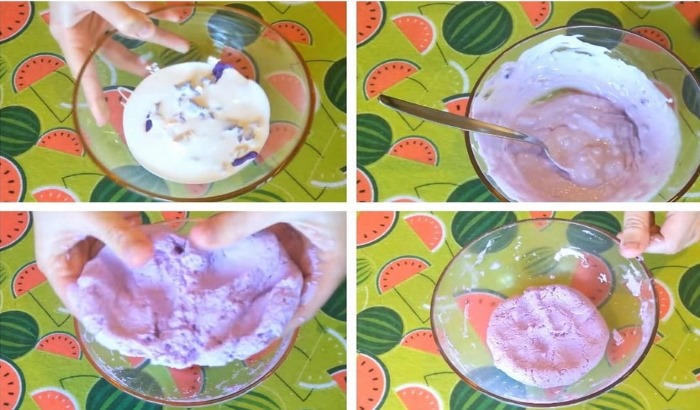
With the addition of glitter and gelatin
This method allows you to create a cute iridescent slime.
Ingredients required:
- gelatin – 1 sachet;
- light plasticine – 1 serving;
- glitter – 1 tsp.
A solution is prepared from gelatin, simultaneously heating and kneading the airy plasticine. Afterwards, the crushed product is stirred in water until the lumps disappear. The cooled gelatin solution is poured into the resulting mass and continued to shake, first with a mixer, and then kneaded by hand.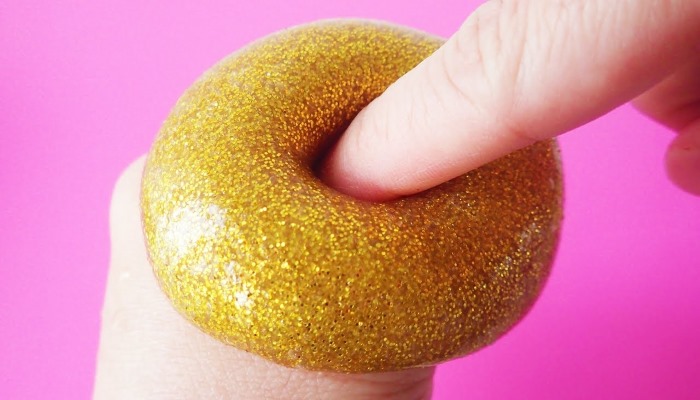
As a result, the substance is supplemented with glitter and thoroughly kneaded again. The resulting slime after the above manipulations will act for about 3-4 days. But its advantage is that light plasticine for creating such a craft can be replaced with ordinary plasticine.
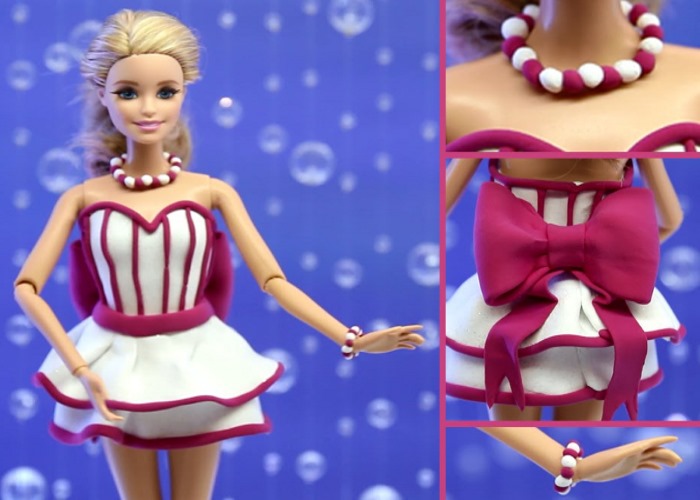
Clothes for dolls from light plasticine. Master class
Crafts made from lightweight plasticine (it is not difficult to follow the step-by-step plan for their creation) always turn out very beautiful and durable. A very interesting work is modeling an outfit for the Star Butterfly doll.
To create it you will need:
- a pack of multi-colored lightweight plasticine;
- small scissors;
- modeling board;
- plastic scalpel.
The algorithm of actions is as follows:
- Modeling tights. To do this, take a piece of softened purple plasticine and form 2 rectangles from it along the length from the beginning of the doll's hips to the middle of the calves. These parts are wrapped around one and then the other leg, cutting off unnecessary pieces. Next, narrow strips are molded from coral plasticine, which are placed on the resulting tights to create the appearance of striped ones. After this, the doll is wrapped around the waist with transparent film so that the clothes do not stick together.
- Making a skirt. A blank is molded from turquoise plasticine, cutting it out with a scalpel from the rolled out product fabric. The resulting detail is wrapped around the doll's waist, over the film previously applied to the tights. A ruffle is created from small white plasticine circles, gluing them to the hem of the skirt from the back so that only their halves are visible.
- Gathering the top of the dress. The prepared blanks of the back and front are applied to the doll's body, from the back and front, respectively, adjusting the parts to size. Anything unnecessary is removed with a scalpel or cut out.
- After this, we move on to the sleeves: The blanks for them are also applied to the body of the toy and formed as needed. The frill on these dress parts is made from halves of white circles, which are glued over the bottom of both parts. The collar is also molded from white plasticine and attached to the neck.
- Finish the work by decorating the front of the dress bodice a small octopus made of pink plasticine. If desired, you can cut out a star from yellow modeling product and glue it to the side of the skirt.
Light plasticine can be used to make many crafts. Dolls' outfits are also made from this material. - You can also make a headband for a doll from raspberry plasticine named Star Butterfly. To do this, take a piece of material, roll it into a long thin cylinder, then press the piece with your finger and bend it to the shape of the toy's head so that it looks like a hoop. Horns are also formed from two small pieces of raspberry color, which are attached to the rim.
- To create shoes they take purple plasticine, roll it out thinly and cut out two rectangles from it, which are then wrapped around the doll's legs from the end of the tights to the feet.
- Wedges for doll shoes are made from white plasticine. These parts attached to the feet can also be effectively decorated with thin black plasticine strips. They should be glued to the wedges in a zigzag pattern.
- Horns and eyes are made from small white pieces, which are then attached to the toes and bottom sides of the shoes, respectively.
Food made from light plasticine
Plasticine, which hardens quickly after working with it, is ideal for creating such crafts from its lighter form as toy food, for example, sweet desserts. A step-by-step description of their modeling will help even children cope with such a task.
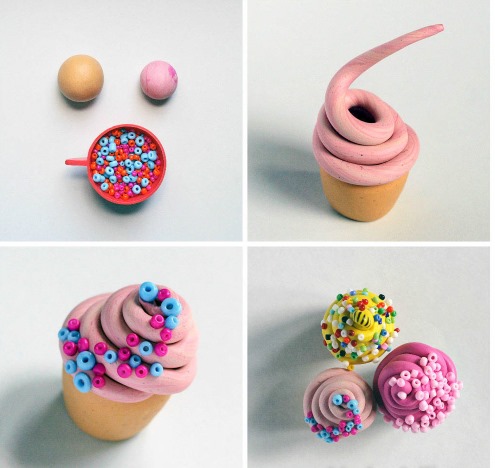
Plan for making a colorful lollipop
Required components:
- long toothpick;
- white air plasticine;
- another 7 pieces of light plasticine of different colors.
Work scheme:
- It is necessary to mold a thick sausage about 15 cm long from white plasticine.
- From multi-colored pieces of material, thin cylindrical strips of the same length are created.
- They are attached one by one to the white blank, after which the resulting multi-colored piece is carefully rolled out on the table.
- The long strip is then twisted into a spiral, and then in a circle. At the end, you should get a bright and appetizing lollipop, which is strung on a toothpick.
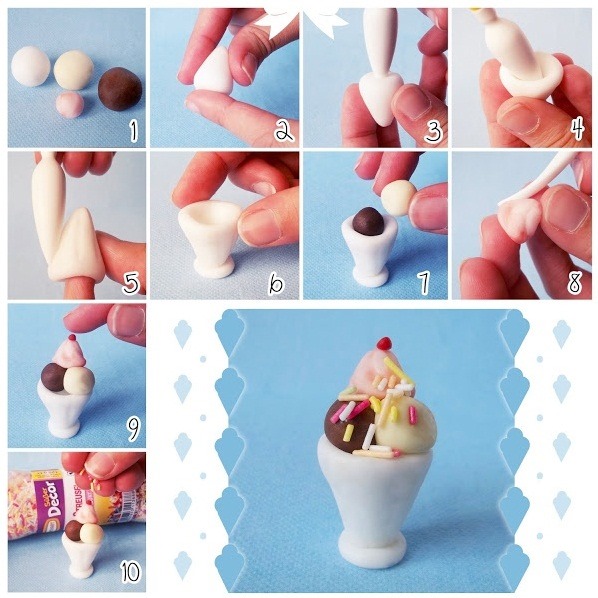
You can also make popsicle ice cream from hardening plasticine.
Ice cream popsicle
To do this you will need:
- rolling pin for rolling out plastic material;
- stack;
- plastic drinking straw;
- multi-colored light plasticine;
- a cardboard blank in the shape of an Eskimo.
Work scheme:
- First, you need to take a kneaded piece of raspberry-colored plasticine and roll it into a flat cake about 5 cm wide.
- Then repeat the first step to get another piece of ice cream.
- A similar part is also cut out from white plasticine.
- In total, you get 3 ice cream pieces: 2 raspberry and 1 white. They are joined together, placing the light part between two pieces of the same color. All this is pressed down well with your hand so that the ice cream does not fall apart.
- A very thin flat cake of 0.5-1 cm thickness is rolled out of light pink plasticine. Then a neat rectangle is cut out, approximately 2 times larger than the resulting ice cream. This blank is used to completely cover the popsicle on all sides.
- A tube is attached to the resulting craft.
 You can even make a cake from light plasticine, it will look very natural and appetizing.
Cake
To create such a craft you will need to take:
- molds for sculpting decor;
- multi-colored hardening plasticine;
- glass and rolling pin.
The algorithm that you will have to follow to create a decorative dessert:
- For the bottom crust, use a yellow plasticine blank. The plastic material for this part is rolled out thickly and a triangle with rounded corners is cut out of the resulting flat cake.
- A part of exactly the same size and shape is formed from red plasticine.
- The layer of the cake is cut out of a thinner, light green plasticine cake.
- The layers of the craft are connected and pressed lightly.
- The red top is covered with glaze made from a thin layer of pink.
- From the orange and red rolled blanks, decorations in the form of raspberries and tangerine slices are cut out. This is done using decorative molds.
- The resulting figures are distributed over the surface of the cake with icing.
Keychains for backpacks made of lightweight plasticine
Crafts from lightweight plasticine (it is not difficult to learn the art of creating them step by step) can be made by both adults and children. Teenagers, for example, really like to create keychains for backpacks and bags from this material.
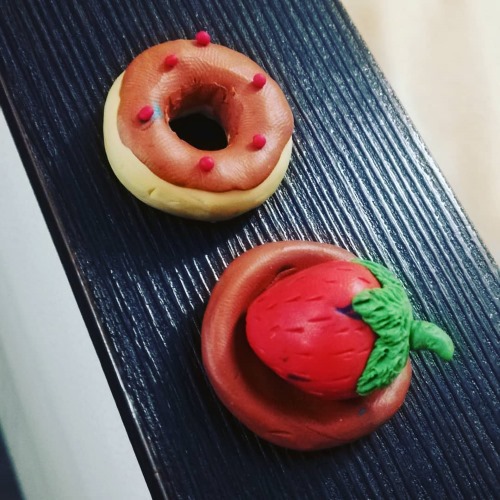
For the donut and 2 ice cream accessories you will need:
- 3 pendant chains for making keychains;
- multi-colored hardening plasticine;
- glass and rolling pin;
- scissors.
Stages of modeling:
- A circle with a diameter of 6 cm and a thickness of 4 cm is formed from light brown plasticine. A hole is made in the middle using a stack.
- The resulting donut is covered with glaze: from pink plasticine, rolled into a thin flat cake, from which a circle is cut out, with a hole in the middle, 1.5 times larger in diameter than the donut.
- The blank can now be covered with a topping, which is made from multi-colored thin and short pieces cut from long plasticine sausage blanks.
- A link from the pendant is inserted into the finished donut.
- A rectangle 2 cm wide, 4 cm high and 3 cm thick is molded from beige plasticine. Two corners of the figure are smoothed out, and one of them is completely cut diagonally.
- The purple elastic material is rolled out and a rectangle is cut out, almost 2 times larger than the previous one. The prepared popsicle is covered with the glaze, cutting off all the excess.
- Multi-colored sprinkles, the creation of which was described above, are attached to the icing.
- The very top of the finished popsicle is equipped with a link from a pendant.
- Now we begin to make ice cream in the form of a cone. To do this, roll a cone slightly longer than 2 cm from a rolled out brown plasticine circle. You can use a stack to cut out patterns on the blank.
- Roll a ball of 3 cm in diameter from pink plasticine and place it on the prepared and hardened cone, pressing it down a little. Then use your fingers to make a ruffle along the edge of the ball where it meets the cone.
- The top of the ice cream is covered with dark brown plasticine glaze. It is better if it does not cover the ball completely. A link from the third pendant is placed on top of the ice cream cone.
- The finished keychains are given a day to dry completely, after which the remaining parts of the chains are attached.
Animals from lightweight plasticine
Crafts made from lightweight plasticine (step-by-step instructions for making them are provided in the master classes) do not stain your hands and do not deteriorate for a long time. You can easily make animal figures for children from this material. You can teach your child to make Ryaba the Hen from hardening plasticine.
Ryaba the Hen
You will need to prepare:
- multi-colored plasticine;
- stack;
- matches.
Job Description:
- A ball is rolled from orange plasticine, then an elongated, teardrop-shaped cylinder is formed from it. Its rounded top should be narrower than the bottom.
- Sausages of the same length are molded from blue, white and crimson pieces of plasticine, they are connected together, pressed well with fingers and put on one end of a match.
- Next, the resulting tail with the sticking out end of the match is stuck into the chicken’s body where it should be.
- Identical pieces of green plasticine will be used to create the wings. The molded blanks, just like the tail, are put on matches and attached to the sides.
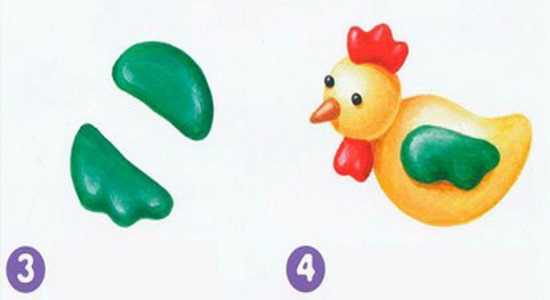
- For the crest, make 3 balls from red plasticine and attach them to the top of the bird's body.
- The beak is also formed from a red plasticine sausage, bent in half and put on a match. Using its other end, the detail is attached to the upper part of the body.
- All that's left is to mold the eyes. They are made from white and black plasticine.

- The result is a craft like the one in the picture.
A cute pig can also present step-by-step crafts from lightweight plasticine.
Piggy
To make it you will need:
- hardening plasticine of several colors;
- stack;
- match.
The stages of creating the craft will be as follows:
- Take a piece of pink plasticine the size of a large walnut. Roll the material into a cylinder, tapering towards the top.
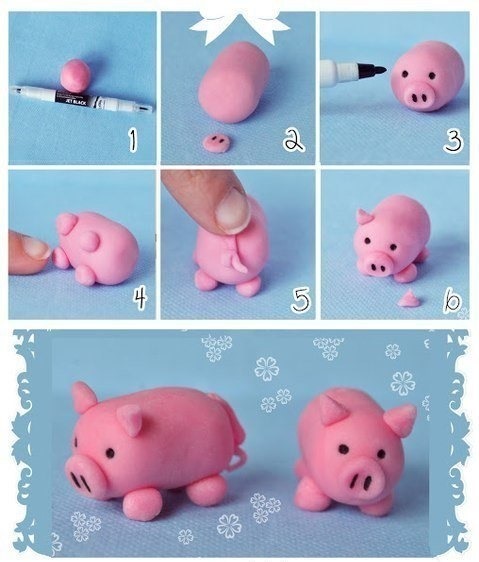
- For the lower legs, use plasticine of the same color. Two pieces of the same size are rolled into the shape of drops, elongated at one end. At the other, the wider blanks are made flattened. This part is cut in the middle and given the shape of pig hooves with fingers.
- The finished hind legs are attached to the lower part of the body.
- Next, the animal's upper limbs are molded from the same pink plasticine. From slightly larger pieces of material than for the hind legs, strongly elongated parts are made, similar to clubs. The elongated part is left sharp, and the rounded part is made in the form of hooves, like the hind legs.
- The finished front legs are shortened if necessary and attached to the upper body of the future pig.
- Next, insert a match into the body from above so that one end sticks out slightly.
- Instead of a Christmas tree, you can make a knitted scarf out of green plasticine. To do this, form a long sausage so that the finished product can be wrapped around the pig's body. Press the part down a little with your finger, making it slightly flat.
- You can use a stack to make a pattern on the scarf so that it looks exactly like a knitted one. The edges of the piece are cut, making a semblance of fringe. The finished scarf is transferred to the animal blank in the area of the protruding match and wrapped around the body, leaving the ends on different sides.
- Then they start to mold the pig's head. They prepare a ball, trying it on to the size of the body. On the side where the snout will be, the head is pulled out a little and a slightly flattened end is made. Then two holes are made there with a stack. Below, they draw the mouth. The prepared head is put on top of the match sticking out of the body and fixed well.
- To create the ears, pieces of plasticine are torn off, similar in size to those used to mold the hind legs. Then teardrop-shaped parts are formed, which are then flattened.
- The resulting ears are attached to the pig's head and bent towards its surface.
- The tail is formed from a small sausage twisted into a spiral. The prepared hook is glued to the back of the body.
- Eyes are molded from white and black plasticine and attached to the head.
House made of lightweight plasticine
It will be very easy to make even a home for minions from the hardening material.
For such a house you will need:
- light multi-colored plasticine;
- board for rolling and forming parts and blanks;
- stack and ruler.
Sequence of actions for creating a craft:
- A long cylinder is rolled out of green plasticine, from which bars of the same size are then cut off with a plastic scalpel or stack, measuring them with a ruler. In total, 20 equally long parts should come out.
- The resulting green logs for the walls of the house are connected in groups of 5 and pressed tightly against each other.
- From the yellow elastic material rolled into a sausage, three pairs of parts are cut for the top of the roof. There should be 2 long, 2 medium, and 2 small blanks. They are then folded in threes and pressed well.
- For the roof, roll out a thin flat cake from red plasticine, from which cut out an even rectangle with a stack.
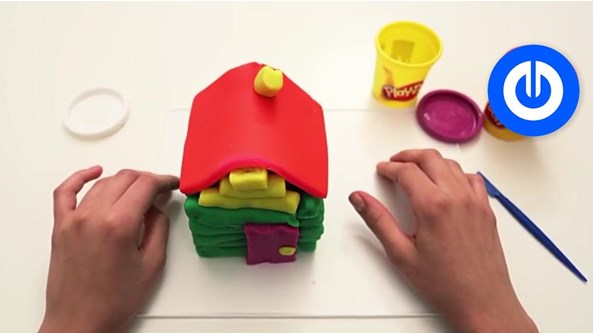
- They begin assembling the house: they connect the green walls together. They insert an empty plasticine jar inside to strengthen the structure. They place yellow roofing parts on the top of the log house on two opposite sides. Then they cover it all with a red rectangle.
- Take some burgundy-colored plasticine, knead it into a flat cake, and use a stack to cut out a rectangle for the front door.
- I make a chimney and a door handle from yellow modeling material.
- The final pieces are attached in place. The finished house should look like this:
The crafts are beautiful, easy to make and easy to care for.
Light plasticine hardens quickly, so it is advisable to start and finish work at the same time.
Products made from this material become similar to clay toys. If you handle the crafts carefully, they can last almost a year without breaking, and sometimes even more. The main thing is not to throw them from a height or wet them with water, since products made from air plasticine are very afraid of it.
Almost all children love to make their dreams come true with the help of plasticine creativity. That is why the hardening material will be so useful for them. After all, its light form allows you to create wonderful and long-lasting crafts.
Author: tanyda
Article formatting: Oksana Grivina
Video about fakes from lightweight plasticine
Variants of such fakes:
Oh, how many interesting things you can make from this plasticine... I didn’t even imagine that such beauty was possible.
and how to make a bunny 🙂
I did it all just great!